




Best Flexible Leather Glue: A Maker’s Buying Guide
What if the glue that feels strongest is the wrong choice for leather that needs to bend? Finding the best glue for leather that stays flexible means looking beyond initial grip. The adhesive, the leather, and the way the joint is built all influence how the finished piece feels.
It’s reasonable to worry that glue might stiffen the leather, leave a mark, or seep through the surface. If you plan to stitch the joint, the adhesive also needs to suit that construction. A small test on matching scrap helps you judge the result before committing to your project.
This guide explains what to compare when choosing a leather adhesive, from the type of leather and joint to the movement the finished piece will face. You’ll also learn how to assess a bond after curing and how to gather supplies without buying more than you need. We’ll include EcoStick 1804 as one product to consider, alongside the practical factors that help you choose for your work.
Key Takeaways
- Choose glue for the leather’s firmness, thickness, surface, and the movement the finished piece will face.
- Compare water-based adhesive, contact adhesive, and cyanoacrylate by handling and project fit, not by bond strength alone.
- For a useful scrap test, copy the actual joint with offcuts of the same leather and follow the adhesive maker’s instructions.
- The best glue for leather that stays flexible depends on the adhesive, leather, preparation, and joint working together.
- Consider EcoStick 1804 as you prepare supplies, then match your choice to the project rather than assuming one glue suits every job.
What Makes the Best Glue for Leather That Stays Flexible?
A flexible leather bond accommodates the movement a finished project is designed to make after the adhesive has cured. That doesn’t mean the joint will stay supple in every condition or suit every construction. Its feel depends on the adhesive and how it’s applied, as well as the leather’s temper, surface preparation, joint design, and intended use.
Flexibility and bond strength are related considerations, but they aren’t interchangeable. A joint can feel firm yet resist the movement your project needs. A bond that bends easily may not provide enough support for its intended job. The best glue for leather that stays flexible is the one that suits the whole assembly, not simply the one described as flexible.
Why leather projects need a bond that moves
A folded seam, a lining join, and a soft accessory don’t all move in the same way. A lining needs to sit smoothly against the outer leather, while a folded seam must follow the leather’s shape without creating an awkward ridge. If the glued area feels too rigid for its location, the piece may handle differently, look uneven, or resist the movement its design calls for.
Glue can hold layers in position, but it doesn’t have to do every job in the assembly. In a stitched project, the stitching and joint construction can provide additional support. Plan the bond around the role it needs to play. Strong initial grip alone doesn’t predict how the finished piece will behave. Cyanoacrylate adhesives, also known as super glue, can be used on leather, but formulations vary. Consider how the finished joint needs to move instead of treating all fast-setting adhesives as equivalent.
What can make a glued leather joint feel stiff?
Too much adhesive, an uneven coat, or a joint design poorly suited to the project can change the feel of the assembled leather. Adhesive concentrated in one area may create a noticeable ridge, while inconsistent application can leave parts of the join feeling different. Follow the adhesive maker’s directions rather than adding more in the hope of improving the result.
The leather matters just as much. A firm, thick piece naturally handles differently from a softer, thinner one, and adding a second layer changes the assembly again. Surface preparation also affects how the adhesive meets the leather. There’s no reliable shortcut from the glue name alone to the finished feel.
Test the actual materials together. Use offcuts of the leather you plan to work with, prepare them as you would the project, and make the same kind of joint. Once the adhesive has cured according to its instructions, handle and flex the sample as the finished item will be used. Hab-To Leather House sells EcoStick 1804 leather glue. Assess it against your leather and construction rather than assuming one adhesive suits every project.
Leather Glue Types Compared: Which Bonds Can Stay Supple?
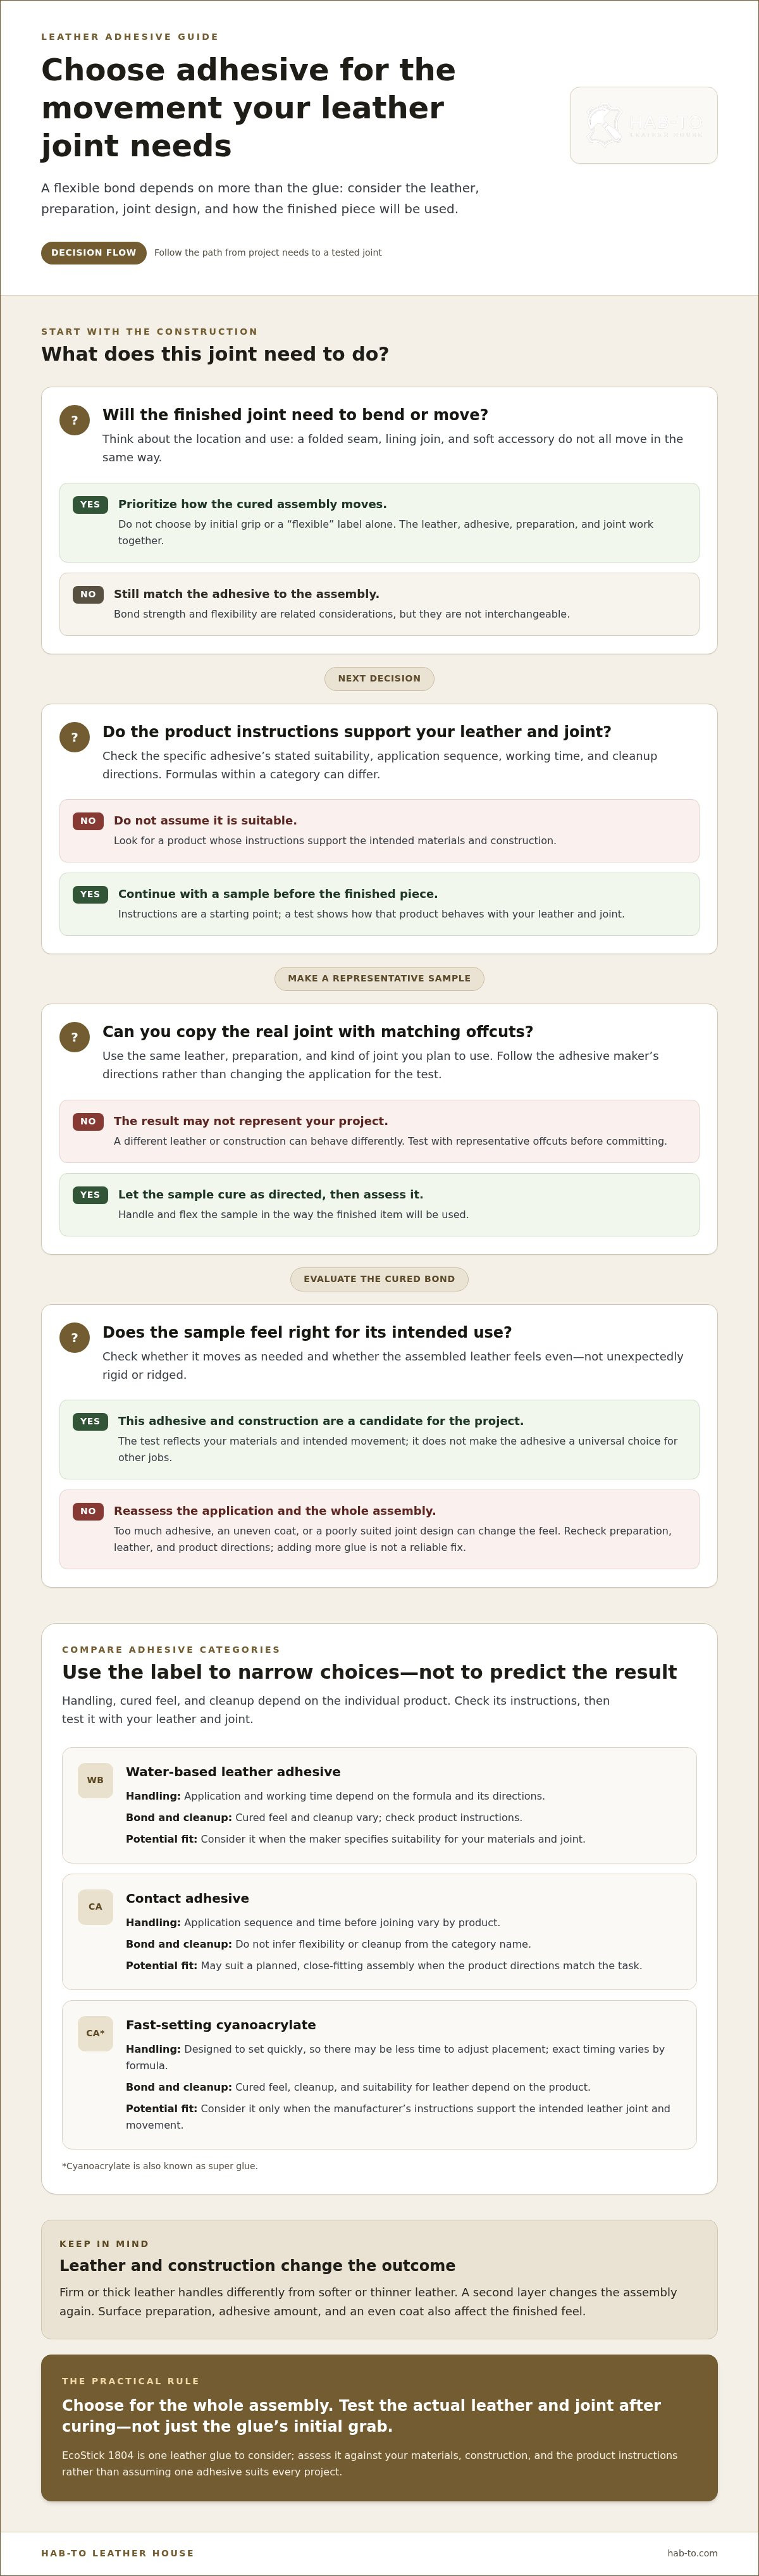
Adhesive labels can help narrow your choices, but they don’t tell the whole story. Formulas within the same category can differ in working time, application, cured feel, and cleanup. Use this comparison as a starting point, then follow the specific manufacturer’s instructions for the product you choose. Test it with your leather and joint before committing to a finished piece.
Leather has a complex structure, and its treatment affects the material makers work with. The National Park Service explains how animal skin’s structure and processing matter when selecting an adhesive. That’s a useful reminder: a glue’s performance on one leather or construction doesn’t guarantee the same result on another.
| Adhesive type | Handling and working time | Bond feel and cleanup | Potential fit |
|---|---|---|---|
| Water-based leather adhesive | Application and working time depend on the formula and its directions. | Cured feel and cleanup vary. Check the product instructions. | Consider it for leather assemblies when the maker specifies suitability for your materials and joint. |
| Contact adhesive | Application sequence and time before joining vary by product. Follow its instructions closely. | Don’t infer flexibility or cleanup from the category name. | May suit a planned, close-fitting assembly when the product directions match the task. |
| Fast-setting cyanoacrylate | Designed to set quickly, so there may be less time to adjust placement. Exact timing varies by formula. | Cured feel, cleanup, and suitability for leather depend on the product. | Consider it only when the manufacturer’s instructions support the intended leather joint and movement. |
Water-based leather adhesive: where it may fit
Water-based describes the adhesive’s carrier, not a guarantee of flexibility, bond strength, or easy cleanup. Those properties belong to the individual formula and should be checked against its product information. Hab-To sells EcoStick 1804 leather glue. Check the product instructions and test an offcut rather than assuming its cure, compatible materials, or finished feel from the category alone.
Contact adhesive and fast-setting glue: understand the trade-offs
Contact adhesives are used for assemblies where makers want the parts joined across a prepared area, while cyanoacrylate is known as a fast-setting adhesive. Actual handling and repositioning depend on each product’s application method and stated working time. A quick set can reduce time for adjustment, but it doesn’t prove a joint will stay flexible through use. Strong initial grab doesn’t establish long-term performance either. Follow product safety guidance, application instructions, and cleanup directions rather than relying on category generalisations.
There’s no universal winner. The best glue for leather that stays flexible is the one whose documented use fits your leather and construction, confirmed with a practical sample. If you’re gathering project supplies, browse Hab-To’s leathercraft bundles alongside the materials your project calls for.
How to Compare Flexible Leather Glue for Your Project
Start with the leather and the job the joint must do. A glue that suits a flat lining may not be the right choice for a folded edge or a stitched seam that moves with wear. The best glue for leather that stays flexible is a project-specific choice, guided by the materials, construction, and adhesive instructions rather than a single broad label.
Match glue to leather and construction
Ask how the finished piece will move: will it bend, fold, stretch, or stay comparatively rigid? Then consider the leather’s firmness, thickness, and surface. Firm vegetable-tanned leather and softer leather can respond differently when joined. Adding a lining or overlapping layers also changes the feel. Choose materials with the project in mind, and don’t assume one adhesive behaves identically across every hide or surface.
Next, identify the bond’s role. Is the glue there to hold pieces temporarily for assembly, join a lining, or support a stitched construction? Positioning layers for stitching has different demands from relying on an adhesive joint alone. Decide what the adhesive must contribute and what the stitching or other construction will do.
Read product information for useful evidence
Product labels can help, but specific instructions are more useful than category names. Look for stated leather compatibility, application instructions, working time, and curing guidance. Claims such as “flexible,” “permanent,” or “waterproof” apply to that particular product. They aren’t guarantees for every leather, joint, or use. Follow the manufacturer’s safety and handling instructions throughout.
Keep product information and workshop observations separate. A manufacturer’s technical information tells you what the maker claims and how the adhesive is intended to be used. Your sample test shows how that specific combination of leather, preparation, application, and joint feels in your hands. A preference for longer adjustment time, for example, is a practical consideration, not proof of greater flexibility after curing.
Before choosing, compare the leather’s firmness, thickness, and surface; the joint’s purpose; the movement expected in use; and the adhesive’s documented compatibility, application, working time, curing guidance, and safety directions.
- For a lining: Consider how the added layer affects the finished thickness and whether the adhesive directions suit the materials being joined.
- For a stitched assembly: Decide whether glue is mainly for positioning or also has a defined bonding role.
- For a moving fold: Recreate the fold in a sample and assess it after following the stated curing instructions.
- For a firmer or softer hide: Test the actual leather rather than extrapolating from another project or surface.
Use product information to narrow your options, then use a sample to assess the result. That small step grounds your choice in the materials and construction you’ll actually use.
How to Test Leather Glue Flexibility Before Using It
A small sample can show how an adhesive behaves with your leather and construction before you commit to a finished piece. It won’t predict every condition the item may encounter, but it can reveal a stiff-feeling join, visible residue, or poor fit for the movement you expect. Keep the test separate from your project, and follow the adhesive maker’s directions from preparation through curing.
Prepare a representative scrap test
Make the sample a miniature version of the real assembly. A glue smear on a single scrap won’t tell you how a folded, layered, lined, or stitched joint will handle. Match the leather, surface orientation, and construction as closely as possible, and use the adhesive only as directed by its manufacturer.
- Choose matching offcuts. Use the same leather, thickness, and finish planned for the project. If the two joined pieces have different surfaces or firmness, include both in the sample.
- Recreate the joint. Prepare and position the offcuts as you intend to for the finished item. If the design includes a fold or stitching, reproduce that feature rather than testing the adhesive alone.
- Apply according to the label. Follow the product’s application, handling, and safety instructions. Don’t substitute a familiar method from another adhesive, since instructions can differ by formula.
- Set the sample aside. Allow it to cure according to the manufacturer’s guidance. Avoid judging the bond early or disturbing it in ways the product instructions advise against.
Assess the cured bond without overclaiming
Once you’ve followed the stated curing guidance, handle the sample as the project will be handled. Bend it along the line of a planned fold, or flex the joined area in the direction it will move in use. Notice whether the joint feels unexpectedly rigid, separates at an edge, or shows adhesive residue where appearance matters.
There’s no universal pass threshold. A sample that suits a structured panel may not feel right for a soft, frequently flexed component. Compare what you observe with the intended use and the adhesive maker’s claims. Keep the test modest and controlled. Don’t treat it as proof of waterproofness, long-term durability, or performance under conditions you haven’t tested.
If the result differs from what the project needs, pause before using the adhesive on the finished work. Revisit the leather surface preparation, application method, adhesive choice, or joint design, changing one factor at a time where practical. Then make another sample. That makes it easier to see which adjustment affected the feel or hold.
A scrap test reduces surprises, not risk to zero. Leather can vary, and a finished item may be bent or handled differently from a sample. Use the test to make a better-informed choice, then build the piece in keeping with the adhesive instructions. This is a practical step toward finding the best glue for leather that stays flexible for your materials and construction.
Explore leathercraft bundles as you prepare supplies for your project.
Choosing EcoStick Leather Glue and Getting Your Project Ready
EcoStick 1804 is a leather glue sold by Hab-To. It’s a product to consider, not a promise that it will suit every leather, joint, or moving part. Compare its product information and manufacturer’s instructions with the leather you’re using and the job the bond needs to do. If flexibility matters, test a sample made from the same materials and construction before applying adhesive to your finished piece.
Hab-To focuses on vegetable-tanned leather, so makers working with that material can compare its firmness, thickness, surface, and intended movement with the adhesive guidance. A lining join, a stitched assembly, and a folded section have different demands. Let the project guide your choice rather than expecting one glue to behave the same way in every build.
What you will need
Gather only what your planned construction and the adhesive instructions call for. A clear setup makes it easier to apply the glue as directed and keep your test representative of the finished work.
- Project leather: Use the actual leather intended for the build, including any lining or second layer that will form the joint.
- Matching offcuts: Keep scraps for a small test that reproduces the surface orientation and joint construction.
- Selected adhesive: Read its product information before use, and follow its application, curing, safety, and handling instructions.
- Required tools and materials: Prepare only the items specified by the adhesive maker or needed for the construction you’ve planned.
As you prepare, browse Hab-To’s leathercraft bundles for grouped supplies. Choose a bundle that suits the work you’re doing and the materials you still need.
A practical next step for makers
Put the product guidance beside your project notes before committing. Check that the intended leather and joint fit the stated use, then test a matching offcut and assess the cured sample as the finished piece will move. The result can help you make a more informed choice, but it isn’t a guarantee of performance in every finished item.
If you’re weighing leather or construction choices, Mike offers a free one-to-one video consultation for material-selection questions. Bring the project details that matter: the leather type, the joint you’re building, and how the piece will move. For glue, the manufacturer’s instructions remain the reference for application and use.
Explore related supplies
- EcoStick 1804 leather glue, to compare with your planned project.
- Leathercraft bundles, for grouped supplies as you prepare your workbench.
Match the adhesive guidance to your leather and construction, test before working on the finished piece, and gather only what the work calls for.
Put Your Next Leather Project in Motion
Let the piece you’re making set the standard. Before choosing an adhesive, picture how the finished item should feel in your hands and move in use. That clear goal can guide your material and construction choices without expecting one glue to suit every project.
The best glue for leather that stays flexible is a considered match, not a shortcut. Compare the product guidance with your design, then make choices that respect both the leather and the work you’re putting into it. A thoughtful start can help you build with greater confidence.
As your project takes shape, choose only the supplies that support the work ahead. A focused kit can make preparation simpler, whether you’re starting a new piece or replenishing your bench.
Trust your hands, take care with the details, and enjoy making something that feels right from the first fold to the final stitch.
Frequently Asked Questions
Does leather glue stay flexible after it dries?
It depends on the formula and the materials being joined. Some adhesives are designed to form bonds that accommodate movement, while others may feel rigid after curing. A flexible label alone doesn’t tell you how a glue will behave on your leather or in a particular seam. Check the product’s stated uses and curing instructions, then judge a sample made with the leather and construction you plan to use.
Can I use water-based glue on vegetable-tanned leather?
Yes, if the specific adhesive’s instructions say it’s suitable for the leather and joint. “Water-based” describes a broad category, not compatibility with every surface or finish. Check the maker’s guidance and test an offcut first, especially if the leather has a coated or treated surface. Hab-To sells EcoStick 1804 leather glue; assess it according to its product information rather than assuming category-wide performance.
Is contact cement or water-based glue better for flexible leather projects?
Neither category is automatically best for every flexible project. Compare the specific products’ instructions for leather compatibility, application sequence, working time, and intended use. Your choice may depend on whether you need time to position layers, how the joint is constructed, and how it will move. The best glue for leather that stays flexible is one that fits those requirements, with its suitability assessed through product guidance and a relevant sample.
How can I test whether leather glue will stay flexible?
Make a small sample with matching scraps and the same layer arrangement as your project. After following the adhesive’s curing guidance, flex the sample along the direction the finished piece will move. Check whether the joint feels too rigid, whether its edges lift, and whether adhesive affects the visible surface. Compare the result with the project’s needs. A sample offers useful evidence, but it can’t guarantee how a finished item will perform in every situation.
Can leather glue replace stitching?
Use adhesive alone only if the product is intended for that type of joint and the construction suits the loads the item will face. A glued lining seam inside a lightly used accessory has different demands from a stress-bearing bag handle or strap. For a stitched assembly, glue may help hold layers in position while stitching forms part of the construction. Follow product guidance, and don’t assume a strong initial bond makes stitching unnecessary.
Why does my leather glue make the leather stiff?
Stiffness can come from adhesive buildup, an uneven coat, or a joint that adds too much material to a particular area. The leather’s own firmness and thickness also affect how the assembled piece feels. Inspect where the stiffness occurs. If it follows the glued area, compare a carefully prepared sample with a control piece of the same leather. This can help you identify whether application, adhesive choice, or construction needs adjustment.
Can I use the same leather glue for linings and bags?
Possibly, but don’t assume one glue suits every join in a bag. A lining attachment, a folded gusset, and a handle base each have different construction and movement requirements. Check that the product guidance covers the leather and intended joint, and test the most demanding join on matching scraps. The same adhesive may suit more than one part, but the product’s directions and the role of each joint should guide your choice.
Ready to prepare your next leather project? Explore EcoStick 1804 leather glue and choose your supplies to match the work ahead.
Disclaimer
All our blog articles are made for information purposes only we dont take responsability for any content from third parties.