




Easy Leathercraft Projects for Beginners: 5 Rewarding First Makes
What if your best first leather project is the smallest one? Easy leathercraft projects for beginners don’t need a long list of tools or a whole hide. A simple, useful make can teach you the basics without making every cut feel like a high-stakes decision.
It’s natural to feel unsure when the tools and techniques are new, especially if you’re worried about wasting good leather. Start with a project that has just a few steps and lets you practise one skill at a time. Vegetable-tanned leather is a practical choice for learning to cut, punch, stitch and finish edges. Buying a small cut or panel lets you get started without committing to a whole hide.
In this guide, you’ll find five rewarding first makes, from compact everyday accessories to a hands-on tray project. Each offers a manageable way to build skills you can use again. Choose a project that suits your patience and tools, then focus on what it can teach you. That first finished piece is a good reason to try another.
Key Takeaways
- Use project size, number of techniques, and intended use to narrow down your first make.
- Compare five beginner project ideas and choose one that matches your interests and patience for detail.
- Follow a simple, step-by-step plan to take your chosen project from pattern to finished piece.
- Choose tools and materials for your specific project instead of gathering every leathercraft tool at once.
- Explore easy leathercraft projects for beginners and see how smaller leather cuts or a curated bundle can help you get started.
Why easy leathercraft projects make better first makes
A first project should give you enough room to learn without asking you to master every technique at once. A beginner-friendly leathercraft project has few pieces, uses a limited set of techniques, and has a clear shape you can recognise as it comes together. Use those criteria to narrow your options: look for a straightforward path from flat leather to a finished item, rather than a design with many parts and steps.
Small projects are easier to plan. You can measure the shape, decide where each cut and hole belongs, and focus on carrying out those steps carefully. The same habits transfer to larger projects. Even if your first piece has an uneven edge or a stitch that wanders, you’ll have practised decisions that matter in leathercraft: laying out a pattern, handling the material, and working through the stages in order. The Leather crafting overview gives useful background on the wider range of techniques and tools involved.
Material choice is part of that planning. A clearly defined, manageable shape makes it easier to estimate what you need and avoid unnecessary waste. For example, vegetable-tanned leather for leathercraft is one option to consider when its characteristics suit your pattern. Before cutting, check the project’s material guidance and plan how the pattern will fit on your piece. A careful start is better than rushing to make the first mark.
What makes a leathercraft project beginner-friendly?
Choose a design with a small number of pieces, straightforward assembly, and only a few techniques to learn at once. A forgiving shape gives you space to concentrate on accurate measuring and neat cuts instead of intricate details. Simple doesn’t mean careless: clean edges and deliberate work still take patience. Pick a useful finished piece you’ll enjoy keeping or gifting, so the practice has a purpose beyond the workbench.
How a finished first project builds confidence
Each completed stage makes the next one feel less unfamiliar. Marking the pattern shows how the design sits on the leather; cutting reveals how steady your hand is; assembly lets you see the parts become a whole. That visible progress can keep you motivated, even if the result isn’t perfect. Small imperfections are evidence of a skill in progress, not a reason to abandon the make.
Easy leathercraft projects for beginners are most rewarding when they balance a clear goal with room to learn. Finish one modest piece, notice what went well, and choose one detail to improve next time. Confidence grows through practice, one careful decision at a time.
Five easy leathercraft project ideas for beginners
The right first make depends on the skill you want to practise. These easy leathercraft projects for beginners range from compact accessories to a small tray, each offering a different way to learn. Choose the kind of making you’d like to try, then keep the design simple.
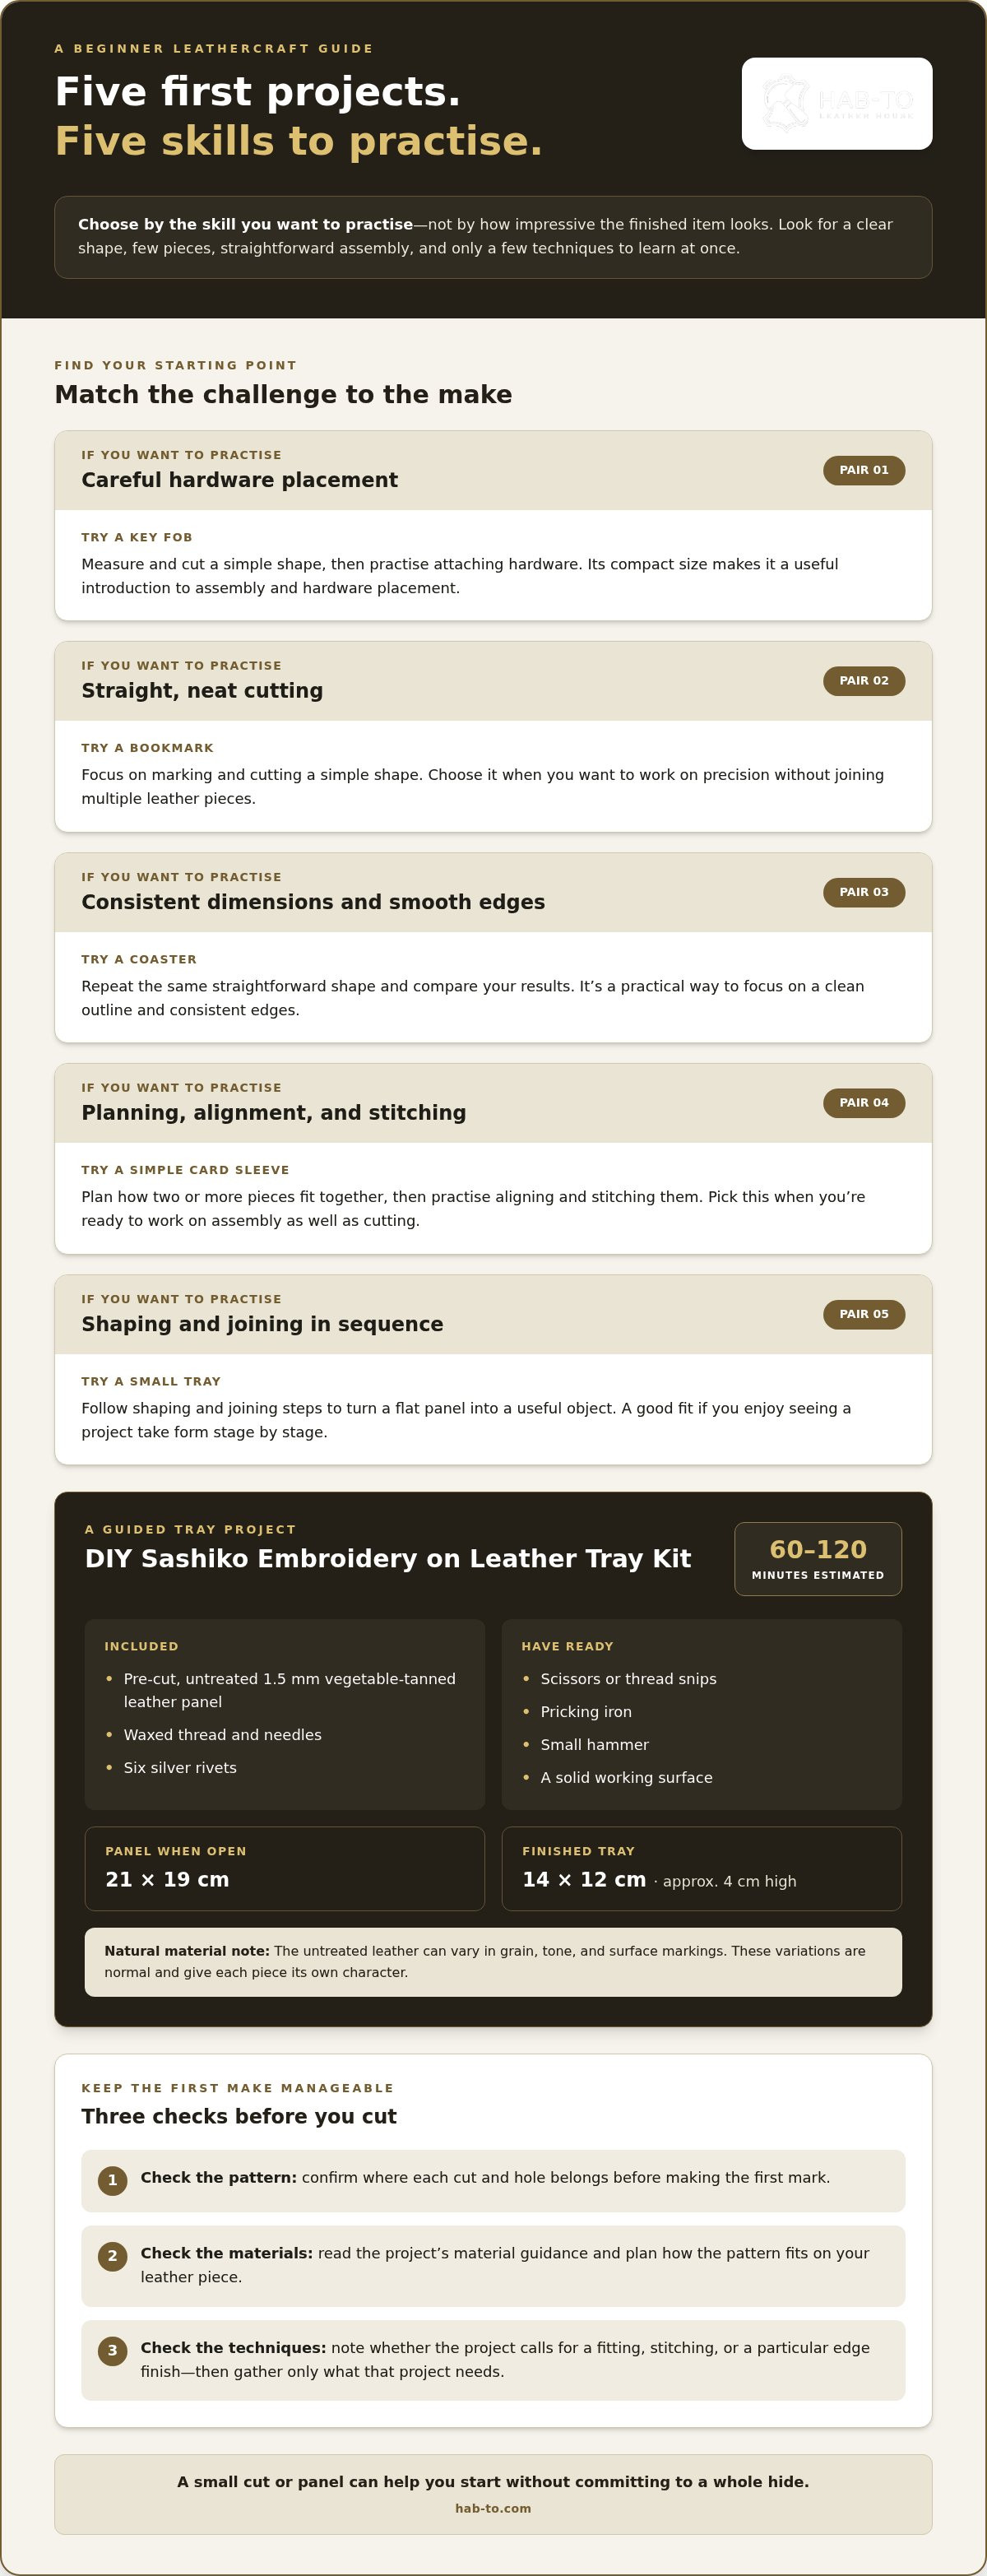
- Key fob: Practise measuring, cutting a simple shape, and attaching hardware. Its small size makes it a useful introduction to assembly and hardware placement.
- Bookmark: Focus on marking and cutting a straight, neat shape. Choose it if you want to practise precision without joining multiple leather pieces.
- Coaster: Work on consistent dimensions and smooth edges. It’s a practical option if you’d like to repeat the same simple shape and compare your results.
- Simple card sleeve: Learn to plan how two or more pieces fit together, then practise alignment and stitching. Choose it if you’re ready to work on assembly as well as cutting.
- Small tray: Follow a sequence of shaping and joining steps to turn a flat panel into a useful object. It suits makers who enjoy seeing a project take form stage by stage.
Small accessories for practising careful cutting and assembly
Key fobs and bookmarks have compact shapes and visible results. A card sleeve adds a planning challenge: its pieces need to meet in the right places. To choose among these easy leathercraft projects for beginners, ask what skill you most want to practise. Pick a bookmark for accurate cutting, or a sleeve if you want to explore joining pieces.
A key fob can teach careful hardware placement, while a coaster lets you focus on a clean outline and consistent edges. Before you start, check whether the pattern calls for a fitting, stitching, or a particular edge finish. That quick check helps you gather the right supplies and avoid adding steps you don’t need.
A leather tray for a satisfying first finished piece
The DIY Sashiko Embroidery on Leather Tray Kit offers a guided way to make a tray. It includes a pre-cut, untreated 1.5 mm vegetable-tanned leather panel, waxed thread, needles, and six silver rivets. The panel measures 21 × 19 cm when open; the finished tray measures 14 × 12 cm, with an approximate height of 4 cm. The estimated build time is 60-120 minutes.
You’ll need scissors or thread snips, a pricking iron, a small hammer, and a solid surface for working. The untreated leather naturally varies in grain, tone, and surface markings. These variations are normal and give each piece its own character, allowing the finished tray to display nicely in your home alongside other handcrafted accents such as decorative metalwork from Tintin.
If you’re weighing up easy leathercraft projects for beginners and want a curated selection of materials to simplify preparation, explore the leathercraft starter bundles.
How to choose your first project without overcomplicating it
Choose by the skill you want to practise, not by how impressive the finished item looks. Easy leathercraft projects for beginners can vary in size and still differ in the number of stages they require. A small project with several joins may need more planning than a larger, simple shape. Every extra join or fitting gives you another point to measure, align, or assemble.
Use this comparison as a starting point. Technique counts are approximate and assume a straightforward design without optional decoration; patterns and construction choices can change what’s involved.
| Project | Main skill | Typical techniques | Beginner fit |
|---|---|---|---|
| Bookmark | Measuring and cutting | 2 | Best for focusing on a clean outline |
| Coaster | Consistent shaping and edge work | 2-3 | Good for practising a repeated shape |
| Key fob | Cutting and hardware placement | 3 | Useful if you want to learn a simple attachment |
| Card sleeve | Planning and hand stitching | 4 | Suitable if you’re ready to align joined panels |
| Small tray | Shaping and assembly | 3 | A satisfying choice for following stages in sequence |
Think about what you’ll use, which tools you have, and how much detail you enjoy. A bookmark needs little assembly; a card sleeve calls for more patience with alignment and stitching. A key fob uses hardware, so factor in the attachment step and choose suitable leathercraft hardware.
Match the project to the skill you want to practise
For measuring and cutting practice, choose a simple outline such as a bookmark or coaster. A card sleeve gives you panels to plan and align, making it a useful next step if you want to learn hand stitching. Decorative stamping can add character, but it introduces another technique, so treat it as optional for a first make. Test an unfamiliar step on a small offcut before working on your project piece.
Choose a project that fits your materials and patience
Start with a small cut or panel sized for the pattern rather than buying more leather than you need. Consider what will keep you engaged: a plain shape gives you a clear visual result, while a stitched sleeve offers more practice with assembly. If you prefer a focused task, keep the design simple. If you enjoy detail, add just one new technique.
Make the plan fit your own pace. Set out the pattern and tools before cutting, and leave room to work carefully. The DIY Sashiko tray kit’s stated build estimate is 60-120 minutes, but there’s no universal completion time for the other project ideas. Let the pattern and your working rhythm guide you. The practical approach to choosing easy leathercraft projects for beginners is to match the project to the skills and materials you have, then take the steps at a pace that feels right.
What you will need: a simple plan for finishing your first leathercraft project
A short materials list keeps preparation focused. Gather only what your chosen pattern calls for, and read the instructions before buying or cutting anything. Easy leathercraft projects for beginners need different supplies depending on whether the design involves stitching, hardware, or a single shaped piece.
What you will need
- Leather: Choose a small piece or panel that fits your pattern, with enough room around the outline to cut comfortably. Browse vegetable-tanned leather and compare options against your project’s requirements.
- Cutting tools: Use a suitable leatherworking knife or other cutting tool, plus a cutting mat or stable protected surface. Browse the leathercraft tools collection for tools suited to the techniques your project uses.
- Measuring and marking tools: Set out a ruler and a marking tool that lets you transfer the pattern clearly.
- Project-specific supplies: Add leather hardware only if your design needs it, or suitable adhesive if the instructions call for gluing.
- Needles and thread: Include these only if your design requires stitching. A simple cut-out accessory may not need them.
A curated selection can simplify preparation by bringing beginner materials together. Explore leathercraft Starter Bundles if you’d like help gathering supplies for your first make.
A calm, step-by-step way to complete the project
Work through the stages in order. Resist the urge to jump from the pattern straight to assembly. A few deliberate checks before each irreversible step can help protect your material and keep the process manageable.
- Choose a pattern. Read the full instructions before making marks. Note the pieces, tools, and order of assembly, and make sure the design matches the supplies you’ve gathered.
- Prepare the surface. Clear a stable work area and place a cutting mat beneath the leather. Keep the pattern, ruler, and tools close at hand.
- Mark and cut. Measure carefully, align the pattern, and mark its outline before cutting. If the marking or cutting technique is unfamiliar, practise on a small offcut first.
- Assemble. Before gluing, stitching, or setting hardware, bring the pieces together without fixing them in place. Check that edges meet, holes align, and hardware sits where the pattern intends. Test unfamiliar stitching or edge-finishing techniques on scrap leather first.
- Finish and inspect. Follow the pattern’s finishing instructions, then check the edges, seams, and attachments. Make sure the item works as intended for its planned use.
Preparation doesn’t need to be elaborate. A clear pattern, a few suitable tools, and a steady pace give you a practical way to learn while making something useful.
Keep the momentum going with the right beginner materials
Good preparation is about choosing what your project needs, not collecting every tool and material in leathercraft. Hab-To Leather House offers vegetable-tanned leather, leatherworking tools, hardware, supplies, and beginner bundles. There’s no minimum order requirement, and you can choose smaller cuts for a practice make instead of committing to a whole hide. Match your material to one pattern and keep your first project focused.
Choose only the materials your project actually needs
Start with the pattern’s shape and intended use. A flat bookmark and a structured item have different needs, so consider how much body and support the finished piece requires before choosing leather. Follow the pattern’s guidance where available, and don’t assume one thickness suits every design. Browse leather bundles and focus on the options that fit your project rather than buying more than you can use.
Separate essentials from extras. The pattern may call for leather, a cutting tool, a ruler, and a marking tool; stitching, hardware, or adhesive are needed only if the design uses them. Decorative stamping or added embellishments can wait. Leaving them out keeps the first make manageable and helps you focus on the core techniques you’re learning.
A curated bundle can simplify preparation by bringing beginner materials together, so you spend less time deciding what belongs on the workbench. The family behind Hab-To Leather House has more than 160 years of leather expertise, and that experience informs a maker-focused approach: start with a defined project, choose material for its purpose, and build your skills one step at a time.
Get guidance and choose your next small challenge
If you’d like help thinking through material or project choices, Mike offers free 15-minute video consultations. Bring a clear question about the make you have in mind, such as what to consider when selecting leather for its structure or which techniques your pattern involves.
After finishing your first piece, repeat a technique you already know before adding a new one. Make another clean cut, practise the same stitching method, or work through a familiar assembly step with a different pattern. Repetition builds steadiness; then you can add one challenge, such as hardware or decorative detail, when you feel ready. The aim isn’t to rush into a complicated project. It’s to keep making with care.
Choose a leathercraft Starter Bundle from Hab-To Leather House to bring together materials for your next small make.
Make your next idea a real project
Choose one small make that interests you, then set a clear learning goal: perhaps steadier cutting, neater alignment, or a more confident finish. Your next project doesn’t need to be more ambitious. Repeating a familiar technique is progress, too.
Keep exploring leathercraft
- Choosing leather for a small practice project
- Getting started with hand stitching
- Simple ways to improve leather edges
Materials for your next make: A curated bundle can help you gather supplies for a focused project. Explore beginner-friendly leathercraft bundles as you plan what to make next.
Take your time, enjoy working with the material, and let each finished piece lead naturally to another skill worth learning.
Frequently Asked Questions
What is the easiest leathercraft project for a beginner?
A key fob or bookmark is often a straightforward starting point because the design can focus on shaping and cutting one piece. The best choice among easy leathercraft projects for beginners depends on what you want to practise: choose a flat accessory for careful measuring, or a small tray if you’re ready to follow assembly steps. Check the pattern first and make sure its required tools and construction suit you.
Can beginners make leather projects without sewing?
Yes. Some designs rely on shaping, folds, adhesive, or hardware instead of stitching. The key is to follow a pattern designed for that construction method. For instance, don’t skip stitches on a sleeve whose panels depend on them to hold their shape and contents. If you want a no-sew start, choose a design that specifies how its pieces join, then practise any unfamiliar step on scrap leather.
What tools do I need to start leathercraft at home?
You only need tools suited to your chosen pattern. A simple one-piece make may call for a ruler, marking tool, and appropriate cutter, while stitching or setting hardware adds its own requirements. Check the instructions before gathering supplies, and avoid buying tools for techniques you won’t use yet. A stable work surface and good light also make it easier to see your marks and keep your hands steady.
Is vegetable-tanned leather suitable for beginner projects?
Yes, vegetable-tanned leather can suit many first projects, but select it according to the pattern’s intended structure and use rather than assuming one type or thickness works for everything. Hab-To focuses exclusively on vegetable-tanned leather and offers smaller cuts as well as larger pieces. Read the project requirements before choosing material, and expect natural differences in grain, tone, and surface to give each piece its own character.
How can I avoid wasting leather when I start a project?
Lay the pattern pieces over the leather before cutting, and check that every outline fits with enough room to cut cleanly. If the pattern has several parts, test different layouts on paper first so you can see how they fit together. Follow any pattern guidance about direction or placement, and don’t trim away extra material until you’ve checked the full layout. A small offcut can help you test a mark or tool before using the main piece.
What should I do if my first leathercraft project has small imperfections?
First, decide whether the irregularity affects how the item works or is simply visible in the finish. If the piece still serves its intended use, keep it and treat the detail as a reminder for your next project. Note the step where it appeared and make one adjustment next time, such as slowing down at a corner or checking alignment before joining pieces. Progress comes from noticing details, not demanding a flawless first result.
Ready to start? Explore Hab-To’s leathercraft starter bundles and choose materials for your first project.
Disclaimer
All our blog articles are made for information purposes only we dont take responsability for any content from third parties.