

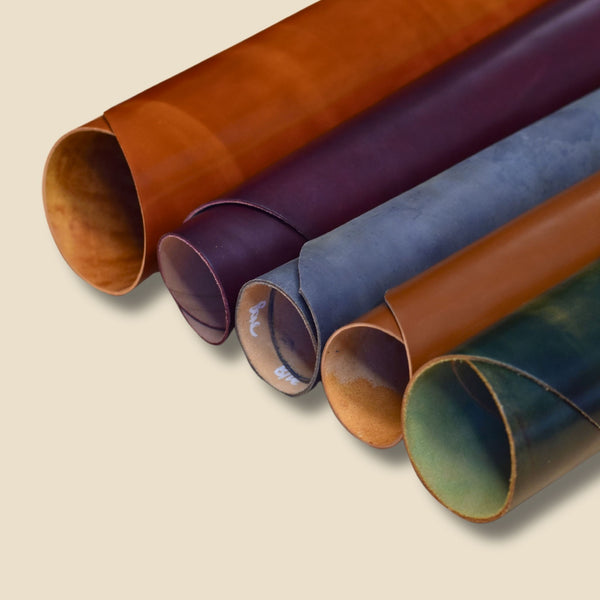
How to Condition Vegetable Tanned Leather and Limit Darkening
Conditioner can protect vegetable-tanned leather, but it may also deepen its color. When conditioning vegetable-tanned leather, choose a formula suited to the hide, test it on a hidden area, and apply a thin, even layer. Some temporary darkening is normal as the conditioner absorbs.
It’s natural to want new leather to keep its original shade. The key is to care for it without saturating the surface or expecting conditioner to prevent every mark. This guide explains how to choose between common conditioner types, apply them carefully, and respond to water stains without stressing the leather.
You’ll also learn why vegetable-tanned leather develops patina, how sunlight and everyday handling affect its color and feel, and when conditioning makes sense. A measured approach helps the leather soften and change naturally, rather than fighting the character that makes it distinctive.
Key Takeaways
- Test a conditioner on an inconspicuous area first to see how it affects the leather’s color.
- Apply conditioner sparingly and let it absorb before buffing away any excess.
- Blot water gently, then let damp leather air-dry naturally without added heat.
- Expect color and texture to evolve as the leather develops its own patina.
- Use signs of dryness and how often the leather is used to guide when it needs care.
Water stains and water resistance
Untreated vegetable-tanned leather readily shows water marks. Blot moisture promptly and avoid rubbing. These steps help manage water without forcing the leather to dry too quickly.
-
Assess Water and Wear Sensitivity
Check the leather’s finish and intended use before exposing it to moisture. Untreated vegetable-tanned leather stains easily and can be more sensitive to water and general wear than some chrome-tanned leathers. A frequently handled wallet, for example, may show marks sooner than an item kept on a shelf. Conditioning does not make the surface waterproof.
- Limit unnecessary water contact, especially on pale, unfinished leather. A splash can leave a visible spot because moisture may absorb unevenly. Leather oil does not provide the same water resistance as wax-containing salve. That difference may matter for a belt or bag used outdoors, but neither product makes leather immune to stains or wear.
-
Manage Water Exposure and Drying
Blot wet leather gently with a soft cloth as soon as possible. Press to lift surface moisture; don’t scrub or rub, as friction can spread the wet area and disturb the grain. Let the item air-dry naturally at room temperature. Avoid heaters, hair dryers, and direct heat, which can dry leather unevenly and stress its surface.
- For a light spill, gently blot the affected area with a clean, damp cloth. Work carefully instead of spreading water across the whole panel, and don’t soak the leather to chase a small mark. A darker patch may remain temporarily as it dries or become part of the developing patina. Let the full area dry before judging the final color.
- Once dry, check for stiffness, a persistent water ring, or surface changes. Leather that stays too dry may stain more easily and can crack if the dryness continues. Don’t add water or heat to force a mark away. If you choose a wax-containing salve for added water resistance, test it on a hidden spot first, since conditioning can darken leather.
Choosing conditioners for vegetable-tanned leather
Choose a conditioner according to the leather’s finish and the color change you can accept. A measured routine helps care for the material without applying more product than it needs.
What You Will Need
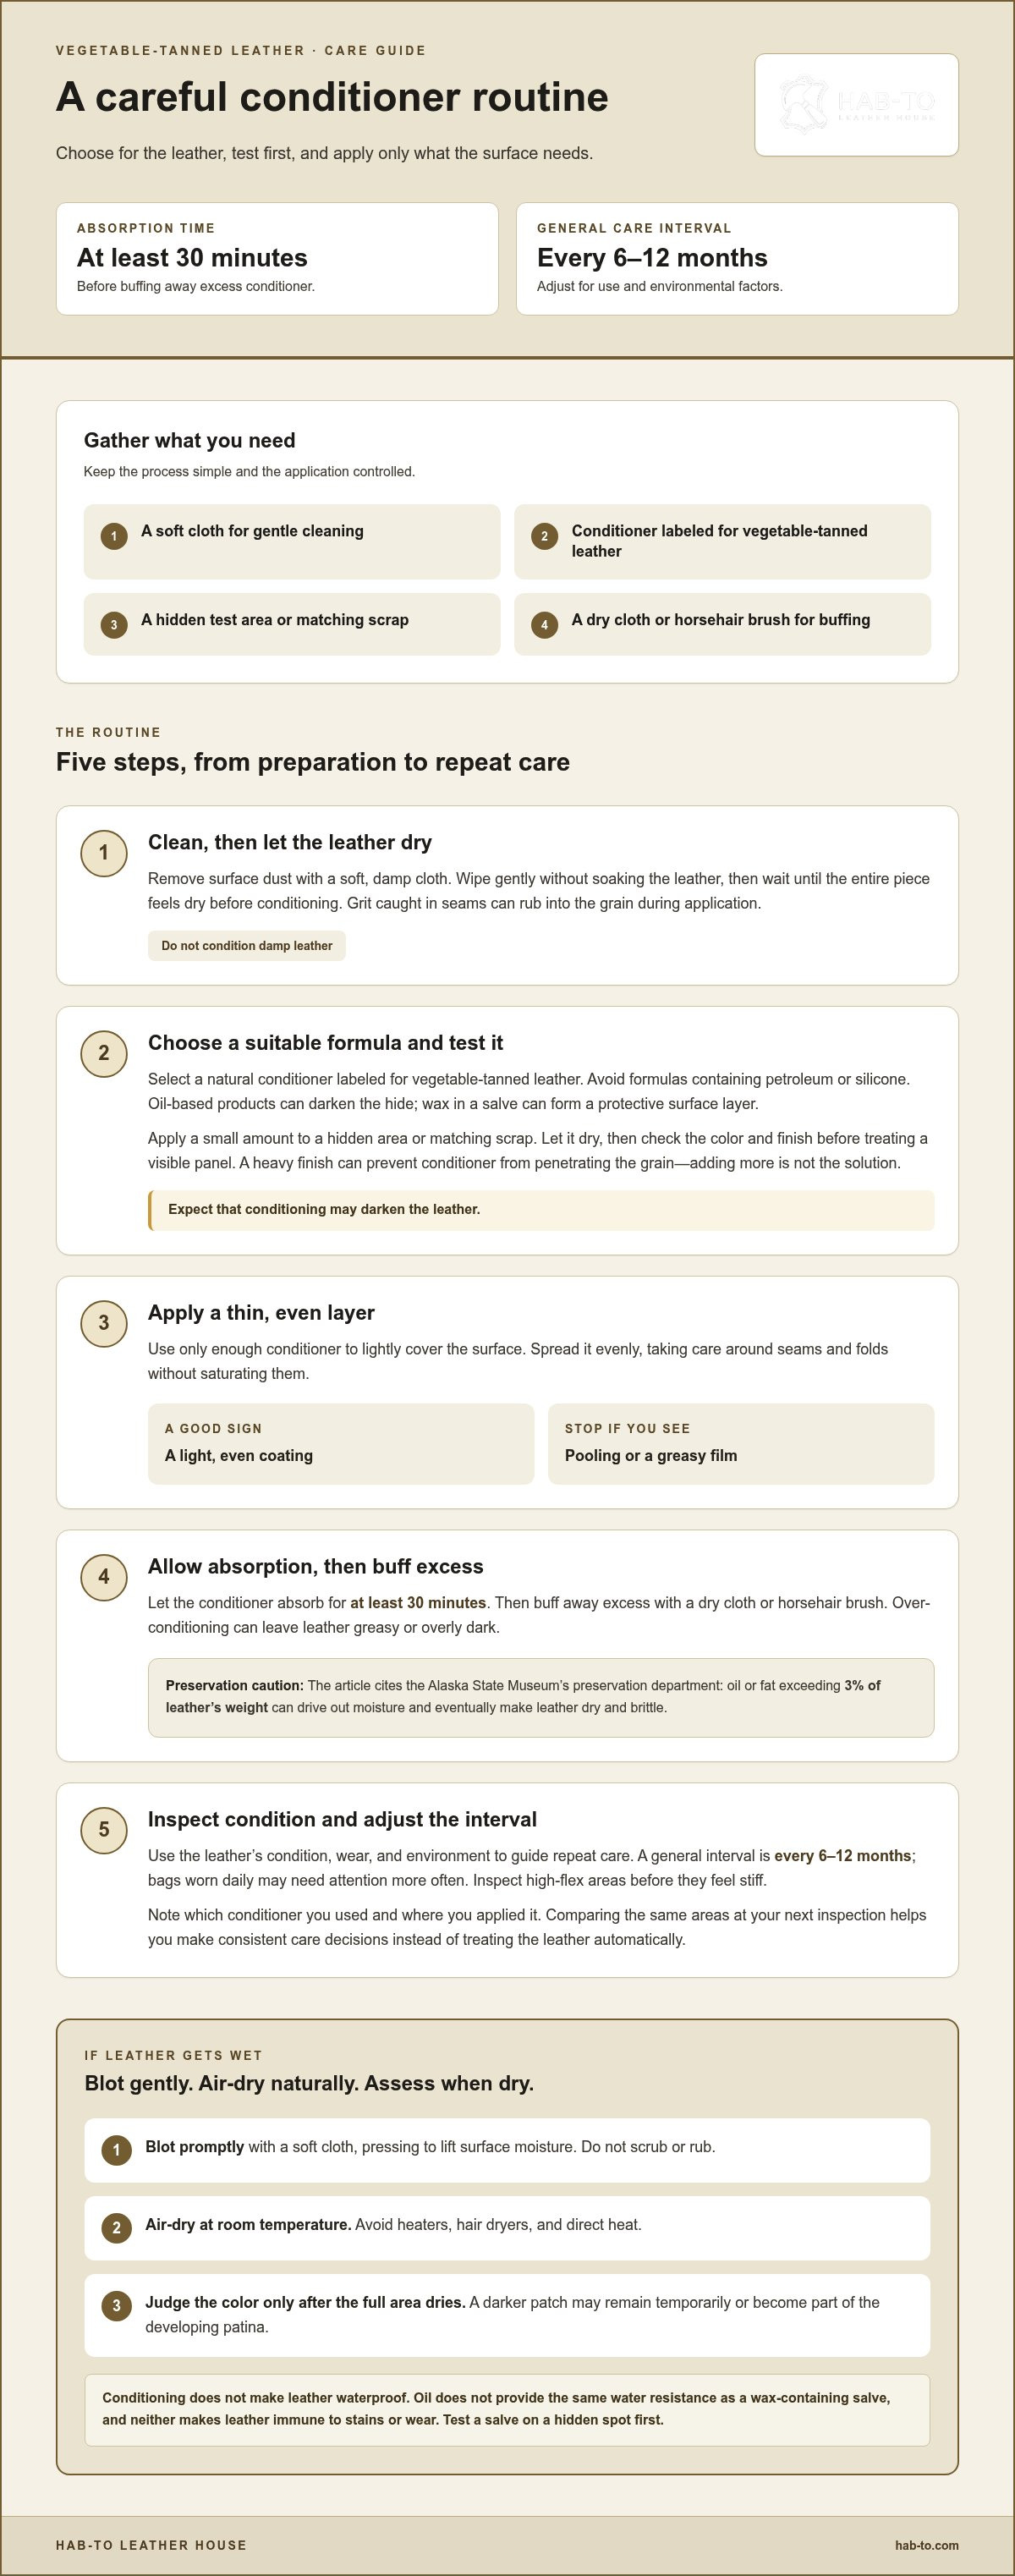
Gather a soft cloth, a conditioner labeled for vegetable-tanned leather, and a hidden test area or matching scrap. Keep a dry cloth or horsehair brush nearby for buffing. If you’re preparing materials for a leathercraft project, the leatherworking tools and crafting bundles can help you assemble project supplies.
-
Clean the Leather Before Conditioning
Remove surface dust with a soft, damp cloth, then let the leather dry completely. Wipe gently without soaking it. Check a dusty wallet’s seams for trapped grit, which can rub into the grain during application. Conditioning vegetable-tanned leather while it is damp can lead to uneven absorption, so wait until the entire piece feels dry.
-
Choose and Test a Conditioner
Choose a natural conditioner labeled for vegetable-tanned leather. Avoid formulas containing petroleum or silicone. Oil-based products can darken the hide, while wax in a salve can form a protective surface layer. Consider the finish you want and the leather’s existing surface treatment.
Test the conditioner on a hidden area or matching scrap. Apply a small amount, let it dry, then check the color and finish before treating a visible panel. A heavy finish can prevent conditioner from penetrating the grain, so don’t try to compensate by applying more.
-
Apply an Appropriate Amount
For careful application, clean and dry the leather, test the product, spread a thin, even layer, then remove any excess after absorption. Use only enough to lightly cover the surface. Stop if the product pools or leaves a greasy film. On a finished item, take care around seams and folds without saturating them.
Let conditioner absorb for at least 30 minutes before buffing away excess. Allow cream to absorb before buffing with a dry cloth or horsehair brush. Over-conditioning can leave leather greasy or overly dark. According to the Alaska State Museum’s preservation department, oil or fat exceeding 3% of leather’s weight can drive out moisture and eventually make leather dry and brittle.
-
Set a Conditioning Schedule
Use the leather’s condition, wear, and environment to guide repeat care. A general interval is every 6 to 12 months, adjusted for use and environmental factors. Bags worn daily may need attention more often. Inspect high-flex areas before they feel stiff; conditioning is preventative care, not a cure for already-dry leather.
Note which conditioner you used and where you applied it. Comparing the same areas at your next inspection helps you make consistent care decisions instead of treating the leather automatically.
Color and texture changes as leather ages
Track changes in the leather’s color and feel as it develops patina. These are part of the aging process, not a reason to keep adding conditioner.
- Record the starting color before regular use. Photograph a new natural-colored panel against a neutral background, then use the same setup for future comparisons. This gives you a reference as the surface darkens. Different lighting can mislead, so check the leather in consistent conditions before deciding its color has changed.
Note where changes appear, too. A belt, wallet, or bag may develop unevenly as different areas are handled or exposed. Keep a short care note with the item’s original shade and any conditioner used. It can help distinguish gradual aging from a change that followed a particular product.
- Expect vegetable-tanned leather to develop a natural patina as it ages. Light-colored leather tends to darken, while dark-colored leather tends to become lighter over time. Changes may not appear evenly across a project. For example, compare a wallet’s frequently handled fold with a less-used interior panel instead of judging a single small area.
Patina describes the leather’s changing appearance, not a promise of one exact final shade. Consider the item’s character when choosing how to use it. If you want a pale surface to remain unchanged, natural vegetable-tanned leather may not meet that expectation as it matures.
- Pay attention to texture as well as color. Vegetable-tanned leather generally becomes softer and more supple with age. A new strap may feel firm, then flex more readily with regular use. That change alone doesn’t mean it needs more conditioner. Compare how the item bends and feels with its original condition, especially at folds and other working areas.
Use the whole piece as your reference. A supple body with a naturally darker tone may be aging normally, while stiffness is a separate sign to assess. Don’t treat every change in feel as a problem to solve with another application.
- When reviewing a project, distinguish patina from conditioner-related darkening. If the color changed after conditioning, compare it with your earlier test area and care notes. Leather may darken temporarily as oils absorb into its fibers over time. Let the surface settle before assessing its appearance, and don’t layer on more product to chase a preferred shade.
For example, compare the treated section with an untreated hidden area after the conditioner has absorbed. The difference can show how that product affects this particular leather. Use that observation to guide future care rather than assuming every vegetable-tanned hide will respond in the same way.
- Decide what you want to preserve before treating the leather. If it remains flexible and its patina suits the piece, continue using it normally and observe changes over time. If you prefer a lighter look, don’t use conditioner as a color-correction tool. Conditioning supports care, but it cannot reverse natural aging or guarantee a fixed shade.
Review your reference photo and notes before each treatment. The aim is to understand the leather’s gradual transformation, not erase every difference. A changing surface and a softer feel are characteristic parts of vegetable-tanned leather’s life.
General handling and sun exposure
Small handling habits shape how vegetable-tanned leather looks over time. These steps help limit dust buildup and uneven sun exposure.
- Brush away dust with a soft, dry cloth or horsehair brush before putting the piece away. Use light strokes across the surface, including around seams where dust can collect. For a bag, check the base and handles; for a belt, wipe its full length. Dry dusting helps prevent particles from being pressed into the grain during everyday handling.
- Keep leather out of direct sunlight, which darkens exposed areas. A bag left beside a bright window may develop a darker side than the panel facing into the room. Choose a spot away from direct sun for display and storage. After using a leather item outdoors, return it to the shade rather than leaving it in a sunlit car or on a windowsill.
- Store leather in a cool, dry place away from direct sunlight. A closet shelf away from a sunny window is better than a bright display ledge. Make sure a bag is clean and dry before storing it. Avoid damp corners, where lingering moisture can affect the leather and its finish.
- Make a brief care check part of your routine. Before storing a wallet or bag, look for dust, damp patches, or conditioner residue. Remove loose dust with a clean cloth, then let any moisture dry naturally. If conditioner remains on the surface after it has had time to absorb, buff off the excess instead of adding another layer.
- Notice how an item is positioned between uses. A belt hung against a sunny wall may darken unevenly, while a bag stored facing a window gets different exposure across its panels. Move stored pieces away from direct light, and avoid leaving them in the same sunlit spot on display. These simple choices limit avoidable color differences without trying to prevent natural aging.
For a vegetable-tanned leather bag, the guide recommends using a soft, dry cloth or horsehair brush to remove dust. Keep that task distinct from any broader care step: the purpose here is simply to lift visible dust with one of the recommended dry tools. Choose the cloth or brush that is easiest to guide across the area you are cleaning, and use a gentle, consistent pass rather than switching into a more involved treatment. This keeps the dust-removal part of the routine clear and uncomplicated.
A useful way to apply the recommendation is to divide attention across the bag’s surfaces, including places that are easy to overlook, and then finish with a quick visual check for remaining dust. If an area still looks dusty, return to it with the same soft, dry cloth or horsehair brush instead of adding a different step. Keep this as a simple maintenance habit, not a reason to overwork the leather. The point is to remove dust with the specified tools while leaving other care decisions separate.
How often should vegetable-tanned leather be conditioned?
Use the item’s wear, environment, and condition to set a care routine. Start with these practical intervals, then inspect the leather before each application.
- Use 6 to 12 months as a general interval, adjusting for use and environmental factors. A belt worn occasionally in a mild indoor setting needs a different routine from a bag carried daily. The calendar is a reminder, not an automatic instruction to apply conditioner. Before each treatment, look for dryness and stiffness, especially where the leather bends or flexes during use.
- Condition vegetable-tanned leather bags at least once a year, and more often if they are worn daily. A daily-use tote gets repeated handling and flexing, while an occasional-use bag may need less frequent care. Check handles, folds, and seams during regular cleaning. Treat dry areas rather than coating the entire bag repeatedly without checking its condition.
- For a natural vegetable-tanned belt, use each month of regular wear as a cue to assess its condition. A frequently worn belt flexes around the waist and rubs against clothing, so inspect its surface and bends during routine care. This is a prompt to check, not to condition automatically every month. Treat it only when its condition calls for it.
- Check both sides of a thick belt before conditioning. A 15 oz belt may need care on its back side if the leather is very thick. Flex the belt gently and examine the less visible side for dryness, rather than judging only its finished face. Apply a light, even layer where needed, and avoid saturating the leather or leaving excess on its surface.
- Let the environment influence how often you inspect, not how much conditioner you apply at once. Frequent use and exposure can change the care interval, while excess product can leave leather greasy or darken it. Note when you last treated the item and which areas you covered. At the next inspection, compare those areas and condition only where needed.
The author suggests giving a natural vegetable-tanned belt some care for every month of effective wear. Use that cue to decide when to inspect, not as a monthly treatment schedule. At each check, pay attention to the bends and surface, and compare the belt’s condition with what you noted at its last treatment. If it shows no dryness or stiffness, wait; if either appears, apply a light, even layer only where needed. Check the reverse side too, particularly on thick leather, and avoid saturating it or leaving excess conditioner.
Hab-To Leather House: Vegetable Tanned Leather
Hab-To Leather House offers vegetable-tanned leather for makers planning a new project. Match the hide to the piece you want to create, and consider how its color and texture may change with use.
For your next project: Explore leathercraft bundles alongside your leather selection to find project supplies in one place.
Explore related topics: choosing leather for bags, understanding leather patina, and caring for leathercraft projects.
Explore Hab-To Leather House’s materials and tools for your next project.
Let Your Next Leather Project Take Shape
Let the leather’s changing color become part of the design, not a flaw to correct. Before conditioning vegetable-tanned leather, decide what finish you want your project to develop and let that guide your care routine. Testing a sample piece can show how a conditioner affects the material before you apply it to a finished project.
For your next project, Hab-To Leather House offers vegetable-tanned leather, leather hardware, and leatherworking tools. Choose materials and components with the finished piece in mind, and build your process around careful, considered craftsmanship.
Take your time, trust your hands, and enjoy watching the leather develop its own character.
Frequently Asked Questions
What conditioner is best for vegetable-tanned leather?
Choose a conditioner labeled for vegetable-tanned leather and suited to the finish you want. Cream or salve may suit you if you want a protective surface, while an oil-based conditioner may darken the hide more noticeably. Before treating a finished piece, test the product on matching scrap if available. This small trial helps you compare the result with your intended shade and finish.
Should new vegetable-tanned leather be conditioned before use?
Not necessarily. New leather doesn’t need conditioner just because it’s new. First assess whether it feels dry or stiff and consider how you’ll use it. If a new strap already bends comfortably, use it and observe its condition before applying product. If you’re making an item, keep an offcut from the same hide for testing before treating the finished piece.
Can you use mink oil, neatsfoot oil, or beeswax on vegetable-tanned leather?
These products can be used, but each may change the leather’s appearance or surface feel. Mink oil and neatsfoot oil may deepen the color, so test them before treating a visible area. Beeswax is used in some leather creams and salves to form a protective layer. Avoid a heavy coat: choose a product that suits your intended finish and use it sparingly.
How does conditioning affect vegetable-tanned leather color and patina?
Conditioning can deepen the shade, sometimes temporarily while the product absorbs. To judge the lasting result, wait for the treated area to settle, then compare it with an untreated section under consistent lighting. On a two-tone project, test a hidden edge or matching offcut first, as a visible difference may remain. Plan for a possible shade shift as part of the finish, not as a way to remove patina.
Disclaimer
All our blog articles are made for information purposes only we dont take responsability for any content from third parties.