




Making a Custom Leather Camera Strap: A Step-by-Step Guide
What if a camera strap looks right but feels uncomfortable or is awkward to attach? When making a custom leather camera strap, start with its connection to the camera and how it will carry the camera’s weight. Then shape the design around your comfort and style. Colour and finish matter, but width, length, leather, and hardware all affect how the strap works in daily use.
You don’t need specialist experience to plan a dependable strap. This guide walks you through matching the design to your camera’s attachment points and your preferred way of carrying it, then choosing suitable vegetable-tanned leather and hardware. Follow the steps from measuring and making a pattern to cutting, stitching, finishing, and inspecting the strap. You’ll finish with a plan that suits your camera, your carrying preferences, and your tools and skills.
Key Takeaways
- Choose a wrist, neck, or cross-body design based on how you want the strap to sit and move.
- Map the strap path and adjustment range before cutting. The finished length depends on your fit and end construction.
- Compare Pueblo and Vaccheta by firmness, thickness, and surface character to find vegetable-tanned leather that suits your design.
- Making a custom leather camera strap is easier to manage when you work through pattern transfer, cutting, hole marking, stitching, and edge finishing in order.
- Source leather and supplies in project quantities without a minimum order, and take advantage of bulk discounts when they suit your needs.
Making a Custom Leather Camera Strap Starts with the Camera and Carrying Style
Start by deciding what the strap needs to do. It should suit the camera’s attachment points, feel comfortable in your preferred carrying position, and match the construction steps you can complete confidently. A simple, well-planned design is a better first project than an elaborate one with unfamiliar hardware. Before making a custom leather camera strap, sketch the camera, strap path, attachment points, and any adjustment you want. That gives you a plan you can test before cutting leather.
Keep security in mind from the beginning. The strap, attachment method, and hardware work together, so don’t choose a component on appearance alone. Check how your camera is designed to accept a strap, then plan a construction you can make carefully and inspect. A paper mock-up won’t prove that a finished strap is secure, but it can reveal fit and placement problems early.
Choose a camera strap style that suits how you carry
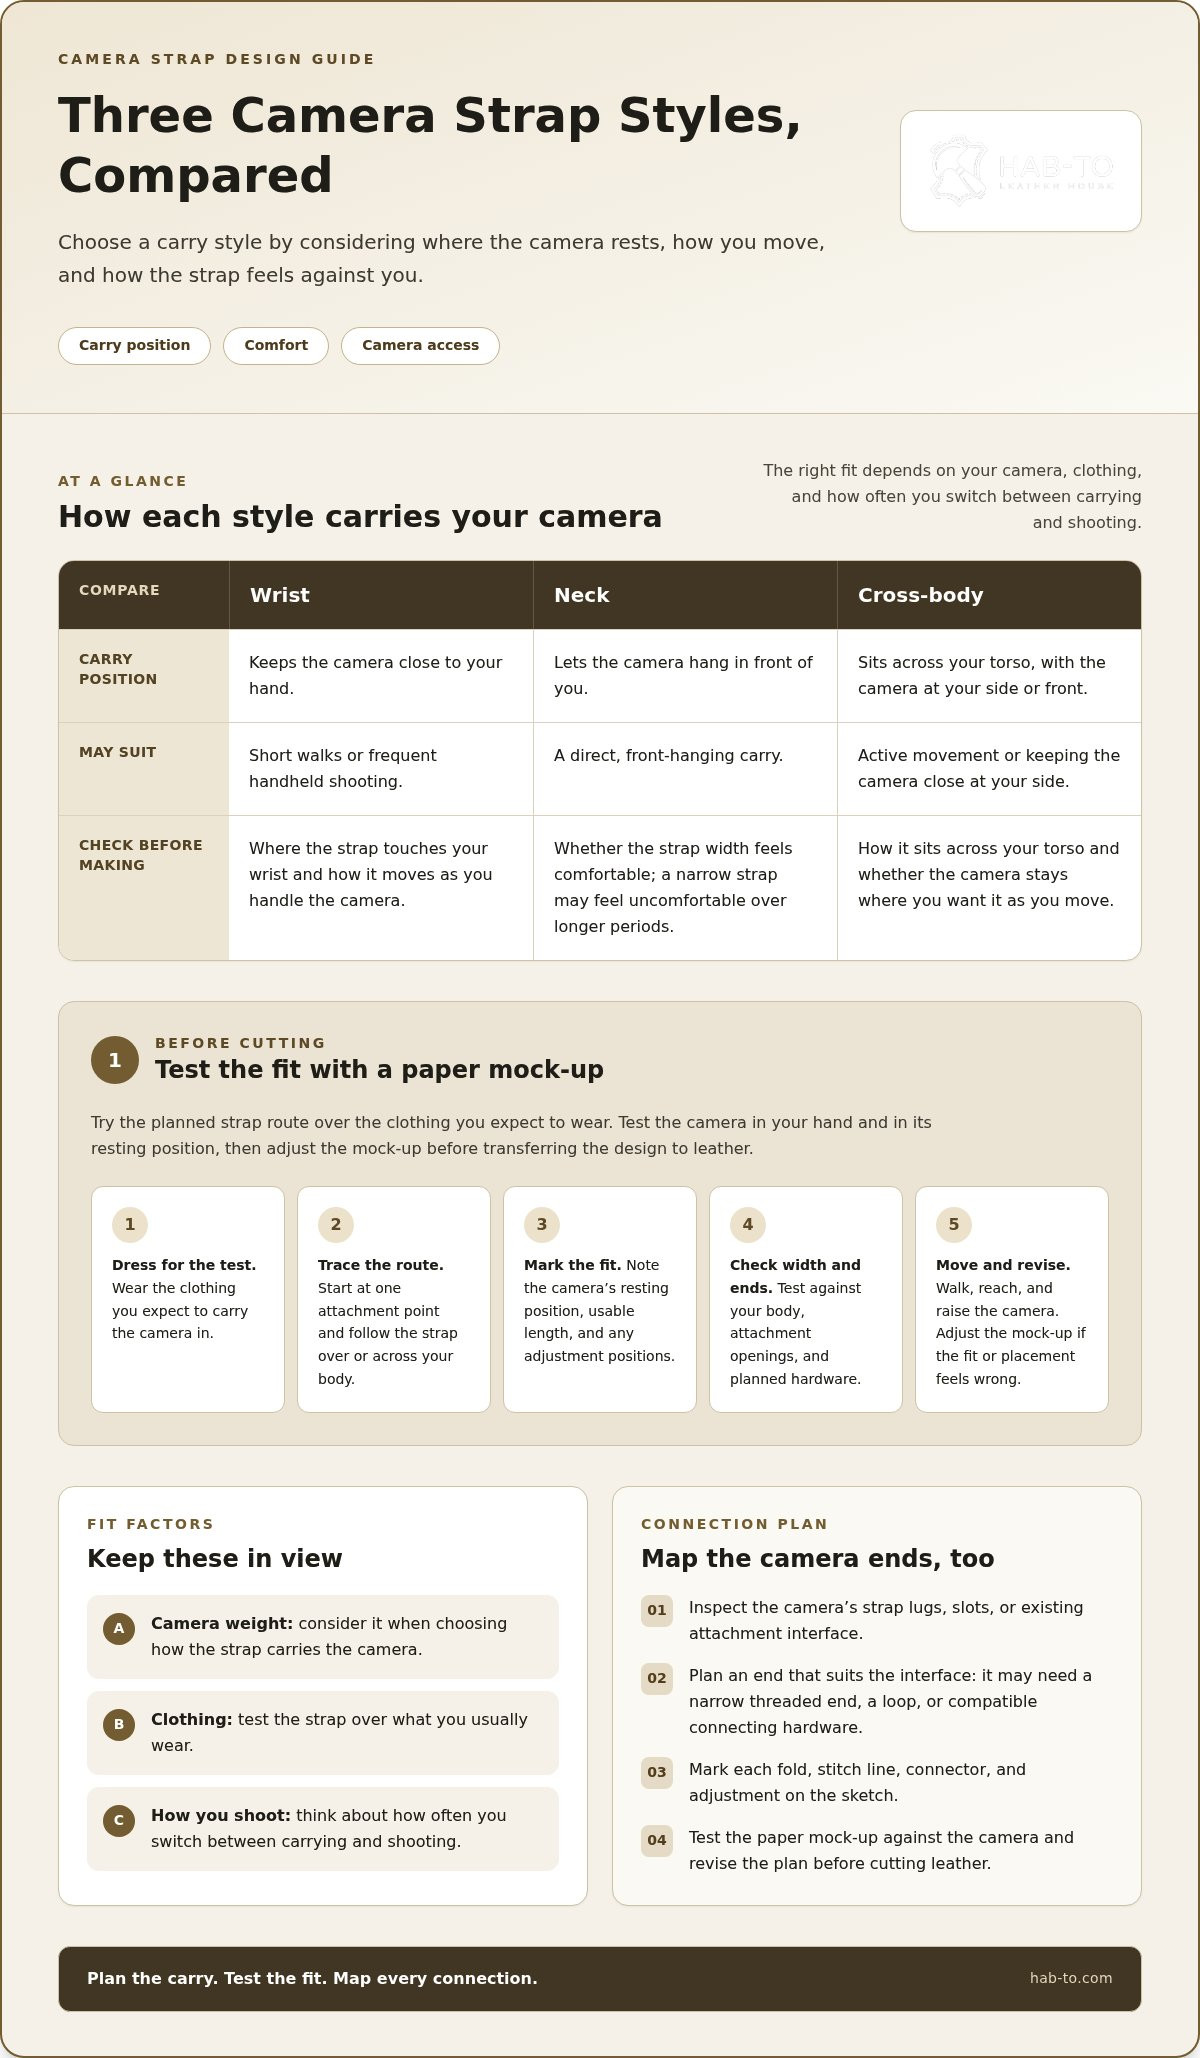
A wrist strap keeps the camera close to your hand. A neck strap lets it hang in front of you, while a cross-body strap sits across your torso with the camera at your side or front. Each style affects pressure and movement differently. Consider your camera’s weight, the clothing you usually wear, and how often you switch between carrying and shooting.
- Wrist: Keeps the camera close for short walks or frequent handheld shooting.
- Neck: Offers a direct, front-hanging carry, though a narrow strap may feel uncomfortable over longer periods.
- Cross-body: Sits across your torso and may suit active movement or a camera you want close at your side.
Make a paper strip, or join scrap paper, to approximate the planned strap length. Position it over the clothing you expect to wear, then practise reaching for and raising the camera. Check where the strap touches you, whether the camera sits where you want it, and whether the strap shifts as you move. Adjust the paper pattern until the placement feels right.
Map the camera’s attachment points before designing
Inspect the camera’s strap lugs, slots, or existing attachment interface. These vary, so don’t assume an end that fits one camera will fit another. If you’re unsure how the interface is intended to be used, consult the camera’s instructions. The attachment method determines whether your design needs a narrow threaded end, a loop, or compatible connecting hardware.
- Record the location and shape of each attachment point.
- Trace the strap route from each point to the intended resting position.
- Draw the strap ends and mark where each connector, fold, stitch line, or adjustment will sit.
- Test the paper mock-up against the camera and revise the sketch before cutting leather.
Plan every connection, not just the visible strap body. A buckle, ring, or other component must suit both the camera attachment and your construction method. As you map the connection, compare available leathercraft supplies and hardware with your design, and choose components that fit the camera and strap ends. Keep your notes beside the sketch. They’ll guide your material choices and the next steps.
Measure and Plan a Custom Leather Camera Strap for a Secure Fit
Once you’ve chosen the carry style and mapped the camera interface, turn those decisions into a pattern you can test. Measure the route the strap will follow while the camera rests where you want it, rather than measuring only the straight-line distance between attachment points. The finished length depends on your fit, the hardware, and how each end is folded, stitched, or connected. Record those details before drawing the final pattern.
A paper mock-up lets you test fit and placement before cutting leather. Use sturdy, non-stretch paper or scrap material. Hold or attach it at the camera’s connection points, then try the planned carry position over the clothing you usually wear. Walk, reach, and raise the camera as you would when taking a photograph. If the strap shifts, feels restrictive, or leaves the camera too high or low, revise the mock-up and test it again.
Measure length and width using a mock-up
Start at the camera and trace the strap route over your body. Mark where you want the camera to rest, then note the shortest and longest usable settings if you plan to add adjustment. Test the mock-up at each setting rather than estimating the adjustment positions after cutting. Test the width too: see how it feels against your shoulder or wrist, then compare it with the camera’s attachment openings and the hardware you plan to use.
- Put on the clothing you expect to wear while carrying the camera.
- Position the camera where you want it to rest, then trace the route from one attachment point, over or across your body, to the other.
- Mark the usable strap length and any adjustment positions on the mock-up.
- Test the proposed width against your body and at both camera ends. Check that the strap and its folded sections can pass through or connect to the planned interface.
- Repeat the fit test with the camera in your hand and in its resting position. Adjust the marks until the movement feels natural.
Keep the strap-body dimensions separate from the end allowances. The body is the main length and width of the strap. Each end needs additional material for a fold, stitched joint, or other connection. Marking these sections separately makes the usable length clear and prevents an end allowance from being mistaken for extra carrying length.
Plan strap ends and attachment interfaces
Draw each end as a separate pattern piece or a clearly marked extension of the strap body. Show where the leather folds, where the stitching runs, and where a buckle, ring, or other hardware sits. Check the folded shape against the camera’s attachment method. The guide “A Crafter’s Guide to Essential Leather Hardware” can help you compare component types as you settle on a design.
Before cutting, lay the pattern against the mock-up and camera again. Confirm that the opening or loop suits the interface and that folds won’t obstruct the connector. Record the body length, end allowances, width, and adjustment marks. If you’re gathering supplies, browse leathercraft bundles for a project-friendly starting point.
Compare Vegetable-Tanned Leather and Hardware for a Camera Strap
Leather and hardware need to work as a set. The strap’s width, the shape of its ends, and the camera’s attachment interface all affect which materials and components suit the design. When making a custom leather camera strap, compare the leather’s firmness, thickness, and surface with your pattern. Then choose hardware that fits the connection you’ve planned. There isn’t one material or component that suits every camera and carry style.
In leatherworking, temper describes how firm or flexible a piece of leather feels. A firmer piece may hold a defined shape, while more flexible leather may bend readily around a shoulder or through a folded end. Neither quality is automatically better. Consider how the strap will sit, how you’ll construct the ends, and whether the leather suits the planned stitching and hardware.
Choose leather by temper, thickness, and finish
Compare product specifications with your paper pattern and construction plan. A thicker piece may need different folds and stitching from a thinner one. The leather’s surface character will also affect the appearance of a broad strap or narrow end. If possible, handle or examine the leather before settling on a design. Don’t assume how it will feel from its name alone.
Badalassi Pueblo leather is one vegetable-tanned option, with a listed thickness range of 2.2-4 mm. Premium Italian vegetable-tanned leather is another, listed at 1.3-1.5 mm. Both are vegetable-tanned leathers, but their listed thicknesses and individual surface character should be considered against your pattern. They aren’t interchangeable by default, and neither is universally better. Think through how each option will work for the strap body and folded ends before deciding.
Match strap hardware to the camera and design
Hardware is part of the attachment plan, not decoration to add at the end. A ring can provide a connection point for a leather loop or end. A snap hook offers a detachable connection when its shape and opening suit the interface. A buckle can support adjustment in a design made for it. Each choice affects how the strap end must be shaped and secured.
- Rings: Check that the ring fits the camera connection and the planned leather loop.
- Snap hooks: Match the hook’s opening and connection style to both the camera interface and strap end.
- Buckles: Allow for the buckle’s position and the extra folds or slots needed to build it into the strap.
Compare hardware dimensions with the camera attachment and your pattern before committing. Check that the leather can pass through or wrap around the component as intended, and plan stitching or another fastening method to suit the construction. Don’t rely on appearance alone or assume a load rating. The related article “A Crafter’s Guide to Essential Leather Hardware” can help you think through component functions. Choose materials and hardware as one complete design, then account for each part before you start construction.
How to Make a Custom Leather Camera Strap Step by Step
With your pattern and materials ready, work methodically and check each stage as you go. Keep the tested pattern nearby, and take your time with the cuts and stitching. Careful construction and a final inspection are particularly important at the strap ends and attachment points.
What You Will Need
Gather your materials and tools before you begin. Choose vegetable-tanned leather that suits your pattern, thread and needles for the construction, and hardware that fits your camera’s attachment interface. A leather stitching bundle may be a useful way to gather supplies for hand stitching.
- Vegetable-tanned leather and the selected attachment hardware
- Suitable thread and stitching needles
- A sharp knife or leatherworking scissors, plus a ruler
- A marking tool, pricking irons, and leatherworking tools for laying out stitch holes
- Tools and materials for finishing exposed edges, such as an edge beveler and Tokonole if appropriate for your chosen method
Cut, Stitch, Finish, and Inspect the Strap
Transfer the checked pattern onto the leather, clearly marking the strap body, folds, hardware positions, and stitch lines. Cut slowly along the outlines with a sharp knife or suitable scissors, keeping the blade controlled and the edges clean. Before making holes, place the cut pieces together and check that the ends still align with your hardware plan.
- Mark the stitch line. Use a ruler or guide to keep the line even, then mark the holes with pricking irons. Consistent spacing helps keep the stitches neat and the seam orderly. Choose spacing that suits the leather, thread, and design.
- Make the holes and stitch. Work carefully along the marked line, then hand-stitch the sections that secure folds or join strap pieces. Keep the tension even and check both sides for orderly stitches.
- Finish the edges. Smooth or bevel exposed edges as appropriate for your design, then use your chosen edge-finishing method. Let any product settle as directed before handling the strap further.
- Inspect every connection. Look closely at the stitching, folds, holes, and hardware attachment points. Check that the hardware moves or closes as intended, and look for loose or missed stitches.
- Test gradually. Attach the strap to the camera and begin with gentle handling over a safe, soft surface. Increase the test gradually, checking the connections as you go. Stop and repair any visible weakness before carrying the camera.
Source Camera Strap Materials and Take Your Finished Project Further
A camera strap is a relatively small project, so you can choose materials in quantities that suit the work rather than buying a whole hide. Hab-To Leather House supplies vegetable-tanned leather, leathercraft tools, hardware, and bundles for makers. These are materials and craft supplies for making your own strap, not finished camera straps.
Buy only what the project calls for
Hab-To Leather House has no minimum order quantity, and leather is available by dm², panel, or shoulder. That lets you choose a project-appropriate quantity without committing to a whole hide. Bulk discounts are available. If you want to compare leather samples, requests may involve a nominal fee. Use your pattern and construction plan to guide the type and amount of material you choose.
Hab-To Leather House’s leathercraft education, including workshops, can help you build skills for new projects. Founder Mike brings over 25 years of personal leather expertise, and free one-to-one video consultations are available for practical material-selection guidance. For purchases within the Netherlands, VAT is included. For purchases to other countries, VAT is exclusive.
Project supplies: Start with leathercraft bundles to gather supplies for your next project. Choose materials and tools to suit your design.
Keep exploring the craft with these related articles:
- A Crafter’s Guide to Essential Leather Hardware
- Solid brass hardware for leathercraft
Carry Your Craft Into the Next Project
After carrying your finished strap, note what you might adjust: how it sits, how easily it attaches, or how the leather feels against your shoulder. Add those observations to your pattern. They’ll give you a useful starting point for refining the design or planning another leathercraft project. Making a custom leather camera strap is a practical way to build skills one considered decision at a time.
At Hab-To, care for the material is backed by over 160 years of family leather experience. Choose the supplies that fit your next idea and let the making guide what you try next.
Start with a thoughtful plan, work patiently, and take pride in every stitch. Explore the bundles and supplies for your next project.
Frequently Asked Questions
Can you make a leather camera strap without a sewing machine?
Yes. You can hand-stitch a leather camera strap with needles, thread, and a way to make evenly spaced holes. A hand-sewn saddle stitch is a practical option for joining folded ends or securing a strap section. Practise on offcuts of the same leather first to get comfortable controlling the needles and thread tension before stitching the strap.
How do you attach a handmade leather strap to different camera lugs?
Match each strap end to the camera’s specific lug or existing connection system. Some cameras have slots that accept a narrow threaded end, while others use a different interface or need an adapter. Follow the camera manufacturer’s instructions for its attachment points. Before carrying the camera, check that each connector is seated as intended and that the leather loop or end can’t slip free during gentle handling.
Can you adjust a custom camera strap after making it?
Often, yes, if you build adjustment into the design with a buckle, slider, or a series of fastening positions. If the strap has fixed stitched ends, changing its length may require unpicking and rebuilding part of it. Avoid adding holes close to existing holes or seams, since that can leave little leather between openings. Test the adjustment with the camera supported over a soft surface before carrying it normally.
What thread is suitable for hand-stitching a leather camera strap?
Choose thread intended for hand-stitching leather. Its thickness should pass cleanly through your prepared holes and suit the strap’s appearance. Waxed thread is a common choice because its coating can help it pass through leather smoothly and stay manageable as you sew. Test the thread, needles, and hole size together on an offcut first. The combination should stitch without forcing or tearing the leather.
How should you care for a vegetable-tanned leather camera strap?
Keep the strap clean and dry, and wipe away dust or surface dirt with a soft, dry cloth. If it gets damp, let it air-dry away from direct heat rather than using a heater or hair dryer. Avoid soaking it or applying an unfamiliar conditioner without testing it on an inconspicuous offcut, since care products can change the leather’s colour or finish.
Disclaimer
All our blog articles are made for information purposes only we dont take responsability for any content from third parties.