


Buying a Whole Hide vs a Side: Compare Cut Size and Yield
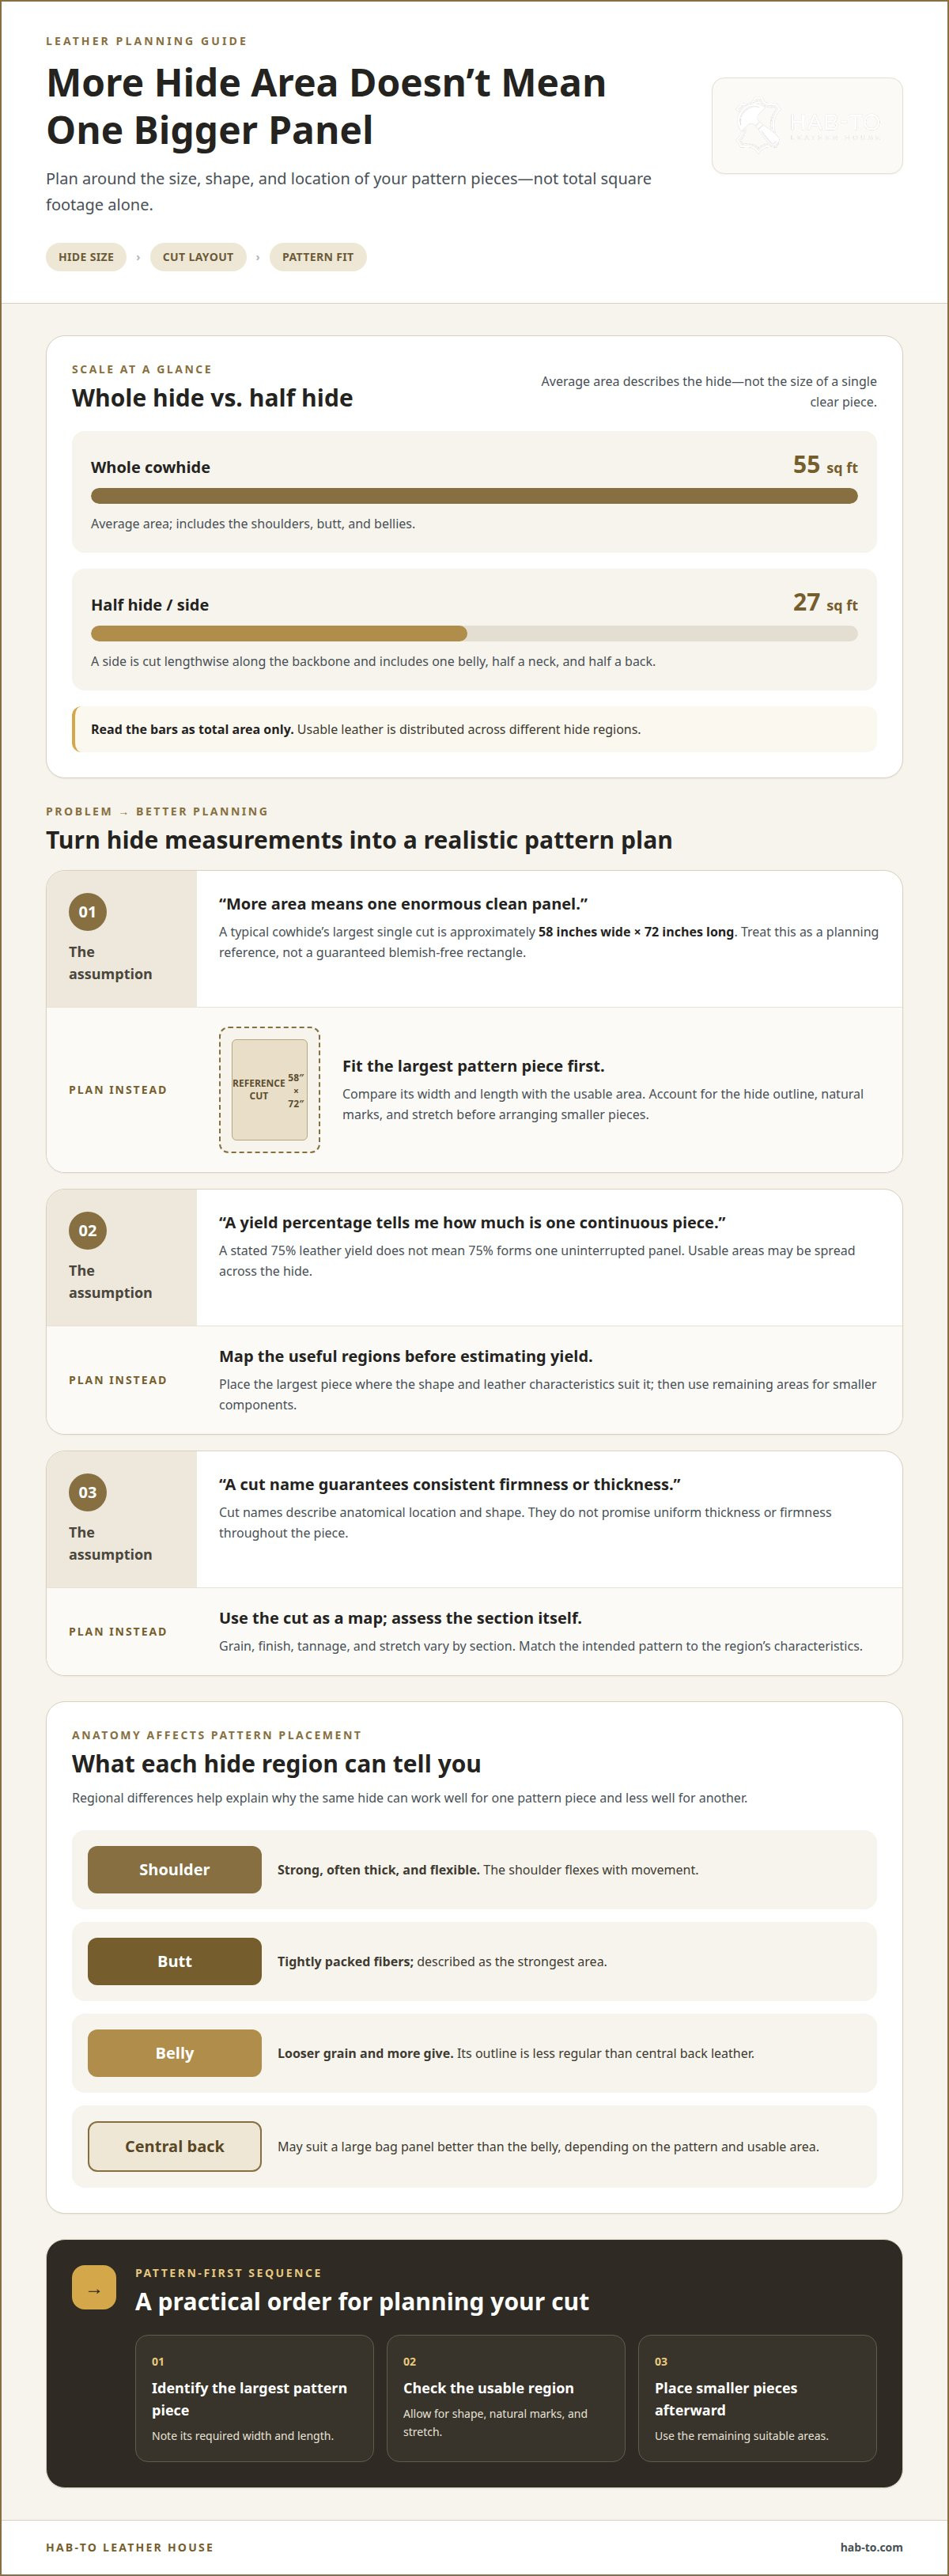
A whole hide gives you more leather, but not necessarily one flawless, oversized panel. When buying a whole hide vs a side, the basic difference is scale: a whole cowhide averages 55 square feet, while a half hide averages 27 square feet. A side is cut lengthwise along the backbone and includes one belly, half a neck, and half a back.
It makes sense to think that more area means more room for large, clean pieces. But the usable leather is spread across different regions, and a typical cowhide’s largest single cut is approximately 58 inches wide by 72 inches long. Total area alone can’t tell you whether a particular pattern will fit without blemishes or stretch-prone sections.
This guide explains what whole hides and sides include, how their cut sizes affect usable yield, and what to expect from each. You’ll also see how shoulders, backs, bends, and bellies differ, so you can match a cut to your project and plan your patterns carefully.
Key Takeaways
- Estimate usable yield by the size and placement of your pattern pieces, not by total hide area alone.
- Learn how shoulders, backs, bends, and bellies differ in strength, stretch, and consistency.
- Understand which hide cuts can suit long pieces and which may offer more flexibility around blemishes.
- Choose leatherworking tools and materials that fit the way you plan to cut and use the leather.
- See how vegetable-tanned leather, hardware, tools, and crafting bundles can support your project.
Approximate largest single cut dimensions
A cowhide can offer substantial total area without yielding one equally large, clear panel. A typical cowhide’s largest single cut is approximately 58 inches wide and 72 inches long. Treat those measurements as a planning reference, not a guarantee that every hide has a clean rectangle of that size.
The hide’s outline, natural marks, and stretch affect where a pattern fits. A 75% leather yield does not mean 75% forms one uninterrupted piece. Usable areas may be distributed across the hide, while the belly often has looser grain and more give. For a large bag panel, the center may suit the pattern better than the belly.
Start with the project’s largest pattern piece. Compare its width and length with the usable area, then place smaller pieces in the remaining spaces. This order helps reveal whether a hide can supply a clean large panel before you plan smaller components. The cowhide selection shows the relevant hide category.
What leather grades, tannages, and thicknesses should buyers compare? Compare grade on the grain side, then assess tannage, finish, and thickness against the project’s needs. Full-aniline leather has no added correcting or protective finish after drum dyeing, while semi-aniline leather receives some pigment during finishing. The suggested leather thickness is 3/64 inches, plus or minus one half of 1/64, measured with a Woburn gauge or equivalent, according to the Department of Commerce, Bureau of Standards.
Thickness matters because a pattern’s fit alone doesn’t show how leather will behave in use. A Woburn gauge or equivalent measures thickness, but the hide’s grain, finish, and stretch still vary by section. Plan the largest piece around its required dimensions, then account for natural blemishes and belly stretch before estimating how many smaller pieces will fit.
Cowhide and steerhide cut types
Cut names describe a hide’s anatomical section and shape, not its thickness or firmness. Understanding the layout helps you match a cut to long patterns, broad panels, or smaller pieces. When deciding between buying a whole hide vs a side, consider which regions your patterns can use.
Cowhide Cut Types
A cowhide cut type identifies which part of the animal’s hide remains in the piece. A full hide includes the shoulders, butt, and bellies, while a back or half back retains the shoulder and butt, with the sides removed. That back cut is useful for projects requiring long lengths of leather.
A side is a full half hide with specified trimming, according to the U.S. Department of Commerce, Bureau of Standards. It keeps several anatomical regions together, so its available area includes leather with different characteristics. The cut label describes location and outline; it doesn’t promise consistent thickness or firmness throughout.
Steerhide Cut Types
Steerhide cut types also use anatomical names to describe the section and shape supplied. Terms such as side, back, and shoulder help map a piece to the animal’s body, which matters when a pattern calls for a particular length or layout.
For example, a back or half back refers to the shoulder-and-butt area after the sides have been removed. A named cut doesn’t define thickness or firmness. Those qualities vary by hide section, tannage, and finish, so the cut name alone can’t determine how a piece will perform.
Use cut terminology to understand what remains attached, then match that layout to your pattern. A long belt pattern may suit a back cut, while a broader project may need more connected hide area. Place large pattern pieces before smaller ones to clarify the required shape and direction before allocating the remaining leather. Buying a whole hide vs a side changes how much connected layout you can consider.
Keep regional differences in mind. The shoulder flexes with movement, while the butt has tightly packed fibers and is described as the strongest area. Belly leather has more give and a less regular outline than central back leather. These differences affect where each pattern piece fits best.
Cut names are useful starting points, not a substitute for understanding the leather’s intended use. In leather terminology, a pattern means an anatomical hide section, not an embossed design, printed motif, or crafting template. Read the cut name as a map of the hide, then match its general outline to your project.
For projects that pair several leathercraft tasks, leathercraft bundles bring related supplies together and help keep the required tools and materials aligned.
Shoulders, backs, bends, and culattas
These cut names identify anatomical sections and their general outlines. They help you compare how much of the hide remains connected, especially when a pattern needs a wide or continuous piece. Exact shapes vary between hides and tanneries, so the name describes a region, not a precise template.
A double shoulder is one connected cut spanning the backbone, unlike two separately cut single shoulders. It excludes the belly and butt areas. This connected span can suit patterns requiring a broad piece across both sides, while a single shoulder provides leather from one side. The shoulder itself is strong, often thick, and flexible to accommodate movement.
A back is the upper portion of a hide with the belly removed. A double back may span both sides of the backbone, while a back can refer to one upper section. This distinction matters when a project needs a continuous central area. A back or half back consists of the shoulder and butt, with the sides removed, and is used for long lengths.
A bend refers to the rear section of the hide. A double bend spans the corresponding bend sections on both sides of the backbone. A culatta is also a rear hide cut associated with the bend and butt area, but its outline can vary by tannery or supplier. These names help you understand the cut’s location before fitting patterns.
Use the cut’s connected shape to decide whether it suits your largest pattern pieces. For example, a pattern that crosses the backbone calls for a connected double cut rather than two separate pieces. A long strap or belt pattern may make better use of a back or half back. Consider grain, stretch, thickness, and firmness, since each can vary by hide section, tannage, and finish.
In leather terminology, a pattern means an anatomical hide section, not an embossed design, printed motif, or crafting template. Read the cut name as a map of the hide, then match its general outline to your project’s piece shapes, allowing for natural variation between hides and tanneries.
Whole hides versus sides
A whole hide keeps the animal’s major sections connected, while a side is approximately half of the hide. For cowhide, average areas are 55 square feet for a whole hide and 27 square feet for a half hide. The difference affects pattern layout, not just the amount of leather available.
A whole hide includes the legs, belly, back, neck, and other areas. Its center generally offers the cleanest leather and highest yield, while surrounding regions have different characteristics. Keeping these sections together gives you more flexibility when arranging large patterns or avoiding blemishes. Upholstery, travel bags, saddle seats, and belts are examples of projects that can use full hides.
A side is separated lengthwise along the backbone. It contains one belly, half a neck, and half a back, combining regions with different stretch and usable area. A side can suit a project that needs less leather than a whole hide, but its total area alone won’t show whether a large pattern fits cleanly.
Choose based on your project’s cutting plan. For several large pieces or patterns that benefit from broad layout options, a whole hide’s connected area can help. For a smaller project with fewer large panels, a side may provide a more practical amount. In either case, place the largest pattern pieces first, then fit smaller pieces into the remaining areas.
Can buyers inspect or return whole hides and sides from US leather suppliers? Inspection options and return policies vary by supplier, so there is no single policy for every US hide purchase. Suppliers set whether pre-purchase inspection is available, along with return eligibility and condition requirements.
Before choosing between the two cuts, map each pattern piece to the hide regions it can use. A large, clean panel may need the central area, while smaller pieces can use surrounding sections. A whole hide offers more placement choices, but not every region is equally suitable. A side reduces the available layout while retaining multiple hide regions.
Differences between a whole hide and a side
The practical difference is layout choice: a whole hide leaves more regions connected, while a side narrows the available area. That affects how you plan patterns, usable yield, and leftover leather.
Comparing Whole-Hide and Side Costs
A whole hide is cheaper than a side only if its cost per usable area is lower for your project. A lower price per square foot alone doesn’t settle the comparison because blemishes and stretch can limit usable sections.
Compare how much leather your patterns can use, not just the seller’s stated area. If a project needs several connected panels, a whole hide may reduce leftover material. If you need one smaller piece, paying for extra area can make the whole hide poor value, even when its unit cost looks lower.
Sales Units and Usable Area
Leather may be sold by the hide, side, or square foot, depending on the seller and product. Ask what the listed area measures: total surface area or a usable estimate. Usable area means leather that fits your pattern after accounting for the hide’s outline, blemishes, and stretchier sections.
A side’s area doesn’t guarantee an equal amount of clean, uninterrupted leather. Map the largest pattern first, then estimate the space left for smaller pieces. This gives you a more useful comparison than treating every square foot as interchangeable.
For projects requiring several large, clean panels or flexibility to position patterns around marks, a whole hide offers more layout options. A side can suit a project requiring fewer pieces or a smaller amount of leather, provided its regions fit the pattern plan.
Storage and shipping affect a hide’s condition. Keep leather dry, out of direct sunlight, and away from sharp folds that could leave creases. During shipping, protect the surface from moisture and abrasion. For storage, support the hide evenly rather than compressing it beneath heavy items. These steps help preserve the grain and usable surface.
What You Will Need
A whole hide or side is easier to assess when your project plan and work surface are ready. Gather the essentials before laying out patterns. You’ll be able to judge whether the leather’s usable sections suit your pieces and keep cutting organized.
- Pattern pieces: Bring full-size patterns for every component, including panels, straps, pockets, and linings. Card or paper templates make it easier to test different placements without marking the leather.
- Measuring and layout tools: A ruler, tape measure, and clear straightedge help you compare pattern dimensions with the hide’s shape. Keep the grain direction and the location of natural marks in view as you plan.
- Cutting equipment: A sharp leather knife and stable cutting surface support controlled cuts along straight edges and curves. Browse leatherworking tools to find equipment suited to your craft.
- Project materials: Consider the leather, thread, hardware, and any lining required for the finished design. Crafting bundles can help you bring related supplies together, while planning these materials alongside your pattern shows which hide regions can serve each component.
Begin with a clean, flat work area large enough to spread the leather without forcing folds. Lay each pattern piece over the intended section, then note where grain, stretch, or visible blemishes affect placement. Keep a separate layout sketch to track planned pieces as you work.
For example, a bag project may call for broad body panels, smaller pockets, straps, and hardware. Test the large panels first, then arrange pockets and smaller components around them. If a pattern piece falls across a stretchy belly area, consider whether that movement suits the component or whether another section would work better.
Keep small offcuts from cutting. They can help you test edge treatments, adhesives, or finish compatibility before applying them to a visible project panel. A labeled layout sketch and organized tools also make it easier to return to the remaining hide later.
Hab-To Leather House
Hab-To Leather House is a natural next step when you’ve planned your hide layout and need materials or tools suited to your project. The choice between a whole hide and a side depends on pattern size, the leather regions your pieces can use, and how much material your work requires. Match those needs to the right leather and supplies for a more considered selection.
For projects calling for vegetable-tanned leather, compare the material’s thickness and intended use with your pattern pieces. Badalassi Pueblo vegetable-tanned leather is one option for leathercraft. Choose a cut and material based on the pieces you need, rather than assuming more hide area automatically means a better fit.
Leather hardware matters when your project includes closures, fittings, or other functional details. Planning hardware alongside the leather helps you account for attachment points and construction before cutting. Leatherworking tools support the work, from preparing and cutting material to assembling the finished project. Choose tools for the techniques your design calls for.
Crafting bundles can bring together supplies for a project, while individual tools and hardware let you focus on specific needs. If you’re deciding between a whole hide and a side, start with your largest pattern pieces, the leather sections they can use, and the components required to complete the design. Then choose materials and supplies that support your plan.
There’s no need to buy more leather than your patterns can use. A side may suit a smaller layout, while a whole hide can offer more placement options for multiple pieces. Aim for a considered match between the leather, the cut, and the work ahead. Have a question about choosing materials or supplies for your project? Contact Hab-To Leather House.
Make Your Next Cut Count
Turn your cutting plan into a project that reflects your own craft. Before choosing materials, consider how each component will look and feel in use, from the first cut to the finished edges. That intention keeps your next decision focused on the work you want to make.
Project supplies: Bring your chosen leather, hardware, and working tools together around the design. Explore crafting bundles to find supplies for your leathercraft project.
Related reading:
- Planning leather patterns for bags and small accessories
- Choosing leatherworking tools for your next project
- Understanding vegetable-tanned leather for craft work
Let your design lead the way. Thoughtful preparation gives every cut a purpose and leaves room for the character that makes handmade leatherwork your own.
Frequently Asked Questions
Will my hide or panel be perfect?
No. Natural leather can have scars, holes, wrinkles, and variations in outline, so a flawless panel isn’t assured. For a visible bag front, position the pattern to keep prominent marks away from the focal area. A small mark may be acceptable beneath a pocket or seam allowance, while a hole through a strap pattern could make that section unusable. Plan cuts around the project’s most visible areas.
What is the difference between buying a whole leather hide and a side?
A whole hide retains the animal’s larger connected area, including regions such as the legs, belly, back, and neck. A side is a half hide divided lengthwise along the backbone. It contains one belly, half a neck, and half a back. For a project with separate panels that don’t need to span both sides, a side can be easier to plan around.
How many square feet of leather are in a whole hide versus a side?
A whole cowhide averages 55 square feet, while a half cowhide averages 27 square feet. These are average areas, not promises about the dimensions of a particular hide. If you need leather for a specific pattern, consider the shape of its pieces as well as the total area. A long, narrow component uses space differently from a broad panel.
How much leather is typically wasted due to scars, holes, and irregular shape?
There isn’t one fixed amount of leather lost to scars, holes, and irregular edges. The usable portion depends on where those features fall and what your project’s pieces require. A small wallet pattern may fit around a blemish that interrupts a large bag panel. Place the largest visible pieces first, then use sound remaining areas for smaller components, letting the pattern layout guide your yield estimate.
Disclaimer
All our blog articles are made for information purposes only we dont take responsability for any content from third parties.