




How to Make a DIY Leather Anniversary Gift That Feels Personal
A DIY leather anniversary gift doesn’t need to be elaborate to be meaningful. A small, useful piece, finished with a thoughtful detail, can carry more feeling than a complicated project you struggle to complete.
If you’re unsure what to make, which leather to choose, or what tools you’ll need, start with the person who’ll receive it and how they might use it. I’m Mike, and I believe good leathercraft starts with a manageable idea and materials that suit the job. Vegetable-tanned leather is a rewarding material to work with, and its surface can develop character as it ages.
In this guide, you’ll learn how to choose a practical project, gather the right leather and tools, and add personal touches that make the finished gift your own. We’ll compare approachable ideas such as a card sleeve, key fob, or coaster, then work through a simple making process. You’ll also find a beginner-friendly tray kit as a ready-to-make option. Start small, work with care, and let the handmade details tell your story.
Key Takeaways
- Choose a DIY leather anniversary gift by matching the project to the recipient’s daily routine and your comfort with hands-on work.
- Plan in a few clear steps, from deciding how the gift will be used to choosing a personal detail that makes it theirs.
- Compare project ideas by intended use, making complexity, and opportunities for personalisation before settling on a design.
- Follow a simple making sequence, and use suitable cutting, marking, and stitching tools to keep the work manageable.
- Gather supplies without committing to a whole hide by exploring leathercraft bundles suited to a small project.
Why Make a DIY Leather Anniversary Gift Instead of Choosing Another Store-Bought Present?
You want to give something personal, useful, and made by hand. That doesn’t mean taking on an elaborate project or producing a flawless, factory-like finish. A DIY leather anniversary gift feels special because you chose it with the recipient in mind, made it yourself, and added details connected to your story together.
Leather is traditionally associated with the third wedding anniversary, but a handmade leather gift isn’t reserved for that milestone. The material’s character and the care behind the making can mark any anniversary, birthday, or ordinary moment you want to celebrate. A small object used every day can become a quiet reminder of the person who made it.
There’s a practical side to making one, too. Start with a clear idea, match it to your crafting confidence, and prepare only the materials and tools the project calls for. The sections ahead will take you from choosing a design through making and presenting it. For a broader look at the craft’s methods and tools, explore this overview of leather crafting techniques.
What makes a handmade leather gift feel personal?
Start with the recipient’s routines. What do they carry, reach for, or keep on their desk? A useful item that fits naturally into their day often feels more personal than a decorative object chosen simply because it looks like an anniversary gift. Their interests and everyday essentials can help narrow your idea before you think about colour or embellishment.
Then choose one detail with a real connection: initials, a meaningful date, a colour they love, or a handwritten note tucked in with the gift. Personalisation works best when it suits both the person and the object. If they prefer simple, practical things, a discreet mark may say more than extra decoration. Let the detail support the gift, not compete with it.
Choose a project that fits your crafting confidence
New to leatherwork? Keep your first project compact and manageable. Choose a design with few steps, and allow time to practise careful cutting and assembly. Leathercraft can involve cutting, stitching, shaping, and finishing, but a gift doesn’t need to demonstrate every technique. A useful object made with attention can mean more than an ambitious project that leaves you stressed.
For a guided starting point, the DIY Sashiko Embroidery on Leather Tray Kit is a beginner-friendly project with an estimated build time of 60-120 minutes. It gives you a defined project to make and give, rather than requiring you to design every detail from scratch. If you’d rather gather supplies around your own compact idea, starter leathercraft bundles can help bring materials and tools together.
Keep the goal simple: choose something the recipient will use, make each step with care, and finish with a detail that feels true to them. That’s where the meaning lives.
Plan a Personalised Leather Anniversary Gift Around the Recipient and Material
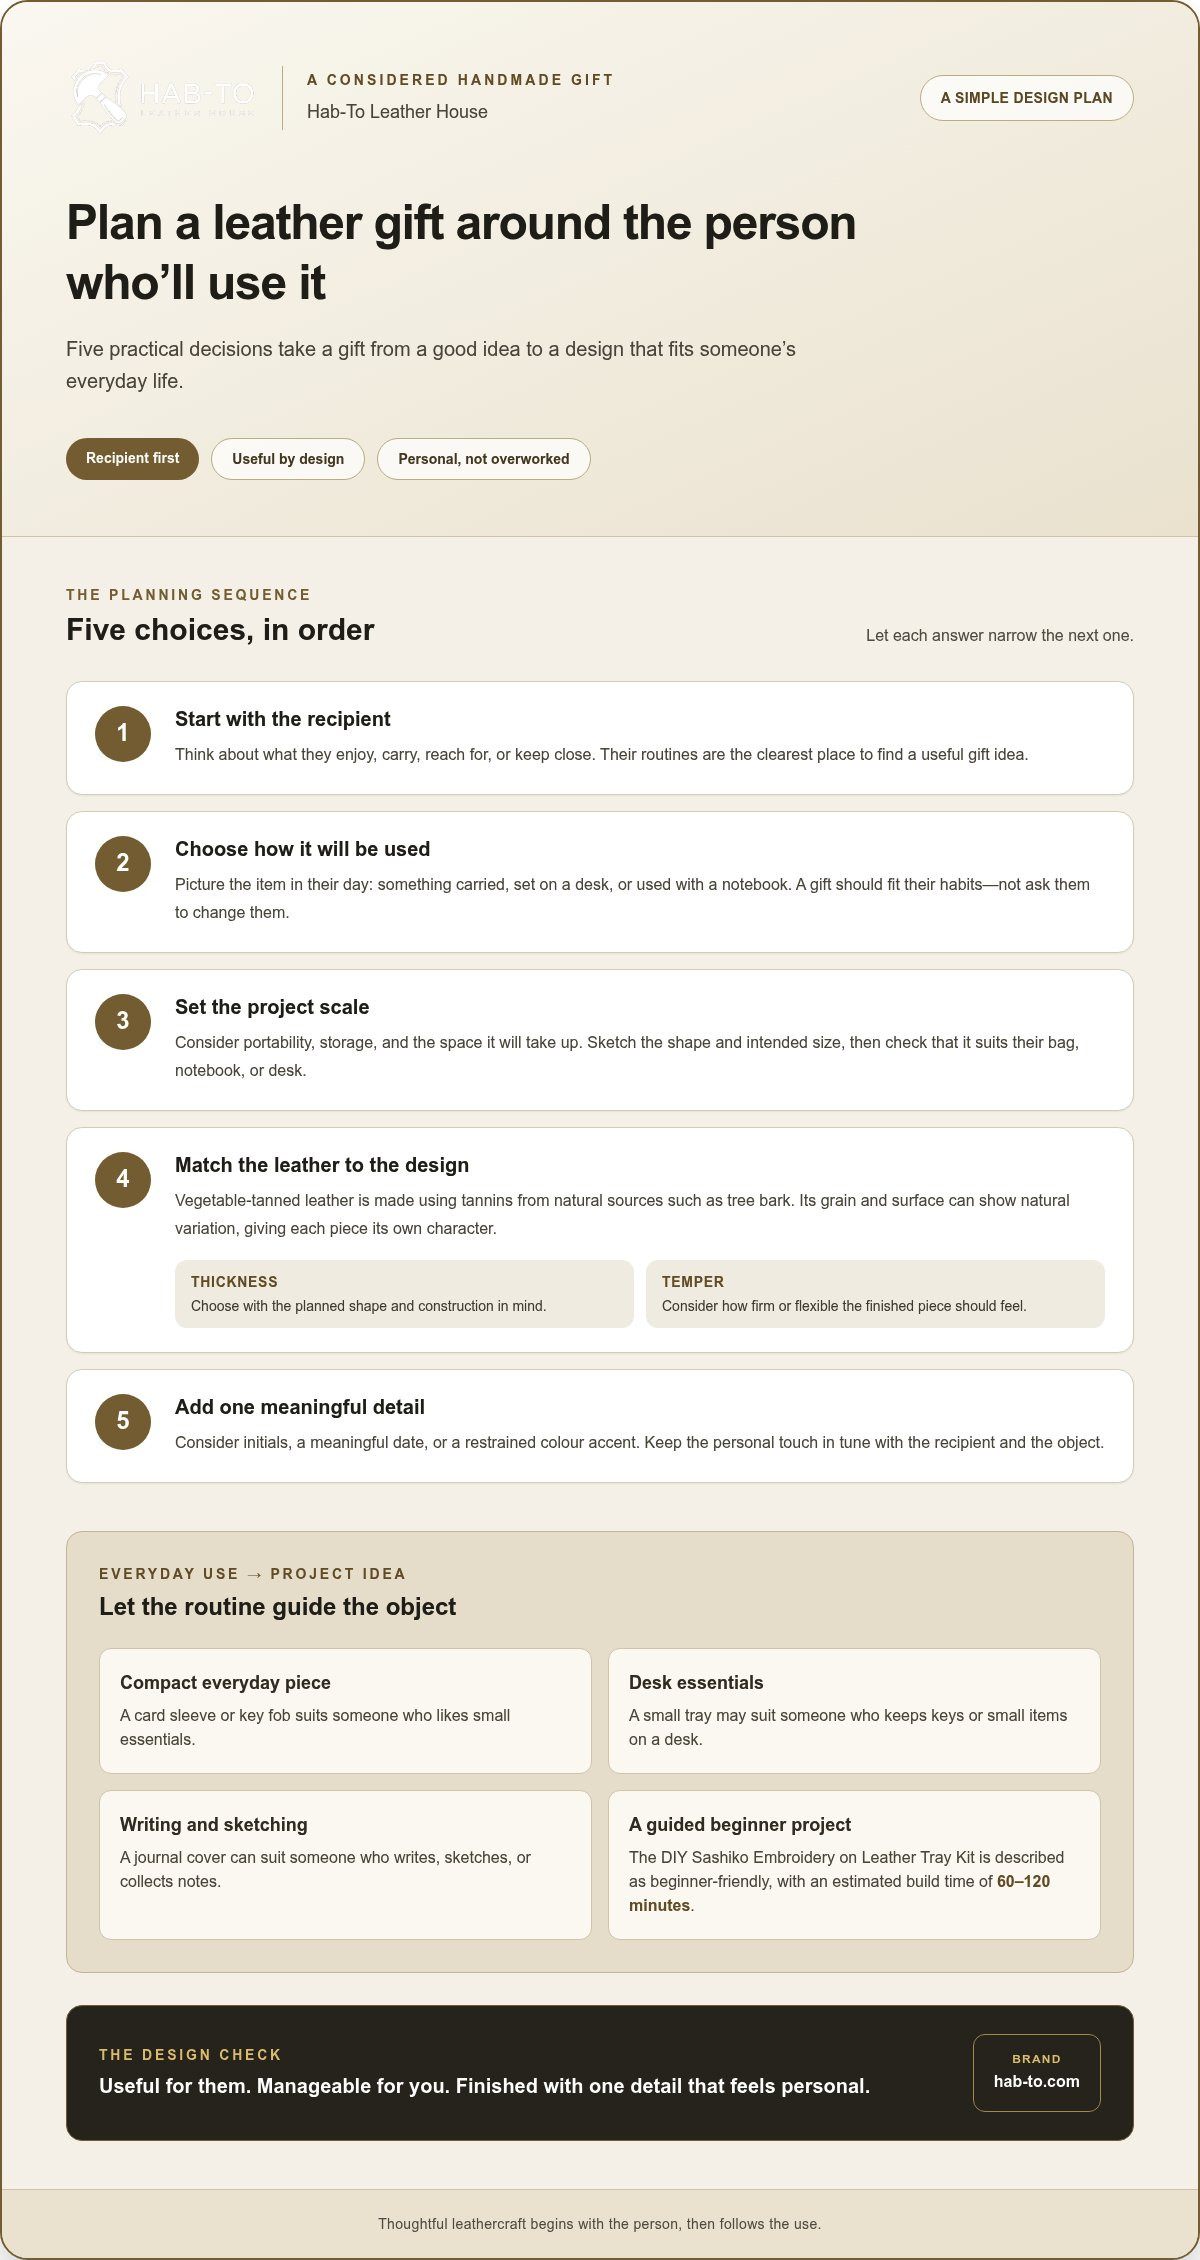
A good design starts with the person, not the leather. Before you cut a pattern, work through these decisions in order. Each one helps narrow the project and choose material that suits the object and the way it will be used.
- Think about the recipient. What do they enjoy, carry, or keep close?
- Choose a daily use. A card sleeve or key fob suits someone who likes compact everyday pieces. A small tray may work better for someone who keeps keys or small items on a desk. A journal cover can suit a person who writes, sketches, or collects notes.
- Set the project scale. Consider portability, storage, and how much space the item should take up. A gift that fits easily into a pocket or bag needs a different shape from a desk object.
- Match the leather to the design. Vegetable-tanned leather is made using tannins from natural sources such as tree bark. Its grain and surface can show natural variation, giving each piece its own character.
- Choose one personal detail. Consider initials, a meaningful date, or a restrained colour accent that complements the design.
Match the gift idea to how the recipient lives
Use is a helpful design filter. If the recipient travels light, keep a card sleeve or key fob compact, without extra features they won’t use. For a desk gift, think about what they set down and how much room they have. A journal cover should suit the notebook they’ll carry, while a small tray needs a place to live when it isn’t in use. The aim is a gift that fits their habits, not a project that asks them to change them.
Also consider how the item will be stored. A piece that needs to fold, stack, or slip into a bag should be planned around those movements. Sketch the intended size and shape before settling on a pattern, then check that it fits the recipient’s usual bag, notebook, or desk space.
Choose leather and personal details with intention
Leather’s colour, surface character, and finish all shape the look of the finished piece. A smooth, even surface creates a different impression from leather with more visible grain variation. Compare the material options in Hab-To Leather House’s leathercraft range, and consider the whole panel rather than choosing by colour name alone.
Thickness and temper, meaning how firm or flexible the leather feels, should follow the design. A small, flexible item and a structured desk piece have different needs, so choose material that works with the shape and construction you’ve planned. Hab-To Leather House offers leather by dm², panel, or shoulder, depending on the leather, with no minimum order requirement. A compact project doesn’t have to mean buying a whole hide. When buying, VAT is included for purchases within the Netherlands and VAT is exclusive for other countries.
Keep personalisation in proportion. Initials or a date can make a clean design feel specific, while a subtle colour accent can add meaning without overwhelming the leather. Choose details the recipient will recognise and enjoy. A considered mark is enough.
Compare DIY Leather Anniversary Gift Projects by Skill, Use, and Personalisation
The right project balances three things: what the recipient will use, what you can confidently make, and where a personal detail will feel natural. Compare the options before choosing. Complexity is relative: a simple shape with few parts is generally easier to plan than a project with several panels, closures, or precise fitting.
| Project | Intended use | Relative making complexity | Personalisation opportunities |
|---|---|---|---|
| Small accessory, such as a card sleeve or key fob | Everyday carry | Often a more approachable starting point because the shape and assembly can be kept simple | Initials, a small colour accent, or a shape linked to the recipient’s interests |
| Desk tray | Holding small items at home or work | Moderate; shaping and securing the corners add steps beyond a flat piece | Choose a colour they like or add a meaningful mark where the design allows |
| Journal or notebook cover | Writing, sketching, or keeping notes | Moderate to more involved, depending on fit, folds, and construction | Initials, a significant date, or a detail connected to their writing habit |
Use the comparison as a guide, not a promise that every version will suit every beginner. A card sleeve with a straightforward design may be manageable, while adding multiple pockets or a closure increases the planning. Make a small test piece if you haven’t cut or stitched leather before. It gives you a chance to practise the motions and see how your chosen material behaves before working on the gift itself.
Which small leather project suits a beginner?
Look for clean shapes and fewer components. A key fob can be a compact way to practise cutting and joining, while a basic card sleeve introduces careful alignment and stitching. These are project ideas, not claims about specific kits. Use suitable offcuts to make a test piece and check your cutting and stitch spacing. Keep the design simple until each step feels familiar.
When is a tray, journal cover, or accessory the better choice?
Choose a tray for someone who’d enjoy a handmade object on a desk or at home. The DIY Sashiko Embroidery on Leather Tray Kit is a ready-to-make example. It includes a pre-cut 1.5 mm vegetable-tanned leather panel, waxed thread, needles, and six silver rivets. The panel opens to 21 × 19 cm and finishes at 14 × 12 cm, approximately 4 cm high. You’ll also need scissors or thread snips, a pricking iron, a small hammer, and a solid work surface.
A journal cover may suit a regular writer or note-taker, but plan around the notebook it needs to fit. For a larger bag-inspired gift, the leather’s role in a bigger project calls for more planning. Explore leather for bags as you consider materials. Whichever direction you choose, browse leathercraft bundles for a practical way to gather supplies for making.
How to Make a DIY Leather Anniversary Gift: A Beginner-Friendly Workflow
A DIY leather anniversary gift comes together more smoothly when you settle the design and gather the right materials before making the first cut. Work through the steps in order, and give yourself room to pause and check your work. Careful preparation matters more than speed.
What You Will Need
- Project-appropriate vegetable-tanned leather: Choose thickness and firmness to suit the shape and construction. Browse Hab-To’s vegetable-tanned leather selection or use a pre-cut panel for a guided project.
- Cutting tools: Use a sharp craft or leather knife, a cutting mat, and a ruler suited to your pattern. Find leather cutting tools for the job.
- Marking tools: Have a pencil, scratch awl, or other suitable marking tool ready to trace the pattern and mark stitch positions. Explore leather marking tools for your setup.
- Stitching supplies: For a sewn project, gather leather needles and thread appropriate to your design with leather stitching supplies.
Explore leathercraft tools for your project and gather only what the chosen design calls for. A prepared kit can simplify the supply list: the DIY Sashiko Embroidery on Leather Tray Kit includes a pre-cut vegetable-tanned leather panel, waxed thread, needles, and six silver rivets. It also calls for scissors or thread snips, a pricking iron, a small hammer, and a solid surface.
Prepare your workspace, materials, and pattern
Choose a stable, clear work surface with enough room to lay out the leather and pattern. Before cutting, check every measurement against the finished design. Then align the pattern so the pieces sit as intended on the hide or panel. Look at the grain, tone, and surface first. Untreated vegetable-tanned leather can have natural variations and visible markings. Consider how these will appear on the finished gift rather than treating every mark as a flaw.
For a kit project, follow its supplied layout and instructions. With a pattern you’ve prepared yourself, mark the outline lightly and check it once more before using the blade. Keep fingers clear of the cutting path, secure the material, and make controlled cuts. If the leather shifts or the line feels awkward, stop and reposition it instead of forcing the cut.
Cut, stitch, and assemble at a comfortable pace
Accurate edges and consistent hole spacing give a handmade piece a considered look. Cut along the marked line with steady pressure, then mark stitching positions carefully so they follow the intended path. Practise on a small offcut before stitching a visible area. You’ll get a feel for the materials and can adjust your hand position without risking the main piece.
For hand stitching, pass the needles through the prepared holes in a steady, repeated sequence, keeping the thread even without pulling it excessively tight. Follow the construction order in your pattern. Joining pieces out of sequence can make later steps harder. Fit components together gradually and inspect the alignment as you go.
Finish by checking the edges, seams, and any added hardware. Work patiently with the tools, and stop if you need to reset your grip or clear the work surface. A measured pace helps you notice small issues while they’re still easy to address.
Finish and Present Your Handmade Leather Anniversary Gift with Care
The last details deserve the same attention as the cutting and assembly. Clean edges, tidy stitching, and a careful inspection help a handmade gift feel complete. You don’t need to hide every natural mark in the leather. Instead, check that the finish looks intentional and that the piece is ready to use.
Check the finished piece before wrapping it
Set the gift down under good light and examine it from several angles. Look for rough or uneven edges, loose or inconsistent stitching, visible glue marks, and surface marks that weren’t part of the material’s natural character. Test any closures or hardware gently, and check that joined pieces sit as intended. If something catches your eye, take time to address it rather than rushing straight to the wrapping.
Choose care that suits the leather and the project. Don’t apply a finish or care product simply because it’s part of your general toolkit. An unsuitable product can change the surface or appearance, so use an approach appropriate to the leather. For the DIY Sashiko Embroidery on Leather Tray Kit, the stated finished size is 14 × 12 cm, approximately 4 cm high. Check that the tray sits as intended and that its corners are secured before presenting it.
Then add a personal note. A few handwritten lines can explain why you chose that particular object, what detail connects it to the recipient, or what you enjoyed about making it. Keep the wrapping simple enough that the leather remains the focus. The note gives the recipient a glimpse of the thought and effort behind the gift, not just the finished form.
Gather materials for your next project
After completing one project, you may have a clearer sense of the leather, tools, and hardware you want to work with next. Hab-To supplies vegetable-tanned leather, leatherworking tools, hardware, and crafting bundles for makers. There’s no minimum order requirement, so you can source materials for a small project without committing to a whole hide. A bundle can also be a practical way to bring supplies together for another handmade gift.
Make Your Next Gift by Hand
A handmade present can be the start of a craft you return to for future celebrations. Choose a project that feels achievable, then let each new make teach you something about your materials and your process. Small improvements add up.
Keep exploring the craft with these related resources:
- Leather crafting techniques and history
- Leathercraft masterclasses
For your next project: A leathercraft bundle can help you bring project materials together without building your supply list from scratch.
Pick an idea that feels right for the person receiving it, and enjoy the making as much as the giving. Start your next thoughtful gift by exploring Hab-To’s leathercraft bundles and choosing supplies for a project you’ll be proud to give.
Frequently Asked Questions
Is leather traditionally given for a third wedding anniversary?
Yes. Leather is commonly associated with the third wedding anniversary, and its character makes it a meaningful source of inspiration. It’s not a rule that limits leather gifts to that milestone, though. A handmade leather present can mark any anniversary if it suits the occasion and the person receiving it. Their preferences matter more than following a prescribed gift tradition or choosing a particular format.
Can a beginner make a leather anniversary gift at home?
Yes. A beginner can start at home with a compact design, a manageable set of steps, and time to work carefully. The DIY Sashiko Embroidery on Leather Tray Kit is a beginner-friendly example, with an estimated build time of 60-120 minutes. That estimate applies to this kit only. Other projects can take more or less time depending on their construction and your familiarity with leatherworking.
What can I personalise on a handmade leather gift?
You can make a gift personal with initials, a meaningful date, a considered colour choice, or a handwritten note explaining why you chose the design. Think about what the recipient would recognise and appreciate. Keep the detail in proportion to their taste and the project’s construction. A small mark may suit a simple accessory, while a note can add meaning without changing the leather itself.
Does vegetable-tanned leather change as it is used?
Yes. Vegetable-tanned leather can develop a patina through exposure and handling, but how its appearance changes depends on the leather and how the item is used. There’s no single colour shift or timeline to expect. The tray kit uses untreated vegetable-tanned leather, so natural differences in grain, tone, and surface markings may be visible from the start. Those variations are part of the material’s individual character.
How long does it take to make a leather anniversary gift?
Build time depends on the project’s size, construction, and your experience. The DIY Sashiko Embroidery on Leather Tray Kit has an estimated build time of 60-120 minutes, but that estimate shouldn’t be applied to other designs. Allow extra time for careful preparation, assembly, and a final inspection. Working without a tight deadline gives you room to check details and make adjustments as you go.
Can I buy leather for one small project instead of a whole hide?
Yes. Hab-To has no minimum order requirement, and leather is offered by dm², panel, or shoulder, depending on the leather. These options can help you source an appropriate quantity for a smaller make rather than committing to a whole hide. If you’re considering samples to compare material, note that sample requests may carry a nominal fee. Formats can vary by leather.
What should I do if the recipient prefers a different material?
Choose a gift that genuinely fits the recipient, even if that means setting aside the leather idea. A handmade present feels thoughtful when its material and purpose reflect the person’s preferences, not just the maker’s enthusiasm for a craft. If leather isn’t right for them, consider a different material or a personal gesture they’ll enjoy using or keeping. The care behind the choice still matters.
Disclaimer
All our blog articles are made for information purposes only we dont take responsability for any content from third parties.