




How to Make a Leather Journal Cover: A Step-by-Step Guide
What if the fit of your journal cover is decided before you make a single stitch? The key to how to make a leather journal cover that fits is to measure your notebook first, then build the pattern around it. A cover that’s too tight can be difficult to use, while extra room in the wrong places can leave it looking loose and uneven.
If you’re unsure how much room to allow, which leather to choose, or how to avoid a crooked cut, a little planning makes the project easier. You’ll learn how to measure your journal, choose suitable vegetable-tanned leather, draft and test a pattern, and stitch the cover securely. We’ll also cover the tools and finishing steps that help you create neat edges and a useful handmade cover. Measure carefully, work steadily, and let the notebook guide the project.
Key Takeaways
- Measure your closed notebook and account for its thickness before drafting the pattern, so the folds land in the right places.
- Choose vegetable-tanned leather with a balance of firmness and flexibility for a cover that holds its shape and folds cleanly.
- Test a paper pattern before transferring it to leather to reduce the chance of costly cutting mistakes.
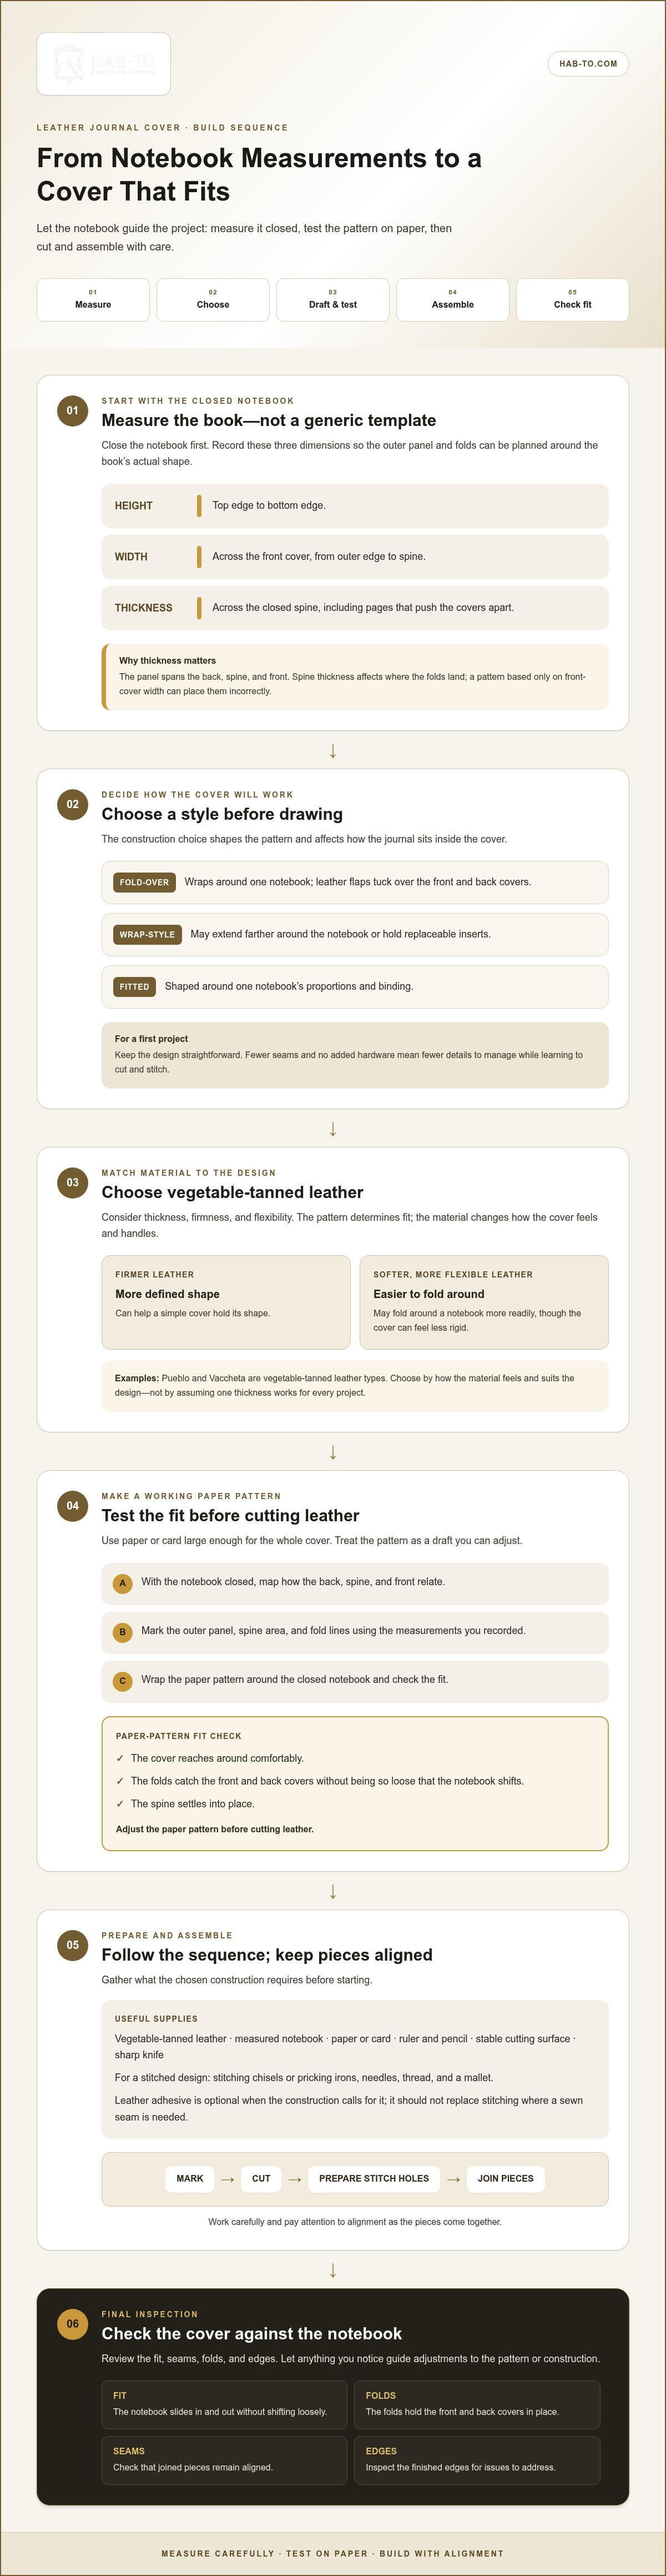
- Follow a careful assembly sequence: mark, cut, prepare stitch holes, and join the pieces with attention to alignment.
- Check the fit, seams, folds, and edges at the end, and use any issues you find to guide adjustments.
How to Make a Leather Journal Cover That Fits Your Notebook
The goal is a protective, reusable cover shaped around the journal you already own. To learn how to make a leather journal cover that fits, start with the notebook’s actual dimensions, not a template made for a different size. A basic design has an outer panel that wraps around the journal, inner folds that hold its covers in place, and an optional closure.
A leather journal cover is a cut-and-folded leather shell made to protect a notebook, with an outer panel, retaining inner folds, and an optional closure. Some designs use one continuous piece; others join separate pieces with stitching. Your construction choice affects both the pattern and how the journal sits inside the cover.
Choose a cover style before drawing the pattern
A simple fold-over cover wraps around one notebook, with leather flaps tucked over its front and back covers. A wrap-style design may extend farther around the notebook or hold replaceable inserts, making it useful for a journal system that changes over time. A fitted cover, by contrast, is shaped around one notebook’s proportions and binding.
Consider how the book opens and how you’ll use it. A bulky spine or frequent page turning can affect where the folds need to sit. For a first project, keep the design straightforward. Fewer seams and no added hardware mean fewer details to manage while you learn to cut and stitch.
Measure the notebook, not a generic template
Close the notebook before measuring it. Record each measurement clearly:
- Height: Measure from the top edge to the bottom edge.
- Width: Measure across the front cover, from the outer edge to the spine.
- Thickness: Measure across the closed book’s spine, including pages that push the covers apart.
These measurements work together. The panel must span the back, spine, and front, while the inner folds need enough depth to grip the notebook covers. Allow enough room for the book to slide in and out without making the folds so loose that it shifts. Thickness is especially important: a pattern based only on the front-cover width may place the folds incorrectly once the leather wraps around the spine.
Draw the shape on paper first. Mark the outer panel, spine area, and fold lines, then wrap the pattern around the closed notebook. Check that the cover reaches around comfortably, the folds catch the front and back covers, and the spine settles into place. Adjust the paper before cutting leather. This simple test is much easier than correcting a misplaced cut. Leatherwork offers many ways to shape and decorate a project, as this overview of leather crafting techniques describes, but a sound fit starts with careful measuring.
Choose Vegetable-Tanned Leather and Gather Journal-Cover Supplies
With your paper pattern ready, choose leather that suits the notebook and the feel you want. Vegetable-tanned leather is a practical choice for a structured cover that you’ll cut, fold, and stitch by hand. The right choice depends on your design, not on a one-size-fits-all thickness rule.
Material choice affects how the cover feels and handles; pattern sizing determines whether it fits the notebook. Keep those decisions separate. Consider the leather’s thickness, firmness, and flexibility, then let your tested pattern guide the cut.
What you will need to make a leather journal cover
Gather your supplies before you begin. The exact tools depend on whether your design uses separate pieces, stitching, or adhesive.
- Vegetable-tanned leather and the notebook you measured
- Paper or card for the pattern, plus a ruler and pencil
- A stable cutting surface and a sharp knife
- Stitching chisels or pricking irons, needles, thread, and a mallet if the design is stitched
- Leather adhesive if your construction calls for it
For marking and making stitch holes, browse the leathercraft tools collection for tools suited to your project. If your design uses adhesive to join pieces, consider Ecostick leather glue. Adhesive is optional and shouldn’t replace stitching where the construction calls for a sewn seam.
Select leather for structure, appearance, and handling
Firmer leather can help a simple cover hold a defined shape. Softer, more flexible leather may fold around a notebook more readily, though the finished cover can feel less rigid. Consider the binding, fold placement, and how often you’ll open the journal. Pueblo and Vaccheta are examples of vegetable-tanned leather types. Choose based on how the material feels and suits your design, rather than assuming a particular thickness will work for every project.
For one journal, a manageable cut or panel sized to your pattern may be enough. You don’t need to buy a whole hide. Hab-To Leather House offers leather without minimum order requirements, making it practical to choose an amount for your project. A curated bundle can also be a convenient way to gather materials for a first cover.
Draft and Test a Leather Journal Cover Pattern Before Cutting
A careful pattern turns your notebook measurements into a layout you can check before the knife touches leather. The closed notebook is your reference: its thickness affects where the spine sits, how far the cover wraps, and where the inner folds need to land. Treat the paper pattern as a working draft, not a fixed template.
Testing the pattern on paper catches fit problems before they become wasted leather.
Make a paper pattern from the closed notebook
Use paper or card large enough to represent the whole cover. Follow this sequence:
- Set the notebook on the paper. With it closed, map how the back, spine, and front relate. Transfer the height and width you recorded, and account for the thickness across the spine.
- Extend the outline. Add the inner flaps that will tuck over the notebook covers. For a wrap-style design, include the extra wrap section in your chosen layout.
- Mark the folds. Draw clear lines at the spine edges and where each inner flap begins. Label the front, back, spine, and folds so the pattern is easy to read later.
- Test and adjust. Wrap the paper around the closed notebook. Check whether the spine area sits naturally, the flaps hold the covers, and the notebook can be inserted without forcing it. Trim or extend the paper where the fit feels too tight or loose, then test again.
Don’t rely on the outer outline alone. The fold lines determine how the cover behaves in use. If they sit too close to the spine, the notebook may resist opening; if they sit too far away, the flaps may not hold securely. Testing with the actual book lets you assess these relationships before cutting leather.
Plan stitching lines and leather layout
When the paper fits, mark any stitch lines and stitching zones on the pattern. Keep each line consistent with the planned seam, and leave enough space between stitching and cut edges for the edge to remain intact. The right spacing depends on your construction and tools, so use the test pattern to check that holes won’t land too close to an edge or fold.
Lay the pattern on the leather before cutting. Check that the full shape fits within the usable area and that the visible surface has the appearance you want. Position the pattern deliberately: the leather’s grain, natural markings, and direction can change how the finished cover looks. Keep the fold lines and stitch marks visible as you transfer the layout.
To make how to make a leather journal cover a smoother process, pause before every major cut. Confirm the pattern’s orientation, the notebook’s fit, and the placement of each fold and seam. Once those checks agree, you’re ready to transfer the design to leather.
Cut, Stitch, and Assemble the Leather Journal Cover
With the paper pattern tested, transfer its outline and construction marks to the leather. Work in order: mark the pieces, cut them, prepare the stitch holes, then join the parts. Before each major cut, check that the pattern is aligned and that the folds and seam marks are where you expect them. A quick check can prevent a piece from being cut to the wrong shape.
Cut and prepare the leather pieces
Hold the pattern steady while tracing around it. Use a marking method that won’t leave unwanted marks on the visible leather surface, and clearly identify fold lines and stitch zones. Set the leather on a suitable cutting surface, keep your free hand clear of the blade’s path, and cut with steady, controlled strokes rather than forcing the knife. Reposition the leather or pattern as needed, then compare the shape with the paper pattern before refining the edges.
Once the pieces align, mark the stitch holes in a straight, even line with a pricking iron or stitching chisel. Keep the tool upright and use a mallet where appropriate. Check that the holes follow the marked seam and don’t stray too close to the cut edge. Consistent spacing helps the finished seam look orderly.
Stitch the cover and check its fit
For a hand-sewn seam, saddle stitching is a useful technique to learn. Cut a length of thread and attach a needle to each end. Pass one needle through the first hole, then send both needles through each following hole from opposite sides, keeping their order consistent. Pull the thread snug after each stitch. Aim for even tension: pulling too hard can pucker or distort the leather, while loose stitches can leave the seam slack.
Before closing a seam that will trap the notebook, or attaching an optional closure, pause for a fit check. Place the notebook in the cover and confirm that the spine settles comfortably, the inner folds hold the covers, and the notebook opens as intended. If something feels tight or sits unevenly, adjust the unstitched area before proceeding. Also confirm that the cover’s front and back are correctly oriented.
Finish the seam with a secure, tidy end, then inspect the stitching for skipped holes, uneven tension, or thread caught across an edge. Accuracy matters more than speed. Each stage of how to make a leather journal cover builds on the last, from clean cuts to a seam that holds its shape through regular use.
Explore leathercraft bundles for your journal-cover project
Finish the Journal Cover, Fix Fit Issues, and Choose Your Next Project
Before calling the cover finished, place the notebook inside and check it in good light. Make sure the folds sit flat, the spine has room to move, and the inner flaps hold the notebook. Look along each seam for missed holes or loose stitches, and inspect the edges and corners for rough spots. A closure or decorative detail is optional. The essential result is a cover that fits, protects the notebook, and opens comfortably.
Burnish and inspect the finished edges
If the leather and construction suit it, you can smooth and burnish the cut edges as an optional finishing step. Follow the guidance for the leather and finishing product you’re using, since results depend on the material and process. Work carefully, then inspect the edges for uneven sections. Test your method on a scrap first rather than assuming every leather responds the same way or expecting a particular finish.
Troubleshoot fit and stitching before personalising
Check one issue at a time during your final inspection. If the cover feels tight, compare the notebook’s thickness with your original measurement, then check whether the fold allowance leaves enough room. If it feels loose, revisit the paper pattern and adjust the folds before making another leather version. Avoid stretching or forcing the leather to compensate for a pattern that needs correction.
- Uneven stitching: Check whether the holes follow a consistent line. Keep thread tension even as you sew, and correct loose or crossed stitches before adding decoration.
- Rough edges: Inspect the full cut line and smooth only where the leather and your chosen finishing method allow it.
- Misplaced folds: Test the cover around the closed notebook again. A fold that sits off the spine can affect both the fit and how the journal opens.
Personalise the cover only after its fit and construction feel sound. A simple stamped detail or an optional closure can give it character, but neither is needed for a functional cover. If you make another, refine your paper pattern based on what you learned, select vegetable-tanned leather suited to the new design, and try a different format, such as a wrap-style cover. That’s a practical next step in learning how to make a leather journal cover with confidence.
Browse beginner leathercraft bundles for materials and tools for your next project.
Put Your Journal-Cover Skills to Work
A well-fitting cover begins with the notebook you’re making it for. Measure carefully, test the paper pattern, and build steadily from there. Those habits make how to make a leather journal cover a repeatable craft, not a one-off guess.
Ready to keep learning? Explore these related topics next:
- Choosing vegetable-tanned leather for a handmade project
- Getting started with hand stitching leather
- Smoothing and finishing leather edges
For your next journal-cover project, find curated beginner bundles alongside vegetable-tanned leather, tools, and other craft supplies. Hab-To Leather House has no minimum order requirements, so you can choose a project-sized amount of leather. If you’d like guidance choosing materials, book a free one-on-one video consultation with Mike, who brings over 25 years of personal leather expertise to the craft.
Take what you’ve learned, refine your pattern, and try another cover style when you’re ready. Each careful cut and stitch builds skill. Choose a leathercraft bundle and get started on your next project.
Frequently Asked Questions
How much leather do I need to make a journal cover?
You need enough leather for the outer panel and any inner flaps or wrap sections in your chosen design. Use your tested paper pattern to estimate the full cut shape, then compare it with the usable area of a leather panel. The amount varies with notebook size and cover style, so there’s no single measurement for every project. For one journal, a project-sized cut may be all you need.
What type of leather is best for a journal cover?
Vegetable-tanned leather is a practical choice for a structured journal cover that you’ll cut, fold, and stitch by hand. Consider its firmness and flexibility alongside your cover design: firmer leather can help the cover hold its shape, while softer leather may fold more readily. The best fit depends on the notebook and construction, not a universal thickness rule. Choose leather you can handle comfortably for the folds and seams.
Can a beginner make a leather journal cover without a pattern?
Yes, but a paper pattern makes the project easier to control, especially for a first cover. Draft one from your closed notebook, mark the spine and fold lines, then test it before cutting leather. Without a pattern, small measuring or alignment errors can affect the fit. If you choose to work directly from measurements, mark each section carefully and check the notebook against the layout before every major cut.
How do I measure a notebook for a leather cover?
Measure the notebook while it’s closed, and record its height, front-cover width, and thickness across the spine. These dimensions help determine the panel size and where the inner folds should sit. Include the spine in your pattern rather than sizing only for the front and back covers. Make a paper draft, wrap it around the notebook, and adjust until the cover fits without forcing the book or leaving the folds too loose.
What tools do I need to hand-stitch a leather journal cover?
For hand stitching, gather stitching chisels or pricking irons to mark holes, a mallet if your tool requires one, suitable needles, and thread. You’ll also need a ruler, pencil, cutting surface, and sharp knife to prepare the leather pieces. Mark the stitch line before making holes, and keep the spacing consistent. The exact tools depend on the leather and seam design, but a simple cover can be made with a focused set of basics. Browse the leathercraft tools collection for tools and supplies for your project.
Do I need to stitch a leather journal cover?
No, stitching isn’t essential for every design. A simple one-piece cover with folded inner flaps may hold the notebook without a sewn seam, while separate pieces or a design that needs extra reinforcement may call for stitching. Let the construction guide the decision. If you do stitch, mark the seam and prepare the holes before assembly so the line stays orderly and the stitches don’t sit too close to the cut edge.
How do I make a leather journal cover fit more than one notebook?
Design a roomier wrap-style cover around the largest notebook you want it to hold, and test it with each notebook before cutting leather. Account for differences in height, width, and spine thickness, then adjust the flaps so they can retain the smaller book too. A cover sized for several notebooks may fit each less snugly than a cover made for one. For a reliable fit, choose notebooks with reasonably similar dimensions.
Disclaimer
All our blog articles are made for information purposes only we dont take responsability for any content from third parties.