




How to Optimize Your Leather Cutting Layout: Plan Every Piece, Waste Less
Optimizing your leather cutting layout starts with the material, not just the pattern. A hide’s shape, grain, and natural marks all affect where each piece belongs, so treating it like a flat sheet can lead to avoidable waste or poorly placed components.
If you’ve ever hesitated before cutting into good leather, you know the pressure: poor placement can waste usable material, but chasing maximum yield can compromise appearance or strength. A thoughtful layout balances all three. It gives visible pieces the character and consistency they need, while reserving suitable areas for parts that carry stress.
In this guide, you’ll learn how to assess leather, map its usable areas, arrange pattern pieces, and account for natural variation before making the first cut. We’ll also look at hand-planning methods and digital layout tools, so you can build a repeatable process that reduces avoidable offcuts without sacrificing the quality of your project. Good planning respects the material and makes every cut count.
Key Takeaways
- Start with the leather’s usable shape and character, then position pattern pieces around grain direction, stretch, marks, and thickness.
- Balance material yield with the appearance and strength each project piece needs instead of treating every area as interchangeable.
- Use a repeatable prepare, inspect, place, review, mark, and cut process, with a paper or digital mock-up before cutting.
- When optimizing your leather cutting layout, group pieces strategically while protecting visible areas and parts that carry load.
- Match the leather and usable area to your project. A panel or shoulder can help you plan without committing to a whole hide.
Optimizing Your Leather Cutting Layout Starts with the Hide
A layout that uses every scrap can still produce a weaker or less attractive piece. But placing patterns without considering the leather can leave good material stranded as offcuts. The goal is to balance yield with the finished project’s appearance and function by inspecting the material before you cut.
A cutting layout is the planned placement of pattern pieces on usable leather. In industrial cutting, this kind of arrangement is called nesting. For leathercraft, it means more than fitting shapes together: you’re matching each piece to an area with the right character, thickness, and working qualities. Layout quality depends on matching each pattern piece to suitable leather.
Start by looking at the leather itself. It isn’t a uniform rectangle, and its shape, edges, surface changes, and natural marks all affect placement. Consider the project, too. A visible bag flap may call for an even, consistent surface, while a small internal component might make good use of an area with a mark that won’t affect its function.
What should you inspect before placing a leather pattern?
Lay the leather flat and take in the whole surface before setting down templates. Note the outline and edges, then look for changes in grain, wrinkles, scars, holes, or other marks. Don’t automatically treat every irregularity as waste. Decide whether it matters for the part you plan to cut.
Set aside areas suitable for prominent or functional pieces, and identify areas better reserved for less visible components or excluded from the plan. Check thickness and temper, too. If a pattern needs to fold cleanly, or a component needs to hold its shape, the leather’s feel and substance may guide where that piece belongs. Compare those qualities with the intended use rather than assuming one area suits every part.
Why a pattern-first approach can waste good leather
It’s tempting to place the biggest template first because it seems like the hardest piece to fit. But that can use up a broad, even area that would have been better suited to a prominent panel, leaving a visible piece to compete for less suitable space. A bag front or flap, for example, deserves deliberate placement, not whatever area remains after smaller or less selective parts have been arranged.
Choose the material with the finished design in mind, then plan around the leather you have. If you’re still weighing up your options, browse our vegetable-tanned leather selection. Selecting suitable material before the blade touches it makes the layout more purposeful, helping you preserve the look and function of the finished piece while reducing avoidable waste.
Understand Hide Shape, Leather Character, and Pattern Placement
Leather doesn’t offer the neat, consistent boundaries of a sheet of paper. Its outline is irregular, and its character can change across the surface. Grain direction, stretch, thickness, and natural marks all influence where a pattern piece belongs. Read those qualities alongside each template’s shape, and you can plan for the finished item rather than simply filling open space.
Nesting is arranging pattern pieces to use suitable leather efficiently. The aim isn’t to fit every piece as tightly as possible at any cost. A good layout considers what each piece must do and how it will look. A concealed pocket and a prominent exterior panel may have very different placement needs.
Match the leather area to the job of each pattern piece
Reserve areas with a consistent appearance for large, visible components, such as a bag front or flap. Check whether the grain runs in a direction that suits the design, especially for pieces that will sit side by side. A mark that’s acceptable on a concealed lining or small internal part may distract on a broad exterior panel.
Function matters just as much as appearance. Straps and other load-bearing pieces need leather suited to their intended use, so consider thickness and how the material behaves before placing them. Don’t assume that the closest open area is the best choice. Match each piece to the qualities it needs, then use areas with acceptable variation for less visible components where appropriate.
Read the pattern before arranging its pieces
Before moving templates onto the leather, study the pattern as a set. Mark which pieces repeat, which need mirrored pairs, where fold lines sit, and whether any design details must face a particular direction. A left and right component may need to be cut as a pair, not treated as interchangeable shapes.
Check seam allowances and overlaps, too. The template’s outline may not show the full leather area required if pieces need to meet, fold, or overlap during assembly. Allow for those requirements in your plan, and keep every piece within the leather’s genuinely usable boundary. An uneven edge can look spacious in a flat layout but may not provide enough sound material for the complete pattern shape.
As you optimize the layout, make choices in this order: suit the leather to each piece’s function, preserve the intended appearance, then look for ways to reduce leftover space. If you’re planning your project materials together, explore leathercraft bundles for a convenient way to bring supplies together.
Compare Cutting Layout Strategies Without Sacrificing the Finished Piece
A yield-first layout aims to fit as many pieces as possible into the available leather. That can work well for small components with flexible placement, but it may use a clean, consistent area for a part that doesn’t need it. A function-first layout assigns leather according to each piece’s appearance and job, then looks for efficient ways to place the rest. For a bag, that might mean reserving the best-matched area for the exterior panels before fitting smaller parts around them.
The tightest layout isn’t always the best layout. Rotating or flipping a template can close gaps, but only do so if the design allows it and the leather’s grain direction, stretch, and appearance still suit the piece. A strap that changes direction or a mirrored pair that no longer matches may save space while compromising the result. Optimizing your leather cutting layout means finding a sensible balance, not eliminating every gap.
When should you prioritize yield, appearance, or strength?
Let each piece’s role guide its placement. Prioritize visual consistency for large exterior panels. Choose material that suits the intended function for straps, closures, and other load-bearing parts. Small or concealed components can make good use of leftover areas, provided the leather’s character and thickness remain appropriate. Group similar pieces when their requirements match; separate them when grouping would put a visible face or functional part in an unsuitable area.
How do layout approaches change by project type?
Different projects call for different priorities. Use the finished design as your guide, then adjust the layout strategy to suit the parts that matter most:
- Bags: Place the main panels first, checking that their appearance works together. Fit gussets, straps, and smaller components around them without sacrificing the leather qualities those parts need.
- Belts: Plan for the full usable length of the strap and a consistent appearance along it. Don’t break the strap into shorter sections just to fill gaps unless the design calls for that construction.
- Small accessories: Group compact templates to use space efficiently, but protect visible faces and edges from marks or unsuitable grain direction.
For a bag project, comparing your pattern plan with vegetable-tanned leather for bags can help keep material choice and placement decisions aligned. Make those decisions before cutting. A little open space in the layout is a worthwhile trade if it preserves the look, fit, or function the finished piece requires.
Follow a Repeatable Step-by-Step Leather Cutting Layout
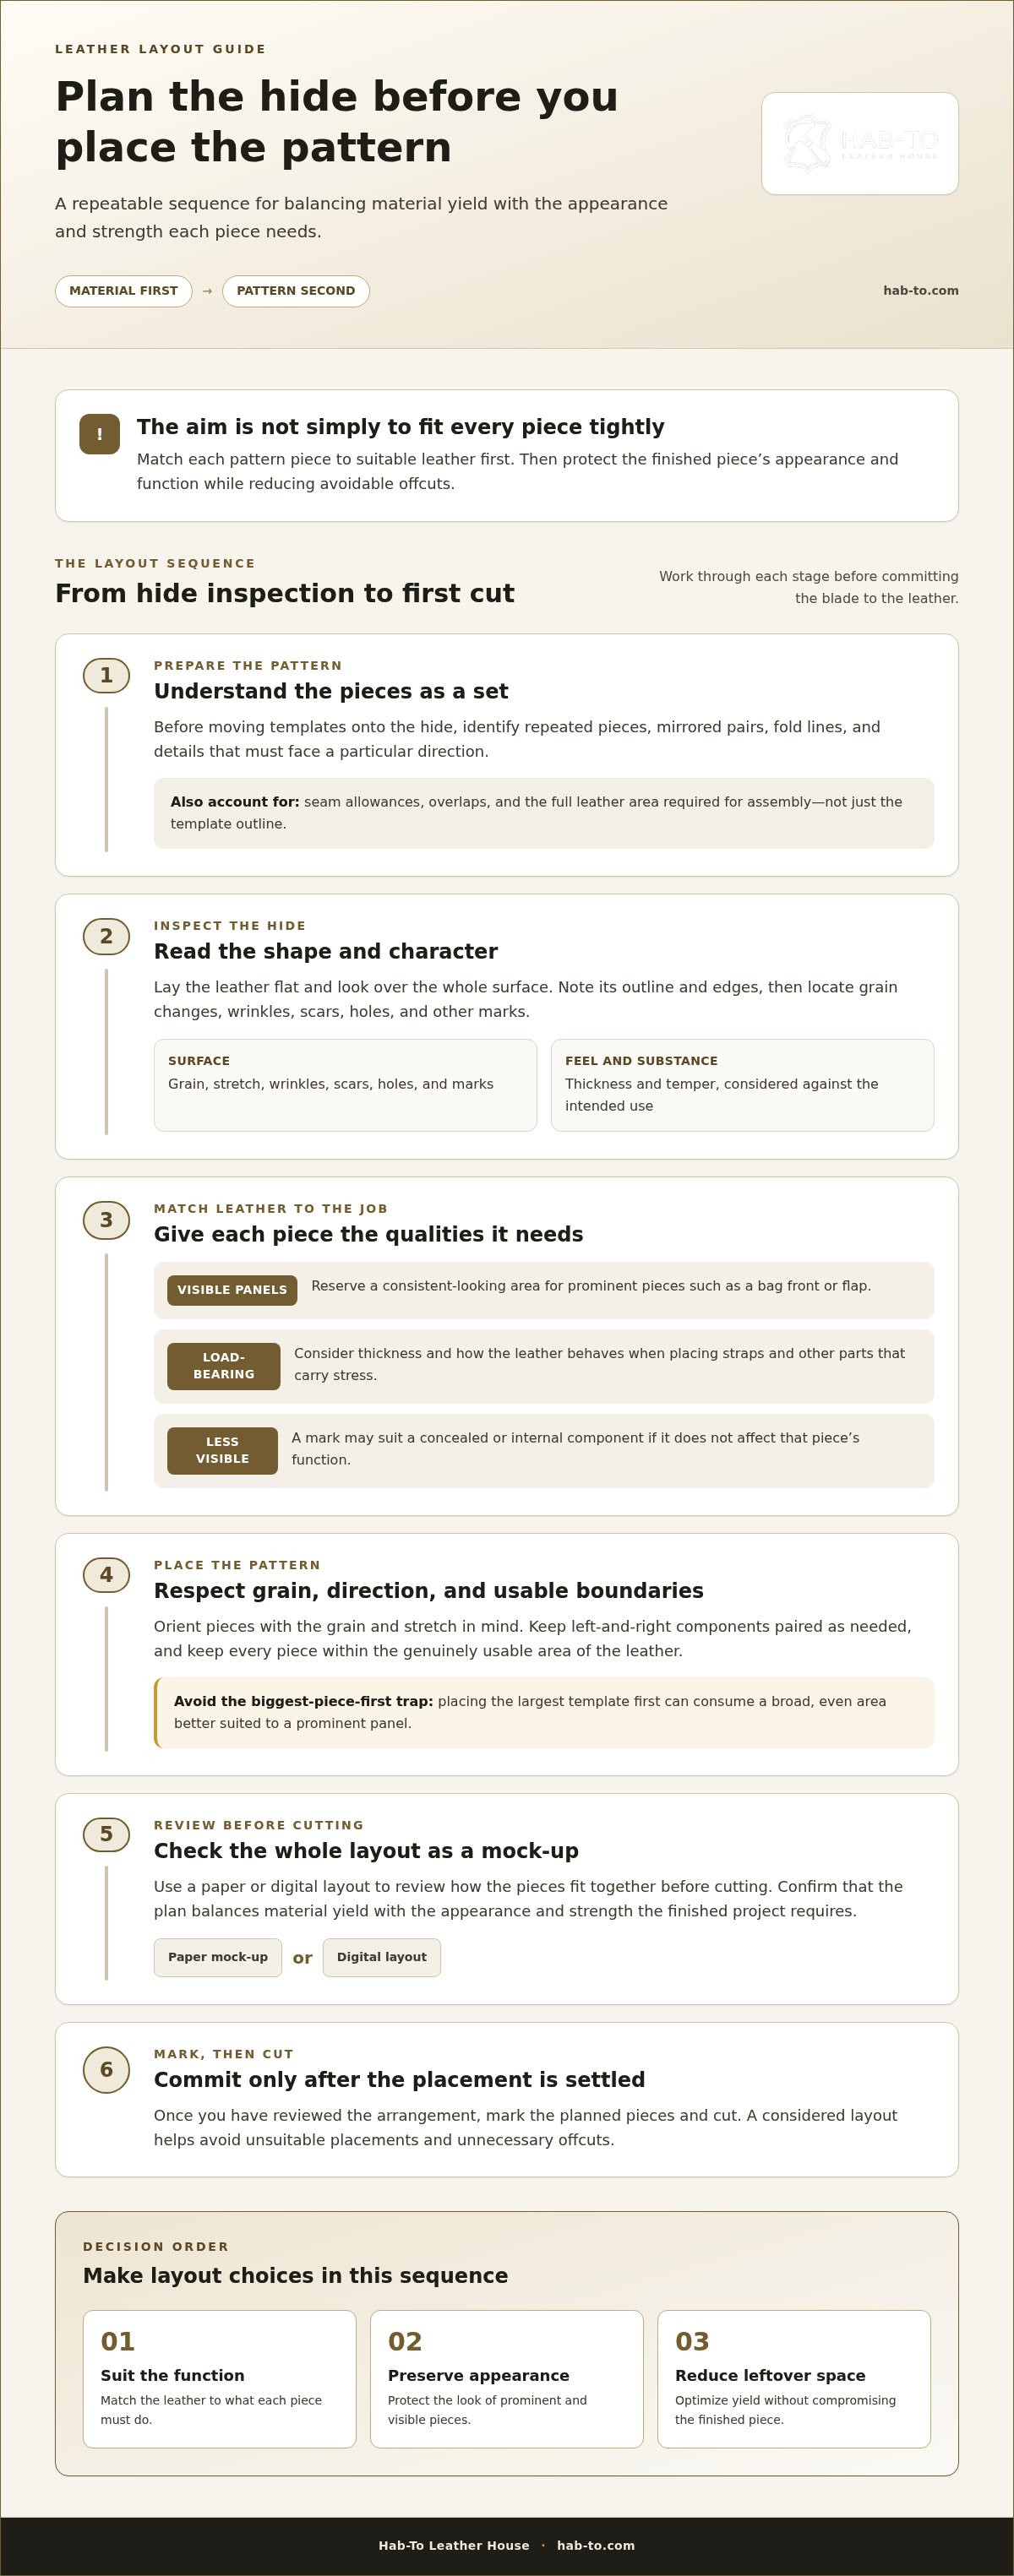
A consistent routine helps you catch placement problems while the leather is still intact. Before cutting, make a paper or digital mock-up of the pattern on an outline that reflects the usable shape of your leather. Test arrangements there first. You can adjust pieces freely without committing them to the material.
What you will need to plan and cut
Gather your materials before laying out the pattern:
- Your complete project pattern, including repeated or mirrored pieces.
- Vegetable-tanned leather suited to your project.
- A ruler, pencil, and stable cutting surface for measuring and marking.
- A sharp knife or suitable scissors for the shape and type of cut. Browse leathercraft tools for cutting tools and other workshop equipment.
Leave enough room around the leather to guide your chosen tool steadily along each template.
Mark, review, and cut in a controlled order
Follow the same sequence for each project. Resist the urge to move directly from placing templates to cutting:
- Prepare: Gather the full pattern and note pieces that repeat, mirror, fold, or need an allowance. Make your paper or digital mock-up.
- Inspect: Lay the leather flat and identify its usable boundary, marks, and changes in surface or thickness.
- Place: Arrange each pattern piece according to its function and appearance. Check grain direction and any details that must face a particular way.
- Review: Confirm every piece fits within the usable area. Check orientation, repeats, seam allowances, overlaps, and that you have room to guide the cutting tool. This final pre-cut check is your last opportunity to catch placement errors.
- Mark: Once the positions are approved, hold each template steady and trace its outline. Don’t mark a piece until its orientation is settled.
- Cut: Start with the large, important pieces whose placement you’ve reviewed. Then cut the remaining parts from their planned positions, keeping the leather supported.
Afterward, sort the offcuts by size and potential future use rather than putting them all in one pile. Keeping useful remnants organized makes them easier to consider in a later project.
For your next project, browse leathercraft bundles and bring together useful supplies for your workbench.
Choose Project-Suitable Leather and Make Your Layout Repeatable
Start with the finished design. Identify the thickness, firmness, surface character, and usable area each pattern piece calls for, then use that information to shape your cut plan. This keeps material selection connected to the actual project instead of relying on a guessed yield.
No fixed project count applies to every hide, panel, or shoulder. Natural shape and variation affect what you can use. If you don’t need a whole hide, buying vegetable-tanned leather by dm², panel, or shoulder can help you plan around your project. Hab-To Leather House has no minimum order requirement.
Select leather around the project, not a guessed yield
Compare the pattern’s requirements with the leather’s character. A structured component may need different firmness from a piece that folds, while a visible panel may benefit from a consistent surface. Plan the layout within the material’s usable area, and browse the vegetable-tanned leather collection as you choose material for your project.
Turn a successful layout into a repeatable workshop habit
Save a simple diagram of each successful layout. Note pattern positions, orientation, material observations, and which areas worked well for visible panels or smaller components. Record useful offcut sizes and possible future uses, too. These notes won’t make the next piece of leather identical, but they give you a practical starting point and help refine future cut plans.
With each project, you’ll build a clearer record of what works. Use it to plan your next layout with care, while adapting to the character of the leather in front of you.
Plan Your Next Cut with Confidence
A strong layout starts with the leather, not with the biggest pattern piece. Inspect the material, match each component to suitable areas, and balance efficient use with the appearance and function of the finished project. A paper mock-up and a deliberate final review can catch placement issues before the blade touches the leather.
Make the process repeatable. Save a simple layout diagram, note useful offcut sizes, and record which areas worked well for visible or functional pieces. Each project gives you practical information to guide the next one, while leaving room to adapt to the natural character of a new piece of leather.
At Hab-To, we bring over 160 years of family leather expertise to makers, and founder Mike has over 25 years of personal experience. We offer vegetable-tanned leather by dm², panel, or shoulder, with no minimum order, so you can plan around your project rather than a whole hide.
Take your time with the plan. Browse our vegetable-tanned leather and leathercraft supplies, then make each cut with purpose and enjoy bringing your next project to life.
Frequently Asked Questions
How do I arrange leather patterns to reduce waste?
Start by inspecting the leather and assigning suitable areas to visible, structural, and smaller pieces. Place the most important components first, then fit the remaining templates into appropriate open areas. Check grain direction, stretch, surface marks, and seam allowances before tracing. When optimizing your leather cutting layout, use suitable material thoughtfully rather than forcing every pattern piece into a space that compromises its appearance or function.
Should leather pattern pieces follow the grain direction?
Consider grain direction and stretch when placing each piece, especially straps or components that need consistent performance. The right orientation depends on the leather, pattern, and intended use. Avoid rotating a template solely to fill an open space. Compare how the material behaves across the area, and keep the orientation consistent where the design or function calls for it. This helps preserve the intended look and performance of the finished piece.
Can I rotate or flip a leather pattern piece to save material?
Sometimes, but only if the design, grain direction, and visible finish allow it. Check whether the piece is directional, mirrored, or intended to show a particular surface. Flipping a template can change its appearance or create a mismatched pair. Test the placement with paper first, then confirm the orientation on the leather before marking. If the new position affects fit, symmetry, or function, choose a different arrangement.
How do I account for natural marks when planning a leather cutting layout?
Inspect the full usable area before placing templates. Decide which marks are acceptable on concealed or smaller components and which might distract on prominent panels. Natural variation isn’t automatically a defect; judge it against the project’s finish and your own preference. Keep the most visually consistent areas for pieces where appearance matters, and place other components only where the leather’s character remains suitable for their intended use.
Is the tightest possible leather layout always the most efficient?
No. A layout that uses the smallest area can still produce a poor result if it ignores grain, stretch, visible marks, or a component’s purpose. Efficiency means using suitable leather thoughtfully, not fitting every template wherever it happens to fit. An appropriate offcut may be more useful than compromising a prominent or functional piece. Prioritize the finished project, then reduce avoidable waste within those requirements.
How much leather should I buy for a project?
Start with the complete pattern, including repeated pieces, seam allowances, and components that need to be cut more than once. Arrange the templates on a mock-up that reflects the leather’s actual shape, not just a rectangle. Usable boundaries and natural variation affect the plan, so there’s no universal quantity or yield estimate. Optimizing your leather cutting layout before buying can help you estimate the material area your design needs. Hab-To sells vegetable-tanned leather by dm², panel, or shoulder, with no minimum order requirement.
What should I use to mark leather before cutting?
Choose a marking method suited to the leather’s surface and the finish you want, then test it on an inconspicuous offcut. A ruler and pattern template help keep lines and dimensions controlled. Check that marks won’t remain visible on the finished piece. Once placement, orientation, and allowances are confirmed, trace carefully and cut on a suitable surface with a tool appropriate to the shape and cut.
Can I plan a leather project using panels instead of a whole hide?
Yes. A panel or shoulder can suit a project when its usable shape and area fit the complete pattern. Arrange all pieces before cutting, giving particular attention to prominent panels and functional components. Hab-To offers vegetable-tanned leather by dm², panel, or shoulder, with no minimum order requirement. This lets makers plan a material purchase around a project without needing to commit to a whole hide.
Disclaimer
All our blog articles are made for information purposes only we dont take responsability for any content from third parties.