

How to Use Tokonole and Which Tools to Burnish Edges
A clean burnish starts with restraint. Knowing how to use Tokonole means applying a small drop to the leather edge, spreading it carefully with a fingertip, and keeping it off the leather face. Then move a leather slicker back and forth along the edge to smooth the fibers.
It’s easy to apply too much or let the finish stray onto the surface. A controlled, narrow application helps keep the face clean, especially if you plan to apply a top coat later. Take your time and add only enough Tokonole to cover the edge.
This guide walks through application step by step, including ways to control the finish and tools that make burnishing easier. You’ll learn when a fingertip, foam swab, or roller may suit the job, how to choose a slicker groove for your leather’s thickness, and why edge preparation matters. The goal is a smooth, even edge without turning a small finishing task into a cleanup job.
Key Takeaways
- Learn how to judge the amount of finish an edge needs, rather than applying more than the fibers can take.
- Understand what to look for before burnishing, and how drying conditions affect the next step.
- Find out how to approach flesh-side leather and suede, where the surface can respond differently.
- Use careful application and preparation to reduce the risk of unwanted darkening or marks on the leather.
- Explore practical ways to handle dried residue and clean up without making a small finishing problem worse.
How much Tokonole should you apply to a leather edge?
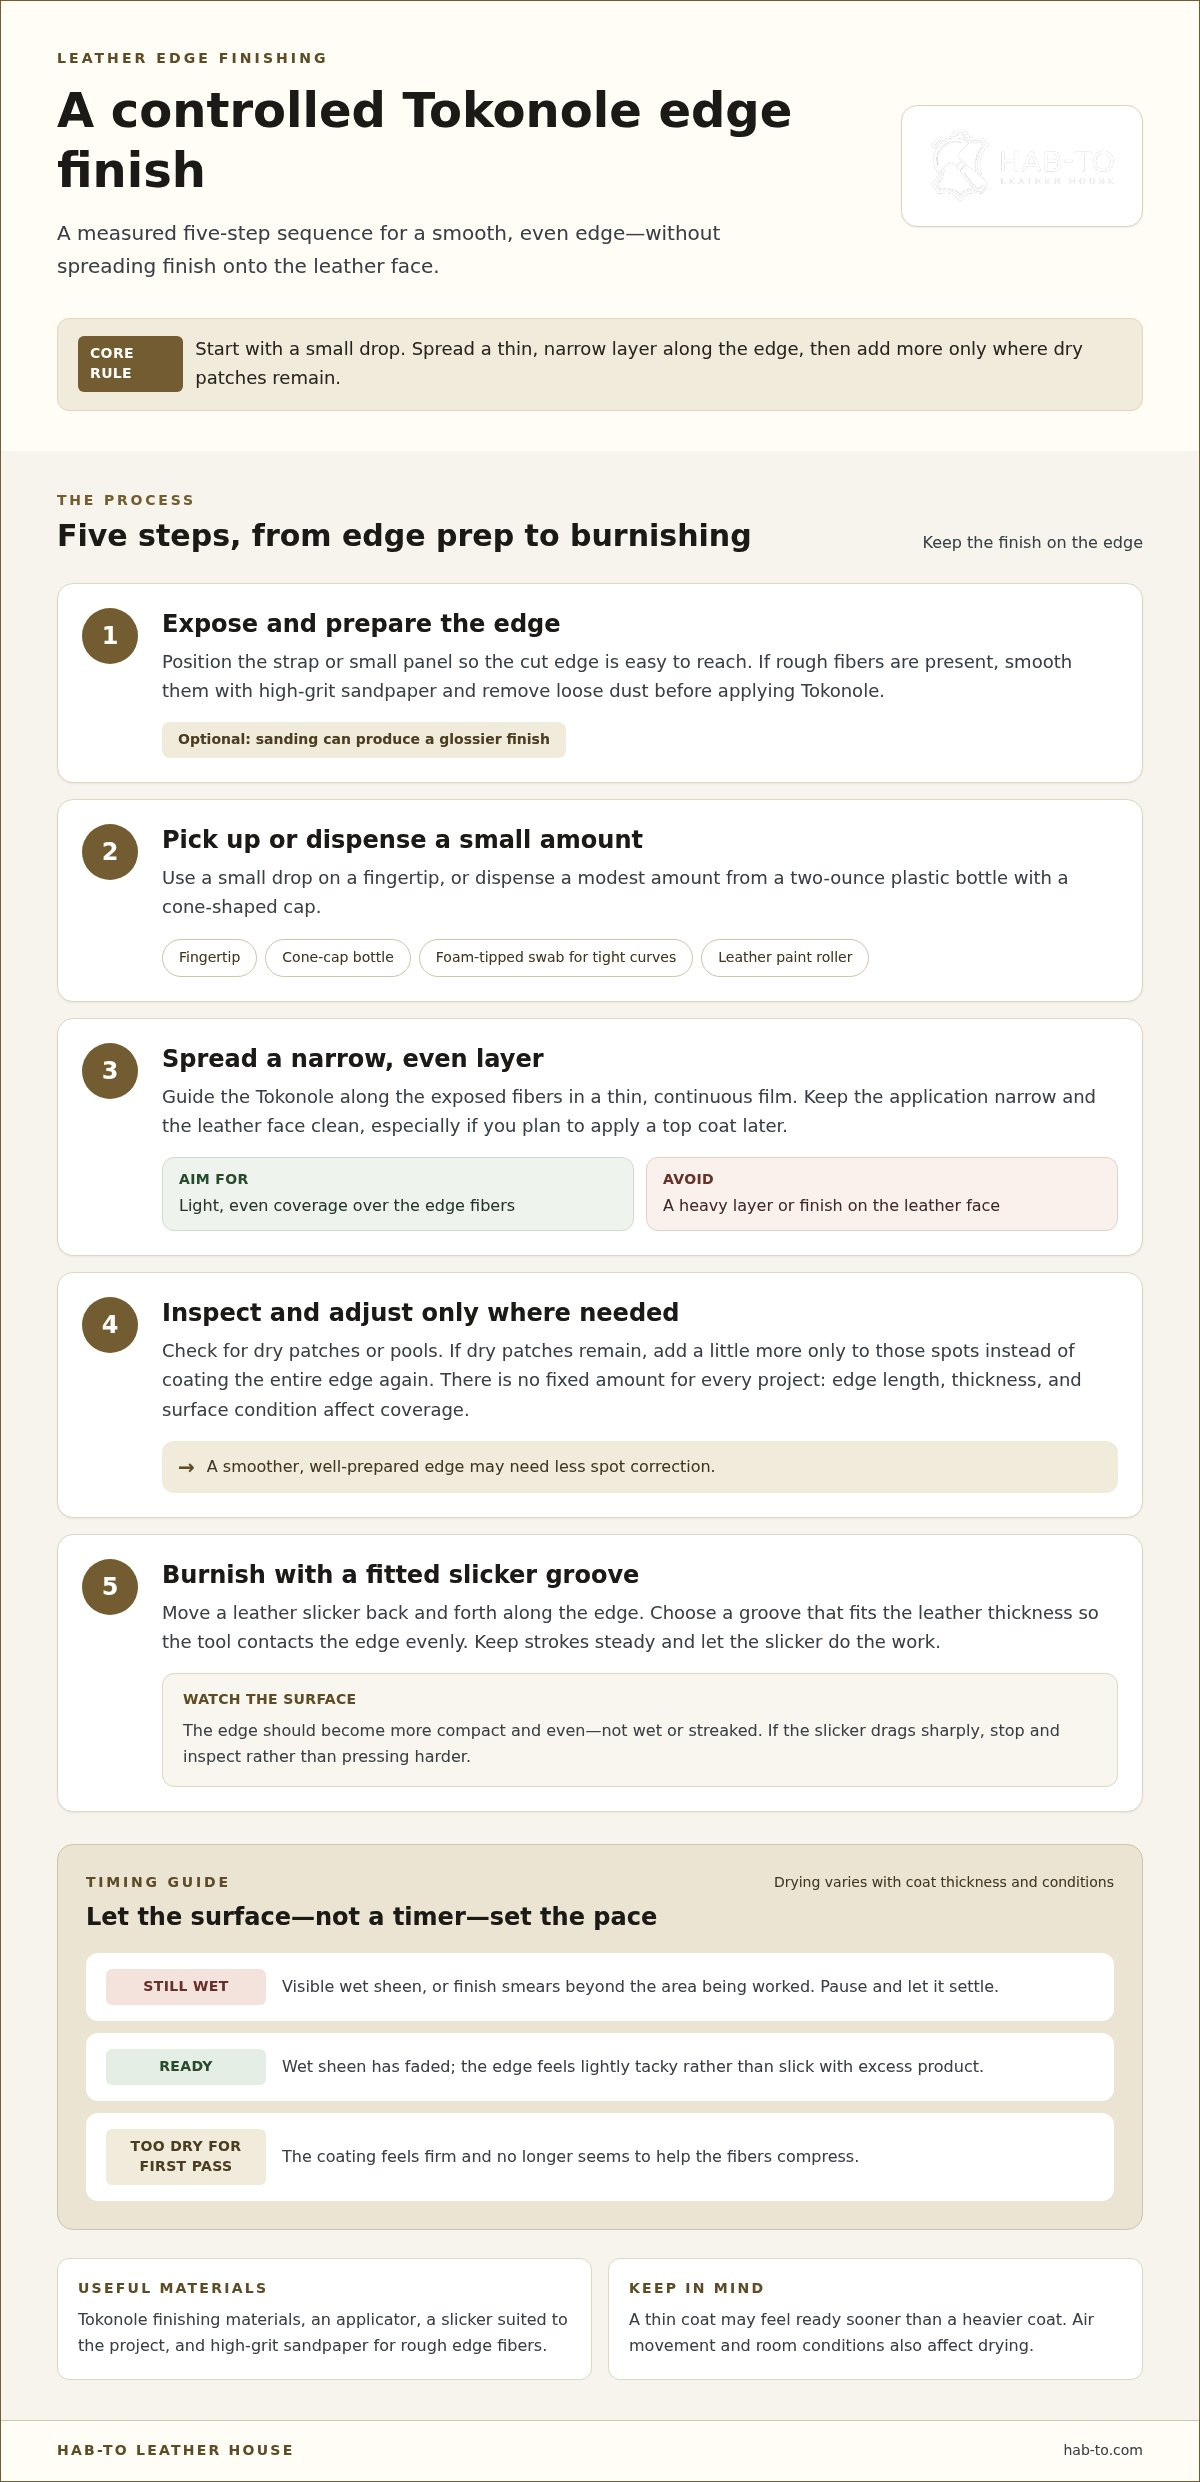
Start with a small drop of Tokonole, not a thick coating. Pick up a small amount with a fingertip, spread it across the edge, then burnish. Aim for a light, even film over the exposed fibers. If dry patches remain, add a little more only to those spots instead of coating the entire edge again.
Apply it with control. A two-ounce plastic bottle with a cone-shaped cap can dispense Tokonole directly onto the edge. Spread it with a fingertip, keeping the application narrow. The leather face should stay clean, since edge finish there can cause problems during top-coating.
What You Will Need
- Tokonole finishing materials for edge work.
- Leatherworking tools, including an applicator and a slicker suited to your project.
- High-grit sandpaper for preparing rough edge fibers before burnishing.
Use this sequence on a strap edge or small leather panel:
- Position the piece so the cut edge is exposed and easy to reach.
- Pick up a small drop with a fingertip, or dispense a small amount from the cone cap.
- Spread Tokonole in a narrow, continuous layer along the edge.
- Inspect for dry patches or pools, then adjust only where needed.
- Move a leather slicker back and forth, using a groove that fits the leather thickness.
Other applicators can help with narrow or awkward edges. A foam-tipped cleaning swab can reach a tight curve, while a leather paint roller offers another way to distribute the finish. Use either to transfer a modest amount, then spread it evenly. An overloaded swipe can reach the face or leave excess product on the edge.
Preparation affects how much Tokonole you need. If the edge has rough fibers, smooth it with high-grit sandpaper first, then remove loose dust before applying the finish. A smoother edge may need less spot correction. Inspect as you work instead of adding a heavy layer by habit.
There’s no fixed amount for every project. Edge length, thickness, and surface condition all affect coverage. Begin with a small drop, spread it thinly, and add more only where the edge remains uneven. Keep the finish on the edge and let the slicker do the work.
For a fingertip application, pick up a small drop of Tokonole, smear it onto the leather edge, and burnish the edge. Treat these actions as one measured sequence: collect the small drop, place it on the edge, spread it with the fingertip, and then burnish. The recommendation is to begin with a small drop rather than a larger amount. Keep the smear directed along the edge as you spread it, and use the fingertip to guide the Tokonole across the edge before burnishing.
A small plastic bottle with a cone-shaped cap is another way to dispense Tokonole. The bottle described for this method is two-ounce. Dispense Tokonole from the bottle onto the edge, then spread it across the edge with a fingertip. This keeps the same basic order of work: pick up or dispense a small amount, spread the Tokonole along the edge, and burnish. The cone-shaped cap serves as the dispensing option; the fingertip is used to distribute the product. Whether you begin with a fingertip drop or dispense from the bottle, the method is to spread the Tokonole over the edge and burnish it.
How long does Tokonole take to dry before burnishing?
Judge the edge by its surface rather than relying on a fixed timer. Tokonole is water-based, so moisture settles as you work. A thin coat on a narrow edge can feel ready sooner than a heavier coat on a broad edge. Air movement and room conditions also affect drying. Use the surface’s feel beneath your burnishing tool as your cue.
Begin when the edge no longer looks wet but still feels slightly tacky. This lets the fibers compress under a slicker. If the surface looks glossy-wet or product shifts ahead of the tool, pause and let it settle. Burnishing too early can spread the finish; waiting until it forms a hard film can make the first pass less effective.
Use these surface cues to decide when to proceed:
- Still wet: The edge has a visible wet sheen, or finish smears beyond the area you’re working.
- Ready to burnish: The wet sheen has faded, and the edge feels lightly tacky rather than slick with excess product.
- Too dry for the first pass: The coating feels firm and no longer seems to help the fibers compress.
When the edge is ready, run a leather slicker back and forth along it. Choose a groove that fits the leather’s thickness so the tool contacts the edge evenly. Keep your strokes steady. If the slicker drags sharply, stop and inspect the surface rather than pressing harder. More pressure won’t correct the wrong moisture level.
On a short strap edge, check the finish after each pass. The surface should become more compact and even, not wet or streaked. On a longer panel, inspect sections as you work. The first area may change while you finish another, so don’t assume the whole edge is drying uniformly. Let the surface guide your pace.
If the edge becomes completely dry before you begin, apply a small amount of Tokonole from the finishing bundle range to that area and reassess its feel. Avoid adding more while it remains wet, since excess finish can smear and make burnishing uneven. A measured pause followed by a light touch helps keep the edge under control.
Sanding a leather edge with high-grit sandpaper before burnishing can produce a glossier finish. If that’s the look you want, prepare the edge this way before applying Tokonole; otherwise, you can skip this step. Decide on the desired appearance before you begin, and use the surface cues to guide your timing.
Can you use Tokonole on flesh-side leather and suede?
Yes. Tokonole can help lay down loose fibers on a leather flesh side, the suede-like underside opposite the grain. The aim is to flatten and bind the surface fibers, not create a polished grain finish. Results depend on the leather’s nap, density, and condition. A firm flesh side may smooth readily, while a long, soft nap can remain visibly textured after burnishing.
Use more restraint with suede. Its raised nap is part of its appearance, so applying Tokonole across the whole panel can change the texture and leave uneven-looking areas. To preserve the nap, avoid coating the visible surface. If your project calls for a smoother, compressed patch, test the treatment on a matching offcut first. Compare the treated and untreated areas in the same light before proceeding.
For a small area on the flesh side, work methodically:
- Brush away loose dust and fibers so they don’t become trapped under the finish.
- Apply a thin layer of Tokonole to a limited section, keeping it away from the grain side.
- Use a slicker or another smooth burnishing tool to press the fibers down with even strokes.
- Let the area settle, then inspect for streaks, stiff patches, or fibers that remain raised.
- Repeat only on areas that still need smoothing, rather than coating the whole piece again.
A foam-tipped swab can help apply Tokonole along a narrow seam allowance or a small interior panel. On a broad suede panel, careful application matters even more. Move the applicator with the nap, and avoid rubbing finish into surrounding areas. A leather slicker can compress fibers, but heavy pressure may leave a shiny track that stands out against the surrounding suede.
Decide whether you want a smooth finish or the original feel. A bag interior or hidden flesh-side seam may benefit from a neater, flatter surface. A visible suede panel may need its soft nap left untouched. For a strap with an exposed underside, treat a short section of scrap first, then compare its feel and appearance with the untreated leather.
These distinctions shape how to use Tokonole on fibrous leather: decide whether you want to flatten the nap, keep the application contained, and assess the result before treating a larger area. A small test patch is especially useful on suede. It shows whether the finish suits the project’s texture before you change the visible surface.
How do you prevent Tokonole from darkening or staining leather
Keep Tokonole on the edge, not the grain face. The leather face can show a mark if finish spreads beyond the cut edge, and residue may interfere with top-coating. A narrow application, a steady hand, and a clear view of the edge help prevent accidental transfer. On a finished wallet panel, protect the visible surface before beginning.
When appearance matters, start with a scrap from the same hide. Apply Tokonole to its edge, burnish it, then compare the treated piece with the untouched leather under the same light. This shows how that specific leather looks after contact with the finish. It’s especially useful when working with pale, unevenly colored, or highly textured leather.
Set up your work so the applicator approaches the edge cleanly:
- Place the leather flat, with the edge exposed and the grain face supported.
- Use a fingertip, foam-tipped swab, or narrow applicator to control placement.
- Apply along the cut edge in short, deliberate strokes instead of sweeping across the panel.
- Check the grain face as you work, especially near corners and curves.
- Keep the burnishing tool aligned with the edge so it doesn’t push finish onto the surface.
For a curved bag flap or strap end, turn the leather as you follow the curve. Don’t twist an applicator across the face to reach a difficult spot. A foam swab can help apply Tokonole near a tight corner, while a fingertip offers direct control on a straight edge. Use only enough finish to cover the exposed fibers, then inspect before adding more.
Masking can create a physical boundary beside the edge. Place low-tack tape on the grain face, close to the cut line, without covering the edge itself. Press the tape down gently, apply Tokonole, then remove the tape carefully before burnishing. Test the tape on scrap first, since adhesive may affect some finishes or delicate surfaces.
If a damp-looking area appears, stop applying Tokonole and avoid rubbing it across the leather. Let the area settle, then assess its appearance before continuing. Don’t add more to the face in an attempt to blend a mark. If you plan to apply a top coat, keep the face free of edge finish from the start. This separation helps prevent stains and coating problems.
How do you clean up or remove dried Tokonole
First identify where the dried Tokonole sits. A raised bead on an unfinished edge is different from a mark on the grain face. You can work directly on the edge, while the face needs a gentler approach. Since Tokonole is water-based, avoid aggressive solvents that could affect the leather’s finish.
For a small, dry excess on an edge, start with a clean, dry cloth. Rub lightly along the edge, not across the face. If residue remains, use fine sandpaper with short, controlled strokes. Keep the abrasive on the edge itself, and stop often to inspect the leather. Sanding can change the edge’s shape and sheen, so remove only the raised material.
Use this sequence to address a dried spot on the grain face:
- Test your cleanup method on a matching scrap or hidden area first.
- Wipe the mark gently with a clean, dry cloth.
- If residue remains, dampen a cloth slightly with water and blot the spot.
- Use a fresh, dry section of cloth to lift moisture without spreading the mark.
- Let the test area dry fully, then compare its color and finish with nearby leather.
Keep the cloth barely damp. Don’t soak the leather or scrub a visible panel. Water can change how leather looks while damp, and friction can spread residue or disturb a surface finish. A scrap test is especially useful on dyed or coated leather: it shows how the specific material responds before you touch the finished project.
For dried Tokonole on suede, avoid rubbing the spot outward. This can push residue deeper into the nap and enlarge the affected patch. Carefully lift loose material with a dry cloth, then assess the texture. Don’t scrape the nap with a blade. If the mark is on a finished face, use the same cautious, test-first approach rather than applying more Tokonole to disguise it.
After cleaning an edge, inspect it under good light. If sanding has left the edge rough, smooth it with high-grit sandpaper before burnishing again. Apply a small amount of Tokonole only to the edge, then work it with a leather slicker. On a grain-face mark, stop if the test leaves a color or texture change. For a wider leathercraft setup, browse the available leathercraft bundles.
Hab-To Leather House: Vegetable Tanned Leather
Hab-To Leather House helps leatherworkers bring edge-finishing techniques into their own projects with vegetable-tanned leather, leatherworking tools, leather hardware, and crafting bundles. If you’re practising Tokonole application, choose a piece suited to your project and build your process around its edge and surface.
Explore Hab-To Leather House’s materials and tools as you prepare a new project or refine your workshop setup. The right leather gives you a surface to practise on; the right tools support careful, consistent work. With no minimum order requirements, you can choose what fits your next leathercraft project.
Visit hab-to.com to explore the leather and tools, or contact Hab-To Leather House.
Make Your Next Edge a Practice in Precision
Build on what you’ve learned before finishing a full strap or panel. Use an offcut to develop a repeatable routine: prepare the edge, apply Tokonole, burnish, and inspect the result. Note what worked for that leather, including the applicator and slicker you chose. These small observations can make your next session more deliberate.
Learning how to use Tokonole is part of building a broader leathercraft practice. As you take on new projects, match your materials and tools to the work, then refine your technique with each piece. The leather, tools, and supplies at Hab-To Leather House can help you keep that process moving.
Keep practising, pay attention to the material, and let each finished edge teach you something useful for the next one.
Frequently Asked Questions
What is Tokonole used for in leathercraft?
Tokonole is used to smooth and compact exposed leather fibers, especially along cut edges. On a strap, for example, it helps create a neater edge before the piece is finished. It can also be used on fibrous flesh-side leather when you want a flatter surface. It’s an edge-finishing aid, not a substitute for preparing a clean, even cut.
How do you apply Tokonole to leather edges step by step?
Apply Tokonole to a clean edge, spread it evenly, then burnish with a suitable slicker. If a strap has several connected edges, finish one at a time so you can keep the product away from the face and work consistently. Inspect the result as you go, and address missed spots locally rather than recoating an already smooth edge.
Should leather be dampened before applying Tokonole?
No, pre-dampening the leather isn’t usually necessary. Start with a clean, dry edge so you can control the moisture from the Tokonole itself. Spraying the whole piece first can make the surface harder to assess and may affect how the leather looks as it dries. For a new leather type, test your process on an offcut.
What tools work best for burnishing leather with Tokonole?
A leather slicker is the main burnishing tool; choose a groove that sits comfortably against the edge. A fingertip, foam swab, or small roller can help apply Tokonole, but these applicators don’t replace the slicker’s burnishing action. For a curved strap end, use short strokes and reposition the leather as needed, keeping the tool in contact with the edge.
How does Tokonole compare with gum tragacanth for edge burnishing?
Tokonole Burnishing Gum is a water-based alternative to gum tragacanth for slicking leather edges.
Where can you buy Tokonole in the United States and what does it cost?
Disclaimer
All our blog articles are made for information purposes only we dont take responsability for any content from third parties.