

Leather Strap Cutter: Choose the Right Width, Blades and Fit
A clean, even strap starts with a tool you can guide confidently. The right leather strap cutter should suit your grip, the leather you plan to use, and the widths your projects require. A stable setup matters just as much as the blade.
It’s tempting to focus only on the cutting edge, but the way a tool sits in your hand affects control throughout a long pass. The leather’s firmness and thickness matter, too. Match these factors to your cutter before risking a good piece of leather.
This guide explains how to use a leather strap cutter, from setting the width to checking blade fit and leather thickness. You’ll learn how to prepare a test cut, identify problems early, and make a more confident first pass on your next strap project.
Key Takeaways
- Match the cutter’s adjustment range to the strap widths you plan to make, and use a consistent measuring method for repeatable cuts.
- Choose a handle and cutter construction that feel steady and controlled in your hand during a cut.
- Compare blade type, sharpness, and replacement compatibility to support clean cutting and practical upkeep.
- Consider how the leather’s structure and surface affect cutting before choosing a material for straps.
- Use the tool’s maximum thickness rating as a deciding factor, then match it to the thickest leather you intend to cut.
Adjustable width and measurement guide
How do you use a leather strap cutter safely and accurately? Set it on a stable work surface, keep your guiding hand behind the cutting edge, and move the tool steadily away from your body. Measure the target width, secure the leather flat, then test the setting on scrap before cutting your project piece.
An adjustable guide sets the distance between the leather’s edge and the blade, which determines the strip width. The tool’s scale may not show the finished width directly, so check the cutter’s instructions to understand how the guide and blade relate. Then verify the setting by cutting a test strip and measuring it with a ruler.
Before adjusting the cutter, identify the reference edge: the straight leather edge that will run against the guide. A ragged or bowed edge can shift during the cut, changing the strip width from one end to the other. Trim a clean reference edge first, or use a straight edge already present on the hide.
Use this repeatable sequence for each new width:
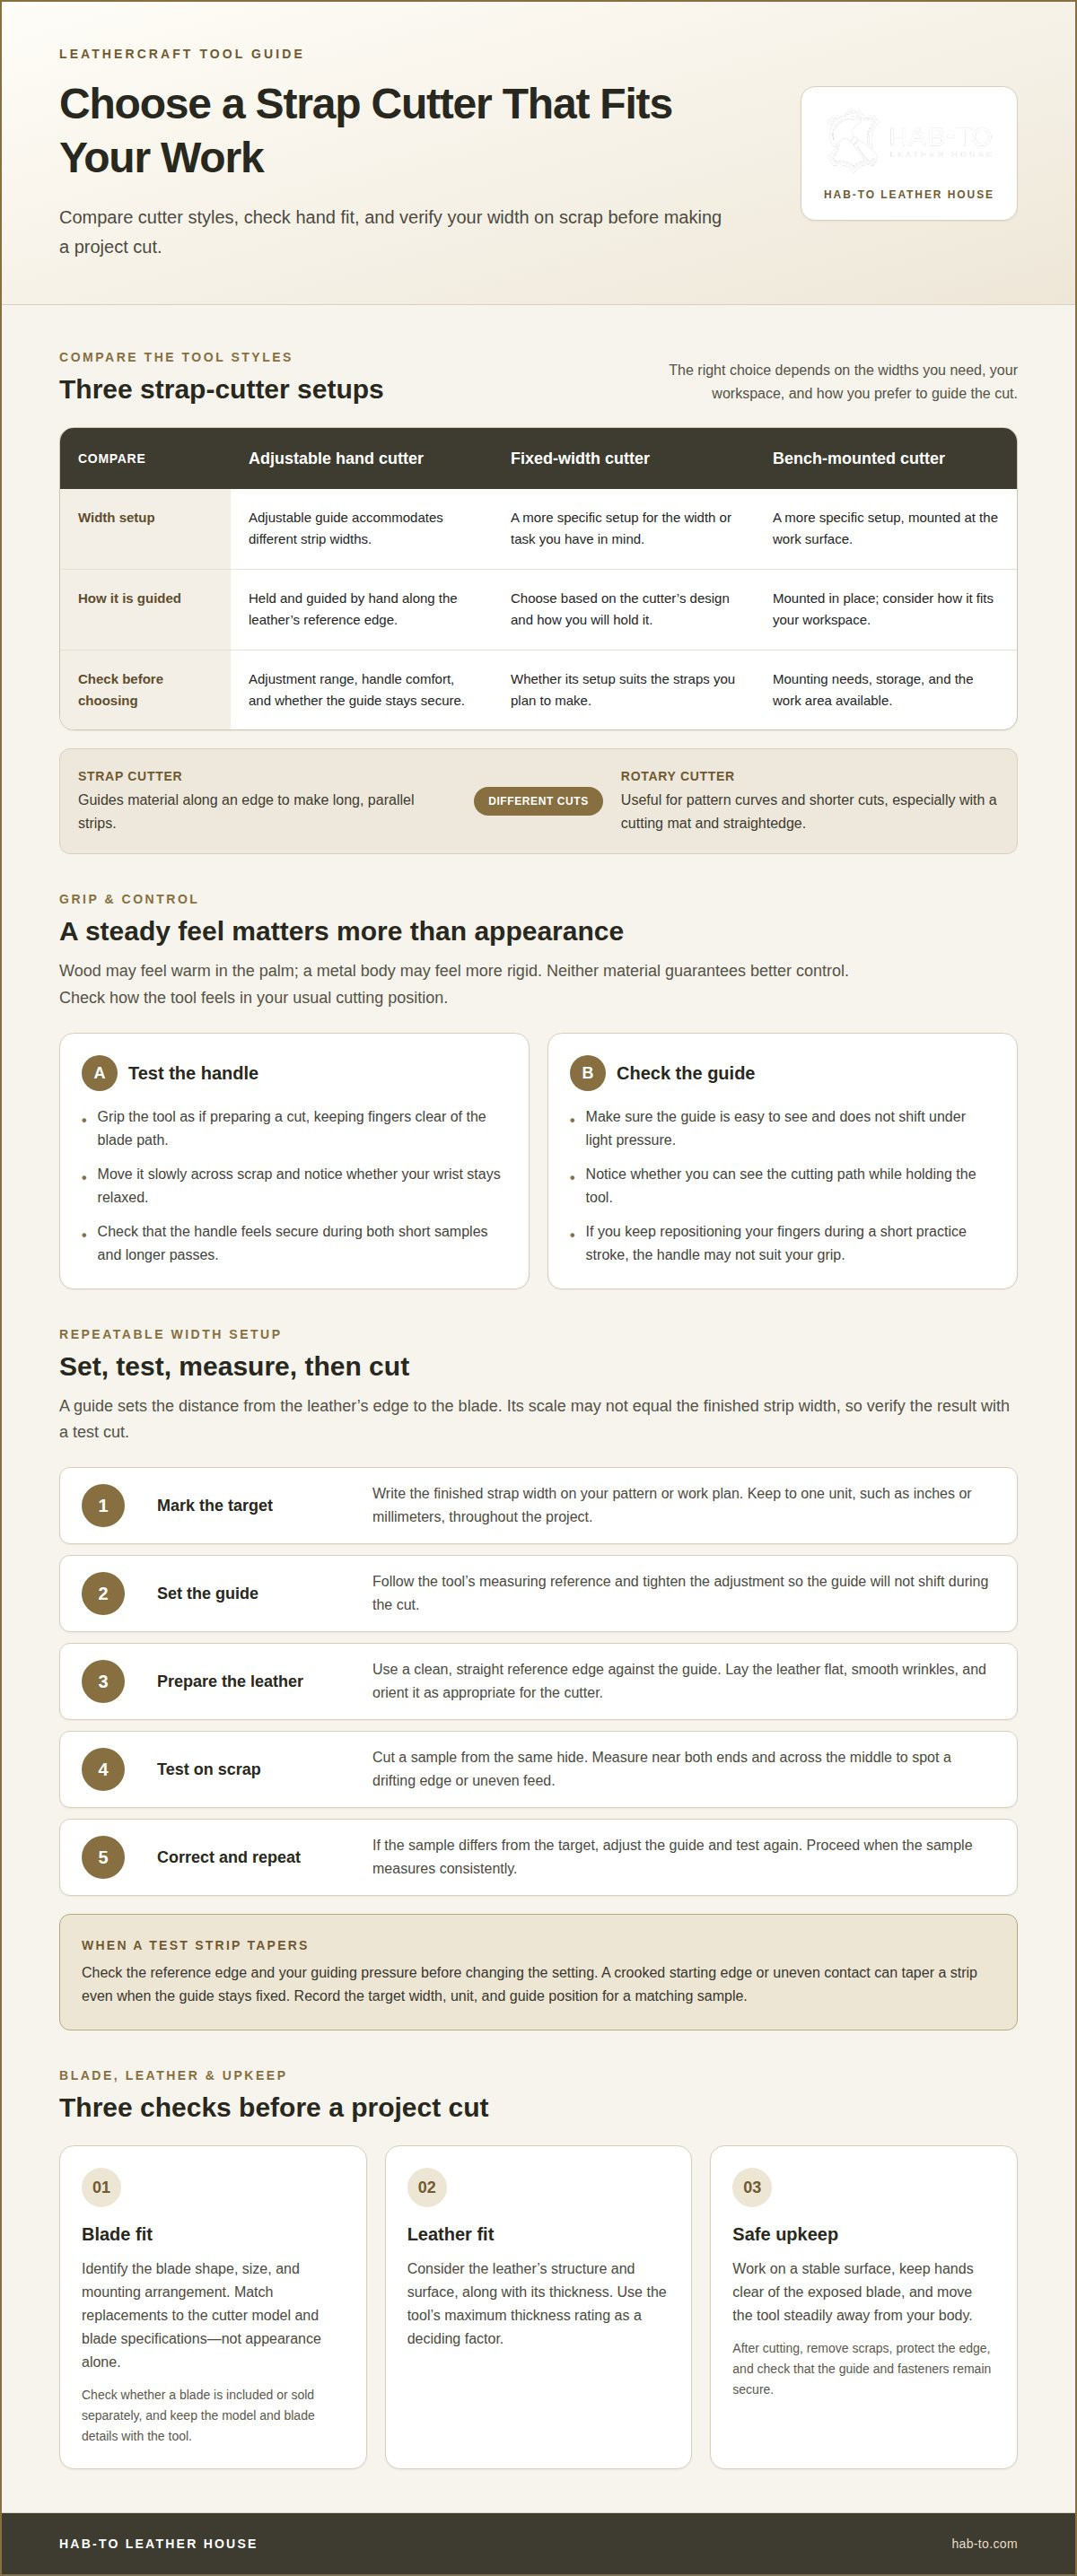
- Mark the target. Write the finished strap width on your pattern or work plan. Keep the measurement in one unit, such as inches or millimeters, throughout the project.
- Set the guide. Adjust the cutter to the corresponding setting, following the tool’s measuring reference. Tighten the adjustment so the guide won’t shift during the cut.
- Prepare the leather. Lay it grain-side up or down as appropriate for your cutter, with the reference edge against the guide. Smooth wrinkles and keep the hide flat.
- Make a test cut. Use a scrap from the same hide. Measure the resulting strip at both ends and across its middle to spot a drifting edge or uneven feed.
- Correct and repeat. If the test strip differs from the target, adjust the guide and cut another sample. Once the sample measures consistently, proceed with the project leather.
For example, a belt pattern may call for a consistent width along its length. Measure the test strip near the start, middle, and end. If the measurements vary, check the reference edge and your guiding pressure before changing the setting. A crooked starting edge or uneven contact can taper the strip, even when the guide stays fixed.
Keep a simple note with the project: target width, unit, and guide position for a matching sample. This makes it easier to repeat a successful cut with the same setup. Recheck after changing leather pieces, since a different edge or hide layout can affect how steadily the material follows the guide.
Cutter material and hand fit
A leather strap cutter should feel steady in your hand before you start a long cut. Common designs include adjustable hand cutters, fixed-width cutters, and bench-mounted strip cutters. Frames may be wood or metal, with different handle shapes and guide mechanisms. Choose a style that suits your workspace and the straps you plan to make.
Wood may feel warm in your palm, while a metal body may feel more rigid. Neither material guarantees better control. Hold the tool in your usual cutting position and check whether the handle shifts, the guide stays secure, and you can see the cutting path. A comfortable grip helps you guide the tool without twisting your wrist.
What types of leather strap cutters are available? Adjustable hand cutters accommodate different strip widths, while fixed-width and bench-mounted versions suit more specific setups. Compare the adjustment range, storage needs, and how you’ll hold or mount the tool.
Try this simple fit check before choosing:
- Grip the handle as if you’re preparing a cut, with fingers clear of the blade path.
- Move the tool slowly across scrap leather and notice whether your wrist stays relaxed.
- Check that the guide is easy to see and doesn’t shift under light pressure.
- Confirm that the handle feels secure for both short samples and longer passes.
A broad handle may feel awkward in a smaller hand, while a narrow grip may feel unstable in a larger hand. If you need to reposition your fingers repeatedly during a short practice stroke, the handle may not suit your grip. Steady control matters more than the frame’s appearance.
Leather strap cutter versus rotary cutter: which is better? A strap cutter guides material along an edge to make long, parallel strips. A rotary cutter is useful for pattern curves and shorter cuts, especially with a cutting mat and straightedge. Choose based on the cut you need, not on the idea that one design suits every task.
How much does a leather strap cutter cost in the United States? Cost depends on the construction, adjustment features, and blade setup. Compare these details with how often you expect to use the tool and whether replacement blades fit your budget.
What safety risks and maintenance does a leather strap cutter require? Its exposed blade can injure fingers, so keep your hands clear of its path and work on a stable surface. After cutting, remove scraps, protect the edge, and check that the guide and fasteners remain secure.
Where can I buy a leather strap cutter in the United States? Look for leathercraft-tool suppliers that describe the adjustment mechanism, blade arrangement, and material capacity. Compare those specifications with your projects, then choose a tool whose handle and setup suit the way you work.
If you’re assembling materials and tools for leathercraft, explore leathercraft bundles as part of your project planning.
Included and replacement blades
Before cutting leather, identify the blade in your tool and how it attaches. Strap cutters use different blade shapes, sizes, and mounting arrangements. A spare blade that looks similar may not fit the holder or sit at the correct angle. Match replacements to the cutter’s model and blade specifications, not appearance alone.
Check the package contents when choosing a cutter. Some listings specify an included blade, while others list spare blades separately. Note the exact model name and blade type, then keep that information with the tool. This makes it easier to find a compatible replacement later, especially if your workshop has several cutters.
Blade material and origin are separate details. Material describes what the cutting edge is made from; origin identifies where it was made. Look for these details in product documentation or on the blade packaging. Don’t infer either from the color, shine, or brand name. Two polished blades, for example, may use different materials or come from different manufacturing locations.
Use a deliberate inspection routine before each cutting session:
- Check the edge. Look for visible nicks, bends, or damage under good light.
- Inspect the fit. Confirm the blade sits securely in its holder and doesn’t shift.
- Test on scrap. Make a short cut in scrap leather similar to your project material.
- Review the result. Look for tearing, dragging, or an uneven cut that may indicate a dull or poorly seated edge.
A clean cut through scrap is a useful practical check, but it won’t identify the blade’s material or origin. Keep those product details separate from your hands-on assessment. If the cutter has a replaceable blade, save its model information rather than relying on memory or a visual match.
Replace a blade when damage or dullness makes controlled cutting difficult. Follow the cutter’s instructions for removing and installing it. Keep your fingers away from the edge, place the removed blade somewhere secure, and fasten the replacement as directed. Test the new setup on scrap before cutting a finished piece.
Blade care also affects the cut. After using the tool, clear away leather fibers and store the blade so its edge won’t touch loose hardware or other tools. Contact with metal objects can damage the edge. Keep spare blades protected and labelled by cutter model so you can identify the right replacement when needed.
For a clean strap, the blade must fit the holder, stay secure, and cut the chosen leather without dragging. Treat the maker’s blade details as specifications, then use a scrap test to assess how it actually cuts.
Materials suitable for cutting
Which leather thicknesses and types can strap cutters handle? Usable thickness depends on the cutter’s design, blade clearance, and the leather’s firmness. Follow the tool’s stated capacity, and assess each hide’s thickness, temper, and construction before cutting.
Leather type affects how it feeds against the guide. Firm vegetable-tanned leather often holds a straight edge well, while softer, more flexible leather can shift or bunch during a long pass. Harness leather and Latigo can also feel denser or more pliable depending on their finish and temper. The name alone won’t tell you how easily a particular piece will cut.
Inspect the hide itself, not just its label. Thickness can vary across a hide, and areas such as the belly may stretch more than the back. For a strap with consistent edges, choose a section with even temper and minimal stretch. Avoid scars or loose grain along the cutting path, as these areas can distort while the leather moves.
Before cutting a project piece, use this material check:
- Identify the layers. Confirm whether the piece is solid leather or includes backing, lining, or a bonded layer.
- Feel the temper. Flex the leather gently and note whether it stays firm or collapses easily.
- Inspect the surface. Look for loose grain, deep wrinkles, waxy buildup, or other features that could affect feeding.
- Test a scrap. Cut a short sample from the same hide and examine its edge and width.
A scrap test reveals more than a quick glance. If the blade drags, the strip twists, or the edge tears, the material may be too thick or soft, or the setup may not support it well. Another section of the hide may cut better. Choose a test piece close to the project leather so both have similar thickness and temper.
Surface treatments matter, too. A heavily waxed or oily finish can behave differently under the guide than an unfinished surface. Don’t force a rough cut with extra pressure. Check the blade condition, keep the leather flat, and try a fresh scrap before continuing. For layered pieces, test through every layer rather than judging only the top leather.
Some cutters are designed for particular leather thicknesses, so the tool’s capacity must suit the material’s structure. Thick, dense leather puts different demands on a blade than a soft, thin piece. The same hide can vary from one area to another, so test a sample before committing to a long strap.
For repeatable results, note the hide section and how the material behaved alongside your project details. A brief entry such as “firm back section, clean sample cut” helps you choose similar leather for the next strap, instead of assuming every part of the same hide will feed alike.
Maximum leather thickness
Maximum thickness means the thickest leather a cutter can accommodate and cut cleanly. Strap cutters don’t all have the same capacity. Check the specific tool’s stated limit, then compare it with the thickest part of your project leather.
Measure the leather with a thickness gauge or caliper before setting up. Check several spots, especially if the hide varies naturally. A strip from the back may measure differently from one near the belly. Use the thickest measurement to determine whether the cutter can handle it.
Consider construction as well as thickness. A single piece of firm leather behaves differently from a soft, compressible hide or a layered blank. If your project combines leather with a backing or lining, the cutter must pass through the full stack. Measure all the layers together, then test the complete assembly on scrap.
Use this sequence to assess a new material:
- Read the tool specification. Find the maker’s maximum thickness and identify how the measurement is defined.
- Measure the project piece. Check several points and note the thickest area, including any joined layers.
- Compare like with like. Keep units consistent, such as millimeters or inches, when comparing the leather and tool rating.
- Make a sample cut. Use scrap from the same material and observe how the blade moves through it.
- Inspect the sample. Look for dragging, compression, tearing, or a cut that stops before passing through.
For example, a strap blank may combine a firm outer layer with a softer lining. Measuring only the outer leather understates the total cutting thickness. Test the full blank, because the combined stack determines the blade’s path and the pressure needed to move the cutter.
Resistance during a sample cut can signal that the tool and material aren’t a good match. Don’t force the handle through a difficult pass. Stop, check that the blade is seated correctly, and compare the leather with the tool’s stated capacity. Extra force makes the tool harder to control and may damage the edge or leather.
Thickness alone doesn’t determine how a cut will turn out. Temper, surface treatment, and how the leather compresses can also affect how it feeds. A firm piece may hold its shape, while a softer one can bunch against the guide. Test the actual hide and layer arrangement rather than relying only on a product description or nominal thickness.
Record the material measurement and sample-cut result with your project notes. That gives you a useful reference when selecting similar leather or repeating the setup. As you gather supplies for the project, leathercraft bundles can help you consider related materials and tools.
Hab-To Leather House: Vegetable Tanned Leather
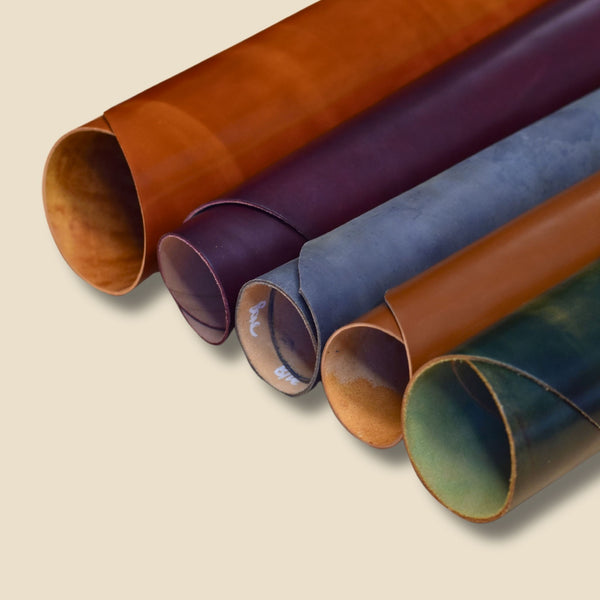
Hab-To Leather House offers vegetable-tanned leather for makers choosing materials for straps. Compare the available leathers and assess a sample with your cutter before committing to a full-length strap. With no minimum order, you can choose the quantity that suits your project.
Browse vegetable tanned leather and consider your planned strap, required thickness, and intended use. Hab-To Leather House also offers leatherworking tools and crafting bundles for leathercraft projects. The right material still depends on your cutter’s capacity and the leather’s own temper, so test a scrap from the same piece before cutting.
Explore vegetable-tanned leather for your next strap project at hab-to.com.
Set Up Your Next Strap Project
Let your next project guide your material and tool choices. A well-matched leather strap cutter is one part of the setup; the leather and supporting tools shape the work that follows. Choose a project that gives you room to practise and refine your approach.
Hab-To Leather House offers vegetable-tanned leather, leather hardware, and leatherworking tools. Its crafting bundles bring related supplies together as you plan your next piece.
For your next project: Explore crafting bundles for leatherwork as you gather materials and tools for your strap-making setup.
Related reading
- How to measure and cut consistent strap widths
- Choosing a blade for leatherworking projects
- Matching leather thickness to a project
Good leatherwork grows through care and practice. Take the next step with confidence, and enjoy making a project that’s truly your own.
Frequently Asked Questions
What makes a good strap-cutting tool?
A good cutter stays stable during a pass, feels comfortable in your hand, and suits the work you plan to do. If you’ll make matching belt straps, prioritize a guide that holds its setting and blades that are easy to replace. Beginners may also appreciate clear adjustment marks. The best fit is the one you can control steadily with the leather and widths your projects require.
What is a leather strap cutter and how does it work?
A leather strap cutter is a hand tool for slicing long strips from a larger piece of leather. Its guide tracks along an edge as the blade cuts parallel to it. For example, a maker can cut strap stock from a hide, then trim individual pieces to project length. The guide provides a reference, while the maker keeps the leather moving evenly.
What is the best cutter for beginners?
An adjustable hand cutter is a practical starting point if your projects need different strap widths. Before choosing one, consider whether you can grip it comfortably, read its guide markings, and find compatible replacement blades. Practise on scrap before cutting project leather. This helps you learn how the tool moves and spot handling issues without risking a finished piece.
Disclaimer
All our blog articles are made for information purposes only we dont take responsability for any content from third parties.