




Troubleshooting Rivet Setting Problems: The Leathercrafter's Guide
Striking harder will never fix a failing rivet; it only damages your hide. When a cap crunches sideways or a stem buckles inside the hole, the culprit is almost always dimensional mismatch or workbench rebound, not your swing. If you find yourself holding your breath before every hammer drop, troubleshooting rivet setting problems comes down to precise geometry rather than raw force.
Every leathercrafter knows the sinking feeling of marring a finished bag on the very last step. You spend hours cutting, beveling, and burnishing, only to watch a mismatched setting die dent your decorative hardware or leave a rivet spinning freely in loose grain. You deserve reliable results every time you strike an anvil.
You will master the exact root causes of bent posts, dented caps, and spinning stems so every piece of hardware seats flush and permanent. We cover foolproof post-length formulas for single-cap, double-cap, and copper burrs, proper die alignment, and safe removal techniques that preserve your vegetable-tanned projects without tearing the leather.
Key Takeaways
- Match your concave setting dies precisely to your hardware profile to prevent crushed, flattened decorative caps.
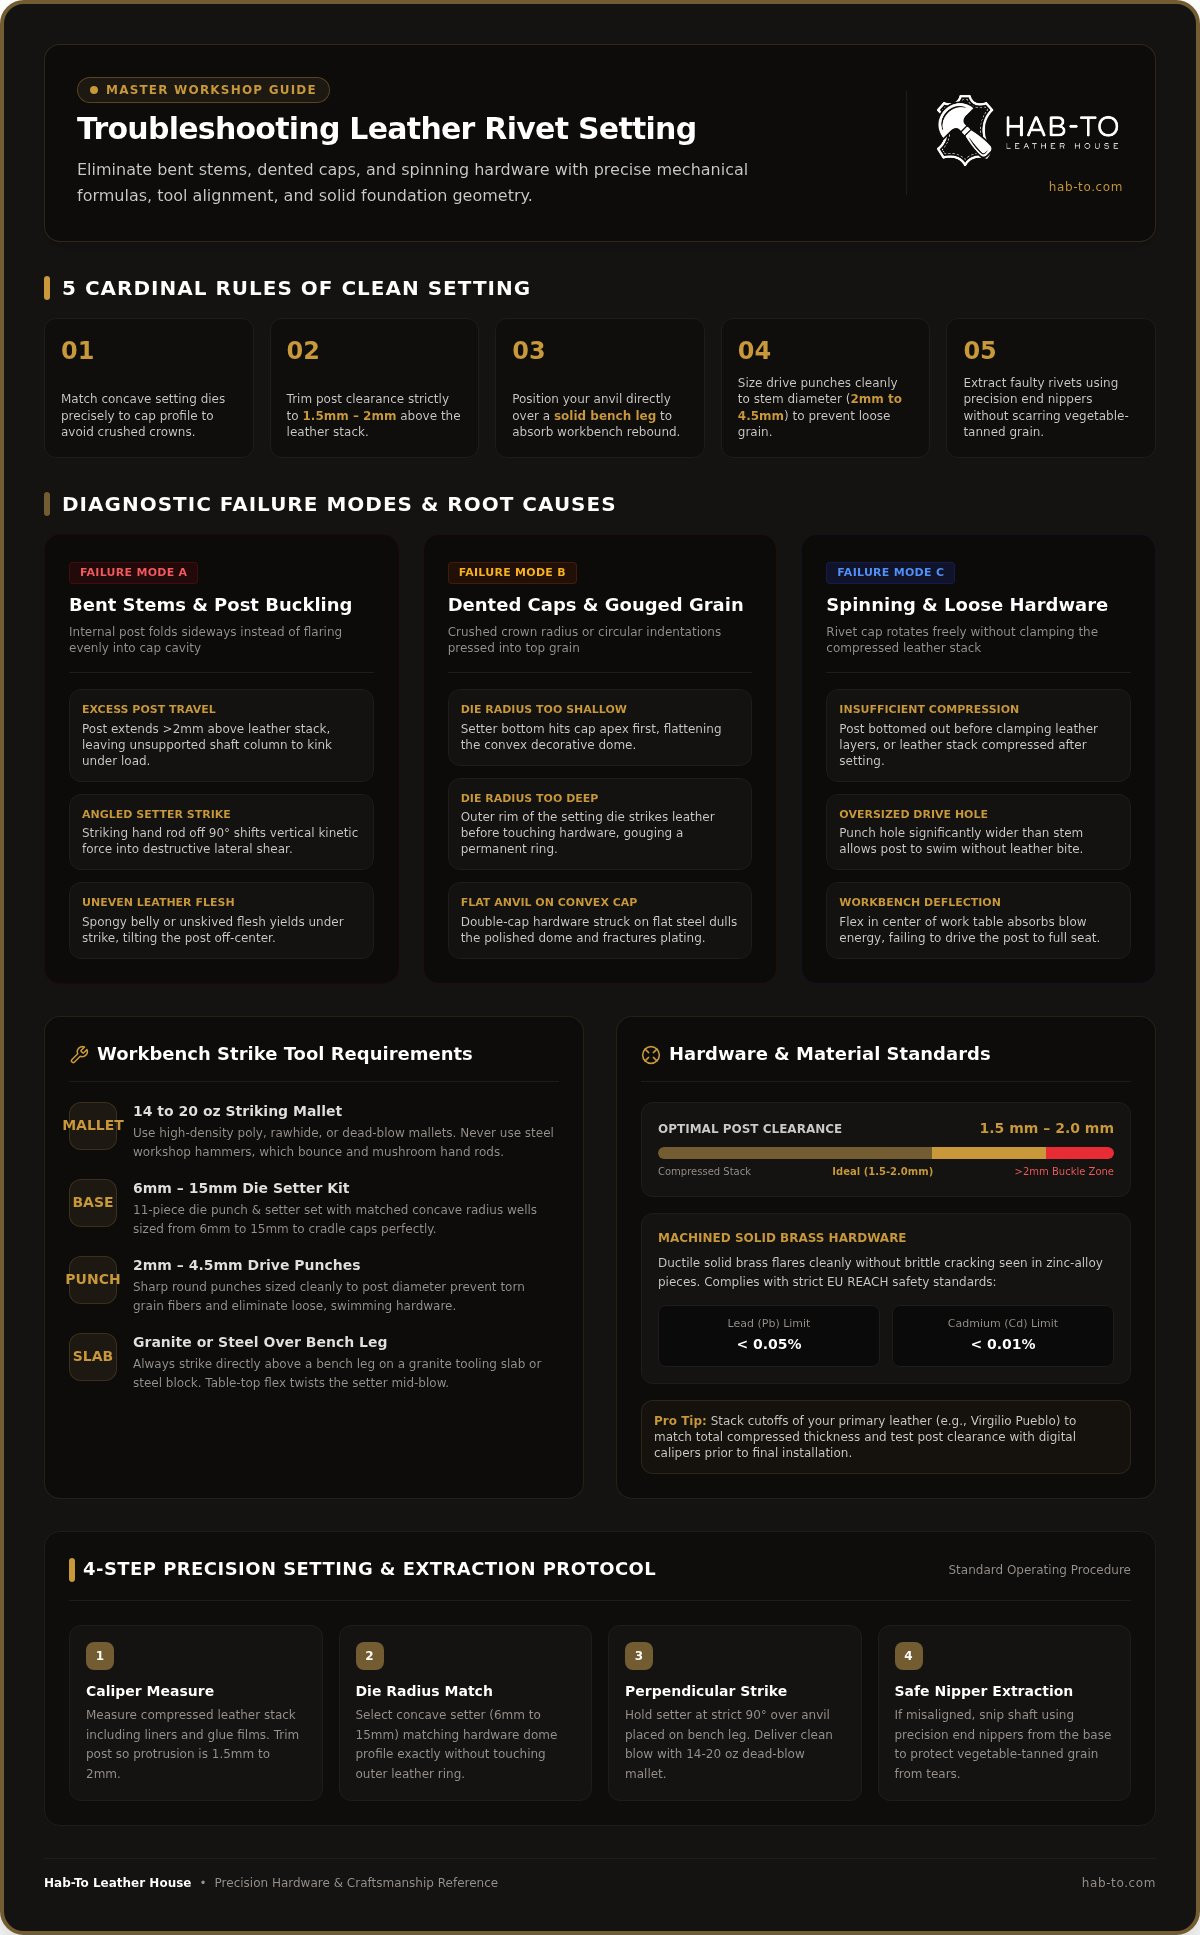
- Master troubleshooting rivet setting problems by trimming post clearance to 1.5mm to 2mm above your leather stack before setting.
- Eliminate internal stem buckling by supporting your anvil over a solid bench leg to absorb rebound.
- Size round drive punches to stem diameter so hardware seats firmly without stretching grain fibers.
- Safely extract misaligned rivets using precision end nippers without scarring or stretching the underlying vegetable-tanned leather.
Essential Setup: What You Will Need for Reliable Rivet Setting
A rivet functions as a permanent mechanical fastener that relies on precise plastic deformation to hold your leather layers together. If your anvil shifts or your setter radius doesn't match the cap curvature, the downward force shears sideways instead of compressing the metal. Successful installation requires complete harmony between your strike surface, anvil, punching tools, and hardware dimensions. Approaching the workbench with mismatched gear turns troubleshooting rivet setting problems into an exercise in frustration.
Workshop Tools and Setting Equipment
Your strike tools dictate how cleanly energy travels through the post. Avoid steel workshop hammers at all costs. Their hard faces bounce off hand rods, mushrooming tool shafts and sending jagged shockwaves into the rivet head. Use these dedicated components instead:
- Matched Setter and Base: Work with an 11-piece tool die punch and setter kit featuring concave wells sized specifically from 6mm to 15mm. If the die radius is too shallow, it crushes the apex of your cap; if it's too deep, it gouges the leather ring around the rim.
- Striking Mallet: Select a high-density poly, rawhide, or dead-blow mallet weighing between 14 and 20 ounces. Dead-blow mallets absorb shock and eliminate erratic rebound.
- Solid Foundation: Set your anvil on a polished steel block or heavy granite tooling slab positioned directly over a bench leg. Striking on the flexible center of a wooden workbench steals energy and twists your setter mid-blow.
- Clean Drive Punches: Keep sharp round punches ready in diameters ranging from 2mm to 4.5mm to create clean holes without tearing fibers.
Hardware Selection and Leather Prep
Cheap zinc-alloy hardware snaps under lateral load. Choosing machined solid brass pieces from a dedicated leather hardware collection gives you ductile metal that flares smoothly without brittle cracks. Solid brass also naturally complies with EU REACH limits on heavy metals, ensuring lead stays below 0.05% and cadmium below 0.01%.
Before installing hardware into your project, dial in your mechanical clearances. Pull scrap cutoffs of your primary material, such as firm Virgilio Pueblo vegetable-tanned leather, and stack them to match your build's exact profile. Use digital calipers to measure the total compressed thickness, factoring in lining layers and adhesive film. When you test hardware temper on matching offcuts first, you resolve troubleshooting rivet setting problems long before an errant strike touches your final piece.
Diagnosing Common Rivet Setting Failures and Root Causes
Every botched rivet tells a distinct mechanical story. When a fastener misbehaves, grabbing a heavier hammer or striking a second time will almost certainly ruin the surrounding grain. Successful troubleshooting rivet setting problems starts with diagnosing the visible deformation on your leather to identify where the geometry broke down.
Bent Stems, Crooked Posts, and Off-Center Collapses
A stem that crunches sideways inside the leather hole stems from excess column height or lateral force. When an unsupported tubular post extends too far beyond your material stack, the physics of compression take over. The metal buckles along the path of least resistance instead of flaring evenly into the cap.
Three common variables trigger this internal collapse:
- Excess Post Length: A stem protruding more than 2mm above the surface has too much unsupported travel, causing the shaft to kink before it mushrooms.
- Angled Setter Alignment: Tilting your hand rod just a few degrees off 90 degrees transforms downward kinetic energy into lateral shear, folding the stem instantly.
- Variable Flesh Compressibility: Spongy belly cuts or unskived flesh fibers yield unpredictably under impact. While dense grain stays firm, soft underlying fibers give way, leaving one side of the hardware post completely unsupported during the strike.
Dented Caps, Puckered Grain, and Spinning Hardware
Surface blemishes often trace back to mismatched dies or poor hole preparation. Setting a convex double-cap rivet against a flat steel anvil flattens the crown, dulling its polished dome and stretching the plating. Conversely, using a concave die with an overly sharp rim gouges a circular ring into delicate vegetable-tanned grain.
Spinning hardware presents the opposite failure mode. If your rivet cap and base rotate freely after setting, either the post bottomed out inside the cap before clamping the leather, or the clearance hole was punched too large. A loose 4mm hole cut for a 3mm stem lets the leather stretch away under load, robbing the fastener of friction. Over-striking thin hide in an attempt to tighten it merely compresses the collagen fibers into an unsightly, puckered ring around the rim.
If you regularly struggle with dimensional mismatch across varying hide thicknesses, dialing in your gear with curated starter bundles helps ensure your drive punches, setters, and hardware profiles work together seamlessly before you tackle expensive projects.
Post Length and Hole Diameter: Getting the Mechanical Dimensions Right
Precision sizing prevents bent hardware before you ever swing a mallet. Most troubleshooting rivet setting problems stem from generic sizing charts that ignore how leather compresses under pressure. Relying on vague designations like small, medium, or large invites failure. Consistent results require exact millimeter tolerances matched to your material stack.
Calculating Post Protrusion Across Varying Leather Tempers
Measure your assembled leather layers with digital calipers under moderate finger pressure. This replicates the compression your mallet strike produces. Once you have that measurement, calculate how far the post extends past the flesh side before capping:
- Double-Cap Rivets: Require 1.5mm to 2.0mm of exposed post above the leather. If the stem protrudes less than 1.5mm, the internal lip cannot capture the cap securely, causing the fastener to pop off under light tension. Exceeding 2.0mm leaves excess unsupported brass inside the assembly, resulting in crooked collapses.
- Solid Copper Rivets with Burrs: Demand 2.0mm to 3.0mm of post clearance above the set copper burr. After driving the burr flush against dense leather for belts, snip the excess shank with end nippers to leave that precise margin for peening into a smooth dome.
Firm temper hides, like heavy bridle leather, resist compression and maintain rigid support around the stem. Softer leathers yield more under impact, meaning your post protrusion can effectively grow during the strike. When your post falls between standard factory lengths, trim the open brass tube using end nippers rather than forcing an oversized stem to compress.
Hole Punching Rules for Friction-Fit Alignment
Never size your drive punch to the rivet cap. Punch strictly for the stem diameter. A double-cap rivet featuring a 9mm cap typically utilizes a 3mm or 3.2mm post. Punching a 4mm hole lets the fastener lean during installation, deflecting your strike energy and kinking the brass.
Your hardware post should slide through the hole with gentle resistance. This snug friction fit holds the post dead perpendicular against the anvil while you position the cap. Inspect the cut edge before inserting hardware. A dull punch leaves ragged, torn collagen fibers that stretch unevenly under stress, leading directly to crooked sets. Sharp, polished drive punches from a curated tools collection ensure crisp holes that support the shank through every blow, eliminating troubleshooting rivet setting problems on finished goods.
Strike Mechanics: Tool Alignment, Anvil Rebound, and Hammer Form
Energy delivery makes or breaks your hardware installation. Even with ideal post protrusion and matched dies, erratic strike mechanics ruin an assembly in a fraction of a second. The physics of impact demand direct kinetic transfer into the tubular post. When working through troubleshooting rivet setting problems, examining your strike habit often reveals why clean components buckle unexpectedly.
Eliminating Anvil Rebound and Workbench Flex
Your workbench foundation must remain completely rigid. Striking over the center span of a flexible wooden tabletop creates a trampoline effect. The wood flexes downward on initial contact and snaps upward instantly, displacing the hardware while the mallet is still in motion.
Secure your setting station using three structural adjustments:
- Align Over Leg Supports: Place your steel anvil directly above a sturdy, load-bearing bench leg to eliminate table bounce entirely.
- Isolate Granite Slabs: Position a high-density rubber sound mat directly beneath your tooling stone. The rubber absorbs harsh high-frequency vibrations while allowing low-frequency kinetic mass to compress the brass.
- Clear Spongy Mats: Remove soft, self-healing cutting mats from beneath your setting base. Their pliable elastomeric layers swallow downward force, robbing your strike of the energy needed to flare the stem.
Mastering the Hand Setter Strike Sequence
Grip your hand setter down near its base rather than by the top knurling. Gripping low gives your fingers immediate tactile control, preventing the rod from rocking off its 90-degree vertical axis. An angled tool deflects energy laterally, denting the outer rim of your decorative hardware.
Two deliberate blows consistently outperform a succession of nervous, lightweight taps. Deliver your first strike with light, measured force. This initial tap seats the cap onto the post and aligns the internal male-female taper. Follow immediately with a single decisive, dead-center stroke to collapse the tubular post into its permanent flare. Inspect the set under low-angle raking light. The cap rim should rest dead flat against the grain with zero light passing beneath the edge.
Upgrade your bench with complete rivet setting tool kits
Mastering this fluid striking rhythm eliminates kinetic rebound, protecting your vegetable-tanned hides from unwanted scuffs and permanently resolving troubleshooting rivet setting problems at the assembly bench.
Preventing Hardware Failures: Upgrades, Repairs, and Expert Guidance
Eliminating hardware failure permanently requires shifting your workshop workflow from reactive fixes to repeatable mechanical systems. Hand rods and mallets work well for casual hobby tasks, but production leathercraft demands unyielding consistency. When manual striking variations keep causing headaches, upgrading your bench tooling removes human inconsistency from the equation entirely.
Upgrading from Hand Rods to Bench Presses
Manual striking relies heavily on wrist alignment and impact velocity. Upgrading to a manual bench-mount hand press introduces a rigid, rack-and-pinion vertical stroke that eliminates tool tilt completely. Screw-in upper dies hold the hardware cap dead parallel to the lower anvil base, preventing off-center deflection across repetitive strap assemblies.
A bench press gives you precise tactile leverage over delicate assemblies. Instead of hoping a mallet blow delivers the correct force, you feel the internal brass post yield and mushroom under direct downward lever pressure. This controlled feel prevents over-compressing sensitive vegetable-tanned hides or crushing thin lining leathers.
Removing Failed Rivets and Continuing Your Leather Education
Even seasoned artisans misset hardware occasionally. Salvaging your project without tearing the surrounding leather requires controlled, non-destructive hardware extraction:
- Shield the Grain: Slide a piece of firm scrap leather directly under the hardware cap to protect your finished grain from metal tool marks.
- Grip the Internal Flange: Seat precision end-cutting nippers around the base of the inner cap. Avoid grabbing the outer decorative face whenever possible.
- Squeeze and Twist: Apply firm grip pressure to bite through the tubular brass post rather than violently prying upward. A gentle rocking motion shears the compressed post without enlarging your punched leather hole.
If you face persistent hardware misalignment or struggle to dial in post allowances on complex, multi-layered bag gussets, you don't have to guess. Schedule a 1-on-1 diagnostic session via a free video consultation with Mike to review your tooling setup and hardware pairing directly.
Deepening your mechanical expertise transforms troubleshooting rivet setting problems from a stressful gamble into a predictable, clean process. For broader fastener strategies, explore our full collection of leather hardware, or discover advanced structural techniques in our artisan masterclasses to refine your heirloom workshop standards.
Master Clean Hardware Installation on Every Project
Pristine hardware installation isn't a matter of luck or sheer force; it's about mechanical discipline. When you dial in your post protrusion to 1.5mm to 2mm, match setting dies to cap profiles, and eliminate bench rebound over a rigid anvil foundation, your fasteners seat cleanly every time. You protect delicate grain surfaces, prevent crooked internal stems, and ensure your finished assemblies hold permanently under real-world tension.
Hab-To Leather House brings over 160 years of family leatherworking heritage and artisan expertise straight to your bench. We supply curated solid brass hardware, precision setting kits, and exclusively sustainable European vegetable-tanned hides with zero minimum order quantities so you can test and build without compromise. Mastering troubleshooting rivet setting problems comes down to pairing proven workshop techniques with dependable, unyielding tools.
Approach your next project with total confidence, trust your dimensional math, and create heirloom leather goods built to last generations.
Frequently Asked Questions
Why does my leather rivet bend sideways instead of setting straight?
Internal stems buckle because the post is excessively long or your strike angle was tilted off 90 degrees. When a tubular post extends too far past the leather stack, the unsupported metal folds along the path of least resistance instead of flaring evenly. Spongy flesh fibers can also yield unevenly under impact, depriving the post of lateral stability.
How do I calculate the correct rivet post length for my leather thickness?
Measure your assembled leather layers with digital calipers under light finger compression, then add 1.5mm to 2mm for double-cap rivets. For solid copper burr rivets, allow 2mm to 3mm of stem beyond the set burr for peening. Precise tolerances prevent troubleshooting rivet setting problems caused by loose fits or over-extended metal stalks.
Can I reuse a rivet if the cap sets loose or crooked?
No, you cannot reuse a deformed rivet. The setting process relies on permanent mechanical deformation, which work-hardens the brass or copper post. Once collapsed crookedly, the metal loses its structural integrity. Prying the parts open stretches the cap, so always discard damaged hardware and install a fresh piece into your punched hole.
What size hole should I punch for standard double-cap leather rivets?
Punch a hole that matches the exact outer diameter of the post, never the cap diameter. Standard double-cap rivets typically use a 3mm or 3.2mm stem, requiring a matching drive punch. A snug friction fit keeps the post aligned dead perpendicular against your anvil during the strike, preventing the hardware from leaning or wandering.
Why is my mallet leaving round dents in the leather around the rivet?
Circular impressions happen when your setting die has an overly sharp rim or your strike lands off-center. If you tilt your setter, the hardened steel edge bites into the vegetable-tanned grain rather than floating above it. Using a die with the wrong concave profile also crushes the leather boundary instead of cradling the domed cap.
How do I safely remove a deformed rivet without damaging the leather project?
Slide a thin scrap of firm vegetable-tanned leather beneath the inner hardware cap to protect the finished grain. Grip the post tightly with precision end-cutting nippers, then squeeze and rock gently to snip through the tubular brass post. Avoid prying straight upward, which stretches the punched hole and tears surrounding collagen fibers.
Are solid brass rivets easier to set than steel or zinc alloy hardware?
Yes, solid brass offers superior ductility compared to brittle zinc alloys or rigid steel. Brass yields smoothly under mallet impact without cracking, splitting, or requiring excessive striking force. Choosing solid brass eliminates common troubleshooting rivet setting problems while ensuring full compliance with EU REACH safety standards for restricted heavy metals like lead and cadmium.
Disclaimer
All our blog articles are made for information purposes only we dont take responsability for any content from third parties.