

Wooden Edge Slicker: Beechwood Build, Size and Weight
A wooden edge slicker is a compact tool used to burnish leather edges. Check its stated dimensions to judge its size and how it may feel in your hand.
It’s easy to focus on groove shape or the look of the wood, but material, length, and weight also affect how a slicker feels in use. Comparing these details helps you choose a tool that suits your work.
Here, you’ll learn what beechwood brings to an edge slicker and how to interpret its measurements without treating one model’s specifications as a universal standard. We’ll also look at how size and weight relate to grip, control, and the leather edges you plan to finish, so you can assess the tool with a craftsperson’s eye.
Key Takeaways
- Assess a slicker by its wood, shape, grooves, and overall feel, not by appearance alone.
- Match the groove to the leather edge, then use steady, quick strokes to work toward a smooth finish.
- Compare U.S. listings by the tool’s construction and intended use, rather than assuming all wooden slickers cost or perform alike.
- For a beginner, prioritize a straightforward design that feels easy to control and suits the leather you work with.
- Choose between hand tools and other burnishing methods based on the control, pace, and finish your project calls for.
Tool dimensions and weight
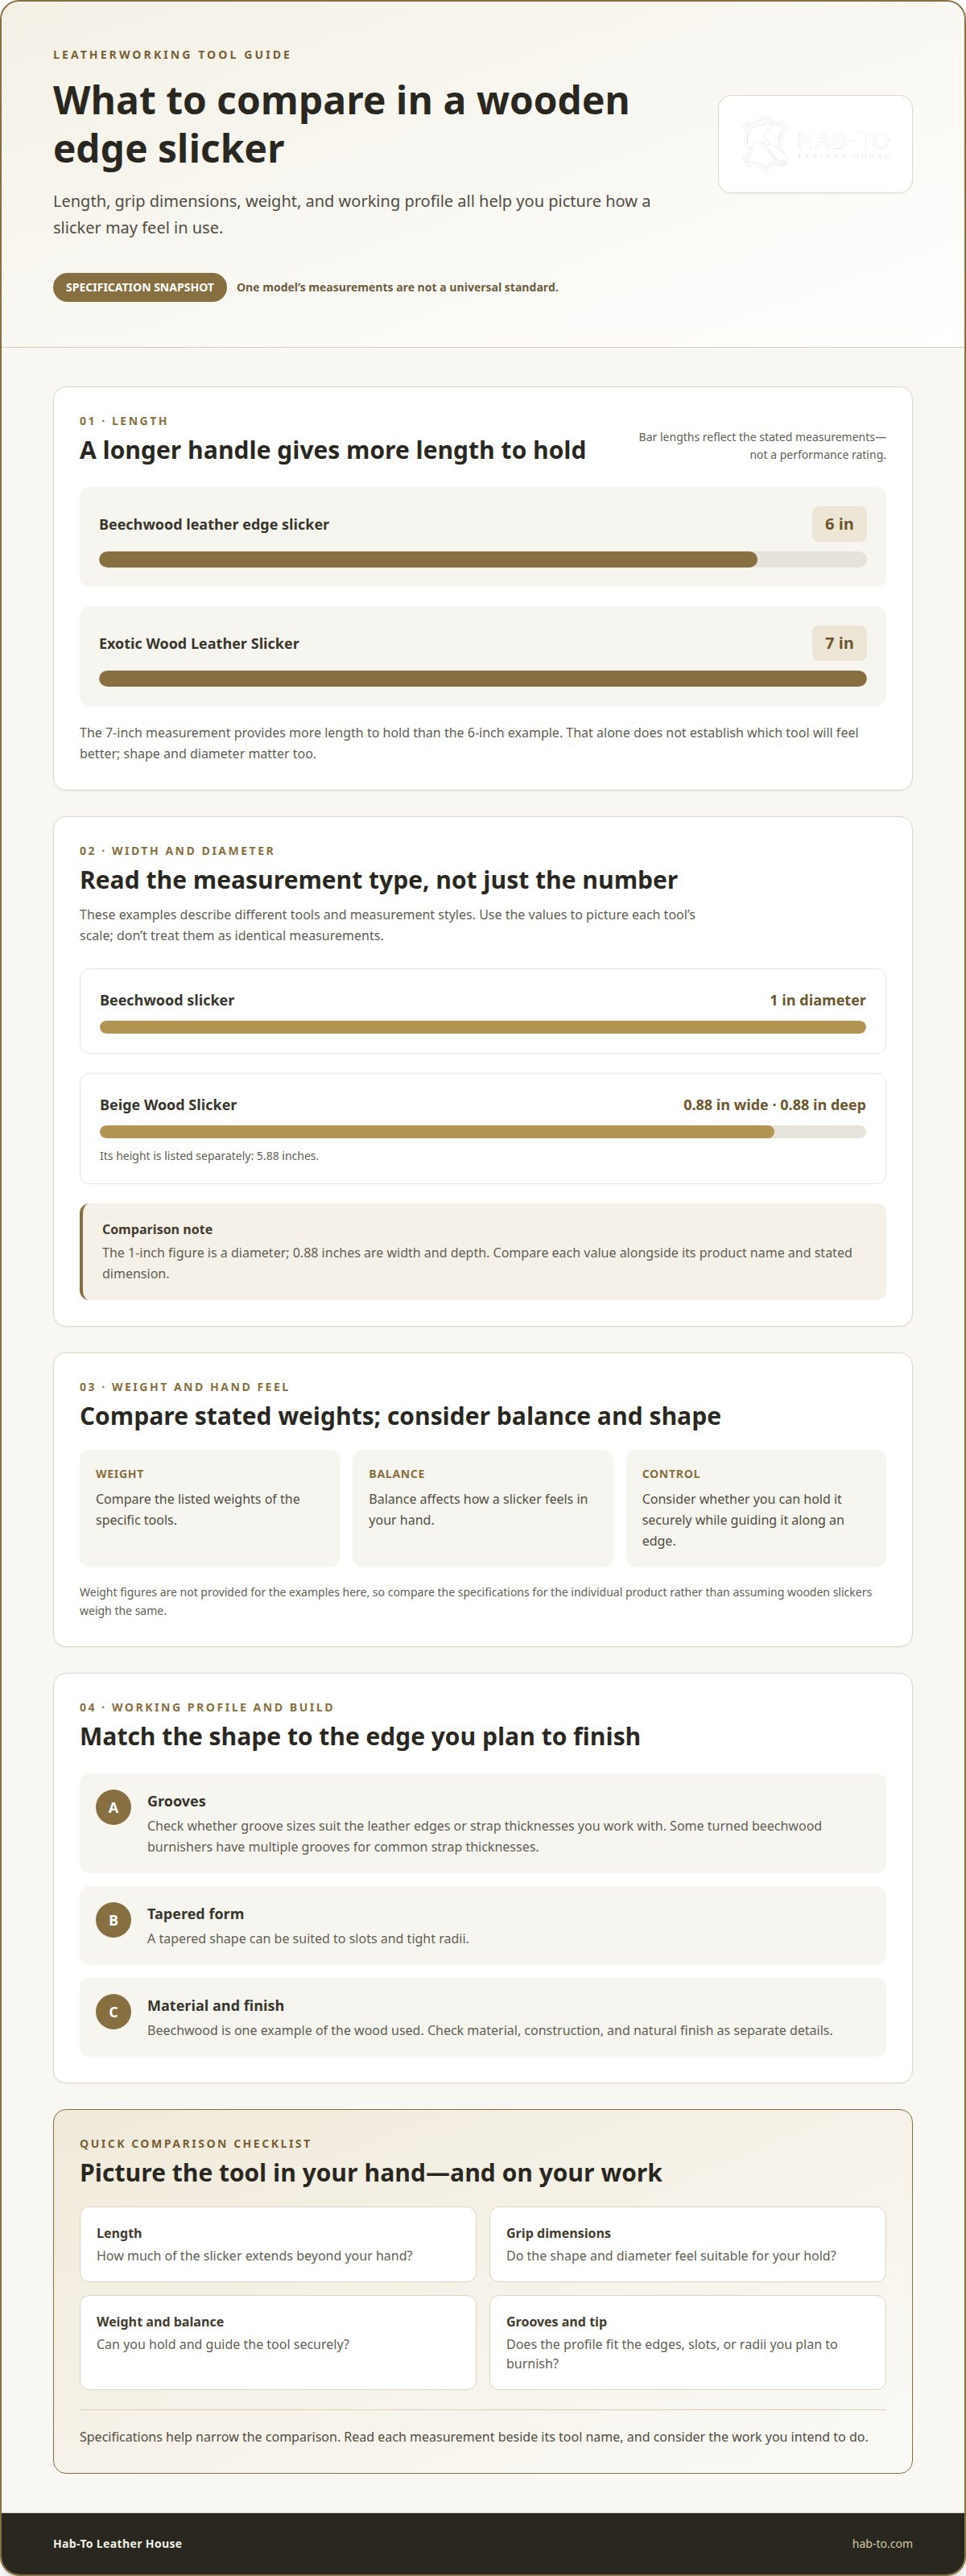
A beechwood leather edge slicker measures 6 inches long and 1 inch in diameter. Those figures describe one specific tool, not a fixed size for every wooden slicker. Compare the length, diameter, and weight of each model as separate details. Together, they help you picture its scale before choosing a tool for your bench.
Length affects how much of the slicker extends beyond your hand. A 6-inch handle gives you a defined grip area, while a 7-inch model provides more length to hold. The longer measurement alone doesn’t establish which tool feels better. Grip depends on the shape and diameter, too. Consider how you hold a burnisher and whether you need precise movement along a short edge.
Weight offers another useful point of comparison. These are different tools, so compare their stated weights rather than assuming every wooden slicker weighs the same. Balance and shape affect how a tool feels in your hand. If possible, check that you can hold it securely while guiding it along an edge.
Measurements can also be given as height, width, and depth. The Beige Wood Slicker is 5.88 inches high, 0.88 inches wide, and 0.88 inches deep. Its width and depth are equal, making those dimensions useful when estimating its profile. Don’t compare its height directly with a handle’s length without considering how each product is measured.
Wood and shape complete the specification picture. The Leather Edge Slicker Burnishing Tool is made of beechwood. A Wooden Leather Edge Burnisher made from turned beechwood has multiple grooves for common strap thicknesses and a tapered form for slots and tight radii. Its natural finish is a separate feature from its measurements.
Use this checklist when comparing product details:
- Length: Compare the 6-inch beechwood slicker with the 7-inch Exotic Wood Leather Slicker.
- Width or diameter: Note the beechwood model’s 1-inch diameter and the Beige Wood Slicker’s 0.88-inch width and depth.
- Working profile: Check whether grooves or a tapered tip suit the edges and slots you plan to burnish.
These figures help narrow your comparison, but dimensions don’t describe every handling detail. For example, the beechwood slicker’s 1-inch diameter and the Beige Wood Slicker’s 0.88-inch width describe different models and measurement styles. Read each specification beside its tool name. That keeps size and weight comparisons grounded in the actual item.
How to use a wooden edge slicker to burnish leather edges
A clean burnish depends on preparation, the right medium, and controlled movement. Gather your supplies first, then work through each stage in order. Set aside scrap leather for a practice pass, especially when using a new groove or burnishing medium.
What you will need
- A wooden edge slicker suited to the leather edge you’re finishing.
- An edge beveler and leatherworking tools for preparing the edge.
- Tokonole burnishing gum or another suitable burnishing medium.
- Fine sandpaper and scrap leather for preparation and testing.
- A leathercraft bundle can help bring project materials and tools together.
- Bevel the edge. Use an edge beveler to remove the sharp corner. Keep the tool’s path even along the leather.
- Sand lightly. Smooth the prepared edge before adding a burnishing medium. Check for rough spots along the full length.
- Apply a thin coat. Spread Tokonole or another burnishing medium over the edge. Avoid coating the leather face unnecessarily.
- Position the slicker. Seat the edge in a suitable groove, if the tool has one. Check that the groove guides the edge without catching.
- Burnish with steady strokes. Move the tool briskly along the edge with consistent pressure. Continue until the surface feels smooth.
- Finish with wax if desired. Apply wax as an optional final step after burnishing.
With Tokonole, brisk rubbing creates friction and heat as the gum dries. The treated edge can darken and shine. Keep the slicker moving, and pause to inspect your progress instead of repeatedly pressing on one spot.
Plan the order carefully if the leather still needs stain, antique, or dye. Tokonole may resist or block their penetration, so use caution on leather that will receive those treatments. Apply coloring before burnishing with Tokonole to avoid coating the area first.
Test your materials and movements on scrap before working on the finished piece. A short practice pass lets you adjust the groove, pressure, and amount of medium without marking your project. Once the edge feels even, repeat the controlled motion along the piece.
How much does a wooden leather edge slicker cost in the United States?
There isn’t one price for every wooden slicker in the United States. Cost depends on the tool’s wood, construction, and working design. A simple wooden form and a shaped burnisher with multiple grooves are different tools, even if both finish leather edges. Compare what each is designed to do before judging its value.
Wood choice is one factor. Beechwood and Cocobolo Rosewood are examples of woods used for leather slickers. Material alone doesn’t determine how well a tool suits your projects, but it can help explain differences between listings. Check the stated wood type, then compare the tool’s shape and features. Don’t assume all wooden burnishers are built alike.
Grooves can also affect a tool’s value. A slicker with several grooves may suit different leather thicknesses, while a basic shape may offer fewer ways to position an edge. Groove sizes matter if you regularly burnish straps of varying thicknesses. If your work uses one consistent edge profile, extra grooves may not add useful value to your setup.
Construction and finishing deserve attention, too. A turned wooden tool, a tapered tip, and a natural finish are distinct build details. A tapered profile can help reach slots and tight radii. If controlled hand use is your priority, a smooth, comfortable shape may matter more than decorative wood. Look for concrete features in the listing rather than relying on a polished product photo.
Use this comparison checklist when reviewing United States listings:
- Wood: Identify the material, such as beechwood or Cocobolo Rosewood.
- Working surfaces: Check whether the tool has grooves and whether they suit your leather edges.
- Shape: Look for a taper if your projects include narrow slots or tight radii.
- Build description: Distinguish a turned tool from a simpler wooden form.
- Intended use: Decide whether hand burnishing fits your workflow and project scale.
Compare listings on equal terms. A multi-groove slicker shouldn’t be judged against a plain design without accounting for its additional working profiles. Likewise, exotic wood doesn’t automatically make a tool the better choice for every craftsperson. Match the features to the leather you use and the edge shapes you need to finish.
For a first purchase, prioritize useful construction over appearance. If a tool’s grooves fit your regular strap work, they may be more valuable than an elaborate wood choice. If your projects need access to tight corners, consider the tool’s profile. This gives you a practical basis for weighing the price without treating every wooden edge slicker as interchangeable.
That access may matter more than the wood choice, so compare the tool with the demands of your work rather than treating any one feature as decisive. The listed prices for these two named options differ, but price alone doesn’t establish which is the better fit. Check the construction and working surfaces against your needs before deciding.
Which wooden edge slickers are best for beginners?
For a beginner, a beechwood slicker offered in four sizes is a practical place to start. The sizes are intended for different leather thicknesses, so you can choose a tool suited to the material you’re learning to finish. The best choice is the size that fits your regular projects, not necessarily the slicker with the most elaborate shape.
A clear match between groove and leather makes practice easier. The Exotic Wood Leather Slicker has grooves for leather weighing 4-8 oz, 8-10 oz, and 10-14 oz. These ranges show how a grooved tool can serve several thickness categories. If your projects use one consistent type of leather, focus on the groove that fits that work. If your materials vary, multiple grooves may prove more useful.
Begin with a simple practice routine. Use scrap similar to your project leather, prepare its edge, and test the slicker’s fit before applying burnishing medium. A groove that is too loose may not guide the edge as intended; one that feels too tight can make smooth movement difficult. Treat the test as a fit check, not a measure of the finished result.
Then build control through repeatable strokes. Keep the edge seated in the chosen groove and move the tool steadily along the scrap. Watch for consistent contact and a smooth surface. If the tool catches or wanders, stop and reassess the fit or edge preparation before continuing. This helps you identify the cause without changing several steps at once.
- Choose by leather: Match a slicker size or groove to the thickness you use most.
- Check the profile: A grooved shape suits guided edge work; a tapered form is useful for slots and tight radii.
- Practice first: Test the chosen groove on scrap before working on a finished piece.
- Keep the routine steady: Use consistent movement, then inspect the edge before adjusting your technique.
A tapered Wooden Leather Edge Burnisher can help if your beginner projects include narrow slots or tight curves. Its multiple grooves suit common strap thicknesses, while the tapered end is designed for restricted areas. That versatility can be useful, but it isn’t essential if you’re learning on straight strap edges. Choose a shape that suits the work in front of you.
For your first wooden edge slicker, prioritize a comfortable grip, a suitable working groove, and a clear match to your leather. A four-size beechwood option gives beginners a range to compare. A grooved model makes sense when its profiles suit the edges you plan to burnish. Practice on scrap, change one factor at a time, and let fit guide your choice.
How do wooden burnishers compare with canvas, plastic, or electric burnishers?
Every burnishing method creates friction, but the tool changes how you guide it. A wooden edge slicker has a shaped surface, often with grooves to position the edge. Canvas wraps around or presses against the edge, while plastic slickers offer another hand-operated surface. An electric setup adds powered movement. The right choice depends on your edge, your control, and your preferred pace.
Wood offers guided contact. A grooved wooden edge slicker can help keep a strap edge seated as you make repeated strokes. Some wooden models also taper to reach slots and tight radii. That shape is useful when a flat tool cannot reach the work comfortably. You control pressure and movement by hand, making it easy to pause and inspect the edge.
Canvas is flexible. You can rub it along an edge with burnishing gum, making it useful when you want a soft material in your hand. Unlike a grooved slicker, canvas doesn’t hold the edge in a shaped channel. You guide it around the leather yourself. This can suit edges that need flexible contact, while a wooden edge slicker provides a more defined path.
Plastic is another manual option. Its surface and shape vary, so compare the working profile rather than assuming every plastic burnisher performs alike. A wooden edge slicker may suit you when you want a groove matched to a strap thickness. A plastic tool may fit your hand or project better. Match the contact surface to the edge you’re finishing.
Electric burnishing changes the motion. The Exotic Wood Leather Slicker can be used by hand or attached to a drill for power slicking. Powered movement can help maintain a repeated motion across an edge, while hand use gives you direct control over each stroke. With a drill-mounted tool, guide the leather carefully against the slicker. Hand burnishing requires no powered equipment.
- Choose wood for hand-guided work with a shaped groove or tapered profile.
- Choose canvas when flexible contact suits the edge and burnishing medium.
- Choose plastic by checking its profile and how it contacts your leather.
- Choose powered slicking when a compatible slicker and drill fit your workflow.
Try each method on scrap before finishing a project. Keep the leather, burnishing medium, and pressure consistent while comparing tools. If you’re assembling materials and tools for your burnishing setup, a leathercraft bundle can be a useful place to start.
Hab-To Leather House: Vegetable Tanned Leather
Hab-To Leather House helps you move from edge-finishing practice to choosing leather and tools for your next project. If you’re selecting material to work with a slicker, explore vegetable-tanned Pueblo leather and consider how the leather suits your project’s construction and finish.
You can also browse leatherworking tools, hardware, and crafting bundles as you build your setup. These supplies can help you bring materials and equipment together thoughtfully when planning a project. Choose the leather first, then identify the tools and hardware your design calls for.
Visit hab-to.com to explore the range, or contact Hab-To Leather House with your leathercraft questions.
Make your next edge a repeatable finish
Let your next project build on what you’ve learned. Keep a short record of what worked, then use it to plan your next leathercraft piece. Small refinements at the bench can make your process more consistent over time.
For related reading, explore preparing leather for finishing, selecting burnishing mediums, and choosing tools for your project. Each topic can help you make more deliberate decisions at the bench.
As you plan your setup, a leathercraft bundle can bring together materials for your next project.
Keep practicing, stay curious, and enjoy the satisfaction of a carefully finished edge.
Frequently Asked Questions
What is a wooden edge slicker used for in leatherworking?
A wooden edge slicker is used to burnish and smooth a prepared leather edge. Rub it along the edge, often with a burnishing medium, to create friction as you work. For example, after shaping a strap edge, use the tool along its length. The slicker helps you maintain consistent contact without cutting or removing leather.
What types of wood are best for leather edge slickers?
Beechwood and Cocobolo Rosewood are both used for leather slickers. Neither is automatically best for every maker. A Cocobolo model’s natural oil aids slicking, while beechwood is a common material for shaped burnishers. Compare the wood with the tool’s finish, profile, and feel in your hand. These details help you choose a wooden edge slicker suited to your working style.
What sizes and shapes of wooden edge slickers are available?
These tools come in different lengths, diameters, grooves, and profiles. One beechwood model is 6 inches long and 1 inch in diameter, while some options offer four sizes. Grooved styles guide strap edges, and tapered shapes can reach slots or tight radii. Compare the tool’s working surface with the leather edge you’re finishing, then test its fit on scrap before using it on a finished piece.
Disclaimer
All our blog articles are made for information purposes only we dont take responsability for any content from third parties.