




Best Hide Part for Straps: A Leatherworker’s Guide
If you’re asking what part of the hide is best for straps, start by looking at the back or bend. These areas are often a practical starting point for long cuts because they can have a more consistent structure. But the right choice depends on the individual hide, the strap’s purpose, and the leather’s condition. Browse our hide and assess the full cutting path before you commit.
Choosing a hide area isn’t just about strength. You also want to consider stretch, thickness, surface marks, and whether the leather will provide the length you need. The shoulder can suit some straps, though it may show more natural variation. The belly is generally softer and more prone to stretching.
This guide explains how to match hide areas to a strap’s purpose and length, assess the leather, and plan your layout before cutting. A careful check at the hide stage can help you make straighter straps and use your material more thoughtfully.
Key Takeaways
- For what part of the hide is best for straps, use the back or bend as a starting point, then assess the individual hide before cutting.
- Compare the back, bend, shoulder, neck, and belly for consistency, flexibility, appearance, and possible limitations.
- Match the leather area to the strap’s purpose. A belt, bag strap, guitar strap, and tack strap may call for different priorities.
- Before cutting, list your strap dimensions, inspect the hide, and map your layout to make good use of the available leather.
- Consider the leather’s temper, thickness, construction, and intended use alongside hide location when choosing strap material.
What Part of a Hide Is Best for Straps? Start with the Back and Bend
For a long strap, the back or bend is often a sensible place to begin. These areas are commonly chosen for their relatively consistent structure, which can make it easier to cut a continuous length with an even feel. The bend is often firmer and thicker than softer areas, but that is general guidance, not a guarantee about every hide.
The back or bend can provide a consistent starting point for long strap cuts. Still, hides vary in structure and condition. The best choice depends on the individual piece, the strap’s job, and the leather’s characteristics. For background on leather types and processing, see Leather.
Why strap makers often begin with the back or bend
A belt or bag strap needs enough usable length to run cleanly from end to end. Starting in the back or bend can help you find a section with a more even character than areas where the leather may vary more. Consistency matters because a noticeable change in thickness or firmness can affect how a strap feels, bends, and finishes.
Before marking a cut, inspect the full route. Look for changes in thickness, loose or wrinkled areas, scars, and other marks that could affect the strap’s appearance or use. Consider the grain direction and whether the leather feels suitable for the load the strap will carry. If you’re comparing available cowhide leather, assess the actual piece rather than relying on its location alone.
Think of the back or bend as a starting point, not a promise. Two hides can differ, and even one hide can have areas that behave differently. Checking the exact route you plan to cut is more useful than assuming every piece from the same region will perform alike.
What makes a strap different from a small leather project?
A small project can often be cut around a mark or uneven patch. A strap gives you fewer ways to work around variation because it needs a long, narrow piece with a consistent look and feel. On a belt, a change in grain or thickness may stand out along the full length. On a bag strap, surface marks can be especially noticeable where the leather curves over the shoulder.
Judge the hide against the project’s use before choosing your cut. Ask yourself:
- Does the strap need to carry a meaningful load, or is appearance the main priority?
- Can the planned route provide the required continuous length without crossing defects?
- Will natural marks suit the finished piece, or do you want a cleaner, more uniform face?
- Does the leather’s thickness and firmness suit how the strap will bend and wear?
These checks turn a general rule into a practical cutting decision. Start with the back or bend, then let the actual hide guide the final layout.
How the Back, Bend, Shoulder, Neck, and Belly Differ
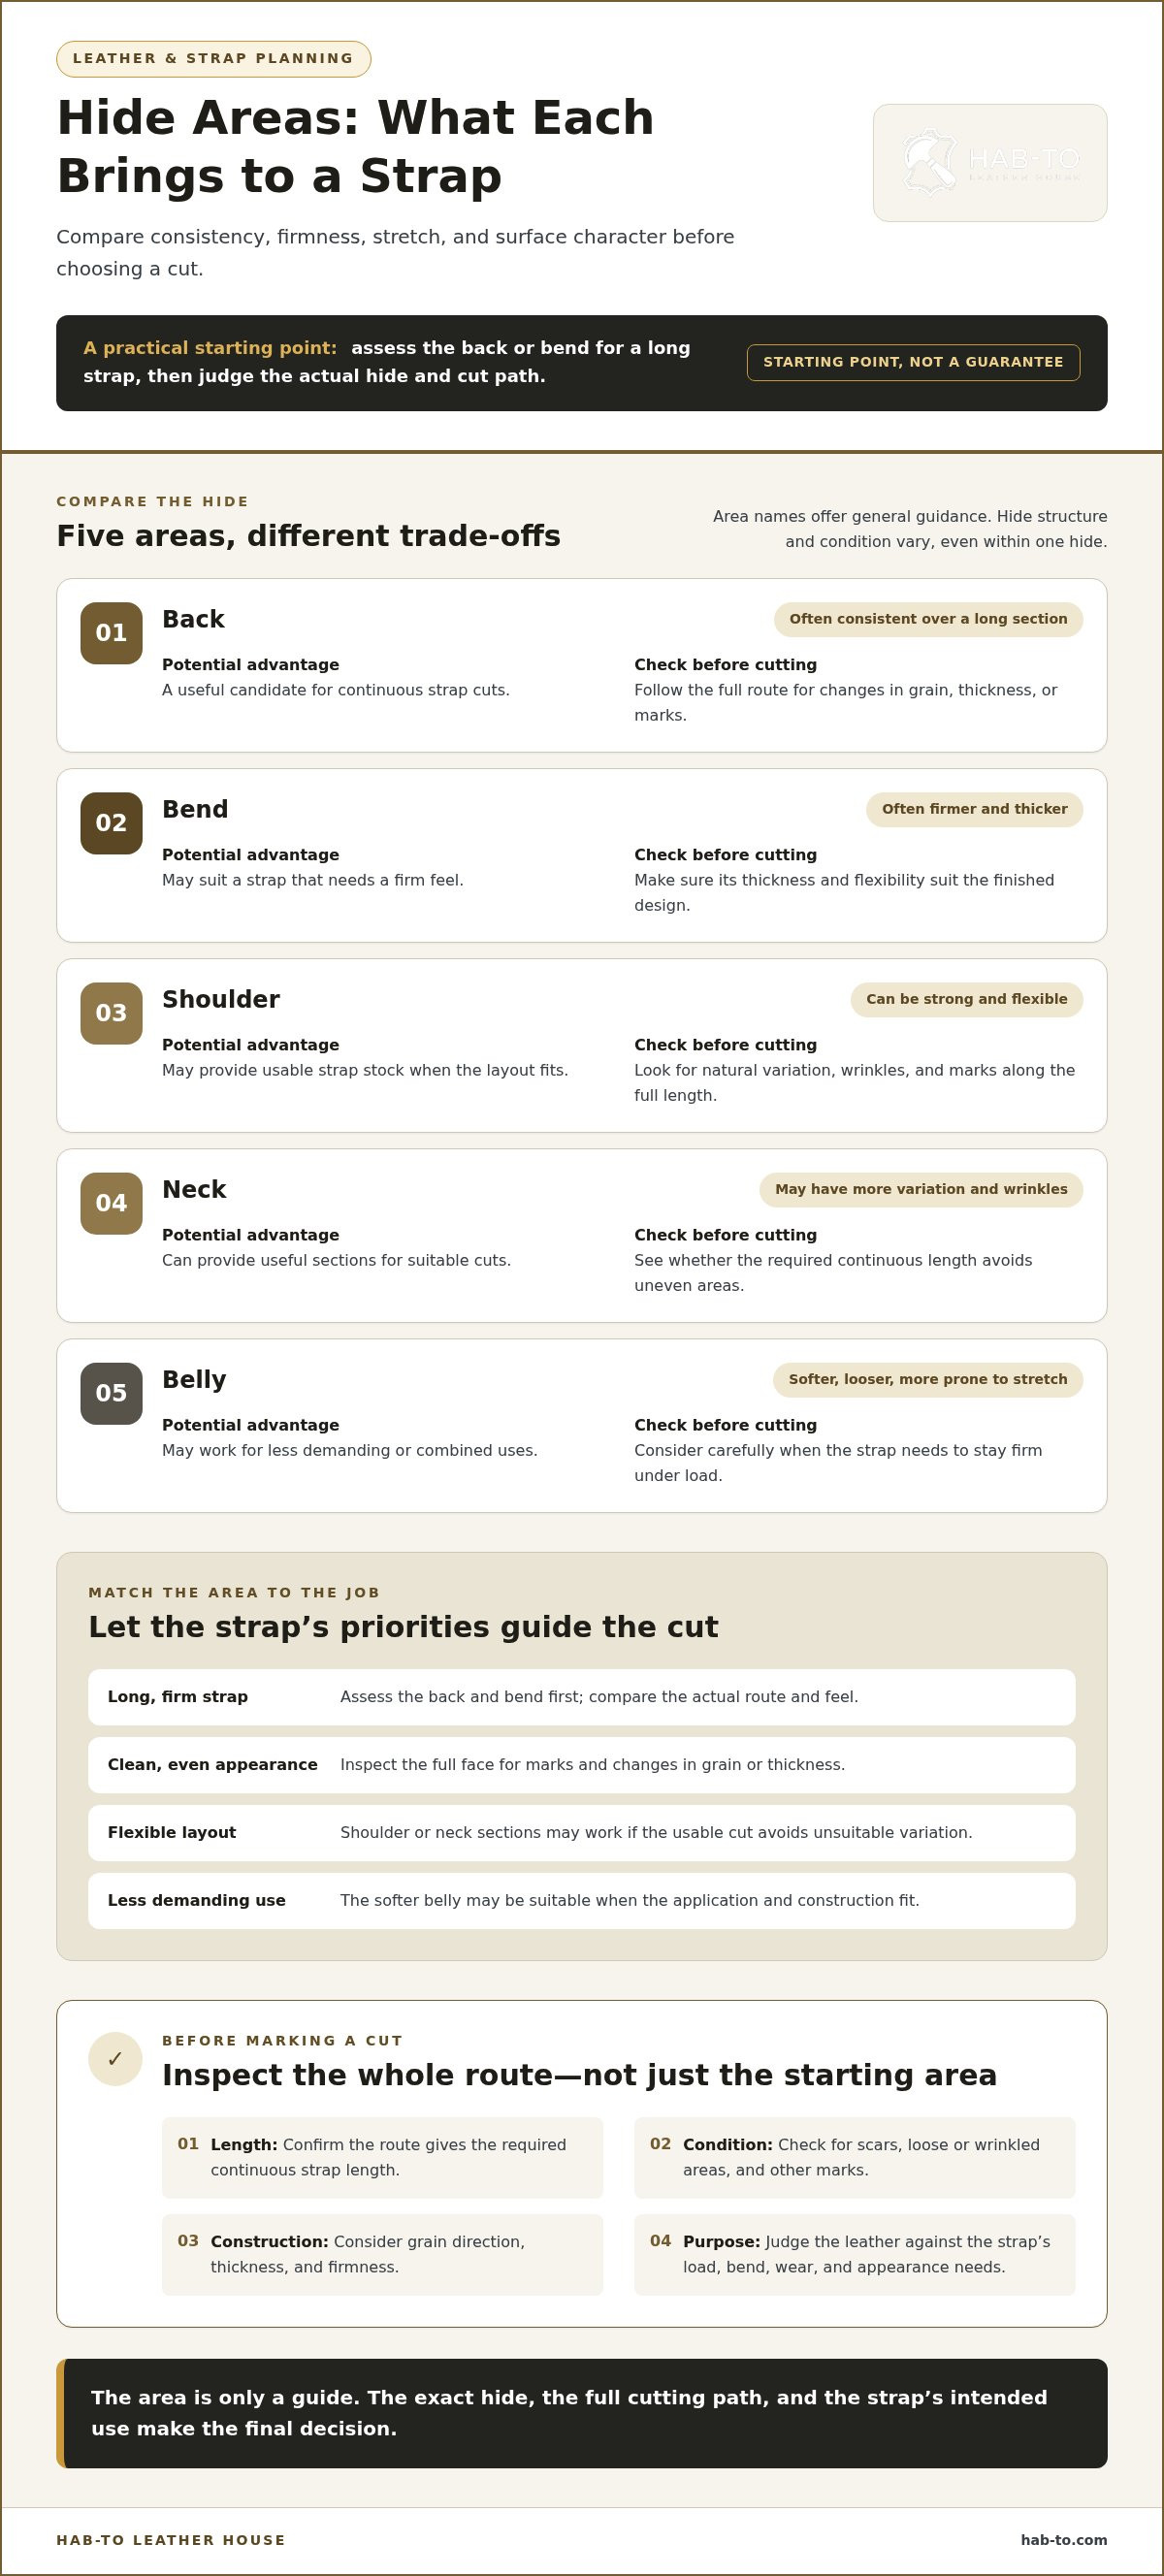
Hide areas differ in firmness, stretch, surface character, and usable shape. The back and bend are common starting points for long, firm straps, but the name of an area can’t tell you everything about a particular hide. Compare the route you plan to cut with the strap’s length, load, and appearance requirements.
| Hide area | Typical character | Possible advantage | Strap-related caution |
|---|---|---|---|
| Back | Often relatively consistent through a long section | A useful candidate for continuous strap cuts | Inspect the full cut path for changes in grain, thickness, or marks |
| Bend | Often firmer and thicker than softer areas | May suit straps that need a firm feel | Check that its thickness and flexibility suit the finished design |
| Shoulder | Can be strong and flexible, with natural variation | May provide usable strap stock when the layout fits | Look for wrinkles and marks along the full length |
| Neck | May show more surface variation and wrinkles | Can provide useful sections for suitable cuts | Assess whether the required continuous length avoids uneven areas |
| Belly | Softer, looser, and more prone to stretch | May work for less demanding or combined uses | Consider carefully before using it for a strap that needs to stay firm |
Which hide areas are most suitable for long, firm straps?
For a long belt, leash, or rein, the back and bend are often the first areas to assess. The back may provide a longer, comparatively even route for a cut, while the bend is commonly valued for its firmer, thicker character. The better choice depends on the strap. A firm feel may matter most for one design, while a smooth, consistent surface over the full length may matter more for another.
These traits are not yield figures or guarantees. Hide shape, thickness, and natural features vary. Lay out the proposed strap on the leather and inspect the complete route, including the portions that will become the finished edges.
Can shoulder, neck, or belly leather still work?
Yes, if the usable section matches the strap’s dimensions and intended construction. A shoulder may provide a suitable cut, but wrinkles, scratches, and changes in thickness can interrupt the line or show on the finished piece. Inspect the neck closely, too. These features aren’t automatic reasons to reject an area. Their importance depends on where they fall and how visible or stressed that part of the strap will be.
The belly’s softer, looser character can make it a less suitable choice for a strap that needs to resist stretching under load. That doesn’t make it useless. It may suit a less demanding application or a project that combines pieces, provided the construction fits the material. For a belt project, browsing leather for belts can help you compare suitable options. Let the intended use, required length, and condition of the leather guide your choice.
Choose the Right Hide Area for Your Strap’s Job
The best cut depends on what the strap needs to do, not just where it sits on the hide. A belt, bag strap, guitar strap, and tack strap may all need a continuous length, but they don’t necessarily need the same balance of firmness, flexibility, and surface appearance. Start with the job, then assess the hide, leather temper, and planned construction together.
Match the cut to length, firmness, and flexibility
First, place the full strap pattern on the hide and look for an uninterrupted cutting path. A long piece with an even feel can be more useful than a supposedly ideal area that can’t provide the length you need without crossing a flaw or a major change in character. Account for the finished strap’s shape and attachment points, too.
Then weigh these priorities against the project:
- Belts: A belt that needs to hold its shape may call for a firmer, more stable section. Consider how the leather will bend around the wearer and how the buckle and holes will be constructed. For project-focused options, explore leather for belts.
- Bag straps: A shoulder strap needs to balance support with comfort. A firm piece may suit a structured design, while a softer temper may work better when the strap needs to drape. The bag’s construction and strap attachments also affect the choice.
- Guitar straps: Comfort and flexibility can matter during extended wear, alongside a consistent look across the visible length. Consider how the strap will sit against the body and whether the leather’s temper suits that movement.
- Tack straps: For equipment expected to carry a load, firmness and a reliable, continuous section may take priority. Match the material to the intended use and construction rather than relying on hide location alone.
There’s no universal thickness or temper that fits every strap. Choose based on the design and intended load, and assess the actual leather before committing to the cut.
Choose for appearance as well as performance
A strap is a long, visible surface. Natural marks, grain changes, and shifts in colour or texture can become prominent along its length. That character may suit a rustic design; for a more uniform finish, look for a cleaner cutting path. The cowhide leather range is one material category to consider, but inspect each hide on its own terms.
Before cutting, lay out the strap’s most visible section first. Decide where you want the cleanest surface, and keep marks away from areas where they would disrupt the design or sit at a high-stress point. If the strap will be folded, stitched, or reinforced, factor that construction into your layout. What part of the hide is best for straps? The answer depends on the required length, firmness, flexibility, appearance, and intended use.
Plan and Cut Straps from a Hide Without Guessing the Yield
A cutting plan turns a hide into a set of deliberate choices instead of a hopeful estimate. Start with the straps you need, inspect the leather you have, map each cut, and only then mark and cut. The usable result depends on the hide’s dimensions and shape, natural features, and the lengths and widths your project requires.
Yield charts are planning estimates, not guarantees, because every hide’s shape, usable area, and strap layout differ. A chart can help you understand general possibilities, but it can’t account for the marks or contours on the piece in front of you. Assess the hide itself before deciding how many straps it can provide.
Inspect and map the usable area before cutting
Begin by listing each strap’s finished length and width, along with any other pieces you need from the same leather. Note which sections will be most visible and whether the design requires a single uninterrupted length. This gives you a clear target before arranging patterns across the hide.
- List the dimensions. Record the required length and width of each strap. Include the portions needed for folds, fastening, or other construction details in your pattern, rather than assuming the visible measurement is the full cut length.
- Inspect the hide. Look over the proposed area for natural marks, wrinkles, brands, and changes in thickness. Check the face and the shape of the usable section. Don’t assume the hide has uniform dimensions or that every part can be cut into a straight, continuous strip.
- Map the cuts. Arrange the longest straps first, then fit shorter pieces around them. Position the cleanest areas where they’ll be most visible, and move a pattern if a flaw would cross an important section or create an unwanted change in appearance.
- Mark and cut. Use a straightedge to mark the full route, then recheck the line, width, and endpoints before cutting. A cut is difficult to undo, so pause if the pattern crosses a wrinkle, changes direction unexpectedly, or doesn’t follow your intended grain direction.
Mark strap direction and make the cut deliberately
Before finalizing the layout, consider how the grain runs and how the leather stretches along the planned strap. Direction can influence how the finished piece behaves, so align the cut with the project’s needs rather than turning a pattern simply to use a gap. Check that the route stays consistent from end to end.
If you’re choosing leather before it arrives, use the available description and images to assess the hide’s shape, visible character, and usable area, then plan conservatively. Once you can examine the actual piece, adjust the layout to its contours and features. Measure twice, mark the complete length and width, and cut only when the straightedge confirms the route you intend.
Choose Strap Leather and Materials That Fit Your Project
For many long straps, the back or bend is a sensible place to start, then inspect the actual hide. Location is only one factor. Leather type, temper, thickness, grain, and construction all influence how well the material suits your design. Consider what the strap needs to do, how it should feel, and how much material your pattern requires.
Hab-To Leather House focuses on vegetable-tanned leather and has no minimum order requirement. Leather is available by dm², as a panel, or by shoulder, depending on the product. That gives you options when your project calls for less than a whole hide. No particular cut guarantees a result, so compare the material’s visible character with your project before committing. VAT is included for purchases within the Netherlands and excluded for purchases in other countries.
What to consider when sourcing strap leather
Bring your project dimensions and intended use into the decision. A belt, bag strap, or other design may call for a different balance of firmness and flexibility. Look at the leather’s surface and usable shape, and think through how the strap will be assembled and finished. Leather samples can be requested, and a nominal fee may apply.
For personal guidance, Hab-To Leather House offers a free 15-minute video consultation with Mike. Discuss your project and the material qualities you’re weighing before choosing. It’s a practical way to get an experienced leatherworker’s perspective while keeping the final decision grounded in the leather itself.
What you will need
- Leather for your project: Choose material to suit your planned strap and pattern.
- Marking and cutting tools: A straightedge and appropriate leatherworking tools help you prepare and cut your layout.
- Edge-finishing materials: Consider Tokonole and edge-finishing bundles for your finishing work.
Build your materials around the project. Explore leathercraft bundles as you prepare for your next make.
Put Your Strap Plan Into Practice
Your next project is a chance to turn careful material selection into a repeatable workshop habit. Note the choices you make and how the leather works with your design. Those observations can help you refine patterns and material decisions for future projects.
If you’re sourcing leather for a new make, the guide to buying leather online offers useful context for assessing material before it arrives.
For your next strap project
Explore leathercraft bundles as you gather materials for the work ahead.
Trust your eye, plan with care, and enjoy making something built to be used.
Frequently Asked Questions
Which part of a cowhide is strongest for straps?
The back or bend is often the strongest place to start looking for strap leather. Makers commonly value the bend for its firmer character and the back for a potentially more consistent cutting path. Neither location guarantees the same performance in every hide. To decide what part of the hide is best for straps, consider the strap’s intended load and length, then inspect the actual leather for features that could affect its use.
Is belly leather unsuitable for making straps?
No. Belly leather tends to be softer, looser, and less consistent, so it may not suit every long or load-bearing strap. But suitability depends on the design and construction. A less demanding strap or a project that uses the belly alongside firmer leather may make use of that area. Assess how the finished piece will be used before deciding to include or avoid it.
Should leather straps be cut along the backbone?
Not automatically. The backbone can help orient your layout, but the best cutting direction depends on the hide’s natural shape, grain, and stretch, as well as the strap’s purpose. Lay out the full pattern and check how the leather feels along the proposed route. If the line crosses an irregular area or leaves too little usable length, adjust the layout instead of following one direction as a fixed rule.
Can you cut long straps from shoulder leather?
Yes, a shoulder may provide material for a long strap if its usable area suits your pattern. Compare its available length and width with the finished dimensions, allowing for folds or attachment details. Then check the complete route for wrinkles, scratches, and shifts in thickness or surface character. A shoulder’s usable length varies, so assess the individual piece instead of assuming every shoulder will provide the same clear, uninterrupted cut.
How do you get the most straps from a hide?
List the strap lengths and widths you need, inspect the hide, map the longest cuts first, and mark each route before cutting. Fit smaller pieces around the main straps only where the leather’s character suits their purpose. The number of usable straps depends on the hide’s dimensions and shape, natural features, and your required sizes. Treat yield estimates as planning aids, not promises, and recheck every mark before making a cut.
Do I need to buy a whole hide to make leather straps?
No. Hab-To Leather House has no minimum order requirement, and leather is available by dm², as a panel, or by shoulder, depending on the product. Plan around the quantity and shape your strap project needs. Measuring your pattern first can help you avoid sourcing more material than necessary while leaving enough for the strap’s construction and layout.
Disclaimer
All our blog articles are made for information purposes only we dont take responsability for any content from third parties.