




How to Glue Leather Pieces for Stitching: Master Guide
Leather glue doesn't exist to hold your project together forever. Thread provides the true mechanical strength; adhesive simply freezes your seams in place so your needles can do their job. If you've ever wrestled with gummy pricking irons, misaligned layers, or harsh chemical fumes filling a small home workshop, you know how quickly poor bonding ruins a fine cut of vegetable-tanned leather. Learning how to properly glue leather pieces for stitching is the single best way to protect your tools and elevate your craft.
You shouldn't have to endure oozing edges or shifting panels right before your punch strikes. In this master guide, you'll master clean seam preparation, modern water-based adhesive selection, and deliberate pressing methods that produce crisp, permanent alignment without compromising leather temper. We'll explore the essential workshop habits to prepare, coat, and join every seam for effortless saddle stitching.
Key Takeaways
- Understand why leather glue serves as an accurate positioning clamp rather than the source of structural strength.
- Discover why modern water-based adhesives safeguard indoor workshop air quality while keeping seams pliable for burnishing.
- Learn how to properly glue leather pieces for stitching by abrading the grain surface to establish a strong mechanical tooth.
- Recognize the visual cue that signals water-based contact adhesive is ready for pressure bonding without messy edge oozing.
- Safeguard expensive pricking irons by using deliberate cure times and crepe rubber clean-up techniques before driving a single punch.
Why Proper Leather Gluing Dictates Your Stitching Precision
Precision hand sewing demands absolute stability. When you drive a pricking iron through multiple layers of vegetable-tanned leather, the impact forces unbonded layers to slip. Even a fraction of a millimeter shift results in crooked stitch channels on the backside of your project. Relying solely on binder clips or double-sided tape often causes leather stretch, uneven pricking holes, and gummy residue that dulls expensive irons. Understanding how to properly glue leather pieces for stitching ensures every cut component stays flush and rigid under hand pressure.
Before examining the underlying mechanics, watch this practical comparison illustrating how different leather glues behave on your workbench:
The Mechanical Role of Adhesives in Saddle Stitching
Think of your adhesive as an invisible, permanent clamp. While historic workshops once depended heavily on rendered animal glue for bookbinding and luggage assembly, modern leatherwork uses targeted formulations designed to flex naturally with fibrous hides. Hand stitching requires zero movement between parts. If layers shift while you cast your threads, your saddle stitch will pucker instantly. Adhesive locks the grain and flesh fibers together, distributing tension across the seam while your thread provides the lasting structural hold.
What You Will Need: Essential Tools and Supplies
Flawless seams require deliberate preparation and clean tooling. Here is the foundational workbench kit for securing your edges properly:
- Water-Based Adhesive: Choose an odorless, non-toxic formulation like Ecostick 1804 for studio safety and flexible seams.
- Glue Spreaders and Bone Folder: Flexible plastic paddles spread glue uniformly; a polished bone folder applies controlled edge pressure without scratching full-grain leathers.
- Scratch Awl and Brass Ruler: Mark precise glue boundaries along your stitching allowance to keep dry edges completely glue-free.
- Pricking Irons and Chisels: Explore our curated leatherworking tools to select diamond or French-style irons that cut clean holes without binding.
- Comprehensive Sets: Pick up all-in-one solutions such as our crafting bundles or the dedicated leathercraft master bundle Ecostick to prepare your workshop immediately.
Mastering how to properly glue leather pieces for stitching prevents adhesive from running into your stitch line. With the right tools laid out on your bench, choosing an adhesive formulation suited to your working environment becomes straightforward.
Choosing the Right Adhesive: Solvent Cement vs. Water-Based Glue
Every leathercrafter eventually faces the choice between traditional chemical contact cements and modern water-based formulas. Your adhesive dictates how easily you punch holes, how clean your seam looks, and whether you can safely work at your dining table or kitchen bench. Understanding chemical behavior is the first critical step when learning how to properly glue leather pieces for stitching without ruining high-grade hides.
The Problem with Heavy Solvent Cements in Small Studios
Solvent-based contact cements rely on volatile solvents to carry their bonding polymers. As these chemicals flash off, they fill enclosed rooms with potent, noxious fumes that demand commercial-grade fume extraction. Beyond personal health hazards, aggressive solvent carriers can penetrate deeply into vegetable-tanned hides, drawing out natural fats and leaving dry spots along the grain. Over years of flex, heavy solvent glue lines often cure into a hard, brittle boundary that cracks internally and resists clean edge burnishing.
Why Water-Based Ecostick Is the Modern Craftsman Choice
Italian water-based polymer technology represents a fundamental upgrade for fine leathercraft. Adhesives like Ecostick 1804 eliminate toxic fumes, creating an entirely odorless bonding process suited for compact home workshops. They dry completely transparent, leave no gummy residue on pricking irons, and maintain the natural temper of your leather.
- Natural Flexibility: The cured polymer moves with full-grain fibers rather than forming a rigid plastic spine inside your seam.
- Edge Finishing Friendly: Because the adhesive remains pliable, edges bevel cleanly and absorb water-based burnishing agents like Tokonole without leaving resistant white glue lines.
- Studio Safety: Non-flammable, zero-VOC formulations keep small spaces clean and safe for daily crafting sessions.
- High Shear Strength: Provides intense temporary holding power that stops seam creep during chisel strikes while allowing easy alignment before pressing.
If you're outfitting a home studio, exploring our complete crafting bundles gives you the exact adhesives, spreaders, and prep tools needed to establish healthy workshop habits from day one. Knowing how to properly glue leather pieces for stitching requires pairing the right glue chemistry with deliberate surface preparation before you ever lay down a bonding line.
Surface Preparation: Preparing Your Leather for a Permanent Bond
Applying adhesive over a smooth, glazed grain surface is the fastest way to cause seam failure. Premium vegetable-tanned hides feature a dense, protective epidermal layer that repels liquid adhesives rather than absorbing them. Without intentional abrasion, your glue forms an insecure skin that delaminates the moment your needles pull tension. Knowing how to properly glue leather pieces for stitching starts with mechanical keying: opening those tightly packed surface fibers so the polymer can anchor deep into the hide.
Roughening the Grain Side Accurately
Set a wing divider from your leatherworking tools to match your precise seam allowance, typically 3 to 4 millimeters from the edge. Scribe a faint guide along the grain. Keep all roughing strictly inside this line. Using a brass wire scratch brush or 120-grit sandpaper, abrade the glazed surface until it takes on a velvety, matte appearance. Wipe away every speck of loose leather dust with a dry horsehair brush before touching the piece with adhesive. Trapped dust creates a barrier that prevents intimate contact between matching panels.
Skiving and Edge Tapering for Flat Seams
Stacking two unskived pieces of 2.0mm leather creates an unsightly 4.0mm edge that resists neat beveling. Skiving thins the perimeter to maintain balanced, professional proportions across every seam:
- Feather Skiving: Shave a gentle, tapering angle across the seam allowance using a freshly stropped Japanese skiving knife or French skiving edger.
- Symmetry Check: Ensure both mating pieces mirror each other in thickness. Uneven margins result in wavy stitch lines and visible stepping on the burnished edge.
- Protecting the Core: Taper only the perimeter where the layers overlap, leaving the interior body of your panel untouched to preserve overall structural rigidity.
- Substrate Preparation: If joining lining to dense outer hides like Badalassi Pueblo leather, gently scuff the flesh side as well to ensure an even absorption rate across both surfaces.
Meticulous surface prep prevents glue from migrating beyond your stitch channel. Taking these few extra minutes guarantees you execute how to properly glue leather pieces for stitching with razor-sharp precision, setting up an effortless application step.
How to Glue Leather Pieces Step-by-Step for Hand Stitching
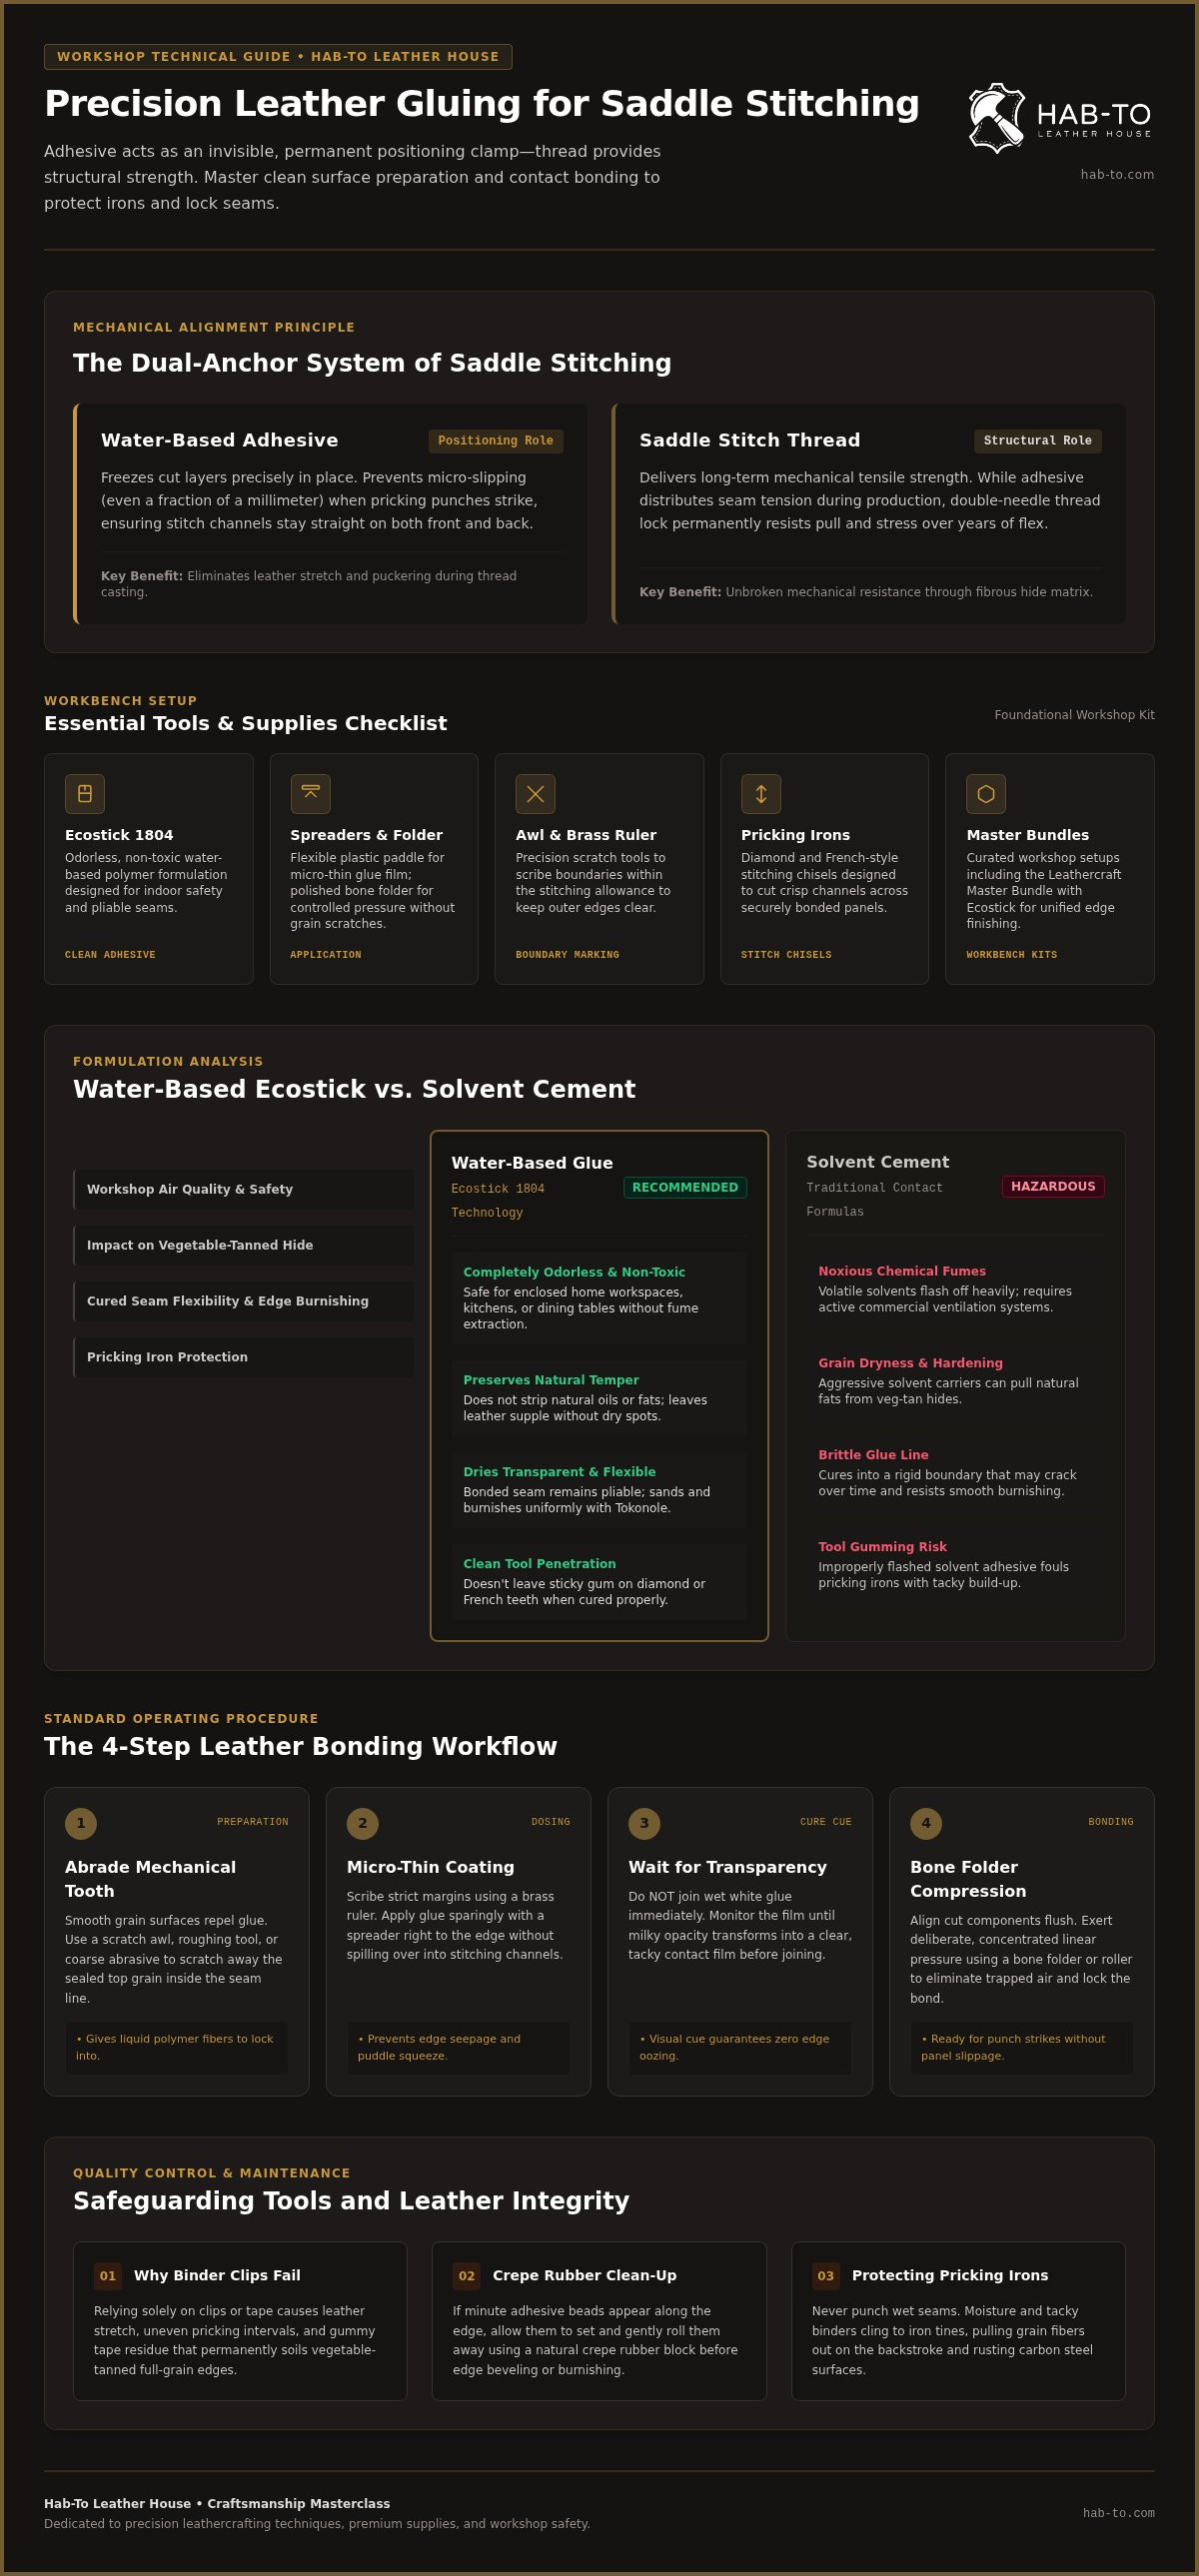
Execution separates amateur leather projects from heirloom craft. Once your bonding channels are abraded and skived, the actual join takes minutes, but it demands strict discipline. Rushing the bond while glue remains wet invites sliding panels and gummy stitch holes. Following a methodical, four-step routine is the secret to mastering how to properly glue leather pieces for stitching with dependable precision.
Applying the Adhesive Without Excess or Seepage
Dip only the tip of a flexible plastic spatula into your adhesive. Spread a micro-thin, unbroken film across both prepared mating faces. Never pour directly onto the hide. Stop your application two millimeters shy of the interior visible margin; when the layers compress, the liquid naturally creeps inward to fill that perimeter without leaking onto clean grain. Watch the color closely. Water-based polymer adhesive applies milky white. As the water content evaporates, the film turns completely clear and glossy. Once transparency arrives and the surface resists finger transfer with a dry, aggressive tack, your window for maximum contact bonding opens.
Aligning and Pressing the Seam
Precision joining requires careful alignment before full contact takes place:
- Reference Registration: Align the critical reference corner first. Let edges kiss gently rather than pressing down immediately across the entire length.
- Directional Closure: Walk the bond forward from one end to the other in a single sweep. This directional movement pushes out trapped air pockets that otherwise cause hollow bubbles.
- Roller Consolidation: Run a smooth steel or hardwood roller along the seam with firm, downward pressure to activate the contact bond between opposing polymer chains.
- Targeted Compaction: On heavy strap work cut from dense hides like Virgilio Vacchetta leather, tap the seam lightly with a smooth-faced cobbler hammer over a granite slab to seat thick fibers together.
Patience during this alignment phase guarantees that every needle path stays straight through both pieces. Learning how to properly glue leather pieces for stitching ensures that zero wet residue creeps into your punch marks when you pick up your irons.
Explore our curated stitching bundles to upgrade your hand-sewing kit.
Preventing Glue Seepage, Cleaning Residue, and Next Crafting Steps
Even seasoned leatherworkers occasionally encounter adhesive seep along an exterior stitch line. The instinct to scrape away wet glue with a metal awl or douse the grain in harsh chemicals like acetone will permanently ruin high-end vegetable-tanned hides. Chemical solvents strip natural tanning oils, discoloring raw fibers and leaving permanent dry patches. Clean workshop practices ensure accidental seepage never damages your investment or gums up your fine stitching tools.
Removing Glue Spills and Protecting Pricking Irons
Let any stray squeeze-out dry completely before attempting cleanup. Once dry, rub a block of natural crepe rubber gently across the affected grain. The crepe rubber catches dry polymer chains and rolls them cleanly away without scratching delicate aniline surfaces like Maryam Vacchetta leather. Never drive your punches into an uncured seam. Wet adhesive pulls up through stitch holes, clinging to blade teeth and increasing pulling friction. If your irons pick up residue, drive them through scrap veg-tan moistened with a tiny smear of Tokonole burnishing gum to wipe the metal clean instantly.
Explore More Guides and Studio Bundles
Completing a cleanly glued seam opens the door to final assembly, stitching, and edging. Take your craft further by exploring our foundational workshops and practical supply kits:
- Hardware Selection: Pair your newly bonded seams with our comprehensive guide to essential leather hardware to find solid brass buckles and rivets.
- Hands-On Learning: Build advanced structural techniques and master traditional construction directly through our expert leathercraft workshops.
- Dedicated Adhesion Kit: Pick up the comprehensive Ecostick leathercraft bundle to secure medical-grade water-based adhesive alongside precision spreaders.
- Comprehensive Sets: Equip your bench for every stage of assembly with our fully stocked curated crafting bundles.
Understanding how to properly glue leather pieces for stitching transforms every downstream step in your project. With your layers securely aligned, clean holes punched, and zero gummy residue resisting your needles, your saddle stitching will pull down flat, straight, and true.
Elevate Your Seams with Generational Craft Standards
Flawless hand stitching begins long before your needles thread the leather. Mastering how to properly glue leather pieces for stitching transforms your entire construction flow. By keying grain surfaces deliberately, relying on modern water-based adhesives rather than harsh solvent cements, and waiting for the clear contact cue, you protect your pricking irons and ensure crisp, unyielding edge alignment.
Drawing on 160 years of family leatherworking heritage since 1857, we know that uncompromising materials produce heirloom results. As an official stockist of Italian Intercom Ecostick water-based adhesives, we serve bespoke artisans across Europe with zero minimum order quantities. Your bench deserves supplies that respect both your craft and your health.
Take pride in every step of your preparation. With clean adhesive habits firmly in place, every stitch you cast will lay flat, even, and built to endure for decades.
Frequently Asked Questions
Can I stitch leather without using glue along the seams first?
No, skipping adhesive almost always leads to misaligned stitching holes and puckered seams. While clips temporarily pinch leather, they can't prevent the middle sections from shifting as your pricking iron punches through multiple plies. Adhesive locks the entire seam flat, distributing mechanical stress evenly across the leather fibers so your saddle stitch stays uniform from start to finish.
Why does leather glue gum up my pricking irons and stitching needles?
Sticky residue on tools happens when you punch or stitch through adhesive that hasn't cured completely. Liquid or semi-wet glue clings to steel teeth upon entry, dragging gummy residue through the hole. Learning how to properly glue leather pieces for stitching requires waiting until water-based contact adhesive turns fully transparent, dry, and tack-free to the touch before driving your irons into the seam.
How long should I let leather glue dry before joining the pieces?
Water-based contact glues like Ecostick generally require about five to ten minutes of drying time depending on workshop temperature and humidity. The exact timing matters less than the visual cue: the wet, milky white liquid must turn entirely clear and glossy. Once it looks completely transparent, you can press the pieces together immediately for an instant, permanent hold.
What is the best way to remove excess glue from vegetable-tanned leather?
A natural crepe rubber eraser is the safest tool for lifting dried adhesive from vegetable-tanned surfaces. Never try to rub wet glue off raw grain, as moisture pushes the polymers deeper into the pores. Let stray drips dry completely, then rub the crepe block lightly across the spot. The natural rubber rolls the dried film away without abrading sensitive aniline leather finishes.
Can I use ordinary PVA wood glue for leathercraft projects?
Standard carpenter's PVA wood glue shouldn't be used because it dries into a rigid, brittle plastic barrier. Leather naturally bends, breathes, and flexes with daily use, which quickly causes wood glue lines to snap internally. Quality leatherwork requires specialized water-based polymer formulations that remain permanently supple, preserving the temper of your vegetable-tanned leather throughout its working lifespan.
Does leather glue replace the need for saddle stitching?
Leather adhesive never replaces traditional saddle stitching on functional goods. Glue offers high shear strength to keep layers aligned against sliding forces, but it lacks the peeling resistance needed to withstand tension at stress points like pockets and gussets. Understanding how to properly glue leather pieces for stitching ensures your adhesive holds everything in position while durable thread supplies lasting mechanical strength.
How do I prevent glued leather edges from becoming stiff and difficult to burnish?
Keep your adhesive layer micro-thin and stop your application about one millimeter back from the raw edge. Heavy applications force excess glue to squeeze out between layers during pressing, forming a rubbery boundary along the edge. Excess glue blocks burnishing gums from penetrating raw vegetable-tanned fibers, preventing you from achieving a glassy, seamless burnish.
Disclaimer
All our blog articles are made for information purposes only we dont take responsability for any content from third parties.