




How to Remove Excess Glue from Leather: A Professional Crafter’s Guide
What if the safest way to remove glue from vegetable-tanned leather is to use less force, not a stronger solvent? If you’re searching for how to remove excess glue from leather, you’re right to be cautious. Sticky residue can collect dirt, but a rushed scrape or harsh chemical can stain the porous grain and damage the fibres you’ve worked hard to preserve.
I’m Mike, and after more than 25 years working with leather, I’ve learned that glue removal is a craft skill in its own right. Patience and careful mechanical action come first. The aim is a clean surface, not a quick fix that leaves a permanent mark.
In this guide, I’ll walk you through a careful approach for wet and dried residue, explain how tools such as a crepe rubber or bone folder can help, and flag methods that carry a higher risk for veg-tan leather. We’ll also look at preventing future glue messes, including choosing an adhesive suited to your work, such as Ecostick 1804. Take it slowly, and you can protect the natural character of the hide while restoring a tidy finish.
Key Takeaways
- Learn how to remove excess glue from leather with a measured approach that helps protect vegetable-tanned leather’s grain and fibres.
- For wet adhesive, lift the excess rather than rubbing it, especially on porous leather such as Pueblo leather.
- Discover how a crepe rubber can help tackle dried residue through gentle mechanical action.
- Understand why I avoid reaching for acetone and other harsh solvents when working with natural leather.
- Explore how Ecostick 1804 can support cleaner glue habits at the workbench.
Preparing Your Workbench: What You Will Need
The first rule in my atelier is simple: don’t panic and reach for the nearest solvent. Vegetable-tanned leather can be porous, so a hurried scrape or unsuitable cleaner may leave a mark that’s harder to fix than the glue. Before deciding how to remove excess glue from leather, check whether the adhesive is wet or dry, where it sits, and whether the surface is finished.
Set up a clean, well-lit workbench so you can see the residue clearly and keep clean tools close at hand. In my family, 160 years of leather experience have taught us that patience beats force. Glue removal is a craft skill. Work slowly, and test your approach on scrap or a hidden area first.
For a visual reference, watch this demonstration from Black Flag Leather Goods, then assess your own leather and adhesive before choosing a method:
What You Will Need
Gather a few controlled, clean tools before you begin. These let you lift or blot adhesive rather than spreading it across the grain. For leathercraft tool options, see the professional leatherworking tools collection.
- Crepe rubber eraser: Use gentle, slow movements to lift dried contact cement.
- Bone folder: Its smooth edge can help ease up residue without digging into the grain.
- Fine-grit sandpaper, 400–600: Reserve it for stubborn raised spots on the flesh side. Use sparingly, as sanding removes leather fibres.
- Clean microfibre cloths: Keep several nearby to blot wet spills, using a fresh section each time.
Professional Supplies to Have on Hand
Keep your cleanup tools clean and separate from glue-covered applicators. Before using any adhesive, read its directions and know which cleanup method the manufacturer recommends. I suggest considering Ecostick 1804 for future projects, while checking its product instructions rather than assuming how a spill should be cleaned.
The Leathercraft Master Bundle is another option to explore when preparing supplies for leatherwork. Choose tools suited to the task, test methods on scrap, and give the leather time and care. That’s a better start than reaching for a harsh cleaner in a hurry.
Removing Wet Glue Before It Sets
A fresh glue spill is easy to mishandle. Wiping it straight away can push adhesive across the surface and into the grain, turning a small spot into a wider stain. On porous vegetable-tanned leather, including Pueblo leather, lift first and blot second. The grain side is the outer, finished surface; the flesh side is the fibrous underside, and each can react differently to moisture and pressure.
Vegetable-tanned leather can absorb liquids quickly because its open, porous structure allows moisture to travel into the hide. Test your cleanup method on a matching offcut or hidden area before treating the project piece. Check the adhesive’s instructions, too. Water cleanup is only appropriate when the glue maker recommends it.
Step-by-Step Wet Glue Removal
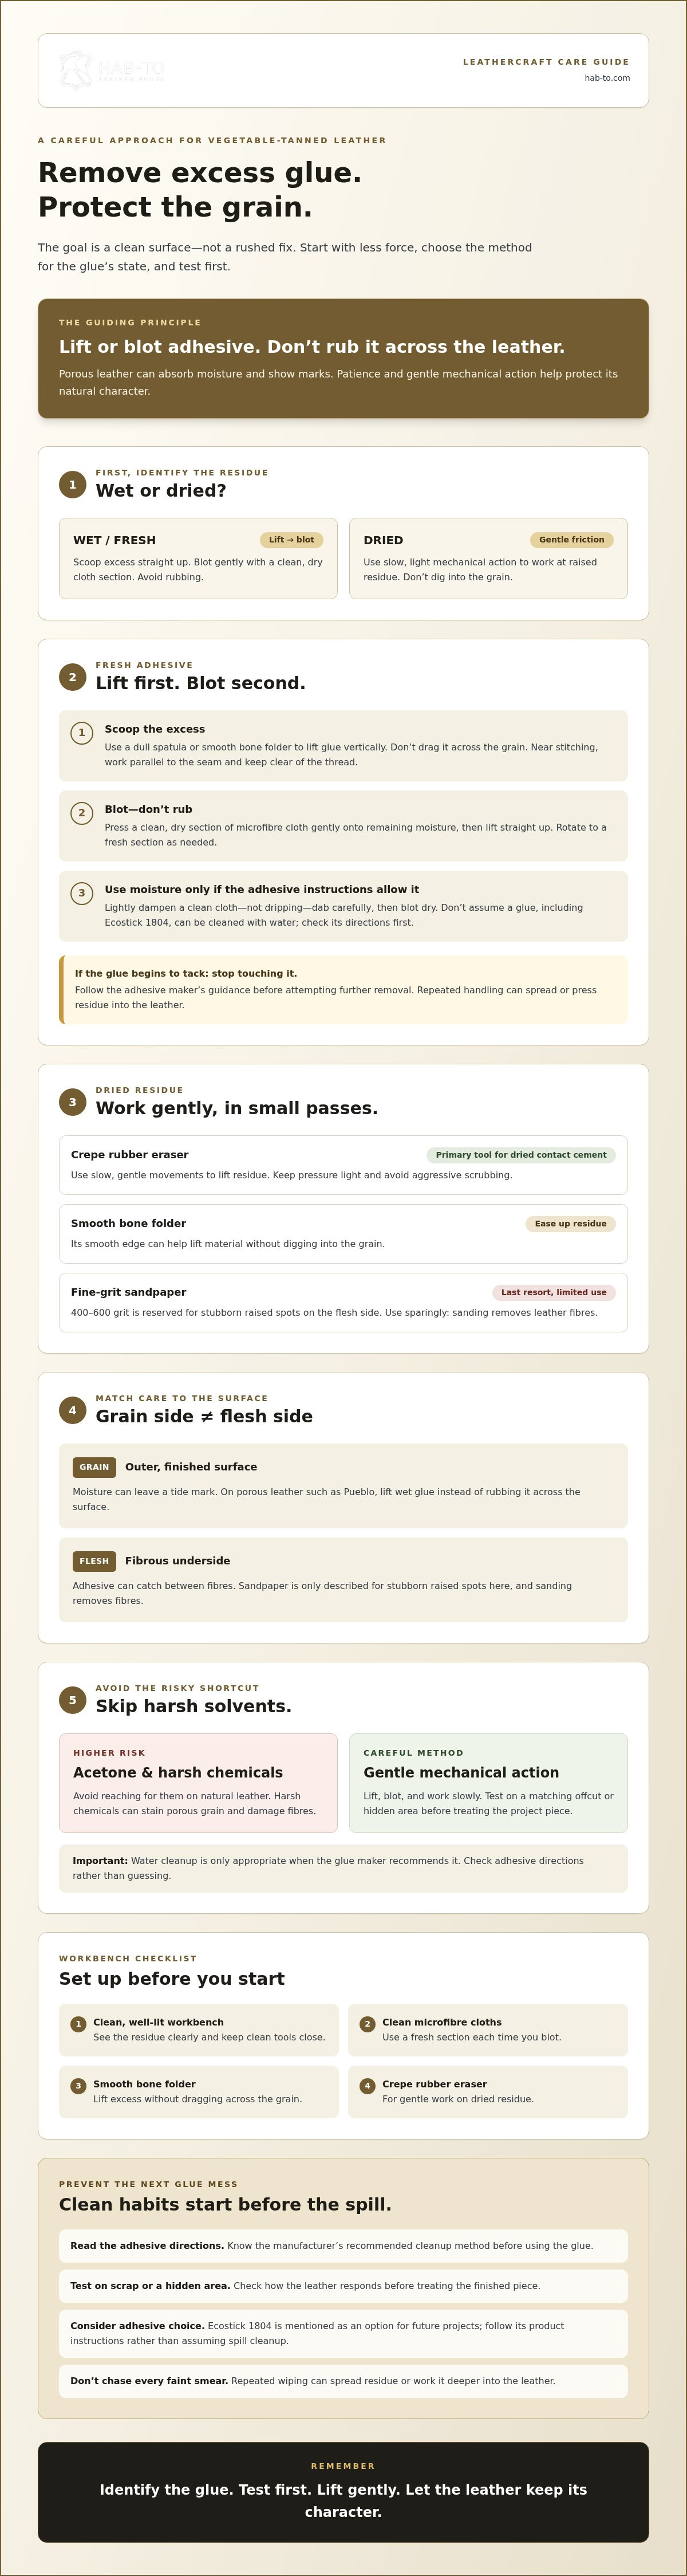
- Scoop the excess: With a dull spatula or smooth bone folder, lift glue vertically from the surface. Don’t drag the tool across the grain. For squeeze-out along a stitching line, work parallel to the seam and keep the tool clear of the thread.
- Blot, don’t rub: Press a clean, dry section of microfibre cloth gently onto the remaining moisture, then lift it straight up. Rotate to a fresh part of the cloth as needed. Rubbing can spread residue and work it deeper into the leather.
- Use a damp cloth only if suitable: If the adhesive instructions allow water cleanup, lightly dampen a clean cloth. It should not be dripping. Dab the residue carefully, then blot with a dry cloth. Don’t assume every water-based glue, including Ecostick 1804, can be removed with water; check its directions first.
Protecting the Grain Side
The grain side shows the leather’s natural surface and can reveal a tide mark if moisture spreads. The flesh side is more fibrous, so adhesive may catch between fibres rather than sit cleanly on top. Keep pressure light on both sides, and use a scrap from the same leather to test how it responds before working on the finished piece.
During assembly, remove raised squeeze-out while it’s still accessible, but don’t chase every faint smear with repeated wiping. If the glue begins to tack, stop touching it and follow the adhesive maker’s guidance before attempting further removal. More handling can spread or press the residue into the grain. For another gentle approach to glue spots, see How to remove glue spots, then test any suggested method on scrap leather before applying it to your project.
If you’re assembling a project and want your core supplies together, browse the leathercraft bundles and check each adhesive’s instructions before use.
How to Lift Dried Residue Without Damaging the Grain
Once glue has dried, resist the urge to dig at it with a fingernail or blade. For a small, raised patch of contact cement, I start with a crepe rubber eraser. It grips the adhesive so you can gradually roll it away, without immediately reaching for a solvent or abrading the leather’s surface.
Leather temper matters. Soft sheep nappa can stretch or mark under pressure, while firm harness leather may feel more stable but still has a grain you don’t want to scuff. On either, begin on an offcut or hidden area. Use a light touch and check your progress often.
The Crepe Rubber Technique
Start at the outside edge of the glue spot and work inward with small, slow circles. The rubber’s grip should gather the adhesive into little rolls or crumbs. Let the tool do the work. Pressing harder or rubbing rapidly creates friction heat, which can darken the grain and leave a lasting change in appearance.
- Keep the eraser clean. Pick or brush away collected glue frequently so you don’t transfer old residue back onto the leather.
- Pause if the leather feels warm, starts to shine, or changes colour. Let it cool before deciding whether another gentle pass is appropriate.
- Stop when the remaining adhesive is thin rather than trying to erase every trace in one go. Repeated aggressive rubbing can damage the surface.
Dealing with Stubborn Spots on the Flesh Side
The flesh side is fuzzy and may hide small glue fragments between its fibres. It can be more forgiving than the visible grain, but cleaning it evenly is harder. First try lifting the dried adhesive with the crepe rubber. For a raised clump that remains, use fine-grit sandpaper with a very light touch to shave the glue, not the leather. Keep the paper on the flesh side, and stop often to inspect your work.
After removal, the area may feel smoother or look different from the surrounding nap. Test any finishing step on scrap first. If appropriate for your project, Tokonole for leathercraft can be used according to its directions to help smooth fibres. Don’t apply it over glue, and avoid carrying it onto the grain side.
This is the patient part of learning how to remove excess glue from leather: use controlled mechanical action, check the surface as you go, and stop before the cleanup becomes the damage.
Solvents vs. Natural Methods: The Professional Verdict
My rule is simple: I don’t reach for acetone to solve a glue problem on vegetable-tanned leather. A solvent may loosen the adhesive, but it can also strip or disrupt the surface finish, alter colour, and leave the leather dry. That risk matters with natural hides such as Italian leather, where a small change can stand out against the surrounding patina.
Start with the least aggressive method that suits the glue: careful lifting for raised residue, or a small amount of mild soap suds for a compatible spot. Use a barely damp cloth, dab rather than scrub, and test on an offcut or hidden area first. Don’t soak the leather. If the adhesive instructions recommend a specific cleanup method, follow them rather than improvising with household chemicals.
The Problem with Acetone
Acetone doesn’t just remove glue; it can take the natural character from vegetable-tanned leather by affecting its colour and finish. Chemical solvents can cause permanent discolouration on aniline-dyed hides. Watch for a sudden pale or dark patch, a change in surface sheen, or an area that feels unusually dry or rough. These may signal solvent damage. Stop immediately if you see a change, and don’t apply more solvent in an attempt to even out the spot.
That’s why my answer to how to remove excess glue from leather is not to soak or chemically strip the affected area. A tiny amount of mild soap suds may be a gentler option for suitable residue, but it still needs a scrap test and a light touch. If the mark persists, pause before trying a stronger chemical.
Post-Cleaning Restoration
After any cleaning, let the leather dry naturally and check the result in good light. The treated area may look newer or lighter because cleaning has removed surface grime or disturbed the finish, while the surrounding leather has developed a patina through use. Don’t try to force an instant match with more rubbing. If the leather feels dry, test a suitable leather conditioner on scrap first, then use it sparingly according to its directions. I wouldn’t assume that a specialty specialty-tanned leather treatment is a general-purpose leather conditioner; check its stated use before applying it.
If a large area has changed colour, feels damaged, or forms part of a valuable project, stop experimenting. A professional assessment may help you decide what to do next.
Prevention: Switching to Cleaner Adhesives
The easiest glue spill to clean is the one you prevent. A tidy application starts with choosing an adhesive suited to your leather and construction method, then learning how it behaves before using it on a finished piece. Water-based adhesives can be easier to clean up while wet, but don’t assume every formula has the same cleanup instructions or working properties.
I recommend Ecostick 1804 as an adhesive to consider for cleaner workshop habits. Check the product directions before use, especially for application, drying, and removal. I don’t promise that a damp cloth will remove every wet spill; test the method on scrap leather and follow the manufacturer’s guidance. Knowing your glue before assembly is part of knowing how to remove excess glue from leather without risking the grain.
Why Choose a Water-Based Adhesive?
Water-based adhesives offer an alternative to solvent-based contact cements, and some are easier to clean while wet. That can make a small spill more manageable, but it doesn’t mean the glue is mess-proof or that water is suitable for every leather surface. Test first. Keep a clean cloth ready, and use only the cleanup method specified for the adhesive you’re working with.
Don’t choose a glue solely because someone calls it repositionable, odourless, or safe for a home studio. Those properties can vary by product. Read the label and product information, then work with suitable ventilation and handling precautions. The best adhesive is one that fits the job and that you understand how to apply.
Mastering Glue Application
Less is more, but there’s no universal layer thickness that works for every leather, joint, or adhesive. Follow the glue maker’s directions. Aim for an even coat across the bonding area rather than a heavy ridge near the edge. A spreader helps control how much glue you apply and reduces pooling that can squeeze out when pieces are pressed together.
- Apply glue only where the joint needs it, and keep the visible edges clean.
- Use a dedicated spreader and avoid returning a glue-covered tool to clean leather.
- Align parts deliberately, following the adhesive’s stated working and bonding instructions.
- Keep a clean cloth nearby, but don’t wipe spills across the grain.
A disciplined bench matters as much as the adhesive. Clear away offcuts, keep tools clean, and test the process on scrap before committing to your project. For guidance on assembly methods, explore the leathercraft masterclasses. In my experience, a clean project starts before the first drop of glue: prepare your workbench, apply with care, and let patience do its part.
Build Cleaner Habits Into Your Next Project
A clean finish comes from steady hands, suitable tools, and an adhesive you understand. Keep your workbench organised, test cleanup methods on scrap, and resist the urge to solve a small spill with a harsh chemical. These habits help protect the leather and make each project easier to manage.
Further Reading
- How to remove glue spots for another gentle cleanup approach.
- Leather conservation and restoration for a broader look at caring for leather objects.
For your next project: Consider Ecostick 1804 leather glue as part of a considered workshop setup, and explore leathercraft bundles for relevant supplies.
With 160 years of family leather heritage behind our work, I believe good craftsmanship is built one careful step at a time. Keep learning, work patiently, and enjoy bringing your next piece to life.
Frequently Asked Questions
Can I use nail polish remover to get glue off my leather bag?
I wouldn’t use nail polish remover on a leather bag, especially vegetable-tanned leather. It may contain acetone, which can strip or alter the finish, change the colour, and dry out the leather. Instead, identify the glue and try the gentlest suitable method first. Test on a hidden area, and avoid rubbing or soaking the spot. If the bag is valuable or the spill is extensive, seek advice from a leather-care professional.
Will vinegar remove dried glue from vegetable-tanned leather?
Vinegar isn’t a method I’d recommend for dried glue on vegetable-tanned leather. Its effect on the leather’s colour and finish can be unpredictable, and it may not loosen the adhesive. Try gently lifting raised residue with a suitable tool, such as a crepe rubber, after testing on an inconspicuous area. For stubborn glue, check the adhesive maker’s cleanup guidance rather than applying a household liquid that could leave another mark.
What is the best tool for removing contact cement residue?
For small patches of dried contact cement, a crepe rubber is a good first tool to try. Work from the edge of the residue inward with light, slow movements, and clean the rubber as glue collects on it. Don’t scrub hard: friction can warm and darken the leather. Test first on scrap or a hidden area, and stop if the grain changes, feels warm, or starts to look polished.
How do I remove glue from the fuzzy flesh side of leather?
Start by gently lifting dried glue with a crepe rubber, taking care not to pull up the leather fibres. The flesh side can trap adhesive in its nap, so inspect it between passes. If a raised clump remains, very lightly shave it with fine-grit sandpaper, keeping the abrasive on the flesh side. Test on a matching offcut first, and stop if the surface thins or the texture changes noticeably.
Is it possible to remove super glue from leather without damage?
It may be possible to reduce or remove a super glue spot, but damage-free removal can’t be guaranteed. Avoid acetone, forceful scraping, and pulling bonded leather apart, as these may affect the finish or fibres. Check the glue manufacturer’s instructions and test any suggested method on a hidden area or matching scrap. If the spill is large, on a visible surface, or attached to another material, pause and seek specialist advice.
Does Ecostick leather glue leave a permanent stain if it spills?
I can’t promise that an Ecostick spill will never leave a mark. The result depends on the leather, the amount of glue, and how it’s handled. Check the instructions for Ecostick 1804 before trying to clean a spill; don’t assume water is suitable unless the directions confirm it. On vegetable-tanned leather, avoid rubbing, blot carefully if instructed, and test cleanup on scrap first.
Why does my leather look dark after I rubbed the glue off?
Rubbing can create friction and heat, which may darken or polish the grain. Moisture or oils transferred during cleanup can also make a spot look darker than the surrounding leather. Stop rubbing and let the area dry naturally before judging the result. Don’t apply solvent or conditioner to try to even out the colour without testing first. If the mark remains, further aggressive cleaning may make it more noticeable.
Can I sand off glue residue from my leather project?
Sanding is a last resort, not a safe way to clean the visible grain. On the flesh side, fine-grit sandpaper may gently shave down a raised glue clump, but it also removes leather fibres and can change the texture. Test on an offcut, use minimal pressure, and stop often to inspect the surface. For grain-side residue, try gentle mechanical lifting first rather than sanding away the leather’s natural surface.
Disclaimer
All our blog articles are made for information purposes only we dont take responsability for any content from third parties.