

How to Save Leather Cut Too Short With Flexible Adhesive
A cut that is too short doesn’t always make the leather unusable. A leather or fabric patch can bridge the gap, and flexible adhesive can join the pieces without leaving a rigid seam. If you’re deciding what to do if you cut leather too short, stop trimming and dry-fit the patch before applying glue. A careful fit helps prevent further damage.
It’s frustrating to discover that a cut has gone too far, especially when the piece needs to fit precisely. A repair is more likely to work when the join is supported, the edges stay aligned, and the adhesive cures without added heat. This guide explains how to assess the cut, add a patch or splice, secure the repair, and avoid common mistakes, so you can decide whether the piece is suitable for repair.
Key Takeaways
- Choose a flexible adhesive for a repair that needs to move, and avoid a rigid bond that could split again.
- For a larger tear, place a flat fabric or mesh support behind the leather before joining the edges.
- Trim only loose, damaged edges; cutting further into sound leather can make the short piece harder to save.
- Consider a leather patch or splice when you need to add length, and let the bond set before continuing.
- For a weight-bearing piece such as a strap, stitching can be an alternative; the hole placement and stitch method matter.
Applying flexible adhesive
Flexible adhesive can join leather edges or attach a patch without making the seam as rigid as superglue. Work slowly: alignment and support matter as much as the adhesive. Test a small amount on scrap leather first to see how it spreads and whether it changes the surface.
For a visual demonstration of flexible contact adhesive on leather, watch this video:
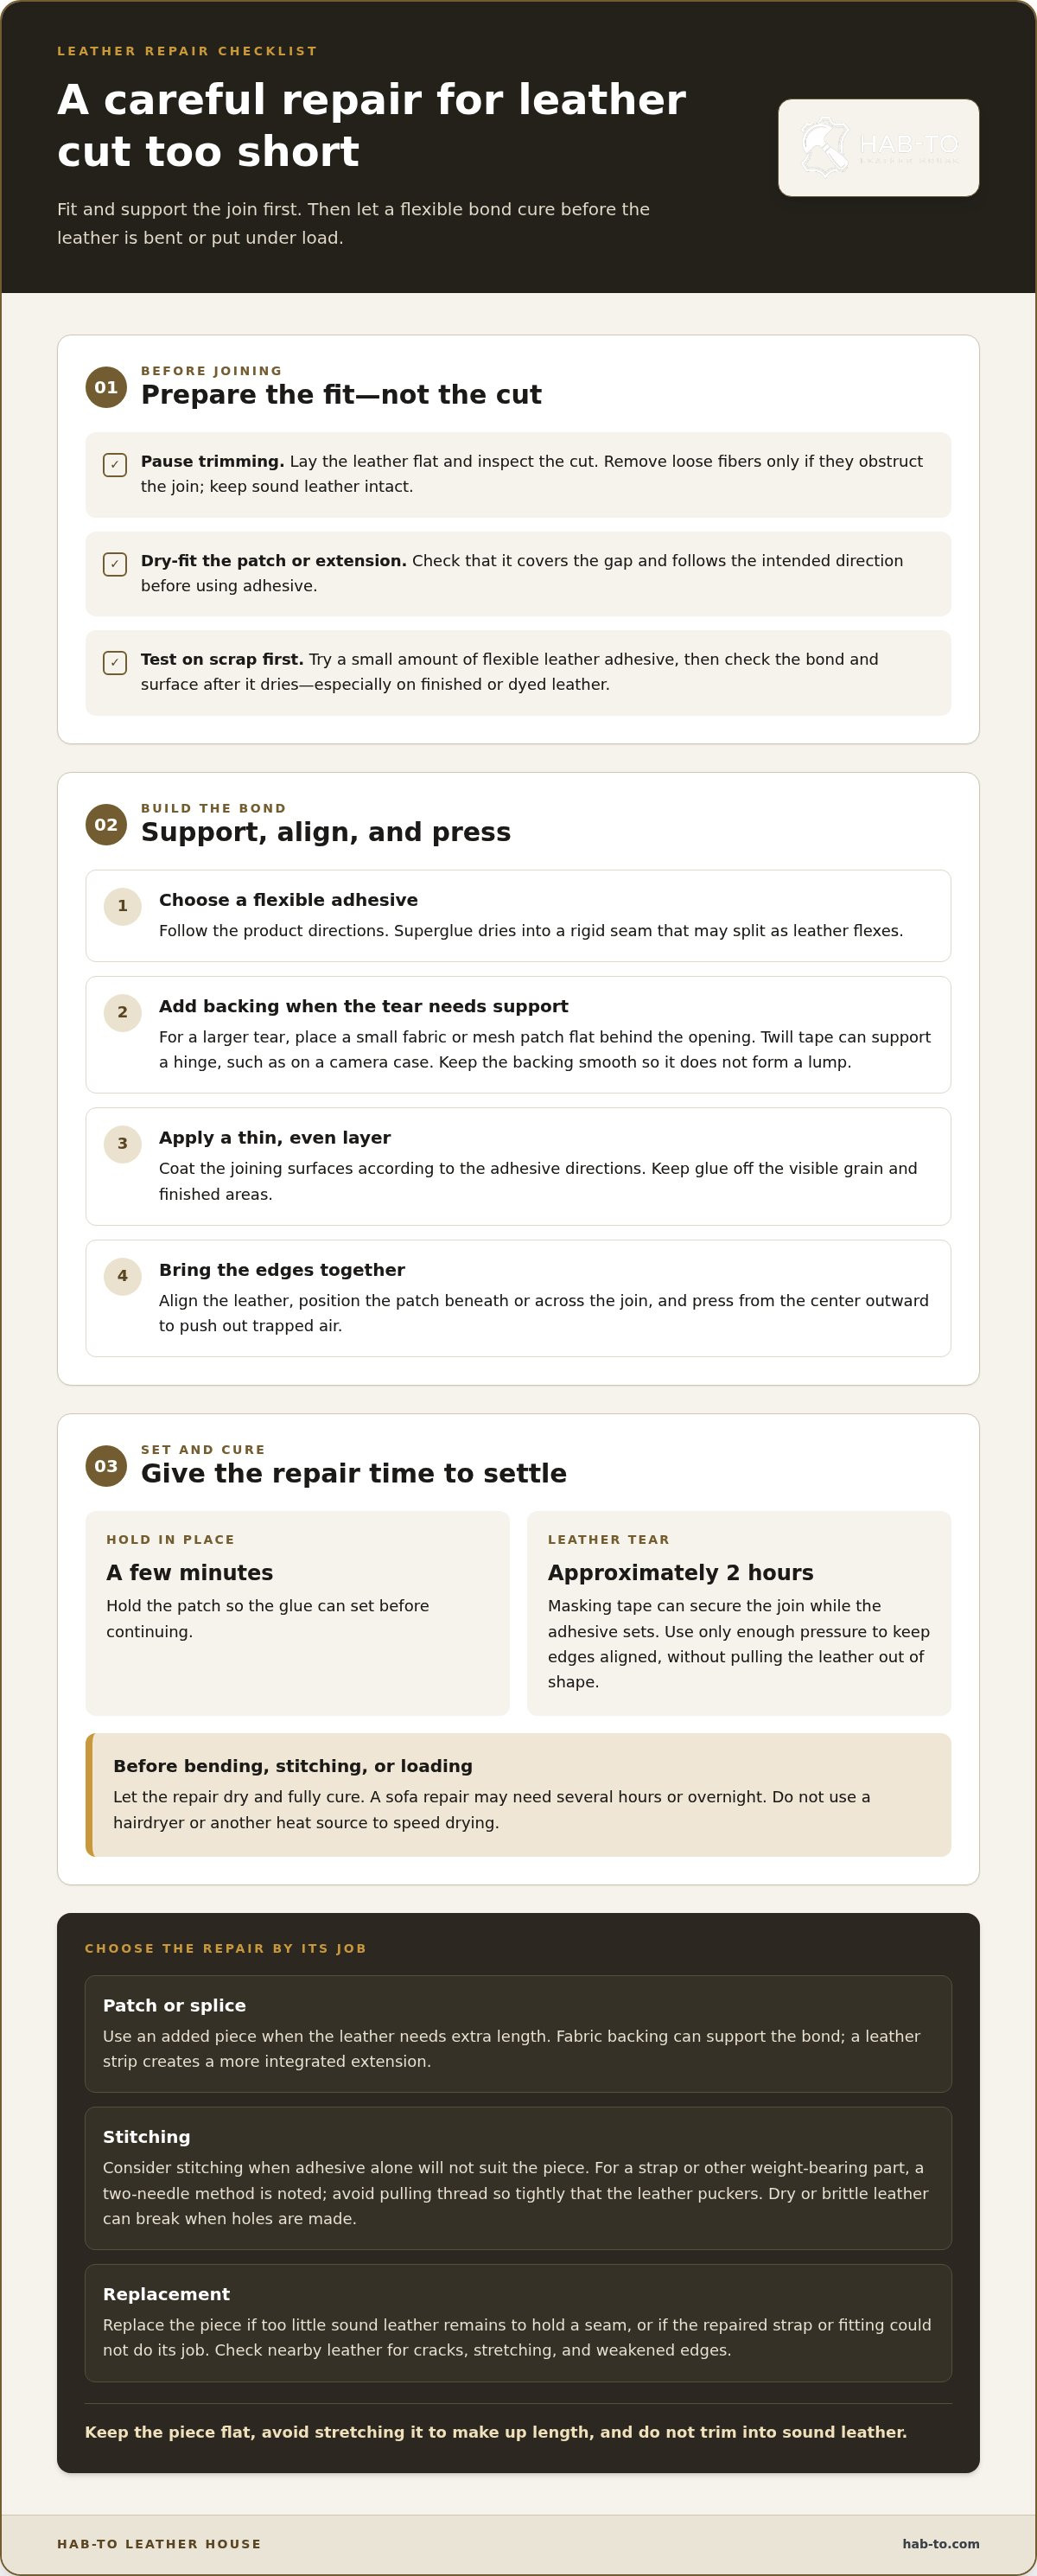
- Lay the leather flat and inspect the cut before applying glue. Remove loose fibers only if they obstruct the join. Don’t trim sound leather just to neaten the edges. Position the patch or extension without adhesive, then check that it covers the gap and follows the intended direction.
- Choose a flexible adhesive designed for leather and follow its application directions. Superglue dries into a rigid seam that may split as the leather flexes. Test a small amount on matching scrap first, then check the bond and surface after it dries, particularly if the leather is finished or dyed.
- Prepare the backing before applying adhesive. For a larger tear, place a small fabric or mesh patch flat behind the opening. Twill tape can also support a hinge, such as on a camera case. Keep the backing smooth, since a wrinkle can create a lump beneath the leather.
- Apply a thin, even layer of adhesive to the joining surfaces, following the product directions. Keep glue off the visible grain and finished areas. Carefully bring the leather edges together, then position the patch beneath or across the join. Press from the center outward to push out trapped air.
- Hold the patch in place for a few minutes so the glue can set before continuing. For a leather tear, secure the join with masking tape while the adhesive sets for approximately 2 hours. Use only enough pressure to keep the edges aligned. Check that tape isn’t pulling the leather out of shape.
- Let the repair dry and fully cure before bending, stitching, or putting the piece under load. A sofa repair may need several hours or overnight. Don’t use a hairdryer or another heat source to speed up drying. Heat can affect the leather and adhesive, while allowing the repair to cure gives the bond time to settle.
Preventing further leather damage
Pause before trimming, stretching, or stitching the cut. The right next step depends on the piece’s function, the leather that remains, and the finish you need.
-
Extend the Piece with Stitching
Use stitching to join a leather extension when adhesive alone won’t suit the piece. Mark the join and check that both layers can support the intended load. Punch aligned holes on each side of the cut, then stitch through them with a needle and sinew. For a strap or another weight-bearing part, use a two-needle method and avoid pulling the thread so tightly that it puckers the leather.
Before heavy stitching, check whether the leather feels dry or brittle. Dry leather can break apart when you make holes, so condition it before stitching. Keep the holes far enough from weak or ragged edges to reduce the risk of tearing. A neat stitch can secure an extension, but it won’t restore strength if the leather around the seam is already failing.
-
Decide Whether to Replace the Leather
Replace the piece if too little sound leather remains to hold a seam, or if the repair would leave a critical strap or fitting unable to do its job. Consider the item’s purpose, the stress on the cut, and whether a visible patch is acceptable. A collectible item may be worth preserving through repair; for an ordinary strap, replacement may be more practical.
Don’t judge the repair by appearance alone. Check the leather beside the cut for cracks, stretching, or weakened edges. If the stitch line would sit too close to damaged material, the join may not hold securely. Even a firm repair can leave a visible line, so weigh function and finish before proceeding.
- Measure the required seam, hem, or fold before cutting an extension. The extra leather needed depends on the construction: a turned hem needs material to fold under, while a stitched seam needs enough width for aligned holes and a stable join. Use the pattern or an intact matching piece as a guide, then dry-fit the extension before trimming it.
- Don’t stretch leather to make up for a short cut. Pulling can distort its shape, grain, or fit, without providing dependable extra length. Stretching a short strap, for example, may leave it misshapen without creating a secure connection. Extend it with a properly fitted piece, or replace it if the remaining leather can’t support a sound join.
- Protect the cut edge while you assess the repair. Keep the piece flat, mark the intended seam, and avoid trimming into sound leather. If you need supplies for a leatherworking project, explore leathercraft bundles suited to your work.
Can a piece of leather cut too short be repaired or extended?
- Assess the cut, the item’s purpose, and the material remaining around the edge. A small gap in a decorative panel may suit a discreet patch, while a short strap must still carry its intended load. Check whether the cut has weakened nearby leather and whether there is enough material for a stable join. Choose repair, extension, or replacement based on function first.
- Consider how the repair will need to flex and how visible the join will be before choosing an adhesive. Flexible adhesive can join leather or bond fabric to its underside, but the join may remain visible. Avoid superglue, which dries into a rigid seam that can split as the leather flexes. DIY adhesive repairs are best suited to protected leather, so identify the surface before proceeding.
- Use a patch or splice when the piece needs added length, rather than just a closed tear. For example, extend a short leather panel with a matching strip joined across the cut. Fabric backing can support the bond, while a leather strip creates a more integrated extension. Dry-fit the added material and check its alignment before applying adhesive.
- Set realistic expectations for the finished appearance. A sound repair should stay joined without reopening or tearing further, but the original cut may remain visible. Compare the grain, color, and direction of the added piece with the original. A close match can make the join less noticeable, but it won’t erase the cut line.
- Choose professional repair for a torn heirloom or another high-value piece. The item’s condition, material, cut location, and importance all affect the repair method. A leather professional can assess whether the cut can be strengthened and finished without compromising the original. This is especially important when a failed home repair could cause further damage.
- Replace a strap if preserving a collectible isn’t the goal and a patch would compromise its use. Check the attachment points and the rest of the strap, not just the shortened end. If the leather near the cut is weak or there’s too little room for a secure join, an extension may not address the underlying problem. Keep the cut piece as a pattern for the replacement.
How to add a leather patch or splice to extend a short piece of leather
A patch can add usable length, while a splice joins two leather sections. Choose the method that suits the project’s shape, movement, and visible finish.
- Measure the missing length against the project’s pattern or an intact matching piece. Mark where the original leather ends and where the extension should finish. For a strap, align the edges so the finished piece stays straight. Leave enough leather for a stable join, but avoid adding bulk where the piece needs to bend or pass through hardware.
- Choose an extension that matches the original leather’s thickness, flexibility, and grain direction. A leather strip can create a consistent finish, while a small piece of strong cloth can support the join from behind. Place the materials together without adhesive first. Check the fit on both sides and adjust the shape before cutting the patch.
- Prepare the surfaces according to the adhesive directions. Remove loose fibers that could interfere with contact, but don’t cut farther into sound leather. Keep the visible grain clean. If using leather glue, such as Ecostick 1804 leather glue, follow its product instructions for application and setting.
- Position the patch or splice carefully before pressing the pieces together. For a splice, align the leather ends without overlapping them unless the design calls for an overlap. For a backing patch, center it beneath the join so it supports both sides. Press from the middle outward to reduce trapped air and keep the edges level.
- Hold the join in place while the adhesive starts to set. Check that the extension hasn’t shifted, then leave the bonded pieces undisturbed for several hours before continuing. Don’t bend, stitch, or put the leather under load during this time. Movement can pull the edges out of alignment before the bond forms.
- Inspect the cured splice before finishing the project. Flex it gently in the direction the item will move, and check for lifting edges or a raised ridge. If the join stays flat, trim only excess patch material, taking care not to nick the original leather. For a visible strap or panel, compare the repaired line with the surrounding grain and color.
Treat the setting time as part of the repair, not as an opportunity to test the join. After applying glue between the patch and the torn leather edges, let it set for several hours before continuing. Keep the pieces in position and avoid unnecessary handling. Use this time to plan the next steps without putting pressure on the bond.
When you return to the leather, continue gradually. Look over the join before trimming or adding any finish, and make sure the patch still supports the intended area and the edges remain aligned. If anything has shifted or lifted, address that before moving on rather than concealing it with finishing work. Keep the repair consistent with the surrounding piece: a neat, low-profile join is especially important where the leather needs to bend or meet hardware. Once the join looks settled, proceed with the rest of the project without forcing the repaired section into a position it will not naturally hold.
How to use stitching to extend a piece of leather
Stitching can give a leather extension extra support when a bonded join isn’t enough. Work methodically, especially on straps and other pieces that carry weight.
- Check the leather around the cut before marking a stitch line. Look for dry, brittle, or weakened areas that could split under needle tension. If the leather feels dry, condition it before heavy stitching. Sound leather is more likely to hold the holes; stitching through fragile edges can spread the damage.
- Choose an extension that suits the piece’s shape and intended use. For a strap, align the extension so its edges continue the original without twisting. Place the pieces together and mark where the holes should pass through both layers. Keep the stitch line clear of ragged edges, where the thread could pull through.
- Punch corresponding holes on each side of the join with an awl or suitable leatherworking tool. Keep the holes aligned through both layers, and avoid making extra punctures while correcting a misplaced hole. Each opening removes material, so careful marking helps preserve the leather between the seam and its edge.
- Thread a needle with sinew, then stitch through the aligned holes. For a strap or another weight-bearing piece, use a two-needle method, passing the thread through each hole from opposite sides. Pull the thread snug enough to bring the layers together, but not so tightly that the leather puckers or the holes lengthen.
- Secure the final stitches and inspect both sides of the seam. Check that no hole has torn toward the edge and that the extension remains straight. Gently flex the joined section in the direction it will move. If the seam opens or the leather distorts, stop using the piece until you reassess the join.
- Finish the project only once the stitching sits evenly along the join. A short decorative panel may need a tidy seam, while a working strap needs stitches that stay secure under load. Keep the extension’s edge aligned with the original, and trim excess material without cutting into the stitch line.
Before sewing, inspect the prepared join and confirm the layers still sit flat and the marked holes align. If the leather is dry, condition it before heavy stitching, since dry leather can break apart during the work. Draw the thread through each opening without forcing it, and pause if the leather begins to stretch or the holes change shape. A sound, even seam depends on keeping the layers together without placing unnecessary strain on them.
For a part that must support weight, such as a strap, use the two-needle method so both sides of the seam pass through the same openings. Keep the piece supported and aligned as you work, rather than letting the extension shift and pull the stitches off course. When the seam is complete, examine the full join and gently test its movement. If the leather starts to split, the join separates, or the strap no longer lies straight, don’t rely on it under load. Reassess the leather and stitching before using the piece again.
Hab-To Leather House: Vegetable Tanned Leather
Hab-To Leather House offers vegetable-tanned leather, leatherworking tools, leather hardware, and crafting bundles for hands-on projects. If your repair needs an extension piece, compare the existing leather’s thickness, grain, and flexibility before choosing a replacement material. Vegetable-tanned Pueblo leather is one option to explore for a leathercraft project. The right material depends on how the repaired piece will be used and how closely the new leather should blend with the original. Tools and hardware can also support the next stages of a project, from preparing leather to assembling components. Browse Hab-To Leather House’s leathercraft materials, or visit hab-to.com to explore the range.
Carry the lesson into your next project
A short cut can change your plan, but it can also sharpen your process. Before your next project, make a paper pattern, check the dimensions, and test your cutting approach on an offcut. Keep useful scraps nearby for fitting or practice. Knowing what to do if you cut leather too short starts with pausing before you make another cut.
For more leathercraft ideas, explore articles about choosing leather for a project, planning strap patterns, and making clean cuts. If you’re gathering supplies for your next repair or build, browse leathercraft bundles for materials and tools to support your work.
Take your time, trust your hands, and keep making with care.
Frequently Asked Questions
What You Will Need (Tools And Materials)?
Prepare flexible leather glue, a patch material, scissors, masking tape, and a flat work surface. For the adhesive, use Ecostick 1804 leather glue and follow its directions. A suitable awl or needle may help if your repair also needs stitching; browse Hab-To Leather House for project tools. Leathercraft bundles offer another way to explore grouped supplies.
How to fix leather cut too short for upholstery, clothing, or a bag
Match the repair to the item’s location and movement. For upholstery, consider whether the damaged spot will be visible or pressed during use. For clothing, check how the area moves when worn. For a bag, inspect nearby seams and attachment points, since they affect how the repair will function. Choose a patch or extension that suits the item’s shape and intended use.
Tips for ensuring a durable bond on leather repairs
For a bonded extension, gather flexible adhesive, matching leather or strong cloth, scissors, and masking tape. A stitching repair also needs a needle, awl, and thread or sinew. Keep a scrap of similar leather nearby to test the adhesive before applying it to the project. Choose materials according to the repair method and the piece’s purpose, especially if the join will bend or carry weight.
Disclaimer
All our blog articles are made for information purposes only we dont take responsability for any content from third parties.