

Leather Glue for Leathercraft: Compare Barge, Master, and Aquilim
Regular craft glue can hold leather for a light-duty project, but it isn’t the dependable choice for a lasting bond. The right leather glue for leathercraft should suit the leather, the joint, and how much flex the finished piece will need.
It’s tempting to reach for the glue already on your workbench, but leather’s surface and movement can affect how an adhesive performs. This guide compares Barge, Master, and Aquilim, explains when regular craft glue may fall short, and covers practical ways to remove excess without damaging your work. You’ll also learn the main types of leathercraft glue and how to choose one for your project.
Key Takeaways
- Match the adhesive to the leather, the joint, and how much movement the finished piece will face.
- Compare Barge, Master, and Aquilim by application and project needs, not just by brand name.
- Use a careful removal approach for excess glue to protect the leather’s surface and finish.
- Learn which adhesive types suit different leathercraft tasks and how to make a more confident choice.
Can I Use Regular Craft Glue for Leather?
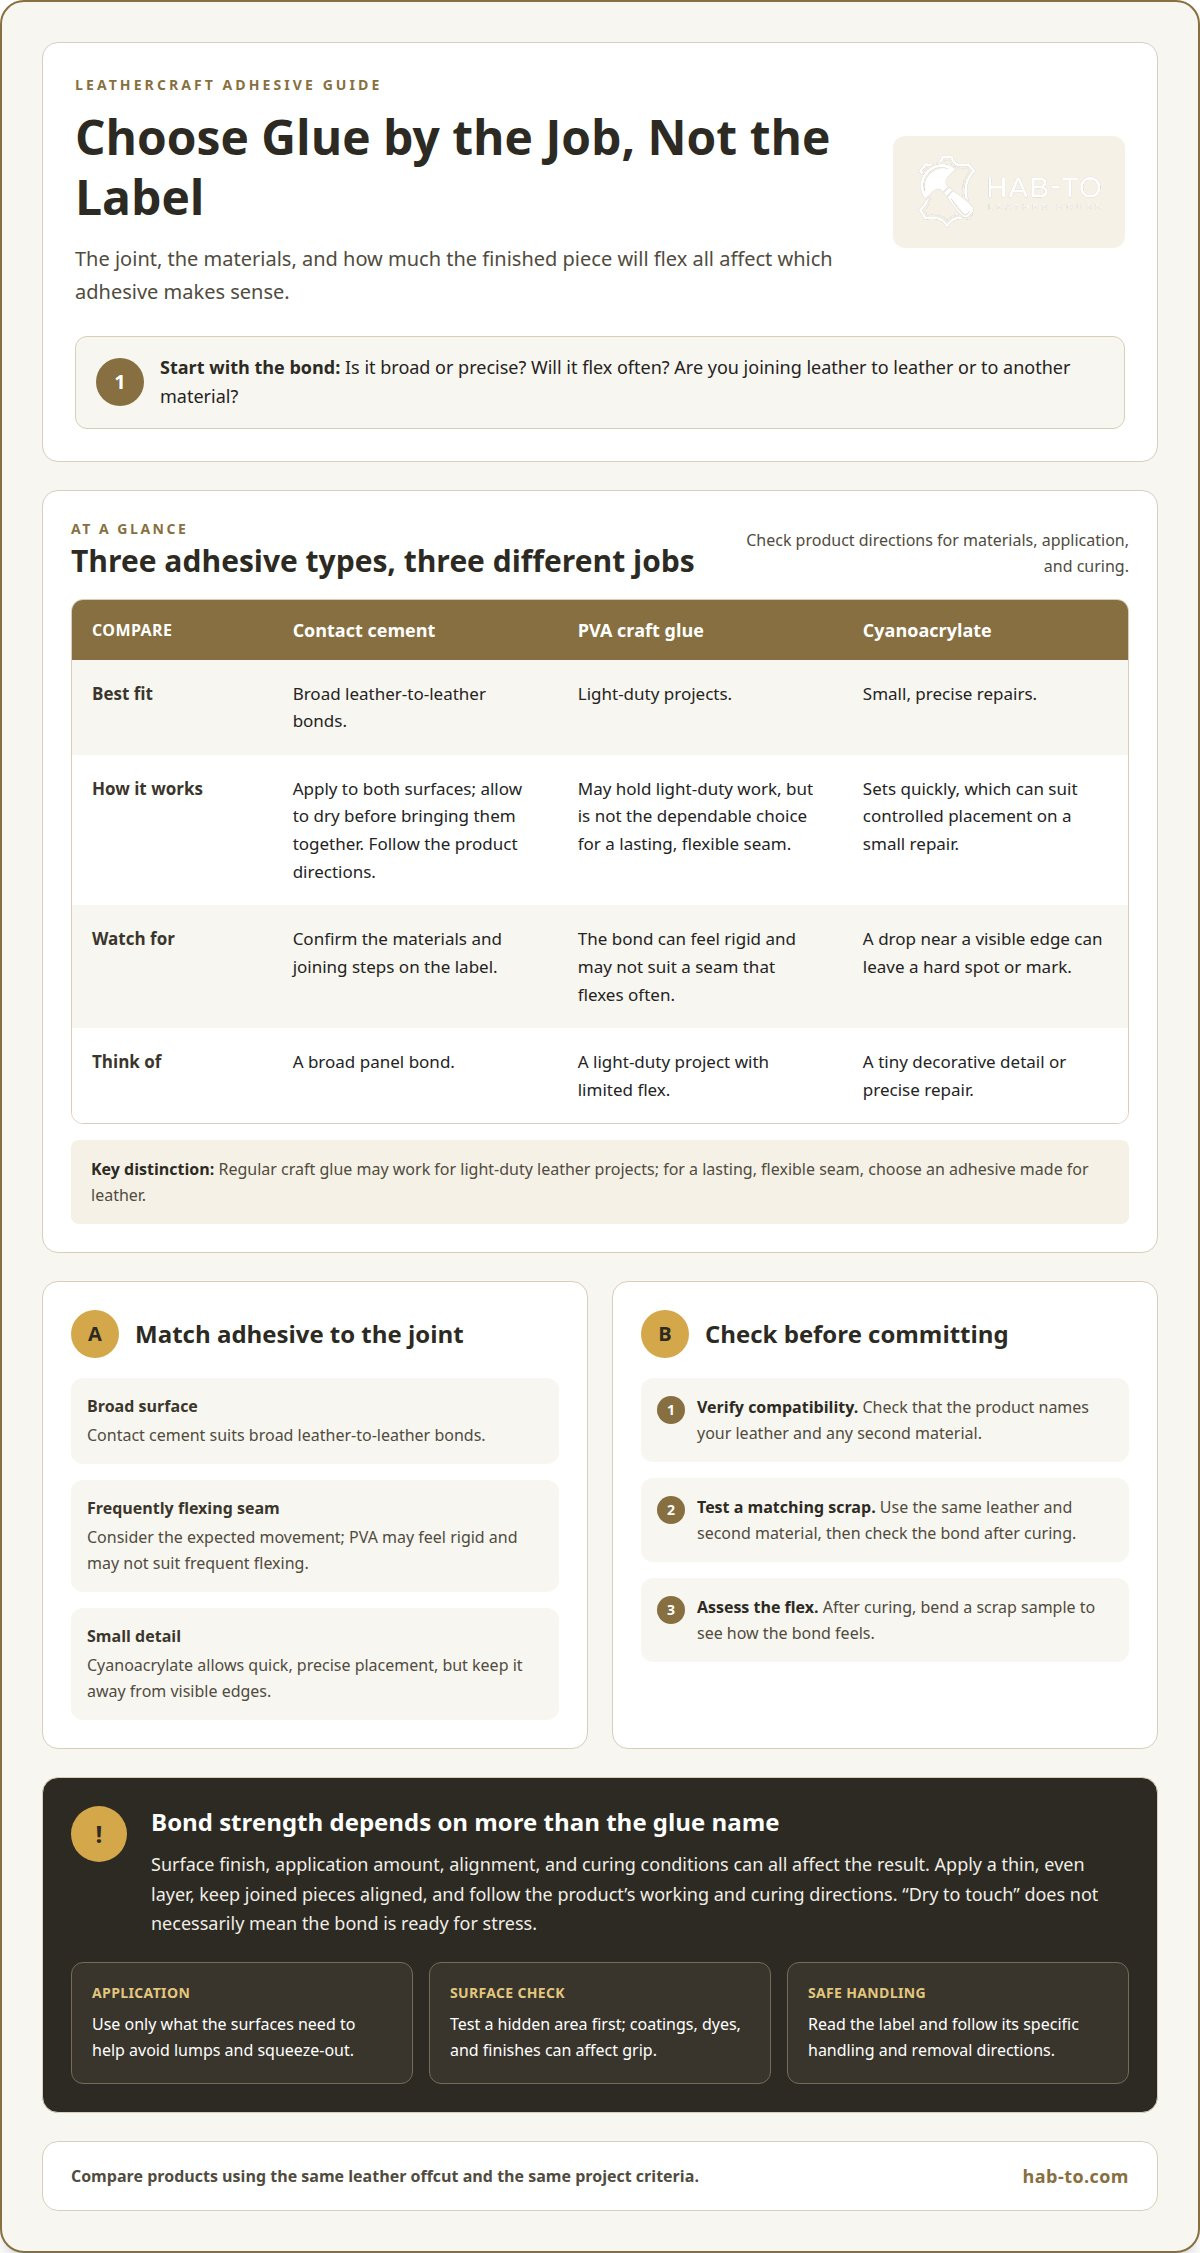
Sometimes, but regular craft glue is best suited to certain leather projects. For a lasting, flexible seam, choose an adhesive made for leather.
Benefits of Leather Glue and Cement
Leather glue can hold layers in place before stitching, helping prevent pieces from shifting as you sew. Cement can also join broad surfaces, such as a folded wallet panel, without stitches across the entire seam. The right choice depends on the joint, leather finish, and expected movement. For a flexible item, bend a scrap sample after the adhesive has cured to assess the bond.
A thin, even application helps prevent lumps between joined layers and reduces glue squeezing out along an edge. Apply only what the surfaces need, then align the pieces carefully. Glue can steady a seam while you stitch, but it doesn’t replace stitches where the design calls for them.
Contact Cement, PVA, and Cyanoacrylate
Contact cement suits broad leather-to-leather bonds. The Ohio Environmental Protection Agency explains that contact adhesive is applied to both surfaces and allowed to dry before they are brought together. Follow the product directions for application and joining. PVA craft glue may work for light-duty projects, but its bond can feel rigid and may not suit a seam that flexes often.
Cyanoacrylate, often called super glue, sets quickly and is best for small, precise repairs. A drop near a visible edge can leave a hard spot or mark. Compare adhesive types by the joint’s size, movement, and finish. A wallet fold needs flexibility, for example, while a tiny decorative detail may call for precise placement.
Drying and Curing Time
How long leather glue takes to dry and fully cure depends on the formula, the amount applied, and drying conditions. “Dry to touch” doesn’t necessarily mean the bond is ready for stress. Check the product directions for its working and curing stages.
Keep joined pieces aligned while the adhesive sets. Avoid bending, stitching, or trimming the seam too soon. A light pull on an edge can reveal a weak bond, but don’t use that as a substitute for the stated cure instructions. For a project-specific option, Ecostick 1804 leather glue is one adhesive made for leathercraft.
Leather and Other Material Bonds
Can leather glue join leather to leather and other materials? Yes, if the adhesive suits both surfaces. Leather-to-leather seams are a common use, while bonds to fabric, rubber, or other materials depend on the product’s compatibility. Read the directions to confirm which materials are named and how to prepare each surface.
For example, attaching a leather panel to fabric calls for glue suited to both materials. Smooth coatings, dyes, and finishes can affect how well an adhesive grips. Test a hidden area or matching scrap first, using the same leather and second material, then check the bond after curing.
Surface Changes and Safe Handling
Can leather glue damage, stain, or stiffen leather? Excess adhesive can leave a visible mark or make a seam feel stiff, especially on absorbent leather. Test a small hidden area first and apply a thin layer. If glue squeezes out, follow the product’s removal directions before it dries.
For safer handling, read the adhesive label before opening the container. Work in the conditions stated, keep glue away from your eyes and skin, and close the container after use. Solvent-based and water-based products can have different handling instructions, so follow the specific directions rather than assuming every glue behaves like school PVA.
Comparing Barge, Master, and Aquilim cements
Barge, Master, and Aquilim are worth comparing in light of the job. Their names alone don’t tell you which is right. Check each product’s directions, intended materials, application method, and curing instructions. Those details matter more than a quick brand comparison.
Start with the joint you’re making. A wide panel needs a different application approach from a narrow strap fold. Then compare products using the same criteria:
- Surface compatibility: Check whether the label names your leather and any second material.
- Application steps: Compare how each cement is applied and joined.
- Working time: Look for the period available to position pieces accurately.
- Bond requirements: Note when the instructions allow handling, stitching, or further work.
- Cleanup guidance: Follow the product’s directions for removing smears or excess.
A long wallet seam needs precise alignment, while a small repair needs controlled placement. Compare Barge, Master, and Aquilim for that specific task rather than treating one brand as a universal answer. Use the same leather offcut for each trial. Note how the adhesive spreads, how the pieces align, and how the cured bond feels when flexed.
Drying and handling strength aren’t always the same stage. According to the U.S. Environmental Protection Agency, at room temperature, this adhesive reaches handling strength in 7 days. Apply that figure only to the adhesive it describes. For Barge, Master, or Aquilim, use the individual product’s directions to determine its handling and curing stages.
Keep a simple note beside each sample. Record the product name, leather surface, application steps, and result. A smooth, even layer can behave differently from a heavy application, just as a clean surface can differ from one carrying dust or finish. Change one factor at a time to make the test useful.
Choose the cement whose directions suit your materials and workflow. If two products seem suitable, compare their instructions on the same type of scrap. For a leathercraft project, leathercraft bundles can help bring relevant materials and tools together.
Storage also matters when comparing cements: a test is useful only if you know how the adhesive was kept. Montana Leather Company advises storing leather adhesives sealed in a cool, dry place to preserve their bonding properties. Make this part of your routine instead of leaving containers open while you work. Note whether each adhesive was sealed and stored in a cool, dry place, so you can interpret differences in spreading or flexibility in context rather than attributing every difference to the brand.
Keep the comparison focused on the task, the directions, and conditions you can control. Use the same type of scrap and make notes the same way for each cement. If a sample behaves unexpectedly, review your application and storage notes before drawing a conclusion. This doesn’t replace the product’s instructions; it helps you follow them consistently. The aim is to choose a cement whose directions suit your materials and workflow, while storing it properly to maintain its bonding properties.
How Do I Remove Excess Glue From My Project?
First identify the adhesive and whether it is fresh or cured, since each needs a different approach. Read the container’s cleanup directions before touching the leather. A rushed wipe can spread adhesive or disturb the surface finish. Work slowly, especially along visible edges and finished panels.
Remove Fresh Glue Carefully
For a fresh smear, stop pressing the joined pieces. Gently lift excess with a clean, dry cloth, blotting rather than wiping sideways. Wiping can carry adhesive across clean leather. Turn the cloth to a clean area as glue transfers.
If a bead sits on the edge, lift it with a blunt tool. A plastic edge can help avoid cutting the leather. Keep the tool nearly flat, and don’t push glue into the grain or pull at the bonded seam. Check the adhesive label before using water or any cleaner.
Handle Dried Adhesive With Care
Dried residue can be harder to remove cleanly. Don’t assume a solvent suits every leather finish: some cleaners may change the color, sheen, or surface feel. Follow the adhesive maker’s removal instructions for that formula. If they name a cleaner, test it first on hidden leather.
For a raised, dry spot, gently lift only what comes away easily. Use a fingernail or blunt plastic tool, not a sharp blade. Stop if the leather begins to scuff. Leaving a thin film may be safer than scraping aggressively. Inspect the area under good light before continuing.
Test Before Cleaning the Project
A scrap test helps protect a finished piece. Use an offcut with the same leather and finish. Apply a small amount of the same glue and let it reach the state you need to clean. Try the label-directed method on the sample first, then look for color changes, roughness, or dull patches.
For example, test the cleanup process on the inside of a folded wallet panel before treating its visible edge. Keep the test area and project dry unless the directions call for moisture. Avoid soaking leather, since excess liquid can affect its shape and surface appearance.
Prevent Squeeze-Out During Assembly
Careful application makes cleanup easier. Spread a thin, even layer across the bonding area, keeping adhesive away from exposed edges. Align the pieces once, then press as directed. Too much glue can squeeze out under pressure.
Before joining a bag panel, check the perimeter for stray adhesive. Use a small applicator for narrow seams and corners, and keep a clean cloth and blunt tool nearby. Close the adhesive container after use and dispose of residue according to its label. This routine helps control cleanup and protect the leather’s finish.
Using regular craft glue on leather
Regular craft glue can work for a small, low-stress task, such as temporarily fixing a paper pattern to a leather scrap. It may also suit a decorative piece that won’t bend often. For a load-bearing seam, choose an adhesive intended for the materials and joint. Start with the label: check its listed materials and directions before opening the bottle.
Choose a Suitable Test Piece
Start with an offcut from the same hide, matching the project’s surface and finish. Apply the glue as directed, then join the scraps. Let the sample reach the curing stage stated on the label, then flex it as the finished item would flex. A flat sample won’t show how a wallet fold behaves.
After the test, check the leather for a dark spot, stiff patch, or lifted edge. A clean-looking bond still needs to withstand the movement expected of the finished project. If the sample changes color or texture, don’t use that method on a visible panel. Test again with an adhesive suited to leather.
Apply a Controlled Layer
Prepare the pieces before applying glue. Dry-fit the edges and mark their alignment, then keep the work surface clean and steady. Use a small applicator to spread a thin layer over the intended area. Avoid coating exposed edges, where squeeze-out can remain visible.
Join the pieces according to the glue label. Align them once, then press evenly. A narrow strap fold needs careful edge alignment, while a broad panel needs consistent contact across its surface. Don’t slide the parts after joining, as this can spread glue beyond the seam or shift the edge.
Support the assembly while the adhesive sets. Use a flat board or gentle pressure only if the directions allow it. Protect the grain with a clean barrier if pressure could mark it. Don’t stitch or flex the piece until the label permits further handling. A sample can show whether the bond suits the planned use.
Know When Craft Glue Isn’t the Right Fit
Choose another adhesive for a seam exposed to repeated bending or pulling. A handbag handle, watch strap, or wallet fold needs a dependable bond suited to its materials. Regular craft glue may not provide the flexibility or strength the joint demands. Match the adhesive to the leather and any second material.
Use craft glue only for tasks its directions support. It can help with temporary placement or a light decorative detail, but it isn’t a substitute for stitching or construction adhesive when the design relies on a durable joint. Close the container after use and store it as the label directs to keep your next test consistent.
What types of glue are used for leathercraft?
Leathercraft adhesives differ in how they join surfaces and handle movement. Start with the joint: a lining, folded strap, and decorative tab each have different demands. Check the product label for compatible materials, application steps, and cleanup directions. The adhesive type narrows the options, but the specific formula still matters.
Contact Cement
Contact cement suits broad, close-fitting bonds. The Ohio Environmental Protection Agency advises applying it to both surfaces and letting it dry before bringing them together. This can suit a leather panel joined across a wide area. Align the pieces carefully before contact, then follow the label’s directions for pressure and handling.
Water-Based Leather Adhesives
Water-based adhesives are another option for leather projects. Their application and drying behavior depend on the formula, so follow its directions rather than assuming it works like general craft glue. For a lining attached to a leather panel, check that the adhesive is intended for both materials. A scrap test can reveal whether the surface changes after curing.
Some water-based products are made for leather, while general-purpose PVA may be better suited to light-duty tasks. Don’t treat the labels as interchangeable. A flexible wallet fold calls for an adhesive suited to a bending joint, while a flat decorative tab has different demands.
Cyanoacrylate and Rubber Cement
Cyanoacrylate, often called super glue, suits small areas where precise placement matters. A tiny repair or detail may need only a controlled drop. It can create a hard spot, so keep it away from visible grain and flexible folds. Test the finish on a hidden scrap before using it on the finished piece.
Rubber cement can help with temporary positioning, such as holding a pattern while marking leather. It isn’t automatically suitable for a permanent structural seam. Decide whether the bond must last or simply help during assembly. Temporary placement can assist with a stitch line, while stitching provides the intended construction.
Choose by Joint and Workflow
Compare adhesives by compatible materials, flexibility, placement time, and cleanup method. A broad panel and a narrow strap edge need different application control. Gather a leather offcut, the chosen adhesive, a small applicator, and a clean cloth before starting. Leathercraft bundles can be another way to gather materials for making.
What You Will Need
- A leather offcut for testing the selected adhesive.
- The chosen glue, checked against the materials in your project.
- A small applicator for controlled placement.
- A clean cloth for the work area and tools.
- Leathercraft bundles as a convenient source of project materials.
Hab-To Leather House: Vegetable Tanned Leather
Hab-To Leather House can help you choose leather and materials for your project. Its vegetable-tanned leather is an option for traditional leathercraft, while leather hardware and leatherworking tools support construction and finishing. Crafting bundles bring useful project materials together.
For adhesive selection, explore Ecostick 1804 leather glue and compare its directions with your leather, joint, and workflow. Match the adhesive to the surfaces you’re bonding, and test your process on scrap before beginning visible work.
Visit hab-to.com to explore leathercraft materials, or contact Hab-To Leather House with your questions.
Put Your Next Leathercraft Project Into Practice
Build on each project by keeping a short record of the materials and techniques you use, then note what you’d adjust next time. Each piece can sharpen your judgment and help you develop a process that suits your style.
As you prepare your workbench, explore leathercraft bundles for materials that can support your next project.
Related reading
- Can I Use Regular Craft Glue for Leather?
- How Do I Remove Excess Glue From My Project?
- What Types of Glue Are Used for Leathercraft?
Choose a project that inspires you, take your time with each step, and enjoy making something by hand.
Frequently Asked Questions
What is the best leather glue for common leathercraft projects?
There isn’t one best adhesive for every leathercraft project. Choose leather glue for leathercraft based on the joint’s movement, the leather finish, and any second material. For a wallet lining, prioritize a formula whose directions cover both leather and lining material. Hab-To Leather House offers EcoStick leather glue. Follow its product instructions and test your project materials together before assembly.
How do you remove leather glue or fix a glued leather project?
If a bond fails, inspect the seam first and check whether the leather itself is damaged. Don’t add more adhesive over a loose, dirty, or uneven joint. If the pieces separate without tearing fibers, remove residue according to the glue maker’s directions, then prepare clean surfaces for a new bond. If the leather is marked or stretched, rebuilding the affected panel may preserve the project better than forcing the seam back together.
Disclaimer
All our blog articles are made for information purposes only we dont take responsability for any content from third parties.