




Leather Sourcing Guide for Historical Reenactment
Authenticity in a reenactment kit doesn't start with the stitching; it starts in the tanning pit. You've likely felt the frustration of finishing a beautiful piece of gear only to see it look "off" because the chrome-tanned leather stays stubbornly modern and never develops a real soul. Finding the right leather for historical reenactment projects is often a struggle between settling for industrial materials or being forced to buy a massive hide when you only need a small panel. We understand that pain because we've spent 160 years obsessing over the details of traditional craftsmanship and the heritage of vegetable-tanned materials.
You deserve materials that age with grace and reflect the history you're bringing to life. This guide will help you discover how to choose the most authentic, durable, and period-correct vegetable-tanned leathers for your next project. We'll demystify leather weights for belts versus armor and show you how to find premium Italian leathers, like those from Conceria Maryam, in the exact sizes you need. By the end, you'll know exactly how to achieve a natural patina that looks centuries old without overspending on excess material or compromising on historical fidelity.
Key Takeaways
- Learn why vegetable-tanned leather is the only historically accurate choice for achieving a natural patina that looks centuries old.
- Understand how to select the right weight, from 1.0mm lining to 4.0mm heavy harness leather, to ensure your gear is both durable and functional.
- Discover the best types of leather for historical reenactment projects, such as textured Pueblo for rustic items or versatile Vaccheta for rugged field gear.
- Identify the essential leatherworking tools and materials needed to build an authentic workshop that respects traditional craft.
- Save money and reduce waste by sourcing premium Italian hides in small panels, allowing you to buy exactly what you need for specific replicas.
The Foundation of Authenticity: Why Vegetable Tanned Leather is Non-Negotiable
Authenticity isn't a buzzword in our workshop; it's the standard. When you're building gear for a 14th-century knight or a Viking trader, the material is your foundation. Vegetable tanning is the oldest known method for transforming raw hides into durable leather. This process uses natural tannins found in tree barks to preserve the material. It's slow. It's labor-intensive. It results in a material that breathes, molds, and lives alongside you. For anyone sourcing leather for historical reenactment projects, this isn't just a preference. It is a requirement for accuracy. We believe in respect for the material and the craft. That means starting with a hide that was prepared using methods your ancestors would recognize.
Modern chrome-tanned leather is a shortcut. Invented in the late 19th century, it uses heavy metal salts to speed up production. While it's efficient for mass-produced sneakers, it's a disaster for a historical replica. Chrome leather looks "plastic" because it's essentially sealed. It won't mold to a wooden scabbard core and it won't hold the shape of a breastplate. Choosing vegetable-tanned leather ensures your project has the structural integrity required for field use. It's the difference between a costume that falls apart and a replica that survives the shield wall. Plus, it's the sustainable choice. Plant-based tanning avoids the toxic runoff associated with industrial chrome processes.
Historical Tanning vs. Modern Industrial Methods
Traditional tanning relies on nature. Oak, chestnut, and mimosa barks provide the tannins that stabilize the hide. This process takes months, not days. We define vegetable tanning as the process of using natural tannins to preserve hides. Because it lacks harsh chemicals, it's the ethical choice for the modern crafter. Chrome tanning breaks immersion instantly. Its blue-grey core and synthetic smell scream "modern factory." If your goal is total historical fidelity, you can't start with a material born in the industrial revolution. You need the organic texture that only traditional pits can provide.
The Magic of the Patina
A real patina can't be faked. Vegetable-tanned leather is reactive. It absorbs the oils from your hands, the sunlight of the campsite, and the rain of the battlefield. Over time, a pale hide transforms into a rich, deep mahogany. This is vital for achieving the "lived-in" look for 14th-century or Viking-age gear. Artificial aging with dyes often looks muddy to a trained eye. True leather for historical reenactment projects ages with you. It tells a story. Every scratch and shade of bronze becomes part of your persona's history. It becomes an heirloom, not just a prop.
Choosing the Right Hide: A Reenactor’s Guide to Premium Italian Leather
Selecting the right hide is where your research meets reality. Most generic suppliers offer "genuine leather" without a trace of origin. For serious leather for historical reenactment projects, you need to know which tannery produced the skin. We source directly from world-renowned Italian tanneries like Conceria Maryam and Carlo Badalassi. These masters use traditional recipes that mirror the leather crafts in Tudor and Stuart England. Knowing your source ensures the material behaves predictably under a needle or a swivel knife. For high-status impressions, such as a noble's purse or an officer’s belt, Shell Cordovan leather offers a dense, lustrous finish that screams luxury and durability.
Vaccheta: The Workhorse of the Middle Ages
If you need a reliable, all-purpose material, Vaccheta leather is your best friend. It's smooth, robust, and incredibly responsive to conditioning. Historically, a similar "blank canvas" leather allowed artisans to apply their own fats and dyes. It's ideal for field gear like pouches, simple turn-shoes, or light armor straps. Because it isn't heavily finished at the factory, you can dye it to match specific archaeological finds. It takes a stamp beautifully. It feels substantial in the hand. It's the material that turns a simple project into a piece of history.
Pueblo and Textured Hides for a Rustic Finish
Not every historical period calls for a perfectly smooth surface. Viking age or early medieval kits often benefit from a rougher, more organic aesthetic. This is where Pueblo leather shines. Produced by Badalassi Carlo, it features a unique "scuffed" finish that looks weathered from day one. As you use it, the surface smooths out and darkens, creating a stunning contrast. Choosing the right weight is key. Use a 1.4mm thickness for flexible pouches or linings. Step up to 2.4mm for items that need to hold their own weight, like a heavy belt or a rugged seax sheath. If you're unsure where to begin your journey, our leather bundles offer a curated selection to get your workshop moving.
Durability vs. Workability: Comparing Leather Weights and Finishes
Selecting a beautiful hide is only half the battle. The technical specifications of that skin determine if your gear survives the next campaign or fails at the first event. When sourcing leather for historical reenactment projects, you have to balance "temper" (stiffness) with thickness. A belt that's too supple will sag under the weight of a sword, while a pouch made from rigid armor-grade leather will be nearly impossible to open. Understanding these nuances helps you build replicas that function as well as they look. Archaeological evidence, such as the finds detailed in Leather in Late Iron Age Scandinavia, shows that historical artisans were masters of selecting specific hide sections for specific tasks. They didn't just use "leather"; they used the right weight for the right job.
Weight Selection for Common Gear
Thickness is measured in millimeters, and even a half-millimeter difference changes how a material behaves. We recommend following these general guidelines for your workshop:
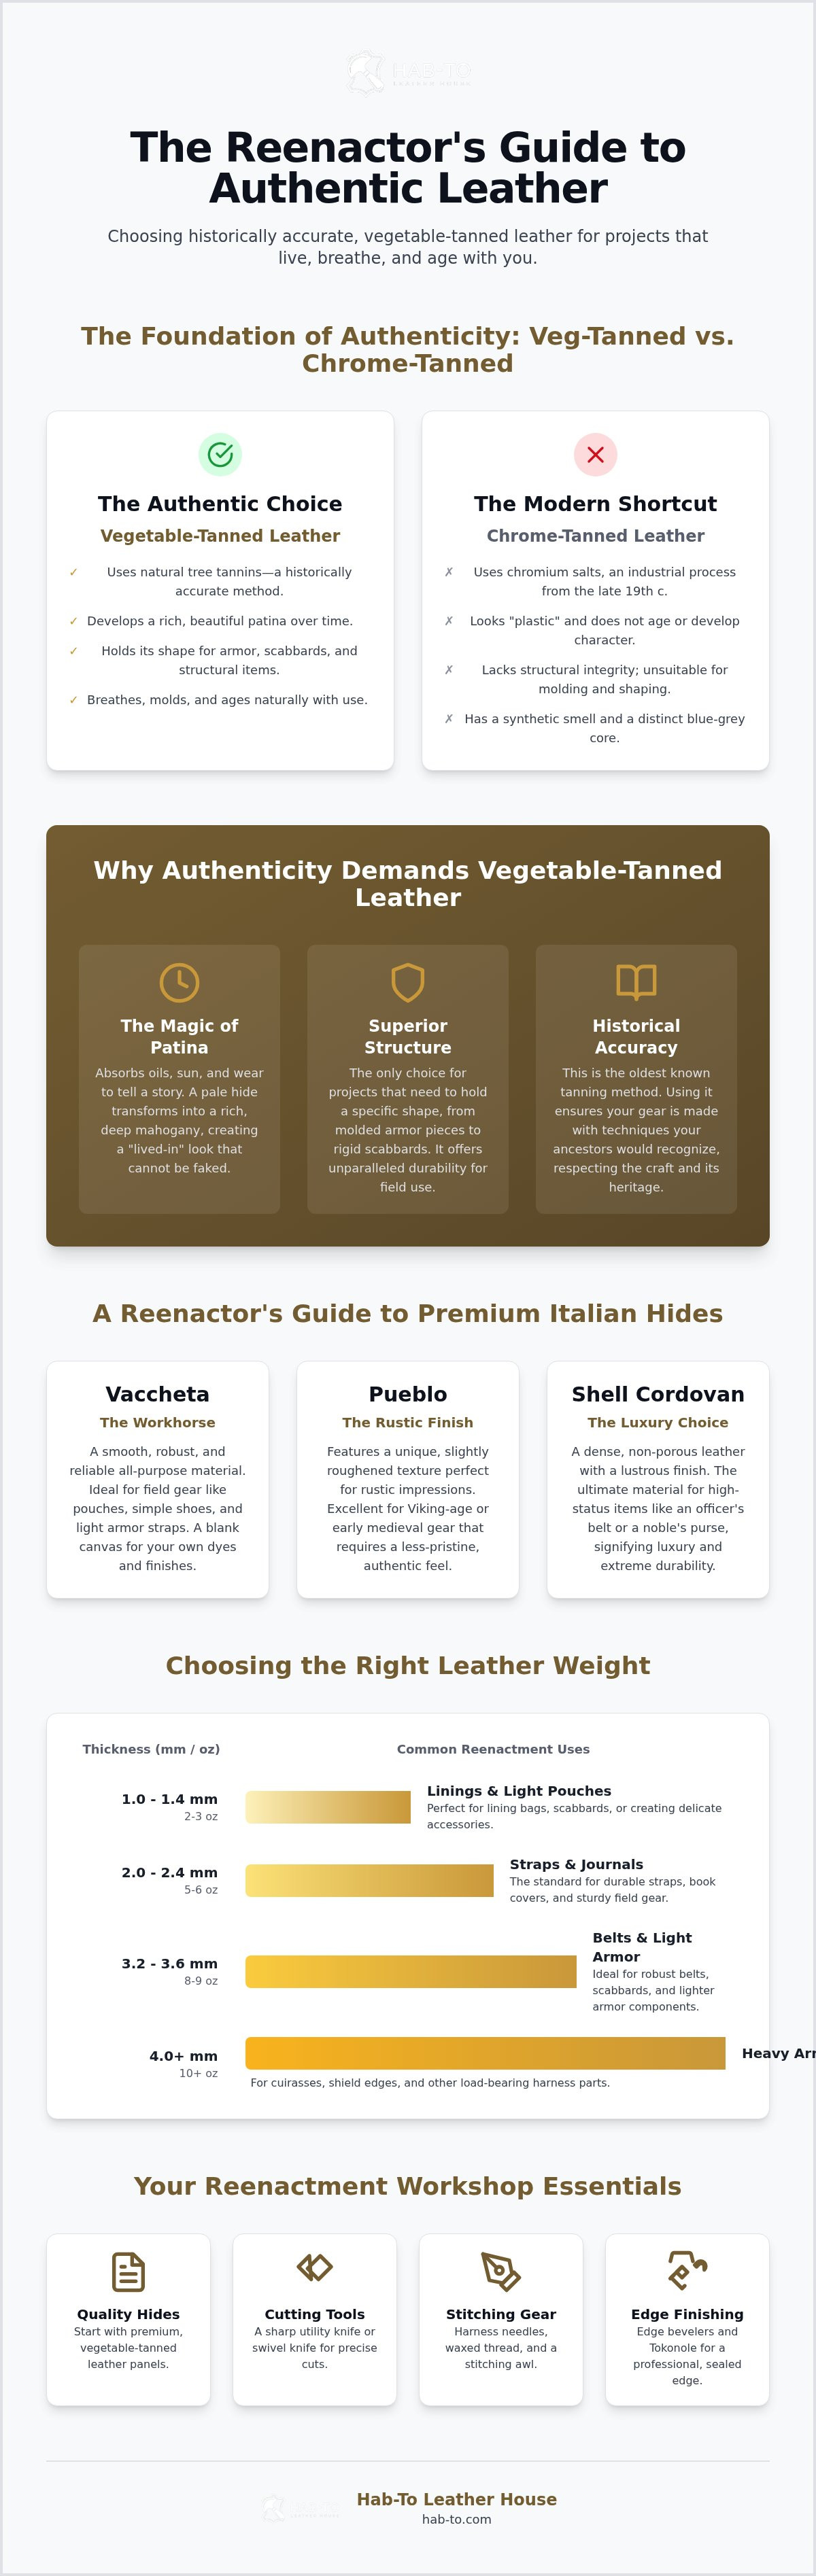
- 1.2mm to 1.6mm: These lighter weights are perfect for book covers, small "kidney" pouches, and soft linings. They offer excellent "give" and are easy to sew by hand.
- 2.0mm to 3.0mm: This is the versatile middle ground. It's the sweet spot for knife sheaths, rugged satchels, and light straps. It provides enough structure to hold a shape without being overly bulky.
- 3.5mm and up: Reserved for heavy-duty use. This is what you need for protective armor, shield edging, and weight-bearing belts.
The Difference Between Harness and Bridle Leather
For items that face extreme tension, equestrian-grade leathers are superior. Harness leather is stuffed with high concentrations of oils and waxes during the tanning process. This makes it incredibly weather-resistant and durable. It often features a "pull-up" effect, where the oils shift when the leather is folded, creating beautiful, lightening highlights that add instant character to historical gear. Bridle leather, on the other hand, is typically finished with a smoother, waxy surface on both sides. It's designed to be comfortable against a horse's skin, making it an excellent choice for high-end straps or suspension systems. You can dive deeper into these materials in our guide on Equestrian Leathers and Hardware.
To avoid wasting premium material, always create a paper pattern before you cut. Because we offer small panels with no minimum order, you can buy exactly the amount needed for a specific scabbard or set of pouches. This precision ensures you aren't left with expensive offcuts that don't fit your next project. It's about working smarter, respecting the material, and ensuring your leather for historical reenactment projects is used to its full potential.
Your Reenactment Workshop: What You Will Need for Your First Project
Setting up your first workspace is an act of preservation. You've selected your hide, but the transformation requires more than just enthusiasm. Using subpar tools often leads to frayed edges and uneven stitching that scream "modern costume" rather than "historical replica." Investing in professional Leathercraft Tools ensures every cut and punch respects the material you've sourced. When working with premium leather for historical reenactment projects, your goal is to make the tool an extension of your hand. This precision is what separates a hobbyist from a master crafter.
The Reenactor’s Essential Tool Kit
Your starter kit should focus on the essentials that impact the final look. A sharp knife for clean edges and a reliable set of punches are non-negotiable. For the edges, many beginners overlook the burnish. Tokonole is the industry secret for achieving a smooth, professional edge that looks period-correct. It seals the fibers without the need for synthetic paints. Bonding your pieces also requires care. We use Ecostick 1804 because it provides a strong, eco-friendly bond. It won't fail when you're in the middle of a muddy field or a crowded tavern. It's the same adhesive used by luxury tanneries, ensuring your gear lasts for years of events.
What you will need
To begin your journey into historical leatherworking, ensure you have these items on your bench:
- Precision Cutting Tools: A sharp Japanese skiving knife or a heavy-duty utility knife for clean lines.
- Edge Bevelers: Available in our tools collection to round off sharp corners.
- Tokonole: Essential for a smooth, burnished edge. You can find it in our Tokonole bundles.
- Ecostick 1804: A professional, non-toxic adhesive for a permanent bond.
- Stitching Awl and Needles: For creating authentic hand-sewn seams.
- Curated Bundles: Our leather bundles provide the perfect variety of hides to start with.
Period-Correct Hardware and Finishing
Hardware is where many reenactors lose points on authenticity. A 15th-century belt shouldn't be held together by a nickel-plated buckle from a modern craft store. Choose Solid Brass Buckles for projects spanning the 14th to 17th centuries. Brass was the standard for a reason. It's durable and develops a beautiful, dark patina over time. Avoid modern, high-gloss finishes. Raw or antique brass provides the muted, lived-in look that fits a historical setting. Historical accuracy depends as much on the buckle as the hide. Even the best leather for historical reenactment projects looks out of place if the hardware is wrong.
Sourcing Like a Master: Why Hab-To is the Reenactor’s Choice
Finding the right leather for historical reenactment projects shouldn't feel like a battle. Most industrial wholesalers force you to buy a full hide, even if you only need enough for a single scabbard or a set of pouches. This leads to wasted money and piles of unused offcuts. We do things differently. Our "No Minimum Order" policy means you can buy exactly the panel size you need. Whether it's a small strip for a 14th-century belt or a specific cut for a Viking-age turn-shoe, we provide the material without the waste. It's about making premium, world-class hides accessible to the individual artisan.
Our expertise isn't just professional; it's ancestral. With over 160 years of family history in the leather trade, we understand the soul of the material. We know the difference between a costume that looks good from a distance and a museum-quality replica that stands up to scrutiny. If you're feeling uncertain about which weight or finish fits your specific persona, you have the "Mike Advantage." You can book a free video consultation to speak with me directly. I'll walk you through our warehouse, show you the grain of the hide, and help you choose the perfect piece for your workshop.
From Amsterdam to Your Workbench
Based in Amsterdam, we curate our collection from the most prestigious tanneries in Italy. We focus on leathers like those from Conceria Maryam and Badalassi Carlo because they prioritize traditional, sustainable methods. Buying small panels instead of full shoulders allows you to experiment with different textures and colors without a massive financial commitment. This approach supports sustainable, small-scale production and ensures that every scrap of leather for historical reenactment projects is put to good use. Plus, for our EU-based crafters, shipping is fast and free from the customs headaches often found when ordering from outside the continent.
Take the Next Step in Your Craft
Building a kit is a journey of continuous learning. If you want to refine your skills beyond the basics, consider joining a Leather Masterclass. These sessions are designed to help you master historical stitching and finishing techniques that bring your gear to life. For those just starting their workshop, our Leather Bundles offer a pre-curated selection of hides, tools, and hardware to get you moving immediately. We aren't just a supplier; we're your partners in the craft.
Shop our full collection of vegetable-tanned leather and start your project today.
Bring Your Historical Vision to Life
You've seen how the right material dictates the success of your replica. Whether you're molding a scabbard or stitching a heavy harness, the structural integrity and patina of vegetable-tanned leather are non-negotiable. We've spent 160 years perfecting our knowledge so you don't have to guess which hide fits your specific era. Authentic results come from using the same natural tannins and traditional methods that artisans have relied on for centuries. It's about respecting the craft from the very first cut.
Sourcing premium leather for historical reenactment projects is finally accessible. You don't need to warehouse full hides to get professional results. Our focus on exclusively vegetable-tanned skins and small panels means you can focus on the craft rather than the cost of waste. We take pride in being a bridge between world-class Italian tanneries and your workbench. We believe that every reenactor, from the beginner to the master, deserves access to materials that tell a real story.
Browse our Vegetable-Tanned Leather Panels for Reenactment
Your next project is a chance to honor the traditions of the past. We're here to help you choose the material that makes your kit look and feel like a true piece of history. Let's build something authentic together.
Frequently Asked Questions
What is the best leather for making a medieval pouch?
Vaccheta leather is the superior choice for medieval pouches because it balances durability with a supple hand feel. A thickness of 1.2mm to 1.6mm allows the pouch to open and close easily while maintaining its shape. If you want a more weathered, rustic appearance from day one, Pueblo leather is an excellent alternative. Both materials are authentic vegetable-tanned options that develop a beautiful patina over time.
Is vegetable-tanned leather more historically accurate than other types?
Vegetable-tanned leather is the only historically accurate material for pre-19th-century reenactment. Chrome tanning was not invented until the mid-1800s, making it a modern industrial shortcut that breaks historical immersion. Traditional tanning uses natural tannins from tree barks like oak or chestnut. This organic process ensures your leather for historical reenactment projects looks, smells, and behaves like the materials used by artisans for centuries.
How thick should leather be for a reenactment belt?
A thickness of 3.5mm to 4.0mm is ideal for a heavy-duty reenactment belt that needs to support the weight of a sword or dagger. Leather that is too thin will stretch and sag under tension, ruining the look and function of your kit. Using a high-quality harness or bridle leather ensures the belt has the necessary temper or stiffness to remain comfortable and secure throughout a long event.
Can I buy small pieces of leather for scabbards without buying a whole hide?
You can buy exactly the panel size you need at Hab-To Leather House because we have no minimum order requirements. Most suppliers force you to purchase a full hide, which is often unnecessary for smaller items like scabbards or pouches. By purchasing smaller panels, you can source premium Italian leather without the financial burden or waste of excess material that might not fit your next project.
How do I make my new leather gear look old and authentic?
The best way to age leather gear is through natural sunlight and regular use. Avoid using heavy artificial dyes that can look muddy and fake to the trained eye. Instead, apply natural oils or waxes and let the material breathe. Sunlight will naturally darken vegetable-tanned hides, while the oils from your hands and the friction of use will create a deep, authentic patina that reflects your character's history.
What tools do I need to start a historical leather project?
You need a few essential tools to begin, including a sharp cutting knife, a stitching awl, and heavy-duty needles. A set of edge bevelers and a burnishing agent like Tokonole are also vital for achieving professional, period-correct edges. Starting with a curated tool kit ensures you have the precision needed to work with premium leather for historical reenactment projects without damaging the material or compromising on accuracy.
Is it better to use brass or steel hardware for reenactment?
Solid brass is generally the preferred choice for projects spanning the 14th to 17th centuries because it is durable and patinas beautifully. While steel and iron were used for earlier periods or specific military applications, brass remains the most versatile material for most historical personas. Always opt for raw or antique finishes rather than modern, shiny coatings that look out of place in a historical setting.
How do I care for vegetable-tanned leather gear after a rainy event?
Dry your leather gear slowly at room temperature away from direct heat sources like fires or radiators. Heat will cause the fibers to shrink and crack, permanently damaging the hide. Once the gear is completely dry, apply a light coat of leather conditioner or oil to restore the natural fats lost during the rain. This simple care routine ensures your investment remains durable for years of future campaigns.
Disclaimer
All our blog articles are made for information purposes only we dont take responsability for any content from third parties.