




Tokonole vs Beeswax: Which Edge Burnishing Agent is Best for Your Craft?
You've likely been told that choosing between Tokonole vs beeswax is a simple binary decision, but the finest edges I've ever produced in my workshop aren't the result of picking a side. Drawing on my family's long history with leather, I've learned that most crafters treat these as rivals, yet the secret to a professional, glass-like finish often lies in understanding how they work as a system rather than just alternatives. I know the frustration of finishing a beautiful Shell Cordovan wallet only to find the edges look fuzzy or feel unpleasantly sticky. It's a common struggle when you're trying to elevate your work to a professional standard.
If you've dealt with Tokonole cracking over time or beeswax creating a messy, unfinished look, you're not alone. I want to help you master the technical differences between these two powerhouses so you can achieve a durable, mirror-like edge every single time. We'll explore how each agent reacts with premium vegetable-tanned leathers like Pueblo, and I'll share a repeatable workflow that ensures your edges stay perfect for years. It's time to stop guessing and start burnishing with the confidence of a master artisan.
Key Takeaways
- Understand how Tokonole penetrates leather fibers for a permanent bond while beeswax creates a timeless, waterproof barrier on the surface.
- Evaluate the technical trade-offs of Tokonole vs beeswax to determine which finish best suits specific leathers like Shell Cordovan or Pueblo.
- Learn to achieve a mirror-like, high-gloss finish using modern agents or a deep, organic glow through traditional hand-burnishing methods.
- Discover how to significantly reduce your finishing time while ensuring your edges remain durable and resistant to fraying.
- Master the professional hybrid workflow that layers both agents for the ultimate combination of structural smoothness and long-term protection.
Understanding Leather Edge Finishing: Why Burnishing Agents Matter
I've spent years at the workbench, and I can tell you that an unfinished edge is the quickest way to make a masterpiece look like a prototype. In the world of leather crafting, burnishing is a fundamental skill that separates the hobbyist from the professional. It isn't just about making things look pretty. It's a physical transformation where you use friction and heat to compress loose leather fibers into a solid, unified mass. Without this compression, the edge of your project remains a structural liability.
Raw edges fail because they are fundamentally porous. Vegetable-tanned leather fibers will fray and absorb moisture, oils, and dirt without proper treatment. If you leave an edge "hairy," it acts like a sponge. This eventually leads to rot or de-lamination. This is where the choice of Tokonole vs beeswax becomes critical. An agent serves as a lubricant during the high-friction phase to prevent burning, then acts as a binder to lock those fibers in place once dry.
It's important to remember that vegetable-tanned leather is the only real candidate for this process. Chrome-tanned leather is processed with mineral salts that stabilize the fibers in a way that prevents them from "welding" together under heat. If you try to burnish a chrome-tanned hide, you'll likely just end up with a messy, floppy edge that refuses to shine. Veg-tan, however, contains natural tannins that respond beautifully to heat, allowing the fibers to compact into a durable, plastic-like state.
The Anatomy of a Professional Edge
A professional edge needs three distinct qualities to be considered successful. First is smoothness. You must remove every trace of "fuzz" from the flesh side and edges until the surface feels like polished stone. Second is shine. We're looking for that "glass" effect where light reflects cleanly off the rim. Finally, there's durability. A well-burnished edge won't fray or peel during daily use. It should remain a solid, protective barrier for the life of the product.
What You Will Need for the Perfect Edge
To get started, you don't need a massive machine, but you do need the right materials. High-quality vegetable-tanned leather is your foundation. I often recommend Badalassi Pueblo because its dense structure takes an edge beautifully. You'll also need your chosen agent, whether that's Tokonole burnishing cream or pure beeswax. To round out your kit, keep a wood or glass slicker and a range of fine-grit sandpaper, typically from 400 to 1000 grit, nearby to refine the surface before you apply any agent.
Tokonole: The Modern Secret to Mirror-Finish Edges
When I first started in this trade, we relied heavily on traditional gums that were often finicky and prone to peeling. Then came Tokonole. This water-based, synthetic burnishing cream from Japan has completely changed how I approach a project. It's a mixture of natural waxes and synthetic resins that acts more like a high-tech glue than a simple polish. Beginners often ask me about the debate of Tokonole vs beeswax, and I tell them that Tokonole is the most forgiving agent you'll ever use. It doesn't just coat the leather; it penetrates deep into the grain to create a permanent bond between the internal fibers.
The real magic happens when you see how it handles the "flesh" side of a hide. If you're working with a premium material like Maryam Vaccheta, you want that back side to feel as smooth as the front. My personal tip is to apply a light amount of Tokonole to the flesh side and use a glass slicker with firm pressure. It compresses the fibers so effectively that the leather almost feels like a single, solid sheet. While artisans have long valued the useful properties of beeswax for surface protection, Tokonole's ability to "glue" the edge from the inside out is why it's become a staple in my workshop.
The Tokonole Application Process
Getting that mirror finish requires a bit of patience. I always apply a very thin, even layer using my finger or a small spatula. Remember, less is more. If you glob it on, you risk staining the grain side of your leather. Once applied, wait about thirty seconds until the cream reaches a "tacky" stage. This is the sweet spot. If you start slicking while it's still wet, you'll just move the cream around. I prefer using a canvas cloth for a high-gloss shine on smaller items, but a traditional wood slicker works best for heavier belts where you need more heat-generating friction.
Pros and Cons of Tokonole
I've found that every tool has its trade-offs. Tokonole is no different, though its benefits usually outweigh the drawbacks for most modern projects. It's important to weigh these factors before you decide which route to take for your specific piece.
- Pros: It provides an incredibly fast, glass-like shine that's hard to beat. Because it's water-soluble, cleanup is a breeze and it won't ruin your workspace if you spill a drop.
- Cons: It is a synthetic product, which might not sit well with those aiming for a 100% organic build. Also, if you apply it too thick on very flexible items like watch straps, the finish can occasionally "crack" over time.
If you're just starting your journey and weighing the merits of Tokonole vs beeswax, I've put together some leathercraft starter bundles that include exactly what you need to test these finishes yourself.
Beeswax: The Timeless Tradition of Natural Protection
While Tokonole has certainly earned its place on my workbench, beeswax is the heritage choice that connects us to the roots of the craft. My family has been working with leather for over 160 years. Throughout that time, pure beeswax has remained the gold standard for protection. In the debate of Tokonole vs beeswax, the latter wins every time when it comes to raw environmental resistance. It provides a natural, waxy barrier against rain, sweat, and humidity that water-based creams simply cannot replicate.
I find that beeswax is most essential when I'm sourcing materials for Equestrian items or heavy-duty belts. These pieces face harsh conditions. Unlike Tokonole, which acts as a binder to glue fibers together, beeswax acts as a sealant. It fills the microscopic gaps in the leather edge with a hydrophobic layer. However, you have to work for it. Beeswax requires significant heat generated through friction to melt the wax into the fibers. Without that heat, the wax just sits on the surface, eventually flaking off.
How to Burnish with Pure Beeswax
There are two main ways I approach this. The "dry" method involves rubbing a solid block of wax directly onto a dry, sanded edge. You then use a wood slicker at high speed to generate the friction needed to drive the wax home. For a more professional result, I prefer the "hot" method. This involves using a heated creasing tool to flow the wax directly into the leather. This ensures deep penetration and a much more durable seal. Depending on how much you buff the edge afterward, you can achieve anything from a subtle matte-satin finish to a deep, organic glow that highlights the natural beauty of traditional edge finishing techniques.
The Limits of Beeswax
It's important to be honest about what beeswax can and cannot do. One common mistake I see beginners make is assuming wax will hide a poorly prepared edge. It won't. While Tokonole can help "glue" down stray fibers, beeswax will actually highlight them. If your sanding isn't perfect, the wax will just make the fuzz more visible. There's also the "sticky" factor. In extremely high-heat environments, a heavily waxed edge can feel slightly tacky to the touch. This is why understanding the specific needs of your project is key to choosing between Tokonole vs beeswax.
Tokonole vs Beeswax: A Head-to-Head Comparison for Artisans
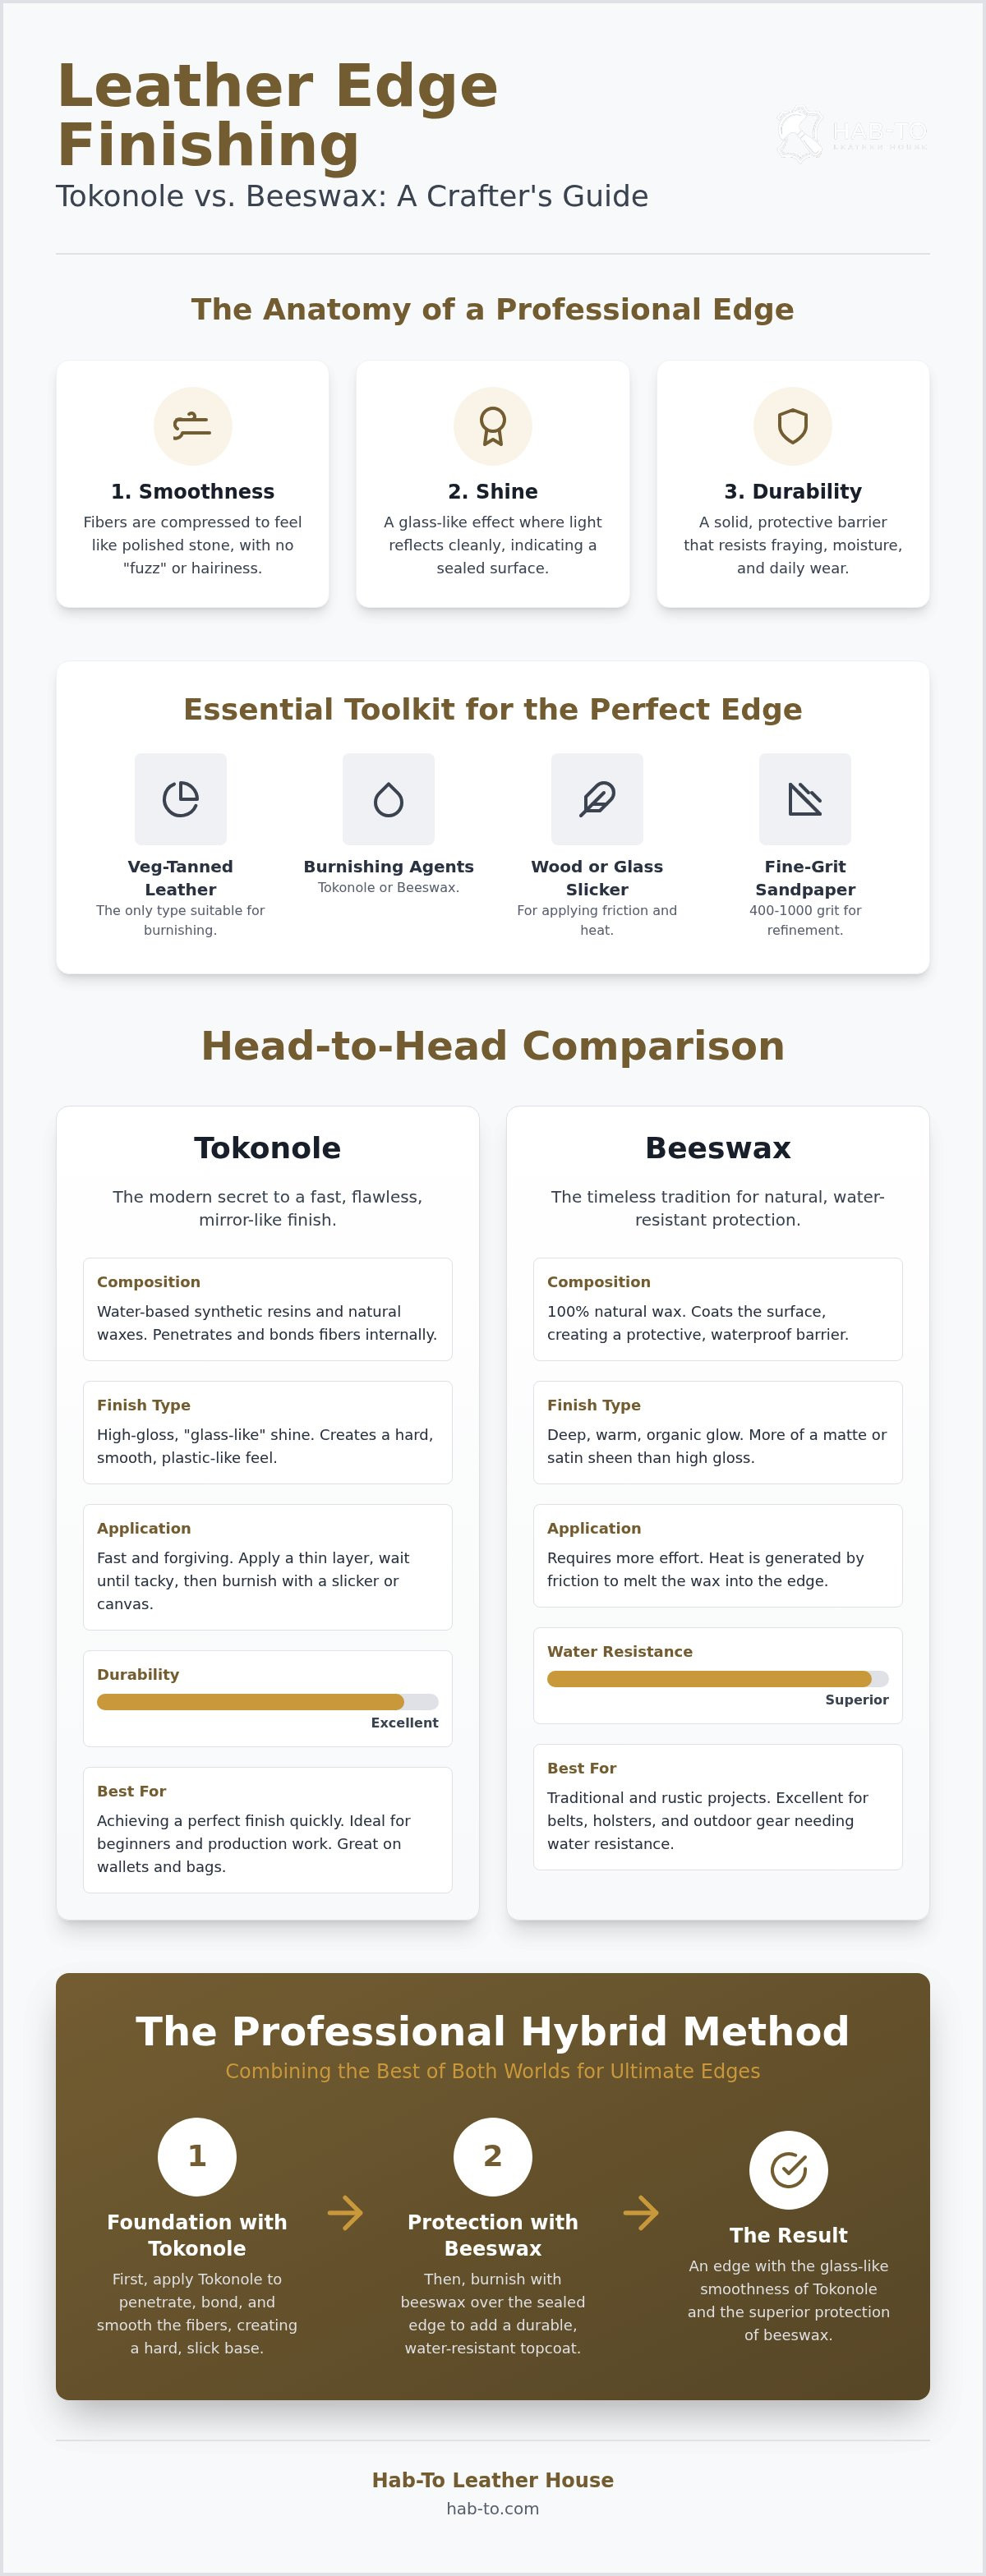
Let's get down to the technical reality of Tokonole vs beeswax. I see many crafters treat these as interchangeable agents. They aren't. Tokonole gives you that modern, high-gloss perfection. It is a look that screams precision and almost resembles a plastic-like finish in its smoothness. Beeswax, by contrast, offers a deep, organic glow. It feels alive and traditional. In my workshop, I prioritize Tokonole when I need speed. It is significantly faster for achieving a smooth, professional surface on a tight deadline. But don't count the wax out just yet. Beeswax edges are incredibly easy to refresh. A quick rub with a cloth and some friction brings the life back into an old belt or bag edge.
Refurbishing a Tokonole edge is a bit more involved. You usually have to sand the edge down slightly and re-apply the cream to get back that original luster. With wax, you just need heat and a cloth. This makes beeswax a favorite for heirloom pieces that are meant to be maintained over decades. From a value perspective, investing in a Tokonole Bundle makes sense for most professional artisans. A single jar goes a very long way, often lasting for hundreds of small goods projects.
Binding vs. Sealing: The Technical Difference
The real secret lies in how these substances interact with the leather's anatomy. Tokonole acts as an adhesive binder for internal fibers. It penetrates the leather. It glues the structure. It locks everything in place permanently. Beeswax acts as an external topical sealant. It protects the surface. It repels moisture. It coats the rim. If you choose the wrong one for the specific hide density, you will pay for it later. Using only wax on a loose-grained hide often results in "fuzzy" edges returning after just a week of use. The fibers weren't truly bound. They were just temporarily smoothed over with a layer of wax.
Which should you choose for your project?
I recommend Tokonole for small goods like wallets and watchstraps. It is the clear winner for precision and thin, layered edges where you want a crisp profile. If you are building a wallet that will live in a pocket, the sleekness of Tokonole prevents it from catching on fabric. For heavy gear like belts, equestrian tack, or large bags, beeswax is my preferred choice. It provides the necessary durability and weatherproofing for items that take a daily beating. Matching the agent to the project's intended use is the mark of a true master. Don't settle for a one-size-fits-all approach.
Mike's Verdict: The Professional Hybrid Method
I've spent decades refining my technique at the workbench. In every Hab-To workshop session, I show my students that the debate of Tokonole vs beeswax isn't about choosing one over the other. It's about how they complement each other. I call this the hybrid method. It is my secret sauce for achieving an edge that doesn't just look like glass on day one but stays that way for years. Most guides tell you to pick a side, but a master knows that the best results come from using the right tools in the right order.
The logic behind this method is simple. Tokonole is an incredible binder. It goes deep into the fibers and glues them together from the inside. Beeswax is a superior sealant. It sits on top and repels the world. When you use them together, you get the structural integrity of a modern synthetic and the timeless protection of a natural wax. It's the best of both worlds. However, you must remember that quality edges start with quality leather. Don't waste your time trying to burnish low-grade hides or scraps; they lack the tannin density required for this process to work.
The 5-Step Hybrid Edge Process
If you want to replicate this in your own shop, follow this specific workflow. It takes a bit more time than a single-agent approach, but the results speak for themselves.
- Step 1: Sand your edges to 600 grit. Do this until the edge is perfectly flat and the layers of leather look like one unified piece.
- Step 2: Apply a thin, even layer of Tokonole. Use a wood slicker and burnish with fast, light strokes until you see a consistent shine.
- Step 3: Lightly sand again with 1000 grit. This removes any tiny bumps or grain that might have "popped" during the first burnish.
- Step 4: Apply a second, very light coat of Tokonole. This time, buff it with a piece of heavy canvas instead of wood for a finer, smoother polish.
- Step 5: Apply pure beeswax. Buff it vigorously with a clean cloth. The friction melts the wax into the Tokonole foundation for a final, waterproof seal.
Ready to Level Up Your Finishing?
If you're ready to stop experimenting and start producing professional results, I've curated a Leathercraft Master Bundle. It contains the exact agents and tools I use every day in my own projects. If you have a specific project in mind and aren't sure which leather or finishing agent is right for you, you can always book a free video consultation with me. I'm here to help you master the craft.
Master Your Edge Finishing
You now have the technical foundation to transform your leatherwork from amateur to heirloom quality. Mastering the nuances of Tokonole vs beeswax isn't just about following a trend. It's about respecting the material and choosing the right chemistry for your specific project. Whether you need the high-speed precision of a synthetic binder or the rugged, waterproof protection of a traditional wax, your edges will now reflect the care you put into every stitch.
At Hab-To, we bring 160 years of family leather expertise to every recommendation. We don't believe in barriers for artisans. That's why we offer no minimum order quantities on our premium Italian leathers and supplies. If you're still unsure which path to take, I'm always available for a free video consultation to walk through your project together.
Your journey toward the perfect edge is a marathon, not a sprint. Keep practicing, keep refining your workflow, and enjoy the process of creating something truly lasting with your own hands. I look forward to seeing the professional results you'll achieve at your workbench.
Frequently Asked Questions
Is Tokonole better than beeswax for beginners?
Tokonole is generally better for beginners because it's significantly easier to apply and achieves results faster. Unlike beeswax, which requires consistent heat and friction to melt into the leather, Tokonole's water-based formula penetrates fibers with minimal physical effort. In the Tokonole vs beeswax debate for newcomers, I always suggest starting with Tokonole to build confidence. It's more forgiving if your sanding isn't perfect yet, as it helps glue down stray fibers.
Can I use beeswax on top of Tokonole?
You can absolutely use beeswax on top of Tokonole, and I actually recommend it for most heavy-use projects. This combination uses Tokonole as a structural binder to lock the internal fibers and beeswax as a topical sealant to provide a waterproof barrier. This layering ensures your edge remains smooth internally while gaining the natural, protective benefits of a wax coating. It's the most durable way to finish an edge on vegetable-tanned leather.
Does Tokonole contain any harmful chemicals?
Tokonole is a water-based product that is considered non-toxic and safe for standard workshop use. It consists of a blend of natural waxes, resins, and pigments. Based on safety data, it doesn't contain restricted substances like Chromium VI or Dimethyl Fumarate. While it's a synthetic cream, it's designed to be environmentally friendly and safe for skin contact. I've used it for years without any concerns regarding harmful fumes or chemical irritants.
Why is my burnished edge turning fuzzy again after a few days?
Fuzziness usually returns because the internal fibers weren't properly compressed or bound during the finishing process. If you only use beeswax on a low-density leather, the wax sits on the surface without actually gluing the fibers down. When the project flexes during use, those fibers break free. To fix this, ensure you sand thoroughly up to a high grit and use a binding agent like Tokonole to create a permanent, unified structure before sealing.
Do I need a heated tool to use beeswax effectively?
A heated tool isn't strictly mandatory, but it significantly improves the performance of beeswax. While you can generate enough heat through vigorous friction with a wood slicker or canvas cloth, a heated creaser allows the wax to liquify and flow deep into the leather grain. This results in a much more durable and professional seal. If you don't have a heated tool, focus on high-speed burnishing to ensure the wax fully integrates with the fibers.
What is the best leather for practicing edge burnishing?
Dense, high-quality vegetable-tanned leathers are the best for practicing your burnishing technique. I recommend starting with something like Badalassi Pueblo or Virgilio Vaccheta. These leathers have a tight fiber structure that responds immediately to heat and friction. Practicing on these premium hides allows you to see exactly how Tokonole vs beeswax affects the edge, helping you understand the physical transformation of the leather without fighting against loose or floppy fibers.
Can I use Tokonole on the back (flesh side) of my leather?
Yes, Tokonole is specifically designed to be used on both the edges and the flesh side of your projects. Applying a thin layer to the back of a hide and compressing it with a glass slicker will result in a smooth, pasted finish. This is particularly useful when you aren't using a lining leather. It prevents the flesh side from fraying or shedding, giving your unlined bags or wallets a much more refined and professional appearance.
How long does a Tokonole edge last compared to a beeswax edge?
A Tokonole finish is essentially permanent because it bonds the fibers together, but it can lose its luster over time. A beeswax edge provides superior initial protection but is a sacrificial layer that wears down with use. The beauty of wax is that it's easily refreshed with a quick buffing. In contrast, Tokonole edges are more durable against structural fraying, though they may eventually require light sanding and a fresh application to restore their mirror-like shine.
Disclaimer
All our blog articles are made for information purposes only we dont take responsability for any content from third parties.