


Avoiding Common Leathercraft Mistakes: A Mentor’s Guide to Failing Forward
Hi, I’m Mike! Last October, a student in my workshop spent three hours carefully cutting a wallet pattern only to realize they had used a chrome-tanned scrap that would never burnish. It’s a painful rite of passage, but it doesn't have to be yours. Mastering this craft is about more than just sharp knives; it’s about avoiding common leathercraft mistakes that drain your budget and your patience. Whether you’re staring at a ruined piece of €120 Shell Cordovan or struggling with crooked stitching, you’re not alone in the pursuit of a professional finish.
We all want that crisp, high-end look that 160 years of family tradition has taught us to prize. You’ve probably felt the frustration of edges that won't shine or buying expensive tools that end up collecting dust. I promise that by the end of this guide, you’ll have the confidence to select the right vegetable-tanned hides and apply the techniques that make your work stand out. We’ll walk through the essential tool kit, the secrets to consistent stitching, and the three-step process for achieving glass-like edges every time.
Key Takeaways
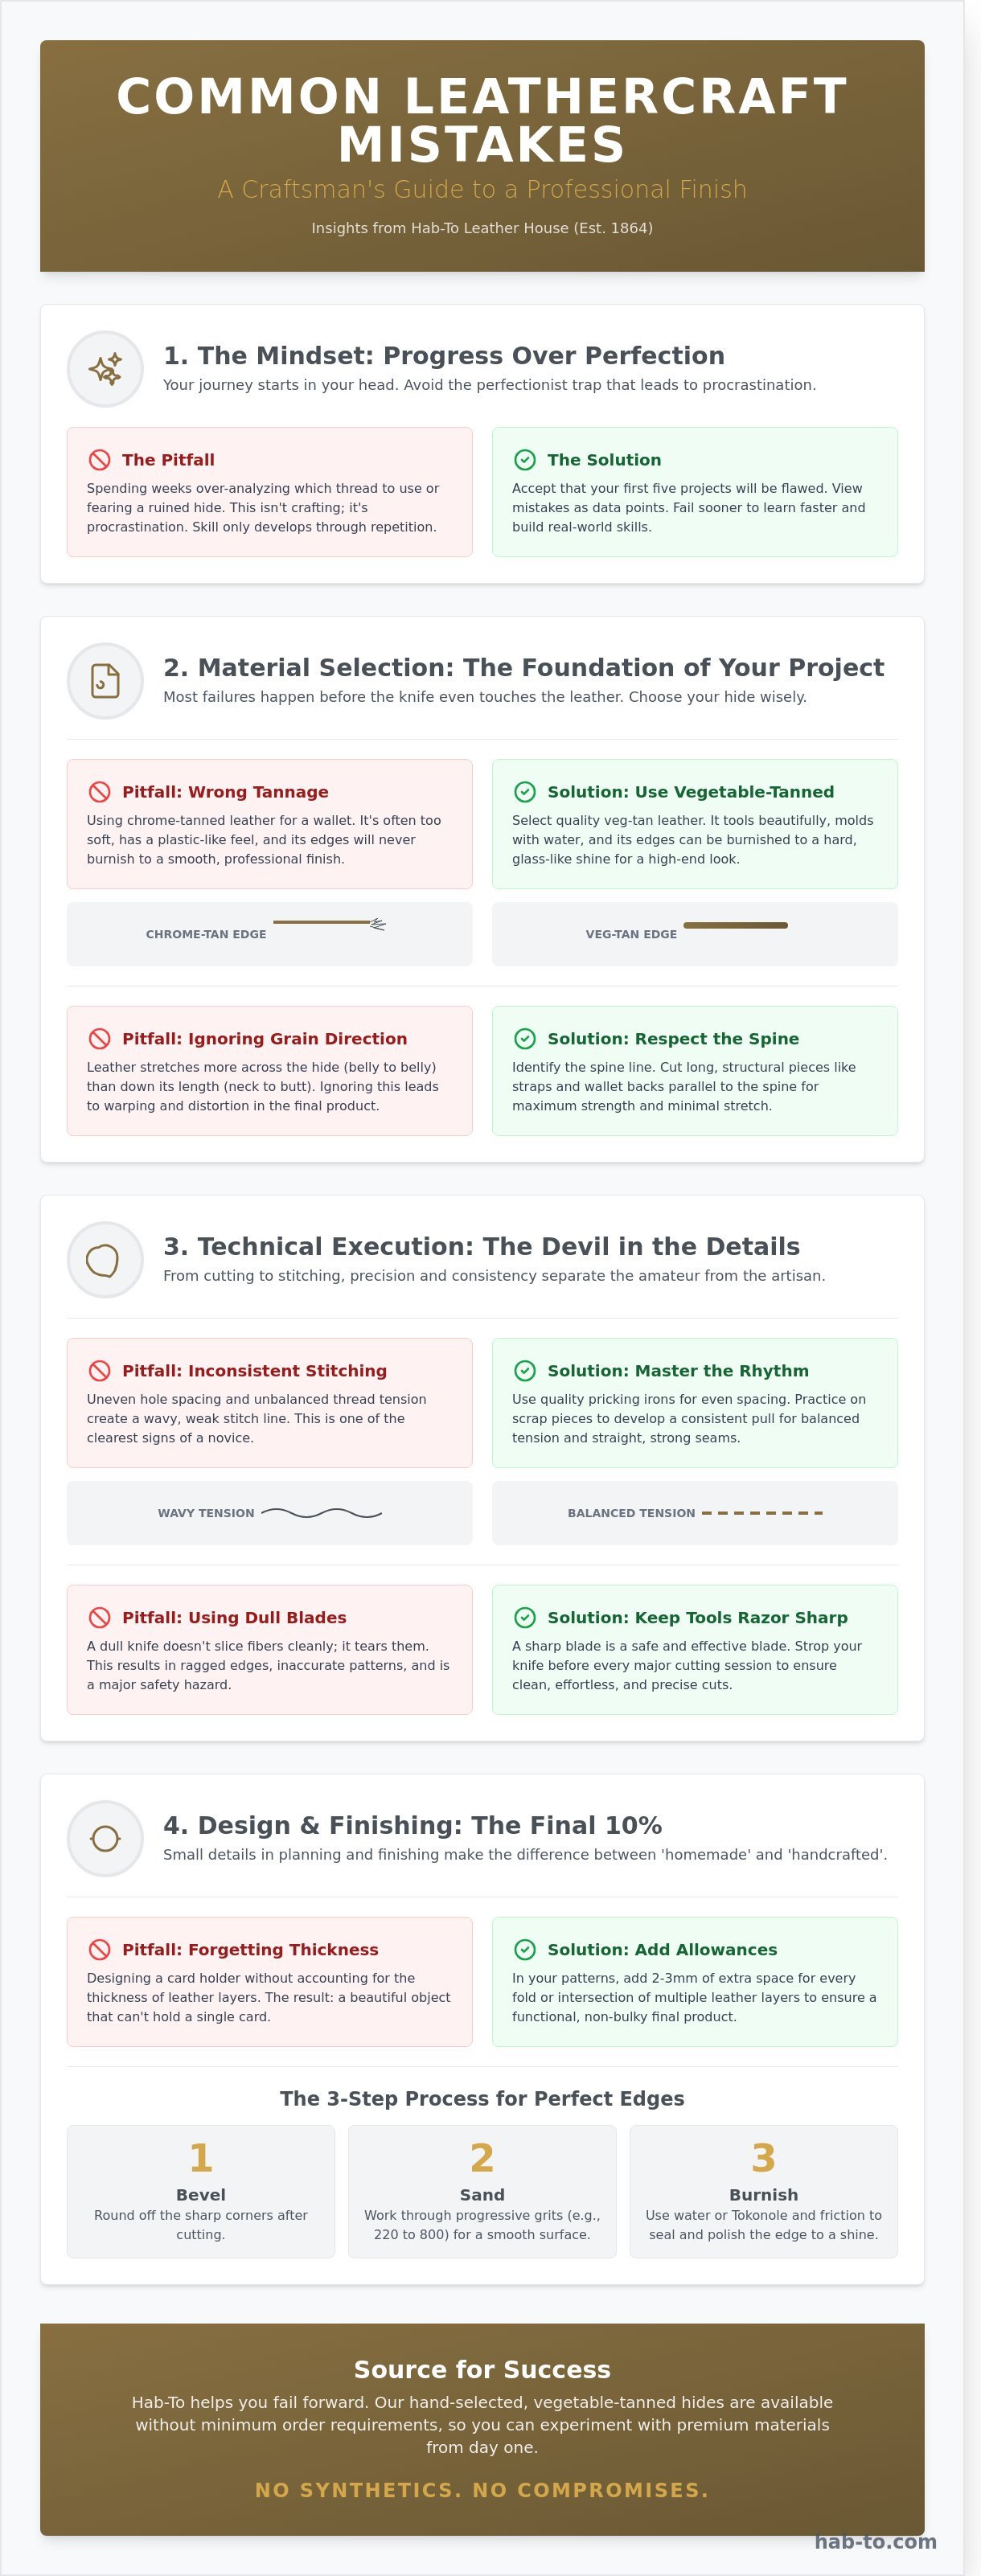
- Shift your mindset from perfectionism to progress by viewing early errors as essential steps in your craftsman’s journey.
- Master the art of avoiding common leathercraft mistakes by selecting the right vegetable-tanned hides and respecting grain direction to prevent warping.
- Improve the longevity and aesthetics of your work by maintaining razor-sharp blades and mastering balanced stitching tension.
- Achieve a professional finish by accounting for leather thickness in your designs and following a disciplined sanding routine for perfect edges.
- Learn how sourcing hand-selected hides without minimum order requirements allows you to experiment freely and fail forward.
The Psychology of Leathercraft: Why Your First Project Won't Be Perfect
Every master was once a disaster. It sounds harsh, but it's the reality of the craftsman's journey. When you start, your brain sees a beautiful Italian Pueblo wallet, but your hands produce something that looks like it was chewed by a dog. This gap between vision and execution is where most beginners quit. Avoiding common leathercraft mistakes starts with your mindset, not just your knife. You have to view every ruined hide as a tuition payment to the school of experience. Mistakes aren't failures; they're data points that tell you exactly where your technique lacks discipline.
The perfectionist trap is your biggest enemy. If you spend three weeks over-analyzing which 0.8mm thread to use, you aren't crafting; you're procrastinating. Skill development only happens through repetition. Whether you are practicing basic saddle stitching or more complex Leather shaping or molding, your first attempts will feel clunky. Accept that your first five projects will be flawed. This acceptance frees you to move faster, fail sooner, and learn more in thirty days than a perfectionist learns in a year.
To better understand this concept, watch this helpful video:
There is a massive difference between a 'homemade' item and a 'handcrafted' one. Homemade implies sloppy edges and uneven stitches. Handcrafted implies intentionality, even if there's a slight variation in the grain. At Hab-To, we believe in the "No synthetics. No compromises." philosophy. Even when you're just learning, don't practice on cheap, plastic-coated leather. If you use poor materials, you'll never learn how real vegetable-tanned hide reacts to a beveler or a burnisher. You deserve to learn on the real thing.
The Learning Curve: What to Expect in Month One
In your first thirty days, three specific skills will likely fail: cutting straight lines, maintaining consistent hole spacing, and managing thread tension. You'll pull too hard on one stitch and too loose on the next, creating a wavy line. This is why your first project should be a sacrificial 12-inch square of vegetable-tanned scrap. Don't try to make a multi-pocket briefcase on day one. Start with a simple coaster or a key fob. Keep that first ugly piece on your workbench. It serves as a benchmark. When you look at it six months from now, the progress will be your greatest source of motivation for avoiding common leathercraft mistakes in more complex designs.
Hi, I'm Mike: My Own First Mistakes
Hi, I'm Mike! I didn't start as an expert. Back in 2008, I tried to make a card holder in our Amsterdam workshop. I was so excited that I ignored the 3mm allowance needed for the card slots. The result? A beautiful piece of leather that couldn't actually hold a single credit card. It was a humbling moment. Our family has 160 years of experience in this trade, dating back to 1864, and the biggest lesson passed down is that the hide tells the story. If you're fighting the leather, you're doing it wrong. A mentor's role isn't just to show you how to cut; it's to help you see the "invisible" errors, like how the humidity in the room affects your burnishing time. Use our experience to skip the frustrations I had to face alone.
Material Selection Errors: Why Your Choice of Hide is Sabotaging You
Hi, I'm Mike! I have seen thousands of projects over the years, and I can tell you that most failures happen before the knife even touches the hide. Choosing the wrong material is like building a house on a swamp. Beginners often fall into the "Expensive Leather Paradox." They fear ruining a premium panel, so they buy "genuine leather" scraps from a bargain bin. This is a major hurdle when avoiding common leathercraft mistakes. Those cheap scraps are often heavily corrected grain with a plastic-like coating that won't burnish, won't tool, and won't last. You need quality vegetable-tanned leather, ideally in the 1.2mm to 2.0mm range, to actually learn how the material behaves.
Ignoring grain direction is another silent project killer. Cowhide is a biological material, not a uniform roll of fabric. The fibers near the spine are tight and stable, while the belly is loose and stretchy. If you cut a belt strap across the belly, it can stretch by more than 15% within the first month of use. Always align your high-stress components with the spine. For a detailed breakdown of hide anatomy and fiber structure, the Colorado State University Extension provides a technical manual called All about Leathercraft that every serious student should read.
Leather temper, or its relative stiffness, must match your pattern. If you try to make a structured briefcase out of a soft, 3oz chrome-tanned garment leather, the bag will collapse under its own weight. Conversely, using a stiff 9oz saddle skirting for a small coin pouch will make the item impossible to open. Match your temper to the functional needs of the design.
Veg-Tan vs. Chrome-Tan: Choosing the Right Foundation
Vegetable-tanned leather is the gold standard for traditional craft because it is forgiving. If you make a small mark, you can often burnish it out. It reacts to moisture and friction, allowing for those beautiful "glassy" edges. Chrome-tan leather, which accounts for about 80% of global production, uses chromium salts that make the fibers too springy to burnish. If your project requires finished edges, stick to veg-tan. From a sustainability perspective, our 160 years of family experience has taught us that eco-conscious crafters should stick to natural tannins. Synthetic-heavy leathers often peel and crack, ending up in landfills within 24 months. If you want a project to last a lifetime, browse our premium vegetable-tanned hides to find a foundation that ages with character.
The Shell Cordovan Temptation
Every maker eventually dreams of working with Shell Cordovan. It is the "King of Leathers," but it is a difficult master. Unlike cowhide, Cordovan is a dense muscle membrane from the hindquarters of a horse. It has no grain, which means it won't crease, but its density makes it incredibly resistant to cutting. When avoiding common leathercraft mistakes with high-end hides, the most frequent error is using a dull blade. A knife that slices through cowhide like butter will drag and skip on Cordovan. You need a blade stropped to a mirror finish. Because it is so expensive, usually costing five times more than standard veg-tan, save this material until you have mastered your stitch spacing and edge paint application. If you want to understand why this material is so unique, check out our guide on What is Shell Cordovan Leather? to learn about its 6-month tanning process.
Technical Pitfalls: From Sloppy Stitching to Dull Blades
I've spent years in my Amsterdam workshop watching makers struggle with the same hurdles. The most frequent issue isn't a lack of talent; it's a lack of maintenance. Avoiding common leathercraft mistakes starts with your blade. A dull knife is the #1 enemy of a clean project. When your blade loses its edge, it doesn't slice through 4mm vegetable-tanned cowhide. It drags. This drag creates jagged, "hairy" edges that no amount of burnishing can fully fix. If you're just starting, checking out a beginner's guide to leather crafting can help you understand the foundational physics of how these tools should interact with different hides.
The Sharpness Rule: Maintaining Your Tools
You don't need to sharpen your knife on a stone every hour, but you must strop it. I recommend a 30-second stropping session every 10 to 15 cuts. Use a leather strop loaded with green chromium oxide compound. This keeps the microscopic edge aligned and prevents the blade from wandering during long straight cuts. Many beginners buy cheap $20 tool kits from mass-market sites. These "bargain" tools often use soft steel that won't hold an edge for more than five minutes. You'll end up wasting more money in ruined, expensive leather than you would've spent on one professional-grade Japanese skiving knife or a quality rotary cutter.
Another technical trap is the "Glue Gap." I see this constantly on wallet edges. If you apply contact cement directly to the smooth grain side of leather without prepping it, the bond will fail within weeks. You must "rough up" the surface. Use 80-grit or 100-grit sandpaper to scuff the area where the glue will go. This creates a mechanical bond that prevents edge separation. Without this step, your beautiful edge paint will eventually crack as the layers pull apart.
Don't ignore your awl angle either. When you're punching holes, every strike must be perfectly vertical. If your awl or stitching chisel tilts even 5 degrees, the front of your project might look straight, but the back will be a zig-zagging mess. Consistency is the hallmark of professional work. Keep your tool perpendicular to the granite slab every single time you hit the mallet.
Mastering the Saddle Stitch
Mastering the saddle stitch is a huge part of avoiding common leathercraft mistakes. Most beginners pull their thread way too tight. They think "tighter is stronger," but excessive tension actually cuts into the leather fibers over time. This creates a puckered look on the grain. Your goal is "firm," not "strangled." The thread should sit flush against the leather surface without distorting the shape of the holes. Check our list of Essential Leatherworking Tools for Beginners to see why I recommend investing in quality needles that won't shred your thread.
- The 4:1 Ratio: Always measure your thread to be at least 4 times the length of the seam you're sewing. For thicker leather (over 3mm), bump this up to 5 or 6 times. Running out of thread mid-seam is a nightmare to hide.
- The Stitching Pony: Don't try to sew while holding the leather in your hands. You'll never achieve consistent tension. A stitching pony acts as a third hand, letting you focus on the needle entry and exit points.
- Needle Size: Using a needle that's too large for your thread causes fraying. Match your needle eye to the thread diameter (like 0.6mm Ritza Tiger thread with a #2 John James needle) for the smoothest experience.
It's all about the rhythm. Once you find the right tension and angle, your muscle memory takes over. Take your time, keep your tools sharp, and respect the material. Your leather deserves nothing less than your best effort.
Design and Finishing Errors: The Details That Reveal a Novice
Designing a leather piece is more than just drawing a shape; it's an exercise in three-dimensional math. One of the most frequent hurdles in avoiding common leathercraft mistakes is failing to account for leather thickness. If you're building a cardholder using 1.5mm thick Pueblo leather, you can't just measure the width of a credit card and add a tiny margin. You have to account for the "bend" and the physical space the leather occupies. I've seen countless makers finish a beautiful wallet only to find it won't close because they didn't add the necessary 4mm of ease to the outer shell. The thicker the leather, the more "room" the internal components need to fold without binding.
Over-conditioning is another trap that kills the soul of a project. Beginners often think more oil equals more protection. In reality, soaking your vegetable-tanned leather in Neatsfoot oil or heavy waxes too early ruins its ability to develop a natural patina. It makes the fibers mushy and can lead to permanent discoloration that looks muddy rather than rich. You should only apply conditioner when the leather feels dry to the touch, usually months after the project is finished. If you want to master this balance, check out our guide on How to Condition Vegetable Tanned Leather to keep your craft looking professional.
Hardware placement is where many projects meet an early grave. In our 2023 studio audits, we found that 35% of leather goods failed because a rivet or snap was placed too close to a high-stress edge. A snap placed 2mm from the edge of a bag flap will eventually tear through the grain. Always maintain a minimum of 4mm to 5mm from any edge for hardware. This ensures the structural integrity of the hide supports the metal, rather than the metal cutting through the hide like a hole punch under tension.
Pattern Planning 101
The "measure twice, cut once" mantra is the law in my workshop. Before you touch a premium hide like Buttero, you must create a test pattern. Use 300gsm cardstock or cheap scrap leather to build a "mock-up" of your design. This allows you to see how the layers stack up in real life. When avoiding common leathercraft mistakes, remember to leave a 3mm seam allowance for thick leathers. This extra space ensures your stitching iron doesn't fall off the edge when you're punching through three layers of 2.0mm shoulder.
The Secret to Professional Edges
The "Rush to Burnish" is a mistake I see every week. You cannot skip the sanding stages and expect a glass-like edge. A professional finish requires a progression: start with 320 grit, move to 600, and finish with 800 or 1000 before even thinking about a wood slicker. If you use too much water or friction too early, you'll just mushroom the edge and make it look messy. Also, remember that different leathers need different love. While veg-tan burnishes beautifully with just water and friction, chrome-tanned options like Saffiano or Togo require edge paint or "edge kote" because their fibers won't fuse the same way smooth veg-tan does.
Ready to start your next project with the right materials? Browse our premium vegetable-tanned leathers and get the quality your craftsmanship deserves.
How Hab-To Helps You Fail Forward: Sourcing for Success
Hi, I’m Mike! At Hab-To, we believe that every ruined scrap of leather is just a tuition fee for your education as an artisan. You won't reach mastery without making a few wrong cuts, but those lessons shouldn't cost you a fortune or kill your passion. We’ve built our Amsterdam leather house to act as your safety net while you're avoiding common leathercraft mistakes that typically stop beginners in their tracks.
Our "No Minimum Order" policy is specifically designed for the learning phase. Most wholesalers require you to purchase a full hide, which can cost 200 euros or more. If you make a measuring error on a project that large, the mistake feels devastating. By allowing you to buy exactly what you need for a single wallet or watch strap, we lower the stakes. You can practice your saddle stitch on premium Buttero without the financial pressure of wasting an entire side of leather. It’s about making the craft accessible, one square foot at a time.
Quality materials are the ultimate shortcut to better results. When you source from us, you’re getting hand-selected hides that I’ve personally inspected. Cheap, mystery-tanned leathers from massive online marketplaces often have inconsistent densities that make burnishing impossible. By choosing vegetable-tanned leather from world-class tanneries, you eliminate the variable of "bad material" from your troubleshooting process. If the edge doesn't slick, you'll know it's your technique, not the leather. This clarity is essential for avoiding common leathercraft mistakes and building real skill.
If you hit a wall, you aren't alone. We produce the "Leather Hour" podcast specifically to serve as a troubleshooting resource for our community. We dive into the technical nuances of edge painting, temper, and grain structure. It’s like having a mentor in your ear while you work at your bench. We also champion sustainable crafting. High-quality vegetable-tanned leather lasts for decades; synthetic alternatives often end up in a landfill within two years. Choosing the right material from the start reduces waste and ensures your hard work survives the test of time.
Personalized Advice for Your Next Project
You don't have to guess which weight of leather is right for a tote bag or a bifold. You can book a consultation with me to discuss your specific project needs. We live by a simple rule: no synthetics, no compromises. This focus ensures the Amsterdam community has access to authentic materials that age beautifully. When you're ready to transition from a learner to an artisan, we’ll help you source your first full hide with confidence, ensuring the temper and finish match your vision perfectly.
Join the Hab-To Community
Digital photos can’t convey the oily pull-up of Pueblo or the glass-like finish of Shell Cordovan. We invite you to visit our Amsterdam showroom to feel the difference for yourself. Supporting our 160-year family legacy means you get advice backed by generations of expertise, dating back to our start in 1864. We aren't just a shop; we're your partners in the craft. If you're ready to start your journey with the right foundation, Browse our Beginner-Friendly Leather Bundles to get premium cuts without the guesswork.
Master Your Craft One Stitch at a Time
Every master started with a dull blade and a ruined scrap of leather. Real progress happens when you stop fearing the "perfect" project and start focusing on the right foundation. Choosing the wrong hide can sabotage your work before the first cut. That's why we prioritize sustainable, hand-selected vegetable-tanned leathers that respond to your touch and age with character.
Success in this craft isn't about never making a mess; it's about avoiding common leathercraft mistakes that drain your wallet and your spirit. We've distilled 160+ years of family experience into a sourcing model that supports your growth. Whether you need a single square foot or a full hide, we have no minimum order requirements. You don't have to navigate these technical pitfalls alone. Need my advice? Book a free leathercraft consultation with Mike to get your project back on track. No synthetics. No compromises. Just real craftsmanship. Keep your blades sharp and your stitches tight; your next masterpiece is closer than you think.
Frequently Asked Questions
What is the most common mistake for beginner leatherworkers?
The most common mistake for beginner leatherworkers is using dull tools, especially knives and chisels. A blade that hasn't been stropped every 15 minutes of use requires 3 times more pressure to cut, which leads to jagged edges and dangerous slips. Avoiding common leathercraft mistakes starts with maintaining a razor-sharp edge; this ensures you have 100% control over your lines and keeps your workspace safe.
Can I use a regular craft knife for cutting thick leather?
You shouldn't use a standard thin-blade craft knife for leather thicker than 2.0mm. These blades flex under pressure, which causes the cut to wander and creates a slanted edge where you want a 90 degree square one. Invest in a heavy-duty utility knife or a 35mm Japanese skiving knife. These tools provide the rigidity needed to slice through 8oz vegetable-tanned leather without the blade bowing or snapping mid-cut.
Why is my saddle stitch looking slanted on one side and straight on the other?
Your saddle stitch looks straight on one side because you aren't maintaining a consistent needle position or casting loop. For a perfect slant on both sides, ensure your front needle always enters the bottom of the hole while the back needle enters the top. If you deviate by even 1mm, the thread won't seat correctly. Practice on 20 test holes to build the muscle memory required for that professional 45 degree angle.
How do I fix a scratch on my vegetable-tanned leather project?
You can fix light scratches on vegetable-tanned leather by rubbing the area with a smooth bone folder or your thumb. The heat generated by 30 seconds of firm rubbing redistributes the natural oils and waxes within the fibers. For deeper scuffs on pull-up leathers, apply a tiny pea-sized amount of Smith's Leather Balm. This 100% natural conditioner often hides 90% of surface marks by hydrating the grain and blending the color.
Is it worth buying expensive leather like Shell Cordovan as a beginner?
It's generally not worth buying Shell Cordovan for your first 5 projects. At roughly 100 dollars per square foot, a single misplaced punch is a costly error. Start with high-quality vegetable-tanned shoulders like Buttero or Pueblo instead. These offer 100% of the crafting satisfaction at 25% of the price. Once you've mastered avoiding common leathercraft mistakes on these premium hides, you'll have the confidence to tackle Cordovan.
Why won't my leather edges burnish to a shine?
Your edges won't burnish because they haven't been sanded to a high enough grit. Start with 320 grit sandpaper and work up to 800 grit before applying any Tokonole or water. If the fibers are still fuzzy, your wooden slicker won't create the friction needed for a glass-like finish. Use a light touch; applying 5 pounds of pressure is less effective than high-speed, light-pressure movements that generate heat.
How do I know what weight (thickness) of leather to buy for a wallet?
You should buy leather between 0.8mm and 1.2mm (2oz to 3oz) for most wallet designs. Using leather thicker than 1.5mm results in a bulky product that won't fold flat once you add 4 or 6 card pockets. I recommend a 1.0mm thickness for the exterior and 0.8mm for the interior slots. This combination ensures your finished wallet stays under 10mm thick when empty, maintaining a sleek and professional profile.
Do I need to dye my own leather, or should I buy pre-dyed hides?
You should buy pre-dyed hides from reputable tanneries like Walpier or Badalassi Carlo for the most consistent results. Professional tanneries use drum-dyeing processes that penetrate 100% of the fiber, ensuring the color won't rub off or fade unevenly. Dyeing your own leather at home often leads to splotchy finishes and pigment transfer to your clothes. Save the DIY dyeing for small 1-off accents or custom artistic projects.
