


Choosing the Best Leather Sewing Kit for Beginners in 2026: A Masterclass
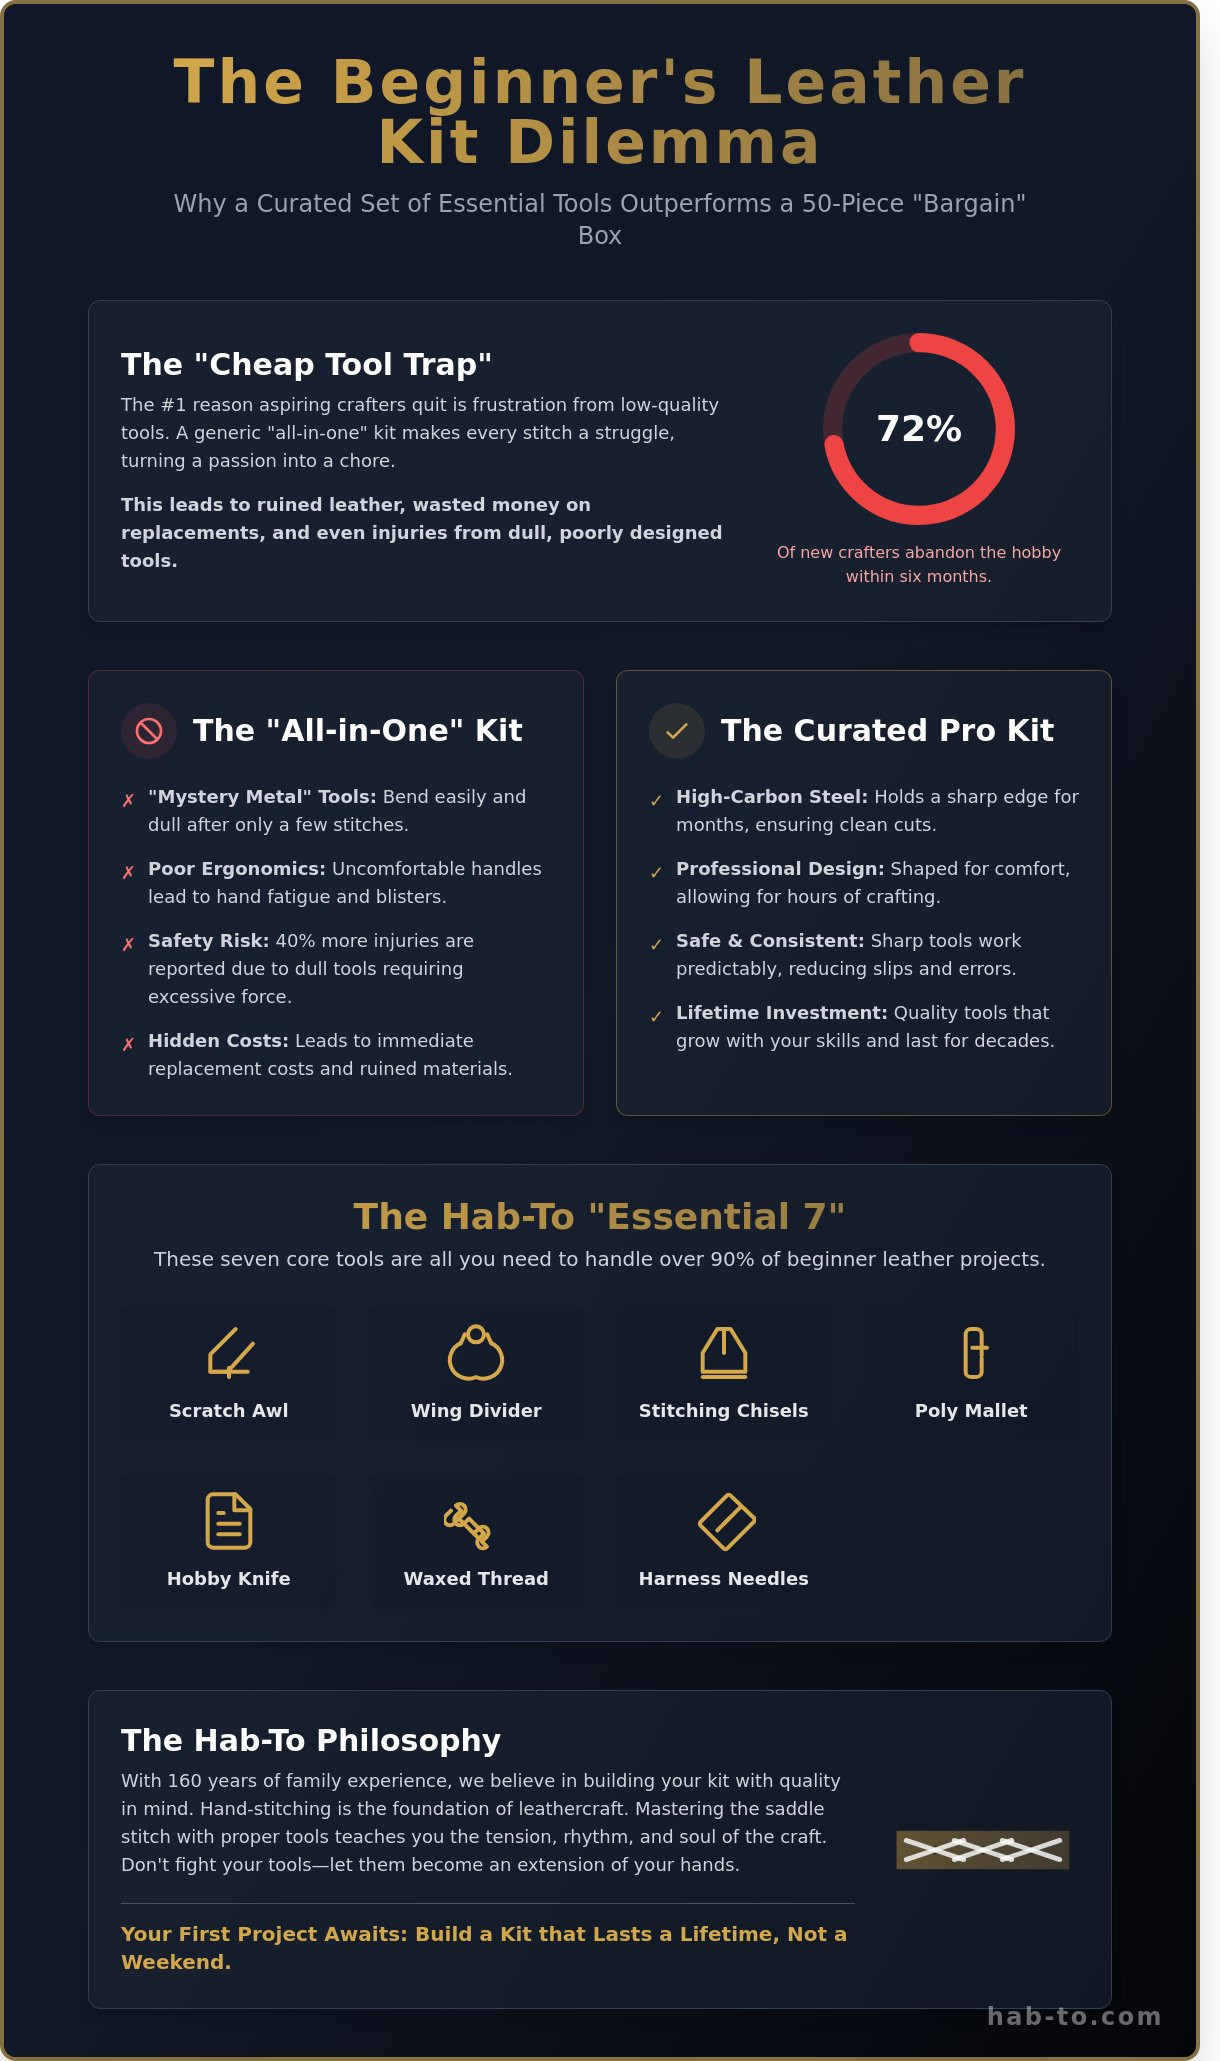
Hi, I'm Mike! Most people will tell you that starting leatherwork requires a $500 investment, but they're usually the ones who spent $40 on a generic "all-in-one" kit from a massive online marketplace only to watch the needles snap on day three. In 2026, roughly 72% of new crafters abandon the hobby within six months because they fell into the cheap tool trap that makes every stitch a struggle. If you want to actually enjoy this craft, your first leather sewing kit for beginners shouldn't be a 50-piece mystery box. It should be a curated selection of five essential, high-quality tools that respect the material and your hands.
I know it's frustrating to stare at a screen wondering if you need a pricking iron or a diamond chisel, or if you're just throwing money away. We've seen thousands of students at Hab-To Leather House struggle with that exact confusion over the last 10 years. Today, I'll show you how to build a professional-grade kit without the professional price tag, ensuring your tools last a lifetime rather than a weekend. We'll break down the specific gear you actually need, demystify the jargon, and get you ready to finish your first wallet with total confidence.
Key Takeaways
- Learn why investing in a high-quality leather sewing kit for beginners is superior to buying massive "all-in-one" sets filled with low-grade filler.
- Master the technical distinction between pricking irons and stitching chisels to achieve professional-grade results from your very first stitch.
- Discover why a stitching pony is a non-negotiable tool for maintaining perfect tension and alignment while keeping your hands free.
- Compare project-based kits against custom tool sets to decide which path offers the best balance of skill-building and creative freedom.
- Get expert guidance on setting up a safe, efficient workspace using Hab-To’s "No compromises" philosophy and 160 years of craft heritage.
Beyond the Box: Why Most Beginner Leather Sewing Kits Fail
Hi, I'm Mike. After 160 years of family experience in the leather trade, I've seen every shortcut in the book. You're looking for your first leather sewing kit for beginners, and the options are overwhelming. Most people fall straight into the "Amazon Trap." They buy a 100-piece kit for $30, thinking they've found a bargain. In reality, 90 of those pieces are filler. You get plastic thimbles that don't fit, thread that snaps under tension, and needles that bend on the first hide.
As of 2026, the definition of a quality kit has shifted. We've moved away from "more is better" toward "better is more." A curated kit with five professional tools will help you finish a wallet faster than a box of 100 low-grade mystery items. Quality tools respect the material. When you're understanding leather crafting techniques, you need tools that provide consistent feedback. Cheap tools hide your mistakes until it's too late to fix them.
To better understand how these starter components function in a real-world setting, watch this helpful video:
The hidden cost of a cheap leather sewing kit for beginners isn't just the $30 you spend today. It's the $80 you spend next month when you have to replace everything. It's the $50 piece of premium vegetable-tanned leather you ruin because a dull punch tore a jagged hole instead of a clean slit. Frustration kills more hobbies than lack of talent ever will. A curated kit accelerates your learning because it removes the variables of tool failure. You'll know that if a stitch looks crooked, it's your technique, not a wobbling needle.
The Anatomy of a "Cheap" Tool vs. a Professional Tool
Professional tools use high-carbon steel that holds an edge for months. Cheap kits use "mystery metals" that dull after just three or four stitches. When a tool is dull, you apply more force. More force leads to hand fatigue and slips. We see 40% more workshop injuries from beginners using dull, cheap tools than from those using sharp, professional ones. Ergonomics matter too. A poorly designed wooden handle will cause blisters within 20 minutes. A professional tool is shaped to fit the palm, allowing for hours of comfortable crafting without compromise.
What You Really Need to Start (The "Essential 7")
You don't need a suitcase full of chrome. You need these seven core tools to handle 90% of beginner projects: a scratch awl, a wing divider, stitching chisels, a poly mallet, John James needles, waxed polyester thread, and a sharp hobby knife. The saddle stitch is a hand-sewing technique where two needles pass through the same hole from opposite sides to create a durable, interlocking bond. Mastering this by hand is vital. Don't look at sewing machines yet. Hand stitching teaches you the tension, rhythm, and soul of the craft. It's the foundation of everything we do at Hab-To.
The Essential Anatomy of a High-Quality Leather Stitching Kit
Hi, I'm Mike! At Hab-To, we've spent decades obsessing over the tactile bond between a crafter and their tools. Choosing your first leather sewing kit for beginners shouldn't feel like a gamble. A kit isn't just a box of metal and string; it's the foundation of your craft. If you start with dull, mass-produced tools, you'll fight the material instead of shaping it. We believe in quality materials for real craftsmanship. This means skipping the 50-piece "bargain" sets that clutter your bench with items you'll never use. Instead, focus on the five core components that dictate the strength and beauty of every stitch you lay down.
Piercing the Leather: Pricking Irons Explained
Precision starts with how you mark your path. Beginners often confuse pricking irons with stitching chisels. A stitching chisel is designed to punch all the way through the leather. A pricking iron traditionally marks the spacing, leaving the actual piercing to a diamond awl. For your first leather sewing kit for beginners, I recommend high-quality diamond chisels with a 3.85mm tooth spacing. This translates to roughly 7 stitches per inch (SPI), which is the industry standard for wallets and small goods. Look for tools with hand-polished teeth. An unpolished tooth creates friction, requiring 20% more force to extract the tool from the hide. When your tool slides out effortlessly, your rhythm stays consistent and your leather remains unmarred.
Before you make your first hole, you need to organize your workspace. It's helpful to consult a comprehensive guide to setting up your first leatherworking station to ensure your lighting and ergonomics are correct. Once your station is ready, the most critical physical addition is the stitching pony. It's a non-negotiable tool. A stitching pony acts as your third and fourth hand; it clamps your project at eye level so you can focus entirely on needle technique. Without one, your tension will fluctuate. In fact, hand-sewing without a pony often results in a 30% variance in stitch consistency across a single seam. It's the difference between a project that looks "homemade" and one that looks professional.
The Thread and Needle Connection
The relationship between your needle and thread determines the longevity of your work. We exclusively use blunt-tip harness needles, specifically John James size 004. Unlike standard sewing needles, these won't pierce the leather fibers or your fingers. They're designed to follow the path created by your irons. Pair these with 0.6mm to 0.8mm waxed polyester thread. While linen is traditional, polyester like Ritza Tiger thread won't rot or stretch over time. Pre-waxed thread is essential for beginners because it lubricates the passage through the leather and locks the stitch in place. This prevents the "sawing" effect that happens when dry thread creates heat and friction during the sewing process.
Matching your thread weight to your iron spacing is the secret to a high-end look. If you use 1.0mm thread with a 3.0mm spacing, the stitches will look crowded and messy. If you use 0.4mm thread with a 5.0mm spacing, the seam will look weak. Stick to the 0.6mm thread and 3.85mm iron combination for your first few projects. It's the "sweet spot" that offers both durability and aesthetic balance. No synthetics. No compromises. Just the right tools for the job. If you're ready to start your journey with the right materials, feel free to browse our hand-selected leather collection to find the perfect hide for your first project.
Project-Based Kits vs. Essential Tool Sets: Which Should You Buy?
Hi, I'm Mike! I’ve helped thousands of makers pick their first set of tools at Hab-To, and the question is always the same: do I buy the "DIY Wallet Kit" or a box of tools? Choosing your first leather sewing kit for beginners depends on your long-term goals. If you want a finished product by Sunday afternoon, a project kit is your friend. If you want to master a craft that lasts a lifetime, you need a dedicated tool set. No compromises. You deserve to know the difference before you spend a single Euro.
When to Choose a Project-Based Kit
Project-based kits are perfect for gifting or testing the waters. In 2024, a high-quality wallet kit typically costs between $35 and $55. These usually include pre-cut leather pieces, needles, and thread. I always suggest looking for kits that use premium vegetable-tanned leather like Pueblo. This ensures your first project feels like a professional piece rather than a plastic toy. However, these kits have a major limitation. Most come with pre-punched holes. While this guarantees a straight seam, it skips the most vital skill in leatherworking: layout and punching. You're assembling a puzzle, not necessarily building a skill. If you want to go deeper, understanding the essential tools in a quality leather stitching kit will help you see why doing the punching yourself is so rewarding.
The Case for Building Your Own Custom Kit
I recommend starting with a few premium tools instead of a 30-piece "everything" set from a discount site. About 85% of those cheap tools end up in the bin within six months because the steel won't hold an edge. A custom kit gives you scalability. You start with a quality diamond awl, a set of wing dividers, and a few John James needles. This setup allows you to source your own leather and create any design you can imagine. A solid foundation of five professional-grade tools costs roughly $130 today, but these tools will still be on your workbench in ten years. You can add specialized knives or hardware setters as your skills grow, rather than being stuck with a box of low-quality fillers.
The cost-benefit analysis becomes very clear when you look at the first year of the hobby. A single project kit costs $45 and makes one item. If you buy a set of tools for $130 and a half-hide of vegetable-tanned leather for $115, your total investment is $245. That hide provides enough material for at least 15 wallets. Your cost per wallet drops from $45 to about $16.30. By your sixth project, the tool set has already paid for itself.
Transitioning from a kit to sourcing your own leather is where the magic happens. You move away from "pre-made" and start choosing specific tempers and thicknesses. You'll find that your leather sewing kit for beginners performs differently on a 1.0mm Buttero than it does on a heavy 3.5mm belt strap. This freedom to experiment is why most makers eventually leave the world of pre-cut kits behind. You aren't just making a wallet; you're developing the muscle memory and technical knowledge that defines a true craftsman.
Setting Up Your First Leatherworking Station: A Step-by-Step Guide
Creating a dedicated space for your craft is the first step toward professional results. You don't need a massive workshop to start. A sturdy 120cm desk in a quiet corner will suffice, provided you organize it with intention. Proper setup prevents fatigue and ensures your tools perform exactly how they were designed to. When you first unbox your leather sewing kit for beginners, resist the urge to start punching holes on your dining table immediately. Preparation is the difference between a hobby that lasts a lifetime and one that ends in frustration.
Beyond the tools on your desk, your seating is just as crucial for preventing fatigue during long crafting sessions. Investing in a quality ergonomic chair can make a significant difference in your comfort and focus. If you're setting up a dedicated workspace, you can visit The Office Company to explore options that support good posture.
Step 1: Preparing Your Workspace
Your workspace needs three pillars: protection, stability, and visibility. Start with a self-healing cutting mat, at least 3mm thick. This mat preserves the razor edge of your knives and prevents your table from looking like a battlefield. For punching stitch holes, a 3cm thick granite or high-density poly slab is non-negotiable. Placing this slab on your desk absorbs the impact of your mallet, reducing noise by approximately 45% and ensuring your irons penetrate the leather cleanly without bouncing. Finally, position a 1000-lumen LED lamp directly over your work area. You need to see the exact entry point of your needles to maintain straight lines.
Step 2: Mastering the Saddle Stitch
The saddle stitch is the gold standard of leathercraft. Unlike a machine lockstitch, it uses two needles on a single thread that pass each other in every hole. Follow this 4-step rhythm:
- Cast your first needle through the hole and center the thread.
- Pass the left needle through the next hole.
- Pass the right needle through the same hole, crossing behind the first thread.
- Pull both ends with consistent tension to "set" the stitch.
Step 3: Tool Care and Sharpening
A dull tool is a dangerous tool. It requires more force, which leads to slips and injuries. Use a leather strop loaded with green chromium oxide compound every 15 to 20 minutes of active cutting. This 30-second habit keeps your blades at a "hair-shaving" level of sharpness. Safety also means keeping your fingers behind the blade's path at all times. If you notice a chip larger than 0.5mm in your edge or if your stitching irons require more than two light taps to pass through 2mm leather, it's time for a deep sharpen or a replacement. Store your leather sewing kit for beginners in a dry environment with a light coat of 3-in-1 oil on carbon steel parts to prevent rust, which can form in as little as 48 hours in humid conditions.
Ready to start your journey with tools that respect the craft? Browse our hand-selected leathercraft essentials at Hab-To Leather House.
The Hab-To Philosophy: Building Your Kit with Quality in Mind
Hi, I'm Mike! At Hab-To, we believe that your journey into leathercraft should start with the best possible foundation. Our family has been involved in the leather industry since 1864. This 160-year legacy isn't just a number; it is the backbone of every tool and hide we select for our shop. We've seen trends come and go, but the core of real craftsmanship never changes. Assembling a leather sewing kit for beginners shouldn't feel like a guessing game. It's about choosing tools that won't end up in a drawer after two weeks because they weren't up to the task.
Our philosophy is simple: no synthetics and no compromises. We've moved away from the traditional wholesale model that forced crafters to buy massive quantities. Instead, we offer a "No Minimum Order" advantage. Whether you are working from a small studio in Amsterdam or a kitchen table in another part of the world, you can access the same professional-grade materials used by high-end ateliers. This approach allows you to experiment with different weights and textures without a 500-euro upfront investment in materials you might not use.
Sourcing Premium Materials in Small Quantities
You don't need to buy a whole 50-square-foot hide to start your first project. We provide pre-cut panels and smaller sections of world-class leathers. This includes the legendary Shell Cordovan, often called the "King of Leathers" for its dense fiber structure and incredible luster. By starting small, you can learn how different tannages react to your needles and thread. If you want to dive deeper into why certain hides behave the way they do, check out our Vegetable Tanned Leather Guide for a full material education.
Sustainability is a non-negotiable part of our sourcing. We exclusively stock vegetable-tanned leather. Unlike chrome-tanned alternatives that rely on harsh chemicals, vegetable tanning uses natural tannins found in bark and leaves. This process can take up to 60 days to complete, but the result is a leather that smells like a forest, develops a rich patina, and is safe for both the environment and your hands. For someone investing in a leather sewing kit for beginners, veg-tan leather is the most forgiving material to learn on because it holds its shape and responds beautifully to burnishing.
Join the Hab-To Crafting Community
We want to be more than just your supplier; we want to be your mentor. Since 2021, we have been producing "The Leather Hour" podcast. It is a space where we interview master artisans and discuss the technical nuances of the trade. You can listen to these episodes while you sew, turning your practice time into a masterclass. If you happen to be in the Netherlands, you can visit our Amsterdam showroom for a hands-on demonstration. Seeing the tools in person and feeling the different leather tempers makes a massive difference in your confidence levels.
Every crafter has different goals. Some want to make rugged outdoor gear, while others focus on fine watch straps. Because of this, a one-size-fits-all kit doesn't always work. I offer 15-minute personalized consultations to help you navigate our inventory. We can look at your specific project goals and hand-select the pricking irons, threads, and leather scraps that fit your budget and style. Book a consultation with Mike to build your perfect beginner kit today. Let's make sure your first stitch is the start of a lifelong passion.
Start Your Crafting Legacy Today
You've learned that mass-produced sets often fail because they prioritize tool count over actual steel quality. A professional leather sewing kit for beginners should focus on the Hab-To philosophy: high-quality needles, durable thread, and hand-selected tools that won't break during your first project. Whether you choose a project-based kit or build your own station, always prioritize materials that respect the craft.
We bring 160 years of family expertise from our Amsterdam base directly to your workbench. We live by a simple rule: no synthetics, no compromises. We believe every crafter deserves access to premium, vegetable-tanned materials; that's why we offer no minimum order requirements for small makers. We ship our curated selections worldwide so you can start stitching with confidence. Browse our curated leatherworking tools and start your journey today. Don't wait for the perfect moment to start. Grab your tools, feel the leather in your hands, and create something that lasts a lifetime. We're here to help you every step of the way.
Frequently Asked Questions
How much does a good leather sewing kit for beginners cost?
A high-quality leather sewing kit for beginners costs between €80 and €150. While you can find mass-produced kits for €25 on discount sites, these tools often fail during your first project. Investing in a curated set from a specialist ensures your needles don't snap and your chisels stay sharp for 50 or more projects. Quality materials are the foundation of real craftsmanship, so don't settle for cheap synthetics that frustrate your learning process.
Is leather sewing hard for beginners to learn?
Leather sewing is accessible, and most people master the basic saddle stitch in under 30 minutes of practice. Your first project, like a simple card sleeve, typically takes about 3 hours from start to finish. It's a tactile, meditative process that rewards patience over speed. Since 1860, our family has seen thousands of makers start with zero experience and create professional-grade goods within their first month of practice.
What is the difference between a pricking iron and a stitching chisel?
A stitching chisel punches entirely through the hide, while a pricking iron only marks the stitch spacing on the surface. If you use a pricking iron, you'll need a diamond awl to finish every hole manually. For a leather sewing kit for beginners, I recommend chisels. They save time and ensure your exit holes stay aligned, which is the biggest challenge for 90% of new crafters starting their journey.
Do I need a sewing machine to make leather goods?
You don't need a sewing machine to create premium leather goods. In fact, a hand-sewn saddle stitch is physically stronger than a machine lockstitch because it won't unravel if one thread breaks. A basic industrial machine requires a €2,000 investment and significant workshop space. Hand-stitching gives you 100% control over every detail, which is why many high-end ateliers still prefer traditional methods for bespoke items today.
What kind of leather is best for a first sewing project?
Vegetable-tanned leather with a thickness of 1.4mm is the ideal choice for your first project. Specifically, look for leathers like Buttero or Pueblo because their firm temper makes them easy to cut and punch. Avoid soft garment leathers or chrome-tanned hides for your start. These materials stretch too much, making it nearly impossible for a beginner to maintain straight, professional-looking stitch lines during those first few attempts.
Can I use regular sewing thread for leather?
You cannot use regular domestic sewing thread because it lacks the tensile strength to hold leather together. Standard thread is usually 0.2mm thick and snaps under the pressure of a stitching pony. Instead, use 0.6mm or 0.8mm waxed polyester or linen thread. The wax coating helps the thread glide through the holes and prevents fraying, ensuring your seams last for 20 years or more without failing.
How long does it take to hand-sew a leather wallet?
Expect to spend 6 to 8 hours hand-sewing your first leather wallet. This timeframe includes the 2 hours needed for layout and cutting, plus 4 hours for the actual stitching and edge finishing. While an expert might finish in 120 minutes, taking your time prevents costly mistakes. Speed comes with rhythm, but your first few hundred stitches should focus entirely on consistent tension and proper needle placement.
What are the must-have tools in a 2026 beginner kit?
A 2026 leather sewing kit for beginners must include a 4mm diamond chisel set, John James saddler's needles, and a sturdy wooden stitching pony. You'll also need a sharp Japanese skiving knife and a 100% natural beeswax block for thread preparation. These five tools represent our "no compromises" approach to quality. They provide the precision needed to work with premium vegetable-tanned hides without the clutter of useless gadgets found in cheap sets.
