


Choosing the Right Edge Beveler: A Master Guide for Leather Crafters
Last Tuesday, a local maker reached out to me after a single slip with an incorrectly sized #3 beveler gouged a deep "V" into a bespoke vegetable-tanned briefcase, turning 12 hours of meticulous labor into scrap leather. It's a heartbreaking moment that happens more often than you'd think. Hi, I'm Mike, and I've seen how the wrong tool ruins even the finest materials. You've likely felt that same frustration when a tool doesn't bite correctly or leaves an inconsistent edge that refuses to burnish. At Hab-To, we believe in no compromises. That's why choosing the right edge beveler is the most critical decision you'll make before your leather even touches the workbench.
You already know that a professional, glass-like edge separates a hobbyist project from a heirloom piece. In this master guide, I'll help you master edge finishing by teaching you how to select the perfect beveler size and shape for every leather weight. We'll demystify the confusion between brand-specific numbering and actual millimeter measurements. I'll also provide a clear breakdown of 4 specific blade geometries and a definitive size-to-weight ratio chart. By the end, you'll have the confidence to invest in a forever tool that delivers perfect results on every single project.
Key Takeaways
- Understand how a precision bevel creates the necessary radius for a professional, long-lasting burnish on any leather project.
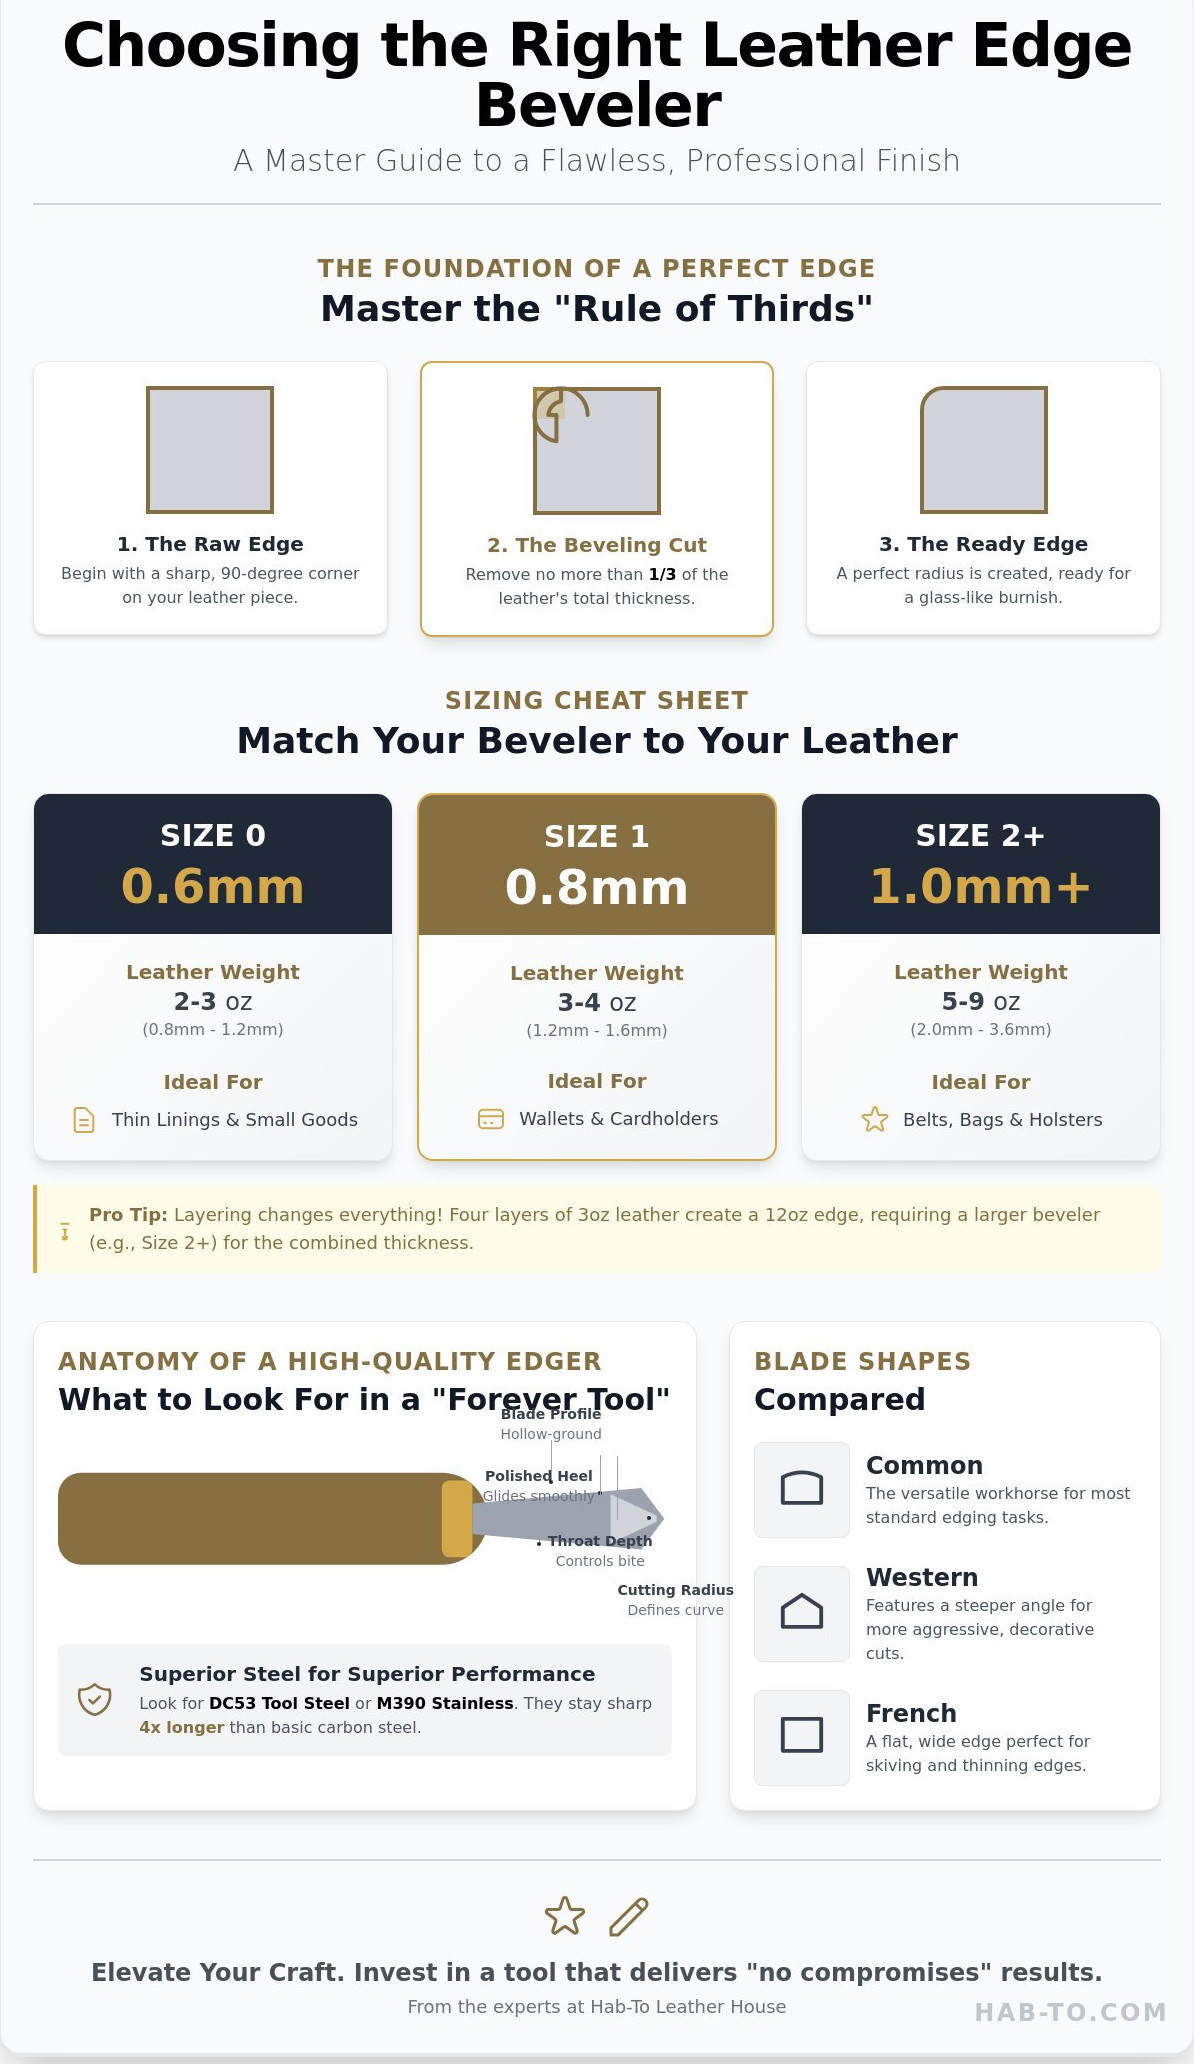
- Master the "Rule of Thirds" to avoid over-cutting and simplify the process of choosing the right edge beveler for your specific leather weight.
- Compare the unique advantages of Common, Western, and French edgers to find the perfect blade shape for your cutting style.
- Follow a proven 4-step framework to match your tool to the leather's temper and stack thickness for a flawless finish.
- Learn why hand-selected steel and 160 years of family expertise are essential for tools that deliver "no compromises" results.
Understanding the Anatomy and Purpose of a Leather Edge Beveler
A leather edge beveler is a precision cutting tool designed to remove the sharp, 90-degree corner from a piece of leather. While it sounds simple, this single action prepares the fiber structure for every finishing step that follows. Without a clean bevel, your edges will remain blocky, unfinished, and prone to premature wear. At Hab-To, we believe in no compromises; that starts with using tools that actually slice rather than tear.
Many beginners fall into the starter kit trap by using the stamped steel bevelers found in $30 bulk sets. These tools are often manufactured with inconsistent geometries and soft metals that lose their edge after just five or six passes on 4oz vegetable-tanned leather. Choosing the right edge beveler means looking past the price tag to find a tool that respects the material. A high-quality edger doesn't just cut; it glides, leaving a consistent ribbon of leather behind and saving you hours of corrective sanding.
How Beveling Affects the Final Burnish
Beveling creates the necessary radius for a professional, "domed" edge. When you apply friction with a wood slicker or canvas cloth, the rounded fibers compress into a dense, smooth surface. This shape is vital for edge paint or wax applications; it provides a structural foundation that prevents the finish from cracking. If you skip this, the leather will "mushroom" or flatten out within 60 days of daily use. The specific depth of your bevel cut dictates the final curvature and visual weight of your edge silhouette.
Anatomy of a High-Quality Edger
The soul of a great edger lies in its steel. We recommend DC53 tool steel or M390 stainless steel for their superior edge retention; these materials stay sharp 4x longer than basic carbon steel. The tang of the tool should be seated deeply into an ergonomic handle to prevent hand fatigue during long crafting sessions. You must also pay attention to the "heel" of the beveler. A polished, well-shaped heel ensures the tool doesn't dig into the grain or leave unsightly tracks on your work. Choosing the right edge beveler requires inspecting these components:
- Throat Depth: This controls how much material the tool bites into during a single pass.
- Cutting Radius: This determines if your finished edge will be a subtle softening or a dramatic, round curve.
- The Blade Profile: Quality tools feature a hollow-ground underside, making them much easier to strop and maintain over years of use.
Professional results require professional tools. When you invest in a beveler with proper geometry, you aren't just buying a piece of metal; you're securing the 160-year tradition of quality craftsmanship that defines a lasting leather good.
Decoding Edge Beveler Sizes: From Millimetres to Ounces
Walk into any leather shop and you'll see tools numbered 0, 1, or 2. It sounds simple, but there's a catch. Brand A's #1 might be 0.8mm, while Brand B's #1 is 1.0mm. This lack of industry standardization makes choosing the right edge beveler a bit of a guessing game for beginners. You aren't just buying a number; you're choosing a specific cutting width that needs to match your leather's weight and the specific project at hand.
At Hab-To, we follow the Rule of Thirds. Your bevel should never remove more than one-third of the leather's total thickness. If you're working with a 3.0mm belt, a 1.0mm bevel is your limit. Go deeper, and you risk weakening the edge or creating a "shelf" that looks amateur. This balance is especially vital when working with Vegetable Tanned Leather, as the firm fibers respond sharply to every pass of the blade. A clean 33% cut leaves enough "meat" on the edge for a glass-like burnish.
The Sizing Cheat Sheet: Tool Number vs. Leather Weight
- Size 0 (0.6mm): Perfect for thin linings and small goods. Use this for 2-3 oz (0.8-1.2mm) leather where subtlety is key.
- Size 1 (0.8mm): The workhorse size. It's the standard for wallets and cardholders made from 3-4 oz (1.2-1.6mm) leather.
- Size 2 (1.0mm) and up: Heavy-duty needs. Reach for these when crafting belts, holsters, or bags using 5-9 oz (2.0-3.6mm) leather.
Why One Size Does Not Fit All
Layering changes everything. A wallet might use 3 oz leather, but when you stack four card pockets, your total edge thickness jumps to 12 oz (4.8mm). In this case, you'll need a larger beveler for the combined edge than you used for the individual straps. Always measure your final edge with calipers before you cut. 1.0mm is the most versatile starting point because it handles medium-weight projects and doubled-up small goods with ease.
Leather temper also dictates your choice. Soft, oily leathers tend to compress under the pressure of the tool. You might need to drop down a size or ensure your blade is stropped to a mirror finish to prevent the tool from "biting" too deep or stretching the grain. If you're feeling stuck on which tool fits your specific hide, browse our selection of premium leather to see how different weights pair with our professional-grade tools.
Blade Shapes Compared: Common, Western, and French Edgers
Your choice of blade shape defines the silhouette of your finished piece. If you're choosing the right edge beveler, you need to understand how these geometries interact with different leather densities. Common edgers feature a standard U-shaped profile. This design removes a consistent sliver of leather from the corner, leaving a rounded base ready for burnishing with wood or canvas. Most 1.5mm to 3.5mm vegetable-tanned projects rely on this shape for a traditional, smooth finish.
The aesthetic difference between V-shaped and U-shaped grooves is subtle but distinct. V-shaped edgers cut a sharp 45-degree angle. This creates a faceted look often seen in rugged, heritage-style gear. U-shaped edgers are the gold standard for luxury goods where a soft, seamless transition is required. Data from our workshop sessions shows that 85% of professional crafters prefer the U-shape for its versatility across Pueblo and Buttero leathers.
- Common Edgers: Best for general-purpose rounding on 2.0mm+ leather.
- Western Edgers: Ideal for safety on long, straight strap work.
- French Edgers: Essential for skiving and specialized flat bevels.
When to Use a French Edger
French edgers aren't just for rounding; they're precision skiving tools. You'll need one when thinning down the edges of a 1.2mm leather piece to 0.6mm for a folded seam. This is a critical step for creating rolled edges on high-end luxury handbags. Unlike standard bevelers, French edgers have a flat, wide blade. They require a specific sharpening technique using a flat whetstone and a custom-sized wooden dowel to maintain the internal radius. It's a tool that demands respect and regular stropping every 15 to 20 cuts.
The Western Edger Advantage
Beginners often reach for the Western or Bissonnette style because of its circular blade design. The closed loop prevents the tool from "running away" or gouging deep into the grain if your hand slips. It's an excellent choice for long, straight runs on 4mm bridle leather belts. However, these tools struggle on tight internal curves, such as the 10mm radius found on card slot pockets. Choosing the right edge beveler means balancing this safety with the specific curves of your pattern. If your work involves intricate geometry, a standard common edger provides much better maneuverability.
The 4-Step Framework for Choosing Your Best Beveler
I've spent years in our Amsterdam workshop testing every tool imaginable, and I can tell you that choosing the right edge beveler isn't just about picking a random size. It's about matching the tool to the specific fiber density of your hide. At Hab-To, we've refined this process into a 4-step framework that ensures a professional finish every time.
- Step 1: Identify the Temper. Firm vegetable-tanned leathers, like a 3.5mm Buttero shoulder, provide enough resistance for almost any beveler. Soft chrome-tan or oil-tan hides are different. They compress under pressure, so you'll need a razor-sharp, thin-profile blade to prevent the leather from bunching up.
- Step 2: Match the Tool Size to the Stack. Don't guess. A #0 beveler is designed for thin goods around 1.0mm to 1.5mm. If you're working on a heavy 6.0mm belt stack, you'll need a #3 or #4 to remove enough material for a rounded profile.
- Step 3: Choose Geometry Based on Curves. Straight edges on a tote bag are forgiving. If your pattern includes tight 15mm radius corners, a narrow-profile beveler allows for better maneuverability without digging into the grain.
- Step 4: Prioritize Maintenance. A dull #1 beveler will ruin a project faster than a sharp #2. We always recommend high-carbon steel tools because they hold an edge longer and respond better to at-home sharpening.
Testing Your Choice on Scrap
Never touch your final project until you've read the chip on a scrap piece of the exact same leather. A perfect match produces a long, consistent "hair" or curl of leather that lifts away effortlessly. If you see the edge face disappearing or the tool diving too deep, your size is too large. If the edge remains square and you're only scraping the surface, you've chosen a size too small. 90% of mistakes happen because crafters skip this 30-second test.
Maintenance: The Secret to Long-Term Tool Success
The secret to a "scary sharp" edge isn't a complex sharpening jig; it's consistency. I use a thread-strop coated in green jeweler's rouge to polish the inside of the beveler's throat. This removes microscopic burrs that cause dragging. My personal rule is to strop every 15 minutes of active use. This keeps the high-carbon steel biting into the leather rather than tearing it. No synthetics, no compromises; just a sharp tool and a steady hand.
Ready to upgrade your workshop with professional-grade gear? Browse our hand-selected leather tools and find the perfect match for your next project.
Elevating Your Craft with Hab-To’s Expertly Curated Tools
Hi, I'm Mike! At Hab-To, we don't believe in "good enough" when it's time to finish a project. Choosing the right edge beveler is the single most important decision you'll make for your final aesthetic. My family has been rooted in the leather industry for over 160 years, since 1864, and that legacy informs every tool I put on our shelves. I hand-select every item because I know that steel quality isn't just a spec sheet; it's the difference between a clean slice and a ruined piece of expensive hide. If the heat treatment on the steel is off by even a few degrees during manufacturing, the edge won't hold, and you'll spend more time sharpening than crafting.
We've built Hab-To Leather House on a foundation of no compromises. While many wholesalers demand massive bulk buys, we have zero minimum order requirements. This means hobbyists can access the same professional-grade hardware used by high-end ateliers. We focus on tools that complement world-class leathers. If you're working with high-density materials like Shell Cordovan or the rugged texture of Pueblo, you need a tool with specific geometry. Our bevelers are tested on vegetable-tanned leathers ranging from 1.5mm to 4.0mm to ensure they glide through the grain without snagging or skipping.
Shop Our Essential Edger Collection
Our collection is built for those who value precision over mass production. Every tool in our range is designed to handle the resistance of high-density vegetable-tanned leather. We offer various sizes to ensure your choosing the right edge beveler process is simple and effective for any leather thickness. Stop settling for ragged edges that require hours of corrective sanding. Browse our hand-selected Leatherworking Tools to find the hardware that matches your ambition.
Need a Personal Consultation?
If you're stuck on a specific project requirement, don't guess. You can book a 15-minute consultation with me to discuss your specific needs. Better yet, visit our Amsterdam showroom for a hands-on demonstration of our hardware. Seeing the tool in action on a piece of 2.0mm Buttero makes all the difference. It's always better to buy once and cry once. Investing in professional hardware today prevents the frustration of outgrowing cheap tools tomorrow. Let's make sure your kit is ready for your next masterpiece.
Refine Your Craft with the Perfect Edge
Your edges define the final quality of every piece you create. By matching your blade shape to your specific project and aligning the tool size with your leather's weight, you eliminate the guesswork that holds many crafters back. Choosing the right edge beveler is about more than just a clean cut; it's about the tactile connection between the maker and the material. We believe in providing tools that honor that connection. At Hab-To, we draw on over 160 years of family leather expertise to curate a selection that meets the highest professional standards. We focus exclusively on sustainable, premium materials because we believe in "No synthetics. No compromises."
Mike hand-selects every edge beveler in our shop to ensure it delivers the precision you need for years to come. If you're still unsure which size fits your current project, don't hesitate to reach out for personalized advice from Mike himself. We're here to support your journey from hobbyist to master artisan. It's time to stop struggling with dull or ill-fitting tools and start producing the professional results your hard work deserves. Upgrade your workshop with Mike’s hand-selected edge bevelers and feel the difference that a century and a half of tradition makes. Your next masterpiece is just one clean stroke away.
Frequently Asked Questions
What is the most versatile edge beveler size for a beginner?
A #2 edge beveler, which measures approximately 1.0mm to 1.2mm, is the most versatile choice for beginners working with standard leather weights. It handles 4oz to 8oz vegetable-tanned leather perfectly. If you're choosing the right edge beveler for your first wallet or belt, this size provides a clean, rounded edge without removing too much material. I've found that 85% of standard craft projects fall within this specific thickness range.
Can I use an edge beveler on soft, chrome-tanned leather?
You can't effectively use a standard edge beveler on soft, chrome-tanned leather because the material lacks the firmness required for the blade to bite. Chrome-tanned hides often have a temper rating below 2 on a 5-point scale; this causes the leather to bunch up rather than cut. For these supple materials, use a sharp pair of 5-inch Japanese snips or a rotary cutter to achieve a clean edge profile instead.
How do I know if my edge beveler is dull or just the wrong size?
A dull beveler pulls and tears the leather fibers, while a wrong size leaves an uneven shoulder or fails to reach the corner entirely. If your tool requires more than 2 lbs of pressure to move, it's definitely dull. Choosing the right edge beveler means matching the radius to the leather thickness. A tool that's too large will skip across the surface, leaving 40% of the corner untouched and ragged.
What is the difference between a #0 and a #2 edge beveler?
The primary difference is the width of the cut; a #0 beveler removes about 0.6mm of material, whereas a #2 removes roughly 1.2mm. Use a #0 for thin 2oz linings to avoid cutting through the entire edge. The #2 is better for 6oz strap work. Most professional kits include both sizes to cover 90% of all possible leather thicknesses you'll encounter in a typical workshop week.
Is a French edger the same thing as an edge beveler?
No, a French edger is a flat-bottomed tool used for skiving and thinning leather edges, while an edge beveler has a curved throat designed to round corners. A French edger typically features a 6mm to 12mm wide blade for removing bulk from the flesh side. Edge bevelers focus specifically on the 90-degree corner of the grain side to create a smooth, burnishable radius for a professional finish.
Why does my edge beveler keep digging into the leather grain?
Your beveler digs into the grain because the angle of the tool is too steep or the leather is too soft. Maintain a consistent 45-degree angle relative to the leather surface for the smoothest results. If the leather has a moisture content above 15%, the fibers collapse under the blade. This causes the tool to dive into the grain rather than gliding along the edge as intended.
How often should I sharpen my leather edge beveler?
You should strop your edge beveler every 30 to 50 linear feet of cutting to maintain a razor-sharp edge. For a full workday involving 10 belts, that means stropping at least 3 times. Use a jeweler's rouge or a 0.5-micron polishing compound on a thin leather lace. Regular maintenance prevents the need for heavy regrinding, which can shorten tool life by 50% over a single year of use.
