


How to Condition Vegetable Tanned Leather: The Artisan's Step-by-Step Guide
Conditioning isn't just a maintenance chore; it's a vital conversation with the fibers of the hide to guide its unique aging process. You've likely stood over a pristine project, oil in hand, feeling that familiar pang of hesitation. One wrong move could lead to permanent stains or a color that's far too dark. It's a common struggle for makers who want to fix dry, stiff leather but feel lost in the confusing world of waxes, oils, and creams. Learning how to condition vegetable tanned leather correctly is the difference between a piece that wears out and one that wears in beautifully.
I've seen many artisans struggle with this balance, but the right technique changes everything. Quality matters. Respect the hide. With a recent analysis showing a 43% increase in the adoption of bio-based tanning methods, choosing natural, compatible care is more essential than ever. This guide will teach you the professional methods to nourish your leather, prevent unsightly cracking, and develop a world-class patina. We'll explore the specific tools and products needed to keep your projects supple and healthy for decades. You'll gain the confidence to maintain any piece with the precision of a master craftsman.
Key Takeaways
- Understand why porous, "naked" hides require specific oil replacement to prevent cracking and maintain structural integrity.
- Learn how to condition vegetable tanned leather using a systematic approach that ensures even color and deep nourishment.
- Identify the critical differences between natural wax-based conditioners and harmful synthetic sprays that can ruin high-quality grain.
- Discover specialized techniques for treating premium leathers like Pueblo and Shell Cordovan without losing their signature textures.
- Master the art of long-term maintenance, including proper storage and post-conditioning care for a world-class patina.
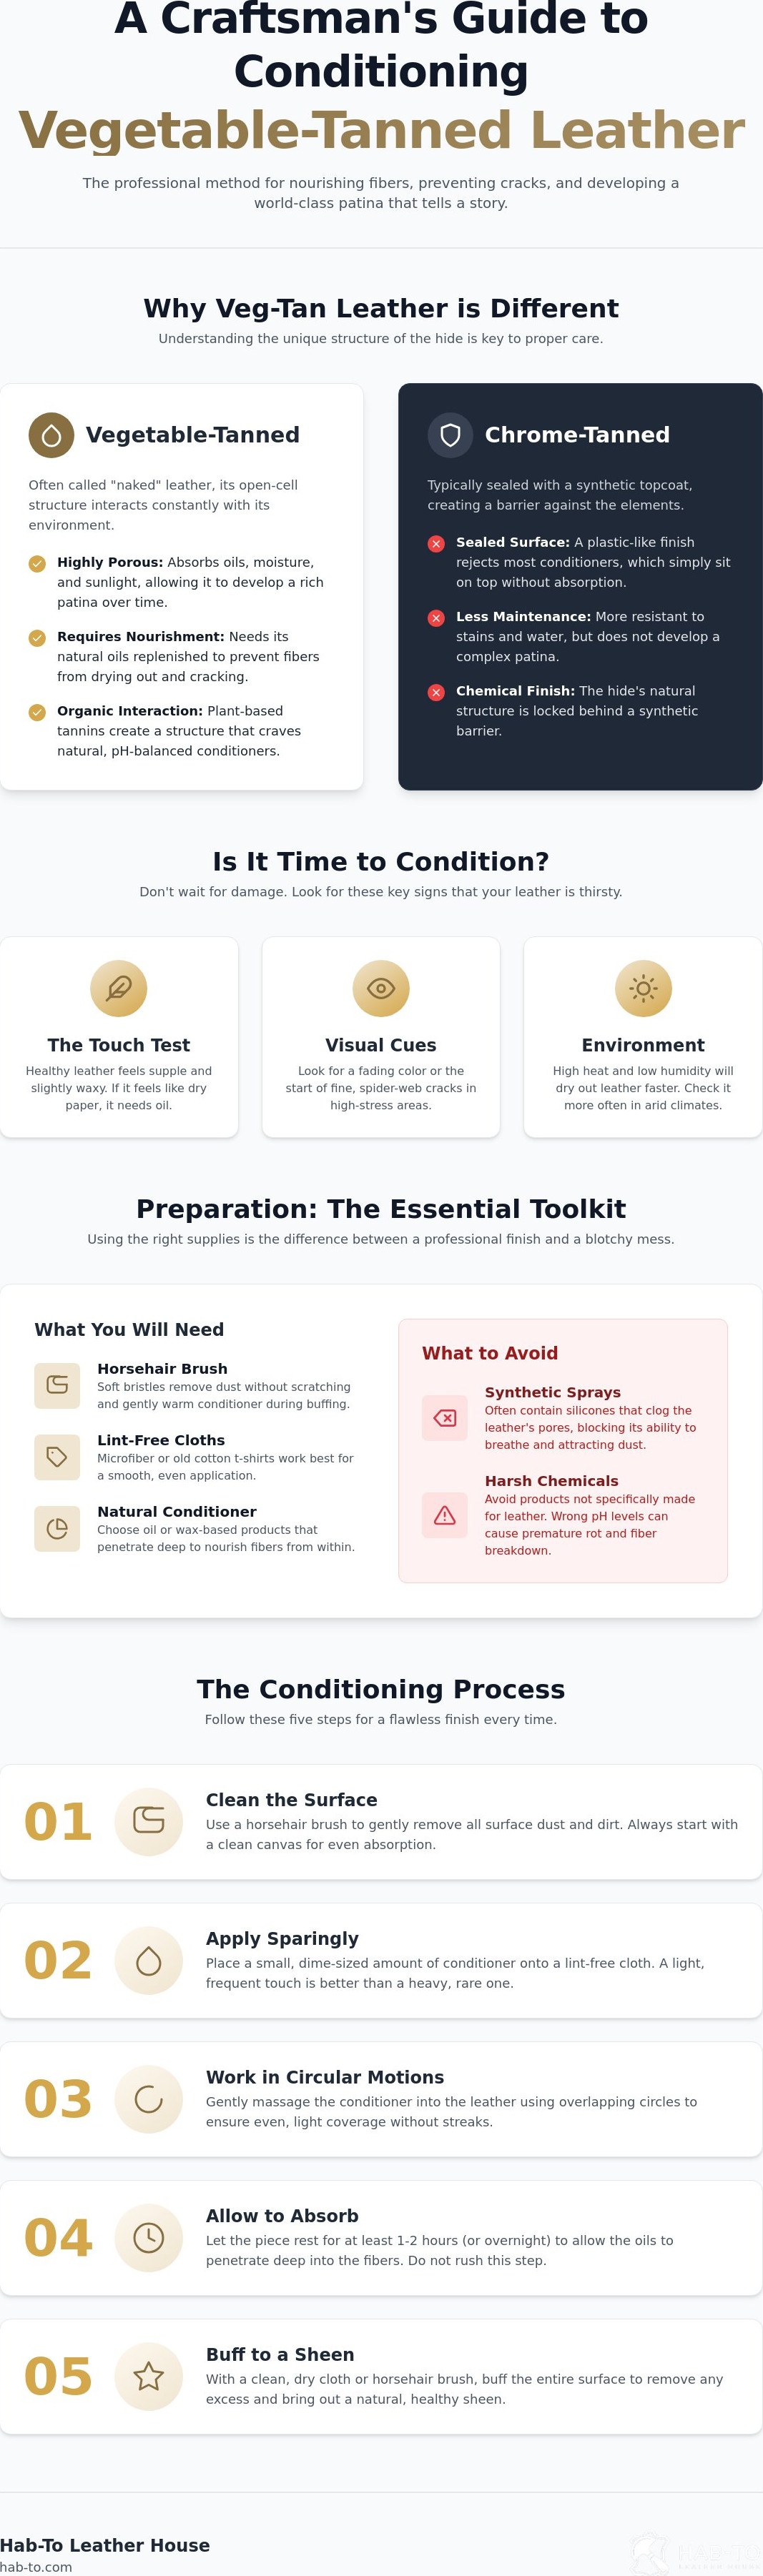
Why Conditioning Vegetable Tanned Leather is Different
Vegetable-tanned leather is a living, breathing material that demands a different level of respect than its chrome-tanned counterparts. Unlike mass-produced hides that are sealed with heavy synthetic topcoats, veg-tan remains "naked" and highly porous. This open-cell structure means the hide is constantly interacting with its environment. It absorbs everything from the oils on your palms to the humidity in the air. Because it isn't locked behind a plastic barrier, it relies on a delicate balance of internal moisture to maintain its strength and flexibility.
Conditioning is essential to replace the natural oils lost through evaporation, sun exposure, and daily handling. Without this maintenance, the fibers begin to stiffen and eventually snap. Learning how to condition vegetable tanned leather is about more than just aesthetics; it is about nourishment. You aren't just coating the surface. You're replenishing the very fats that keep the hide from becoming brittle. However, you must be careful. The goal is to maintain suppleness without over-saturating the fibers. If you apply too much product, the leather can become "mushy" and lose its structural bounce, which is why a light, frequent touch is always better than a heavy, rare one.
To better understand this concept, watch this helpful video:
Veg-Tan vs. Chrome-Tanned Conditioning
The difference lies in the finish. Chrome-tanned leather often features a plastic-like finish that effectively rejects most conditioners. It sits on top and does very little. In contrast, the plant-based tannins found in premium hides like Maryam Vacchetta create a chemical environment that craves natural oils. There's a beautiful interaction between the organic tannins and the fats you apply. To maintain the integrity of these fibers, vegetable-tanned leather requires pH-balanced products to avoid fiber breakdown and ensure the structural longevity of the hide. Using the wrong chemicals can disrupt the natural acidity of the leather, leading to premature rot.
When is it Time to Condition?
Don't wait for the leather to feel like cardboard. You can perform a simple "dryness test" by running your fingers across the surface. It should feel slightly waxy or buttery. If it feels like dry paper, it's thirsty. Look for visual cues as well. You might notice the color starting to fade or the appearance of fine, spider-web cracks in high-stress areas. Environmental factors play a huge role. If you live in a climate with high heat or low humidity, you will need to check your leather more frequently. Regular maintenance ensures that your piece develops a rich, deep patina rather than simply accumulating wear and tear.
Preparation: What You Will Need
Gathering the right supplies is the difference between a professional restoration and a blotchy mess. You've likely invested in premium hides, so don't ruin that investment with harsh chemicals. When mastering how to condition vegetable tanned leather, your choice of applicator and product dictates the final outcome. A poor applicator can leave streaks that are nearly impossible to buff out later. Preparation is the foundation of quality craftsmanship.
Always prioritize natural, wax-based or oil-based conditioners over synthetic sprays. Synthetic products often contain silicones or heavy resins. These sit on the surface and block the leather's ability to breathe. This leads to a sticky finish that attracts dust and grime. In contrast, natural fats penetrate deep into the grain to nourish the fibers from within. If you prefer a sustainable approach, the Olivenleder® collection offers an olive-oil-based alternative that aligns with modern ethical standards while providing superior protection.
Essential Tools and Materials
You need a specific set of tools to achieve a factory-level finish. Using household items often leads to disappointing results. Ensure you have the following ready:
- Horsehair Brush: The industry standard for removing dust and buffing. The soft bristles generate the perfect amount of friction to warm up the conditioner.
- Lint-free Cloths: Microfiber cloths or old cotton t-shirts work best because they don't shed fibers into the grain.
- Edge Bevelers: Use sharp edge bevelers to clean up the edges before applying any finish to ensure a professional profile.
Professional Cleaning Supplies
Preparation starts with a clean surface. Use a gentle leather soap to lift oils and dirt without damaging the tanning. Always use distilled water for this step. Tap water contains minerals like calcium and magnesium. These can leave unsightly white rings or "tide marks" on vegetable-tanned leather that are difficult to remove once dry.
For makers who want to refine every detail, including the edges, we recommend using Tokonole to seal the fibers. If you're looking for a complete set of professional materials, our curated product bundles for finishing ensure you have everything needed to achieve world-class results. Choosing a starter bundle can also provide the baseline tools for maintaining your leather for years to come.
Step-by-Step Guide to Conditioning Veg-Tan
Patience is the most important tool in your workshop when learning how to condition vegetable tanned leather. Rushing this process is the primary cause of uneven darkening and blotchy finishes. I always advise makers to view conditioning as a slow ritual rather than a quick task. Before you begin the full application, always test your chosen product on an inconspicuous area. The inside of a strap or the bottom of a gusset are perfect spots to observe how the specific hide reacts to the oils. Remember the golden rule of the artisan: less is more. You can always apply a second thin layer, but removing excess oil that has already penetrated the fibers is nearly impossible.
Step 1: The Deep Clean
You cannot nourish leather if the pores are clogged with microscopic debris. Start by using a high-quality horsehair brush from our tools collection to clear the surface of dust and grit. If the piece has seen heavy use, take a lint-free cloth and dampen it slightly with distilled water and a tiny amount of gentle leather soap. Wipe the surface using light pressure. It's vital to let the leather air dry completely at room temperature. Never use a hairdryer or place the piece near a radiator. Forced heat can cause the natural tannins to cook, leading to permanent brittleness that no conditioner can fix.
Step 2: Applying the Conditioner
Once the surface is bone dry, it's time to introduce the nourishment. Apply a pea-sized amount of conditioner to your cloth rather than applying it directly to the leather. This prevents a concentrated "dark spot" from forming at the point of contact. Work the product into the grain using small, consistent circular motions. To prevent unsightly tide marks or pooling of color, you must use an edge-to-edge application method, ensuring the conditioner covers the entire panel in one continuous session. This systematic approach ensures that the absorption remains uniform across the entire hide, maintaining the visual balance of your craft.
Step 3: Absorption and Buffing
Now comes the waiting game. Give the leather at least 15 to 30 minutes to sit undisturbed. During this time, the fibers pull the fats into the core of the hide. You might notice a slight "white haze" appearing on the surface. Don't panic. This is simply excess wax or tallow rising as the leather reaches its saturation point. Take a clean, dry horsehair brush and buff the surface with vigorous, long strokes. This friction generates a small amount of heat, which helps set the remaining waxes and creates a healthy, soft sheen. Mastering how to condition vegetable tanned leather ends with this final buff, leaving the piece supple, protected, and ready for years of use.
Conditioning by Leather Type: Pueblo vs. Cordovan
Not all hides react the same way to nourishment. If you've spent time in the workshop, you know that a dry "crust" leather has a much thirstier appetite than a high-density shell. When you are figuring out how to condition vegetable tanned leather, you must first identify the specific tannage. Premium hides from world-renowned tanneries like Badalassi or Maryam feature unique finishes. These react differently to oils and waxes. Applying a heavy oil to a textured leather can accidentally "flatten" the unique grain you specifically chose for your project. Adjusting your frequency and product choice based on the specific leather type is what separates an amateur from a master.
Conditioning Pueblo and Rugged Finishes
Caring for Badalassi Pueblo leather requires a delicate touch. This leather is famous for its scuffed, rustic appearance and unique nap. If you saturate it with liquid oils, you risk losing that signature texture forever. Wax-heavy conditioners are far superior for Pueblo. They provide protection without soaking the fibers to the point of darkening them prematurely. This approach maintains the beautiful matte-to-shiny transition that defines the hide as it ages. You want the patina to develop through honest use, not through a bottle of oil. Understanding the nuances of how to condition vegetable tanned leather is essential when working with these high-end Italian hides.
The Shell Cordovan Exception
Then we have the shell cordovan exception. A hide like Maryam Cordovan Shell is incredibly dense. It's already packed with natural fats from the tanning process. In fact, it rarely needs traditional conditioning. If the surface looks dull, I recommend the "bone" method. Use a smooth deer bone or a similar hard, polished tool to rub the surface. This friction draws out the existing oils and restores the mirror-like shine without the need for extra product. Avoid heavy creams at all costs. They often contain solvents that can dull the shell's natural luster and leave a greasy residue that ruins the feel of the leather.
Adjust your frequency based on the project. A wallet in your pocket receives constant warmth and oil from your hands. It needs less frequent care than a bag sitting on a dusty shelf. Respect the material. Listen to what the hide is telling you. Ready to start your next project with these premium materials? Explore our curated leather bundles to find the perfect hide for your next masterpiece.
The Artisan’s Finish: Post-Conditioning Care
Conditioning is a vital ritual, but it represents only one part of the lifetime of care we advocate here at Hab-To Leather House. Once you've finished the physical application, the way you handle and store the piece determines how that nourishment settles. Mastering how to condition vegetable tanned leather is a great skill, but the artisan’s work continues as the piece transitions back into daily use. This is the stage where the patina truly begins to set and the leather develops its unique character.
If you've applied slightly too much oil and the leather looks darker than you'd like, stay calm. This is a common part of the learning curve when discovering how to condition vegetable tanned leather. Leather is an organic sponge. Over the next 48 hours, those oils will migrate from the surface into the core of the hide, often lightening the shade as they settle into the fibers. The best thing you can do is give it air and avoid the temptation to "fix" it with more products. Time is your most effective tool in this situation.
Storage and Environmental Protection
Proper storage is just as important as the products you apply. Never store conditioned leather in plastic bags or airtight containers. Plastic traps moisture and prevents the hide from breathing, which is a recipe for mold growth. Instead, use breathable cotton dust bags. These protect the surface from workshop dust while allowing essential air circulation. Keep your storage area at a consistent humidity. Extreme dryness will undo your hard work by sapping the moisture you just added, while excessive moisture invites rot. Sunlight also plays a role. Think of it as a natural "tan" for your leather. Controlled exposure to UV light helps deepen the color and set the oils, accelerating the development of a world-class patina.
When to Seek Professional Help
Artisans must also learn to recognize when a piece needs more than a simple buff. Sometimes you might see a white, powdery film on the surface. This is often "spew" or surface bloom. It is simply natural fats or waxes rising to the top and can be easily buffed away with a horsehair brush. However, if you see fuzzy growth or smell a musty odor, you are likely dealing with mold. Deep scratches that have severed the grain fibers also require more advanced techniques than a standard conditioner can provide. If you're stuck on a complex restoration project or aren't sure about the state of your hide, you can always book a free video consultation with Mike. We are here to support your journey from beginner to master craftsman.
Mastering the Art of the Patina
Proper care is the final touch of a true craftsman. You've learned that conditioning is more than just a surface treatment; it's a deep nourishment that respects the unique porosity of the hide. Whether you're working with the rugged texture of Pueblo or the dense shine of Shell Cordovan, your choice of natural, vegetable-based formulas ensures the leather remains healthy for generations. Our approach is built on 160 years of family leather expertise, providing the same professional standards used by artisans across Europe today.
Consistency is your greatest ally. By avoiding synthetic shortcuts and sticking to sustainable methods, you protect the character of your work. Learning how to condition vegetable tanned leather correctly transforms a simple project into a legacy piece that ages with grace. Now that you have the knowledge, it's time to equip your workshop with the right materials. Shop our curated Olivenleder® care range for a natural, artisan finish and give your leather the respect it deserves. Your future self, and the patina of your projects, will thank you.
Frequently Asked Questions
Will conditioning my vegetable-tanned leather make it darker?
Yes, conditioning will almost always darken the hide, at least temporarily. Because naked hides like Maryam Vacchetta are highly porous, they absorb oils that change the way light reflects off the grain. While the shade may lighten slightly after 48 hours as the oils settle, you should expect a permanent deepening of the color that most artisans embrace as the start of a beautiful patina.
How often should I condition my leather bag or wallet?
You should generally condition your leather every 6 to 12 months, depending on the environment. Items crafted from our leather for bags may need more frequent care if they are exposed to sun and wind daily. Understanding how to condition vegetable tanned leather effectively involves monitoring the surface for a dry, papery texture, which indicates the fibers are thirsty for nourishment.
Can I use mink oil on vegetable-tanned leather?
You can use mink oil, but I advise extreme caution because it darkens leather significantly more than wax-based alternatives. While it is an excellent softener for heavy-duty gear, it can dull the mirror-like finish of premium Shell Cordovan Shell. For most artisan projects, a pH-balanced cream from our Fiebing's collection is a safer choice to maintain control over the final aesthetic.
What happens if I over-condition my leather?
Over-conditioning causes the leather to become "mushy" and lose its vital structural integrity. When the internal fibers are drowned in too much oil, they lose their ability to hold a crisp shape for structured items. If you notice a sticky residue, use a clean horsehair brush from our leatherworking tools to buff the surface vigorously, which helps generate friction to draw out and redistribute the excess wax.
Is it possible to restore a patina that has been 'cleaned' away?
You can't truly "clean away" a deep patina, but a harsh soap can strip the surface oils that provide that signature glow. To rebuild that depth, continue using the piece daily and consider joining one of our leathercraft masterclasses to learn advanced surface finishing techniques. Time, friction, and exposure to the elements are the only true ways to restore that lost luster naturally.
Should I condition a brand new piece of veg-tan leather?
Usually, it isn't necessary to condition a brand new piece because premium tanneries finish their hides with a specific balance of fats. Hides like Pueblo leather arrive with a unique waxy feel that already provides protection. The only exception is if the leather has been stored in a very dry warehouse for a long period and feels noticeably stiff or brittle to the touch before you even begin your project.
Can I use coconut oil or olive oil as a leather conditioner?
I strongly recommend avoiding grocery-store oils because they contain organic impurities that can turn rancid over time. When researching how to condition vegetable tanned leather, you may see DIY suggestions, but these oils can rot within the fibers and cause unpleasant odors. For a sustainable, olive-oil-based approach, use our Olivenleder® collection, which is specifically refined for professional artisan leather use.
How do I remove water spots from veg-tan leather before conditioning?
You can blend water spots by using a slightly damp cloth to lightly moisten the entire panel of leather before applying any oils. This prevents minerals from concentrating in one area and leaving a permanent mark. For those looking to finish the rest of the piece, our Tokonole bundles are perfect for sealing the edges once the surface has been successfully blended and allowed to air dry completely.
Disclaimer
All our blog articles are made for information purposes only we dont take responsability for any content from third parties.
