


How to Create a Glossy Leather Edge: The Artisan’s Guide to a Mirror Finish
What if the secret to a mirror-like shine isn't a thick layer of paint, but the patient reveal of the leather's own character? Many artisans struggle with edges that look fibrous or "hairy," only to watch their hard-earned gloss flake away over time. If you have ever wondered how to create a glossy leather edge that looks like solid glass, you know that shortcuts simply don't work. A professional finish is a result of friction, heat, and precision. It is about respect for the material. It is a refusal to make concessions on quality.
I understand the frustration of uneven dye absorption and the disappointment of a dull, uneven finish. You want a result that truly reflects the hours you spend at the workbench. This guide promises to teach you the exact sanding sequences and professional techniques required to transform raw edges into glass-like perfections. We will explore why premium materials like Shell Cordovan and vegetable tanned leather burnish best. You will learn to master hand tools and compounds like Tokonole to achieve a consistent, professional-grade result that lasts for years.
Key Takeaways
- Learn why precision cutting and a "zero-gap" glue-up are the non-negotiable foundations for a professional finish.
- Discover why sanding represents 90% of the effort and how to master the transition between dry and wet sanding grits.
- Master how to create a glossy leather edge by using friction and heat to re-align protein fibers for a mirror-like shine.
- Compare burnishing agents like Tokonole and water to find the perfect match for premium materials like Shell Cordovan or Italian leather.
- Identify quick troubleshooting fixes for "fuzzy" edges and uneven gloss to ensure your artisan results never flake or fade.
What is a Glossy Leather Edge and Why Does it Matter?
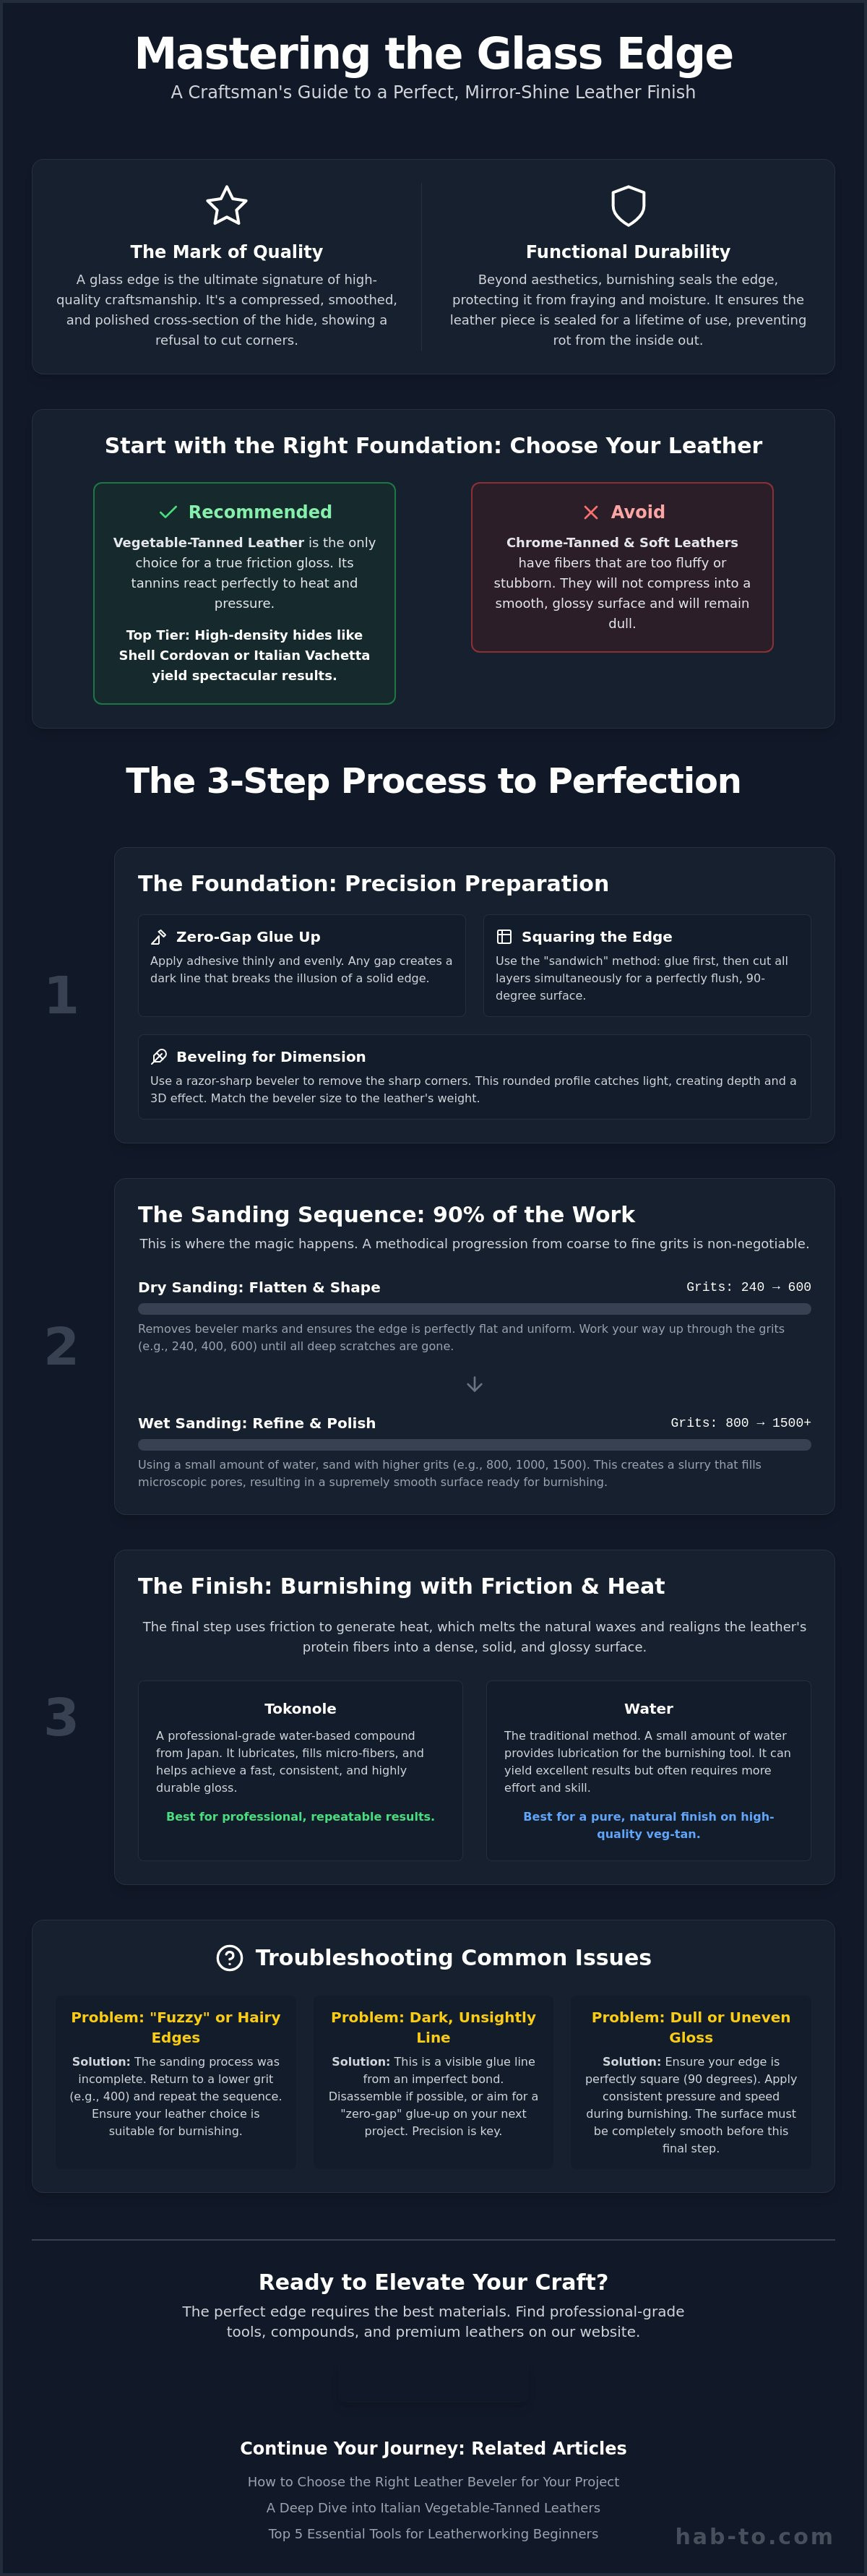
A glossy leather edge is more than a shiny surface. It is a compressed, smoothed, and polished cross-section of the hide. When you look at a "glass edge," you are seeing the result of intense friction and pressure that re-aligns the leather's protein fibers into a single, solid unit. This glass effect is the ultimate signature of high-quality craftsmanship. It tells the world you didn't cut corners. Learning how to create a glossy leather edge is a rite of passage for any serious leatherworker.
Beyond the visual appeal, burnishing serves a critical functional purpose. It protects the leather from fraying and moisture ingress. An unsealed edge acts like a sponge, drawing in oils and water that can rot the leather from the inside out. By mastering how to create a glossy leather edge, you are essentially sealing the piece for a lifetime of use. It is about durability as much as it is about beauty.
To better understand this concept, watch this helpful video:
The Difference Between Burnishing and Edge Painting
Burnishing relies on friction to fuse fibers together naturally. It is an organic process that highlights the leather's own beauty through heat and pressure. Edge painting involves applying a plastic-like pigment layer on top of the edge. While paint can hide imperfections, high-end artisans usually prefer the organic, deep shine of a burnished edge. It won't peel or crack like paint often does. It ages with the piece, maintaining its integrity over decades of wear and tear.
Choosing the Right Leather for a Mirror Finish
Not all hides are created equal. Vegetable-tanned leather is the only real choice for a true friction gloss because the tannins react to heat. High-density hides like Shell Cordovan yield the most spectacular results. Its tight grain structure allows for a level of compression that softer leathers simply can't match. If you try to burnish fluffy or soft-tempered leathers, the fibers will likely remain stubborn and dull. The density of the hide is the secret foundation of every mirror finish.
The Foundation: Preparing Your Edges for Success
A mirror finish is a magnifying glass for your mistakes. If your initial cut is jagged or your glue lines are visible, the gloss will only make those errors stand out. Precision is the silent partner of beauty in leathercraft. You cannot sand your way out of a poor start. Learning how to create a glossy leather edge begins long before you pick up a piece of sandpaper. It starts with the blade. Precision matters. Tools must be sharp. Concessions are not an option.
One of the most common hurdles is the "glue line." When you bond two pieces of leather, any gap between them creates a valley where burnishing agents will pool. This results in a dark, unsightly line that breaks the illusion of a single, solid piece of material. To achieve a "Zero-Gap" bond, apply your adhesive thinly and evenly to the very edge of the grain. Using a high-density material like Badalassi Pueblo leather provides a firm structure that makes this alignment much easier.
Squaring the Edge
A perfectly flush surface is essential for consistent light reflection. Use a wing divider to mark a consistent trim allowance, usually about 2 or 3 millimeters from the final edge. Then, use the "sandwich" method. Glue your layers together first, then perform your final cut through all layers simultaneously. This ensures the edges are perfectly flush from the start. A true 90-degree angle is the only way to get even results. If the edge is slanted, the gloss will look distorted and amateur.
Beveling for Dimension
Beveling removes the sharp, square corners of the leather to create a rounded profile. This curve is what allows the edge to catch light from multiple angles, giving it three-dimensional depth. Selecting the right beveler size is critical. A tool that is too small won't remove enough material to create a curve, while one that is too large can compromise the structural integrity of a thin wallet edge. Match the tool to the weight of your hide.
Ensure your beveler is razor-sharp before you begin. A dull tool will "chatter" across the leather, leaving behind microscopic ripples that are nearly impossible to sand out. Use a smooth, continuous push or pull motion to create a single, unbroken shaving. If you are looking to elevate your craft, investing in professional-grade leatherworking tools is the best way to ensure your foundation is solid. Mastering these early steps is the only way to truly understand how to create a glossy leather edge that stands the test of time.
The Sanding Sequence: The Real Secret to a Glass Finish
Most beginners rush to the wood slicker too early. It's a common mistake. The true secret of how to create a glossy leather edge lies in your sandpaper sequence, not the burnishing gum. Sanding is 90% of the work. Burnishing is just the final 10%. If you don't put in the effort here, your edge will look fibrous and dull regardless of how much friction you apply later. Patience is your most valuable tool at this stage. You can't shortcut your way to a mirror shine.
You should understand the difference between dry and wet sanding. Dry sanding is for leveling the surface and removing any stubborn glue residue left over from the foundation stage. It creates a flat, even canvas. Wet sanding, usually done at higher grits, uses a small amount of water or Tokonole to create a slurry. This slurry fills the microscopic pores of the leather, creating a surface that is incredibly dense and smooth. This technique is particularly effective on high-quality Maryam Vacchetta leather, where the tight grain responds beautifully to the refinement.
The Progressive Grit Map
- Step 1: 400 grit. This is your leveling stage. Use a sanding block to ensure the edge remains perfectly flat or maintains its intended curve. Your goal is to remove glue spots and ensure all layers are perfectly flush.
- Step 2: 800 grit. Now you are refining. This grit removes the coarse scratches left by the 400-grit paper. The edge should start to feel velvety and uniform at this point.
- Step 3: 1500 to 2000 grit. This is the pre-polish stage. You'll notice a natural sheen beginning to emerge even before you apply any compounds. The surface should feel like smooth stone.
Directional Sanding vs. Back-and-Forth
Sanding in one direction is a hallmark of professional work. If you sand back and forth, you tease the leather fibers into a pilled state. They stand up and catch the light, making the edge look fuzzy or "hairy." By sanding in a single, consistent direction, you lay those fibers down flat. It creates a unified surface that is ready for the final burnish. Use a firm sanding block to maintain the profile you created during the beveling stage. If you sand with just your fingers, you risk rounding off the crisp lines that define a high-end piece.
Check your progress with the water test. Apply a tiny drop of water to the edge. If it sits on the surface without soaking in immediately, your edge is sufficiently compressed and ready for the next step. If you're working with Virgilio Pueblo leather, you'll see the color deepen and the texture transform as the fibers become more compact. Never move to a higher grit until the scratches from the previous one are completely gone. The mirror is already there; you're just revealing it.
Burnishing Techniques: Friction, Heat, and Compounds
Once your edge is perfectly sanded, you're ready for the transformation. This is where the magic happens. Friction is the catalyst. As you slick the edge, the heat generated by your movements re-aligns the leather's protein fibers. They fuse into a single, dense layer. This is the core of how to create a glossy leather edge that doesn't just look shiny, but feels like solid glass. Unlike painted edges that sit on top of the material, a friction-burnished edge is an integral part of the leather itself.
The debate between using a wood slicker or a canvas cloth is a common one among artisans. A wood slicker is excellent for maintaining the rounded profile you created during beveling. It provides a hard, consistent surface to press against. However, many master crafters prefer a heavy canvas cloth for the final polish. Canvas generates higher heat more quickly, which is essential for melting waxes and achieving that deep, mirror-like luster. You'll likely find that a combination of both tools yields the most professional results.
Using Tokonole for a Professional Shine
Tokonole is widely regarded as the modern standard for burnishing agents. It's a water-based compound that penetrates deep into the fibers, bonding them together without the harsh chemicals found in some edge paints. Apply a thin, even layer with your finger or a small applicator. Be careful not to get any on the grain side of your leather, as it can resist future dyes or conditioners.
Wait a few seconds until the Tokonole becomes slightly tacky before you start slicking. For exceptionally flat edges, you can even use a small piece of glass as a burnisher. This "glass burnish" technique creates a level of flatness that a wooden tool simply can't achieve. If you're ready to elevate your workbench, you can find professional-grade supplies in our collection of leatherworking tools.
The Beeswax Polish
For a traditional, waterproof finish, beeswax is the gold standard. It's particularly effective on projects involving Pueblo leather, where the rustic texture of the grain contrasts beautifully with a high-gloss edge. Once you've achieved a basic shine with Tokonole, rub a block of pure beeswax along the edge.
Use a clean piece of canvas and rub vigorously. You want to feel the heat through the cloth. This heat melts the wax, allowing it to saturate the compressed fibers. The result is a hard, durable seal that won't crack or peel. Finish with a light buffing using a soft microfiber cloth to give the edge its final "pop." This multi-layered approach is the professional secret to how to create a glossy leather edge that remains beautiful for decades.
Troubleshooting: Why Your Edges Aren't Shining
Even the most patient artisans encounter roadblocks on the path to a mirror finish. It's part of the journey. If your edge looks "fuzzy" or fibrous after you've finished burnishing, the most likely culprit is incomplete sanding. You can't burnish away the texture of raw leather fibers. When this happens, the best solution is to be brave and return to a lower grit, like 400. You must sand until the surface is perfectly uniform before moving back up the sequence. This is how to create a glossy leather edge that stays smooth instead of turning back into a "hairy" mess within days.
Another common issue is an uneven gloss that looks blotchy under the light. This is usually caused by inconsistent pressure or hidden glue spots. If the edge feels "mushy" or refuses to hold a shine despite your best efforts, the leather temper might be too soft. Soft leathers compress and then spring back, losing the friction-induced seal. For a permanent, glass-like result, I always recommend using a harder-tempered material like Vacchetta. Its density provides the necessary resistance to heat and pressure.
The 'Glue Line' Nightmare
Glue is the silent enemy of a clean edge. If your adhesive hasn't fully cured before you start sanding, it will gum up your paper and smear across the leather cross-section. This creates a rubbery barrier that prevents Tokonole from penetrating the fibers. If you see greyish, sticky residue, stop immediately. Use a crepe rubber block to pull the excess glue away from the edge. The best preventative measure is a thin, even application. Less is truly more when you're aiming for a seamless bond.
Maintaining the Gloss Over Time
A glossy edge is a living part of your craft. Over months of use, the shine may dull as the leather flexes and encounters friction. Don't worry. You can easily restore the luster by lightly re-burnishing with a tiny amount of Tokonole and a canvas cloth. Be careful with heavy conditioners or oils. If you over-saturate the edge with grease, you'll soften the compressed fibers and lose that hard, glass-like seal.
Understanding how to create a glossy leather edge is about more than just a single project. It's about developing an eye for detail. Quality is a choice you make at every step of the process. Precision isn't just a technique; it's a habit that defines your work. Keep practicing, respect your materials, and the mirror finish will follow. If you ever feel stuck, I'm always here to help you find the right leatherworking tools for your next masterpiece.
Elevate Your Craft with a Mirror Finish
Mastering how to create a glossy leather edge is a defining moment for any artisan. It marks the transition from basic assembly to high-end refinement. By following the meticulous sanding sequences and friction techniques we've discussed, you ensure your work carries the signature of true luxury. It's about more than just a shine; it's about the integrity and durability of the finished piece.
We support your pursuit of perfection with a legacy spanning 160 years of family heritage. Our selection is sourced directly from the finest Italian tanneries, ensuring you work with the same high-density hides used by the world's leading fashion houses. With no minimum order requirements, we make professional-grade materials accessible for every project on your workbench. Quality is a choice you make with every cut and every burnish.
Shop Premium Italian Hides for Your Next Project and experience the difference that authentic materials bring to your craft. Keep practicing, stay patient, and let your edges reflect the passion you put into your work.
Related Articles
- The Ultimate Guide to Vegetable Tanned Leather
- Essential Tools for Professional Leather Finishing
- How to Choose the Right Hide for Your Project
- Maintaining Your Leatherworking Tools for Longevity
Frequently Asked Questions
Can I get a glossy edge on chrome-tanned leather?
No, chrome-tanned leather generally doesn't burnish because the chemical tanning process prevents fibers from fusing under heat. If you're learning how to create a glossy leather edge, you should stick to vegetable-tanned materials. For chrome-tan hides, using edge paint is the standard way to achieve a finished look, as friction alone won't create a permanent seal.
Do I need a power burnisher for a mirror finish?
You don't need expensive machinery to achieve a professional result. While power burnishers save time on large production runs, a simple wooden slicker or a piece of heavy canvas offers superior control for a mirror finish. Most master artisans prefer hand tools because they can feel the exact moment the fibers begin to fuse under the heat of friction.
What is the best grit sandpaper for leather edges?
A progressive grit sequence is essential for success. Start with 400 grit to level the surface, move to 800 grit to refine the shape, and finish with 1500 to 2000 grit for the pre-polish stage. This map ensures that each step removes the scratches from the previous one, which is the only way to reveal a truly glass-like surface.
Is Tokonole better than beeswax for a glossy finish?
Tokonole and beeswax serve different purposes and are best used together. Tokonole is a burnishing compound that penetrates and bonds fibers during the slicking process to create the initial shine. Beeswax is a natural sealant applied at the very end to provide water resistance and a deep luster. Using both ensures your edge is both beautiful and durable.
Why does my leather edge keep fraying even after burnishing?
Fraying is a sign that the fibers weren't properly leveled during the sanding stage. If you rush to the slicking step while the edge is still "hairy," the fibers will eventually pop back up. To fix this, stop burnishing and return to your lower-grit sandpaper. You must sand the edge until it is perfectly smooth before applying any compounds.
How long does it take to create a professional glossy edge?
Expect to spend 20 to 30 minutes per edge for a high-end wallet or strap. This time includes the full sanding sequence, multiple rounds of slicking, and the final wax polish. It's a slow, meditative process that rewards patience. If you try to shortcut the sequence, the result will likely be a matte finish that lacks depth.
What happens if I get burnishing agent on the front of the leather?
Wipe it off immediately with a clean, damp cloth. Compounds like Tokonole act as a resist, which means they will prevent dyes or conditioners from soaking into the grain. If the agent dries on the surface, it can leave a permanent stain or an uneven patch that ruins the look of your finished piece.
Can I use a Dremel tool for burnishing?
You can use a Dremel, but you must be careful with the speed settings. High RPMs generate intense heat very quickly, which can scorch the leather or create uneven dips in the edge. Always use the lowest possible speed and keep the tool moving constantly. For the most consistent mirror shine, many artisans still find that hand slicking is safer.
