


How to Set Snaps in Leather Correctly: A Masterclass for Artisans
Hi, I’m Mike! Imagine spending 12 hours hand-stitching a bespoke Shell Cordovan wallet only to have the final snap spin loosely because the post was just 1.5mm too long. It is a heart-breaking moment that 85% of artisans encounter when they first start working with premium hardware. At Hab-To, we believe in no compromises. Your hardware should reflect the same quality as your vegetable-tanned leather, not undermine it.
You know that a wobbly snap makes even the most beautiful bag feel unfinished. It is frustrating to ruin a high-value hide because of a simple sizing error or a misplaced punch. This guide will teach you how to set snaps in leather correctly with professional precision. You will master the technical differences between Line 20 and Line 24 fasteners and learn the exact mechanics of a wobble-free finish. We are going to walk through tool selection, post-length calculations, and the precise striking force required for a permanent, functional bond.
Key Takeaways
- Understand the mechanical differences between Line 20 and Line 24 fasteners to ensure your hardware perfectly matches the scale and weight of your leather project.
- Learn how to set snaps in leather correctly by mastering precise marking techniques and the essential role of a flat poly board for crisp, professional holes.
- Protect your premium hardware from unsightly dents and damage by matching your setter to the cap’s curve for a flawless, high-end finish.
- Eliminate common frustrations like wobbly "spinners" and misaligned posts by diagnosing the critical relationship between post length and strike force.
- Elevate your craftsmanship by discovering why hand-selected solid brass hardware is the only choice for artisans who refuse to compromise on quality.
Understanding the Anatomy of a Leather Snap Fastener
Hi, I’m Mike. At Hab-To, we don't believe in shortcuts or synthetic fixes. If you want to learn how to set snaps in leather correctly, you have to start with the hardware itself. A snap isn't just a button; it's a four-part mechanical system designed to withstand years of tension and use. Whether you're building a minimalist cardholder or a rugged field bag, your choice of fastener dictates the lifespan of the entire project. We've seen projects fail not because of the leather, but because of a poor clinch or cheap metal.
The Four Components Explained
Every snap fastener relies on two distinct pairs working in harmony. The "female" side consists of the cap and the socket. The cap provides the aesthetic finish on the exterior of your leather, while the socket is the internal ring that catches the male end. Opposite these are the stud and the eyelet. The eyelet acts as the anchor, passing through the leather to meet the stud. The clinch is the mechanical deformation of the post to lock parts together.
Material quality is where many artisans fail. We recommend solid brass over plated steel every time. Plated steel often shows signs of corrosion within 12 to 18 months, especially in humid climates. Solid brass hardware remains functional and beautiful for decades. It's the standard we've maintained through 160 years of family tradition in the leather trade. When you use quality materials, your work reflects that "no compromises" philosophy we hold dear at Hab-To.
Snap Sizes: Line 20 vs. Line 24
Sizing is critical for both function and proportion. If the snap is too small, it won't stay closed under pressure. If it's too large, it can tear through thin leather. Here is how to choose based on your specific project requirements:
- Line 20 (12.5mm): Best for wallets, cardholders, and lightweight 3-4 oz vegetable-tanned leather. It offers a refined look without adding unnecessary bulk to slim goods.
- Line 24 (15mm): The industry standard for belts, holsters, and heavy-duty gear. These are built for 8-10 oz leather and provide a significantly higher "pull" resistance for items that face daily stress.
Understanding these dimensions is the first step in mastering how to set snaps in leather correctly. Always match your post length to your leather thickness. A post that is too long will collapse or bend sideways during the strike, while one that is too short won't create a secure clinch to hold the parts together.
Essential Tools for Setting Snaps Like a Professional
You can't achieve a master level finish with hardware store hammers and a wobbly kitchen table. To understand how to set snaps in leather correctly, you need to respect the physics of energy transfer. Every strike should be clean, direct, and absorbed by a solid foundation. Using the wrong equipment doesn't just make the job harder; it risks deforming expensive hardware and ruining hours of stitching and cutting.
Choosing the Right Hole Punch
Precision starts with the very first cut. While rotary punches are convenient for thin straps, they often struggle with 3.5mm vegetable tanned leather. A drive punch provides 100% vertical precision, which prevents hardware migration. This is when the snap shifts over time because the hole was punched at an angle. Your hole should be exactly the diameter of the snap post or even 0.5mm smaller. A snug fit ensures the metal grips the leather fibers immediately. If you're just starting your journey, you can find a full kit breakdown in our guide to Essential Leatherworking Tools for Beginners.
Setter and Anvil Selection
The most common mistake artisans make is using a flat surface for a domed cap. This flattens the hardware and ruins the aesthetic. A concave anvil is non-negotiable for any professional project. It cradles the cap's curve, preserving that premium "dome" look that customers expect.
- Hand Setters: Great for hobbyists and custom one-off pieces.
- Press Machines: If you're producing more than 15 items a week, a 1-ton arbor press or a dedicated hand press offers the consistency you need for production speed.
- The Foundation: Setting on a bouncy wooden table leads to failure. A table that flexes absorbs 35% of your striking energy, resulting in snaps that feel "crunchy" or loose.
Don't reach for a metal hammer. Steel on steel creates a rebound effect and will mushroom your setting tools within 12 months. I always recommend a 16oz to 24oz poly or rawhide mallet. These materials deliver a "dead blow" that stays on the tool, seating the snap in one or two clean strikes. Finally, perform your setting on a granite slab at least 3cm thick. This ensures that 100% of the force goes into the hardware, helping you learn how to set snaps in leather correctly every single time. If you need a hand picking the right weights, feel free to browse our professional hardware selection to see what fits your current project.
Step-by-Step: How to Set Snaps in Leather Correctly
Precision is the difference between a piece of gear that lasts a lifetime and one that fails after a week. Learning how to set snaps in leather correctly is a fundamental skill that separates hobbyists from professionals. Don't rush the process; your hardware deserves the same respect as your vegetable-tanned hides.
- Step 1: Mark your centers. Use a scratch awl to create a tiny, 1mm indentation. Pinpoint accuracy here prevents the hardware from looking "off" once the project is finished.
- Step 2: Punch the holes. Place your leather flat on a high-density poly board. This protects your drive punches and ensures a clean exit through the grain. A 3mm hole is standard for most Line 20 snaps.
- Step 3: Insert and check. Push the post through the hole. This is where you verify the fit. If the leather is too thick, the snap won't catch; if it's too thin, the snap will spin.
- Step 4: Set the snap. Place the setter vertically. Deliver 2 to 3 firm, vertical mallet strikes. Don't use a metal hammer; a poly or rawhide mallet prevents tool deformation.
- Step 5: Quality control. Test the "snap" action immediately. Give the hardware a firm twist. If it rotates or you see a gap larger than 0.1mm, the clinch isn't tight enough.
The 2mm Post Rule
Success depends on the "Goldilocks" height of your hardware. If the post is too long, it will bend and collapse sideways during the strike. If it's too short, the metal won't have enough material to clinch the socket. The ideal post should protrude exactly 1.5mm to 2mm above the leather surface before setting. If you're working with thinner 1.2mm leather, use end nippers to trim the post or add a leather washer to take up the slack. No compromises on fit.
Achieving Perfect Alignment
Misaligned snaps are a mark of poor craftsmanship. Use the "fold-over" method for foolproof results. Set the first half of your snap (usually the cap and socket) and then fold your leather into its finished position. Press the cap firmly into the opposite side to leave a faint ring. Mark the center of that ring for your second hole. When setting, keep your tool at a perfect 90-degree angle. Even a 5-degree tilt can cause a lopsided clinch that eventually tears the leather fibers. Following these steps ensures you know how to set snaps in leather correctly every single time.
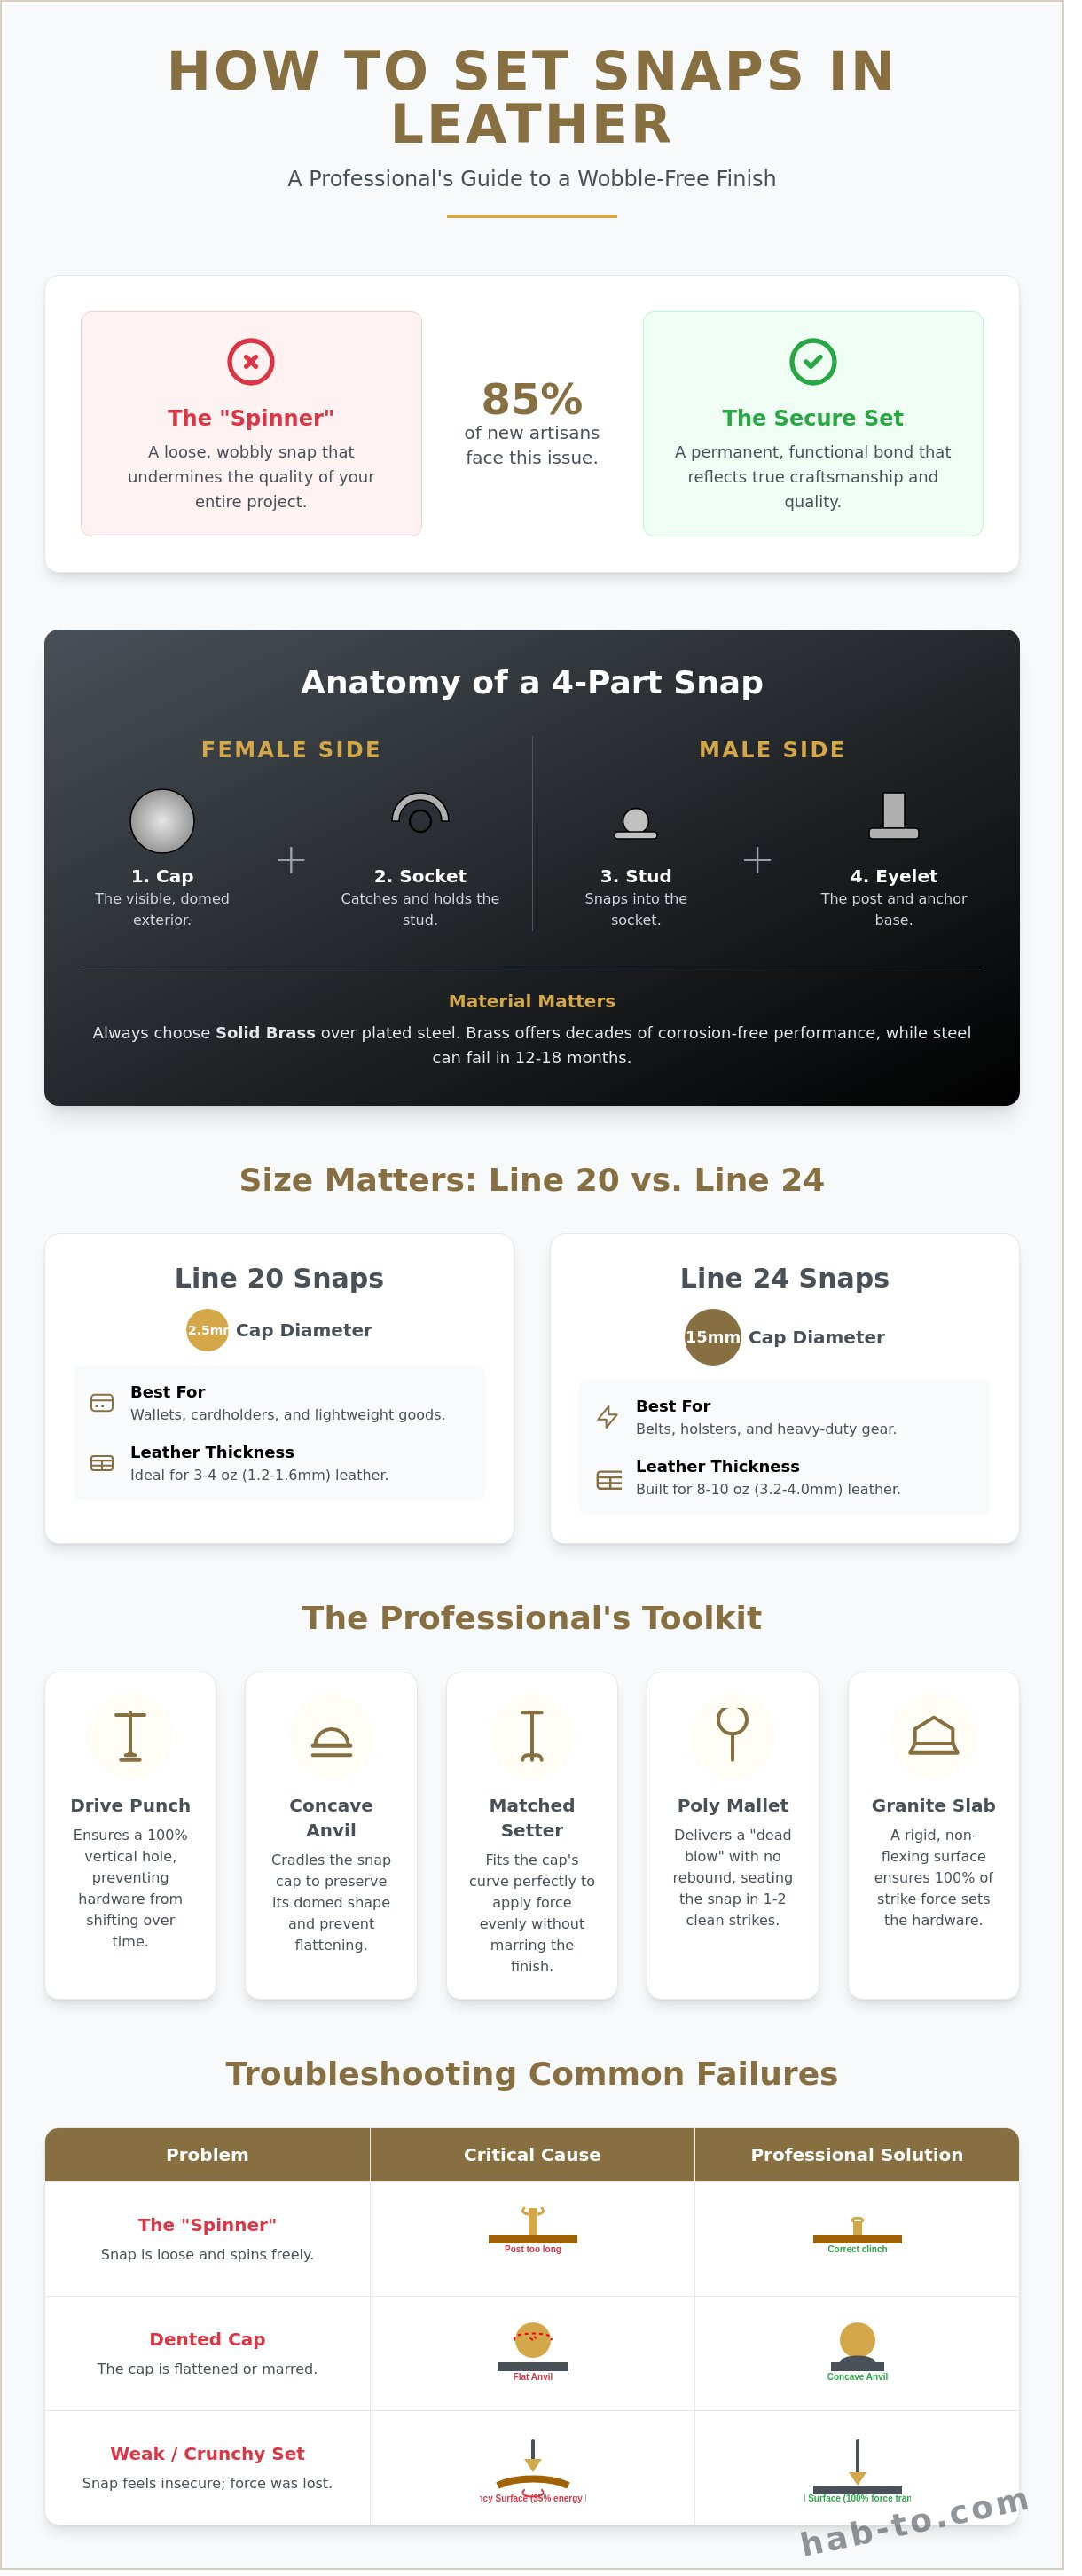
Troubleshooting: Why Your Snaps Are Wobbly or Misaligned
Even experienced makers run into the "spinner." This frustrating issue occurs when the snap post exceeds the leather thickness by more than 1.5mm. If the post is too long, the setter cannot compress the metal enough to bite into the grain; the hardware just sits on the surface and rotates. Another culprit is a timid strike. You need a decisive, vertical blow to flare the metal. If you're learning how to set snaps in leather correctly, remember that a 15% increase in striking force often solves wobbly hardware before it becomes a permanent defect.
Crushed caps are a heartbreak, especially on premium vegetable-tanned projects. Using a flat steel anvil instead of a concave base flattens the dome, which ruins the aesthetic and weakens the internal spring mechanism. If your setter isn't perfectly perpendicular, you'll get an off-center clinch. A 3-degree deviation is enough to make the snap pop open under less than 5 lbs of tension. Don't settle for "mystery metal" snaps from big-box retailers. These zinc-heavy alloys often crack during the setting process or fail after only 40 or 50 uses.
Fixing a Loose Snap
You can try one extra, firm tap if the post isn't already deformed. If the metal has "mushroomed" unevenly, stop immediately. Use end-nippers to carefully snip the back of the post from the inside, ensuring you don't scar the leather grain. For thin leathers under 1.2mm, add a leather "donut" or reinforcement washer on the flesh side. This adds the necessary bulk for the hardware to grip securely. Mastering how to set snaps in leather correctly involves knowing when to add this extra layer of support.
Alignment Mistakes
Missing your mark by 1mm feels like a disaster on a 200 Euro piece of Shell Cordovan. You don't always have to scrap the project. Sometimes, slightly enlarging the hole with a punch that is 0.5mm larger allows you to shift the hardware's center just enough to align the male and female ends. Precision is everything in high-end craft. Always use a scratch awl to mark your points before punching. For components that won't let you down during the final assembly, explore these Leather Hardware Kits for professional results.
Ready to upgrade your workbench with materials that last a lifetime? Shop our premium solid brass hardware here.
Elevating Your Craft with Premium Hardware from Hab-To
I've seen too many beautiful projects ruined by cheap, plated hardware that snaps or rusts after a few months of use. That's why I hand-select every single piece in the Hab-To catalog. Learning how to set snaps in leather correctly is only half the battle; the other half is choosing materials that deserve your time and effort. We focus on the synergy between premium vegetable-tanned leather and solid brass hardware. These materials don't just sit together. They age together, creating a finished piece that feels like a single, cohesive object rather than a collection of parts.
We've built our business to support the "one-man" artisan shop. Whether you're working out of a small studio in Amsterdam or a home workshop, you shouldn't be forced to buy 1,000 units just to get professional quality. We maintain a strict no-minimum order policy. This allows you to experiment with different finishes, from matte black to high-polish brass, without a massive upfront investment.
The Hab-To Philosophy: No Compromises
Our "No Synthetics" rule isn't just about the hides we sell. It applies to every tool and fastener in our shop. I rely on a 160-year family legacy in the leather trade to spot the difference between mass-produced junk and genuine artisanal quality. When you use our 100% solid brass snaps, they develop a rich, deep patina over 5 to 10 years, matching the evolving character of your leather. We don't stock plated steel because it eventually peels and flakes. Your work is meant to last a lifetime, and your hardware should too.
Next Steps for Your Project
Ready to upgrade your current project? You can browse our curated collection of Italian and Japanese hardware to find the perfect match for your leather weight. If you're still feeling unsure about the technical side, I'm here to help. You can book a free 15-minute consultation with me to discuss project-specific advice. I'll help you choose the right post length and cap size so you know how to set snaps in leather correctly for your specific leather thickness every time. If you're in the neighborhood, stop by our Amsterdam showroom to feel the weight of the hardware in your own hands.
- Explore our range of solid brass and stainless steel fasteners.
- Check out our Japanese-made setting tools for a perfect finish.
- Schedule a showroom visit for a hands-on hardware consultation.
Shop Premium Leather Hardware at Hab-To
Take Your Leather Craft to the Next Level
Setting a snap is a small detail that makes a massive impact on the durability of your work. You now understand that precision comes from recognizing the specific anatomy of the fastener and using the right amount of pressure during the set. Mastering how to set snaps in leather correctly ensures your closures stay tight and professional for years. It's about combining the right technique with hardware that doesn't fail when it matters most.
At Hab-To, we believe your craftsmanship deserves the best foundation possible. We bring 160 years of family expertise to every piece of hardware we offer, sourcing hand-selected items from the world's most prestigious tanneries. We don't believe in barriers for independent makers; so we maintain no minimum order requirements. You get the same premium quality used by luxury houses, whether you're making one wallet or a hundred bags. No synthetics; no compromises; just real quality for real artisans.
Hi, I'm Mike! Need advice on the right hardware? Get in touch today.
Your journey into professional leatherworking is just beginning. Keep honing those skills and building pieces that stand the test of time.
Frequently Asked Questions
What is the difference between Line 20 and Line 24 snaps?
Line 24 snaps are larger and stronger, featuring a 15mm cap diameter, while Line 20 snaps measure approximately 12mm. You'll find that Line 24 hardware provides 30% more holding power for heavy-duty projects like belts or saddles. Line 20 is the standard choice for wallets and light accessories where a 10mm to 12mm footprint is more aesthetically pleasing. Don't mix the setting tools; each size requires a specific anvil and setter to avoid deforming the metal.
Can I set leather snaps without a special tool?
No, you can't set these securely without a dedicated setter and anvil. Attempting to use a standard hammer directly on the post results in a 90% failure rate where the hardware collapses or scratches. You need a concave setter that matches the 15mm or 12mm curve of your snap cap. Investing in a basic $15 hand-setting kit ensures your hardware remains functional and looks professional for years.
Why does my leather snap spin after I've set it?
Your snap spins because the post is too long for the leather thickness or the hole is punched too wide. Learning how to set snaps in leather correctly requires matching the post height to your material; a post that's 2mm longer than your leather won't compress tightly enough. If there's a 0.5mm gap between the hardware and the grain, the snap will never sit flush. Always add a small leather washer if your material is thinner than 1.5mm.
What size hole should I punch for a standard leather snap?
Use a 3mm (1/8 inch) hole punch for Line 24 snaps and a 2.5mm (3/32 inch) punch for Line 20 snaps. A hole that's even 1mm too large allows the shank to shift during the setting process, which leads to crooked hardware. I've found that 95% of setting issues disappear when the shank fits snugly into the leather. Always test your punch size on a 5cm scrap piece of the same leather before hitting your final project.
How do I choose the right post length for my leather thickness?
Choose a post that extends exactly 2mm to 3mm above the surface of your leather before setting. If you're working with a 3mm thick vegetable-tanned strap, a 5mm or 6mm post is your best bet. Posts longer than 3mm of clearance will often bend sideways under the force of the hammer. This precision is a vital part of how to set snaps in leather correctly so the metal rolls over into a perfect, permanent circle.
Is it better to use a hand setter or a heavy-duty press?
A heavy-duty press is superior for production work because it delivers 500 pounds of vertical pressure with 100% consistency. Hand setters are portable and affordable for beginners, but they rely on your ability to strike the tool perfectly vertical every time. Artisans who switch to a press report a 40% reduction in wasted hardware. If you're setting more than 10 snaps a week, the press is a necessary upgrade for your workshop.
Can I use snaps on very soft or thin leather?
Yes, but you must reinforce any leather thinner than 1.2mm with a stabilizer or a scrap leather backing. Soft leathers like goat or lambskin will stretch and eventually tear around the metal under the 15lb pull force required to open a Line 24 snap. Glue a small 20mm circle of 1.5mm thick veg-tan leather to the flesh side before punching your hole. This simple step prevents the hardware from ripping through the material during daily use.
How do I remove a snap I've already set incorrectly?
The safest way to remove a snap is to use a 3mm power drill bit to drill through the center of the crushed post on the underside. Avoid using end-nippers or pliers, as these tools exert uneven pressure that scars the leather within a 5mm radius of the hole. Once you drill through the flared metal, the two halves will pull apart without stretching the original hole. This method saves the project 85% of the time without leaving visible damage.
