


How to Use a Pricking Iron: A Masterclass for Traditional Leatherwork (2026)
Your pricking iron isn't just another punch; it's the precision guide that defines the soul of a hand-stitched leather piece. Have you ever felt that hesitation before striking your tool into a beautiful, expensive hide of vegetable-tanned leather? We've all been there. It's frustrating to end up with crooked stitch lines or to realize you've confused a delicate pricking iron with a heavy stitching chisel. You want that signature slanted look, but the fear of a permanent mistake is real. Mastering how to use a pricking iron is the turning point for any serious maker. It marks the shift from simply joining leather to practicing a centuries-old art form.
I understand the respect you have for your materials. You don't want to make concessions on quality, and your tools should reflect that standard. This guide will show you how to mark perfect, consistent stitch lines with total precision. We'll explore the traditional marking method, the differences between French and Japanese styles, and the exact techniques you need to work with confidence. By the end, you'll be ready to create the kind of heirloom-quality work that defines true craftsmanship.
Key Takeaways
- Distinguish between traditional marking and modern punching to elevate your hand-stitching technique to professional standards.
- Learn how to select the ideal Stitches Per Inch (SPI) for a balanced, harmonious look on any thickness of vegetable-tanned leather.
- Master the professional method of how to use a pricking iron to ensure your stitch lines are perfectly straight, slanted, and consistent.
- Compare pricking irons and stitching chisels to decide which tool provides the right level of precision and control for your crafting style.
- Discover essential maintenance secrets, such as polishing with jeweler's rouge, to keep your tools sharp and rust-free for a lifetime of use.
What is a Pricking Iron? Understanding the Traditional Marking Tool
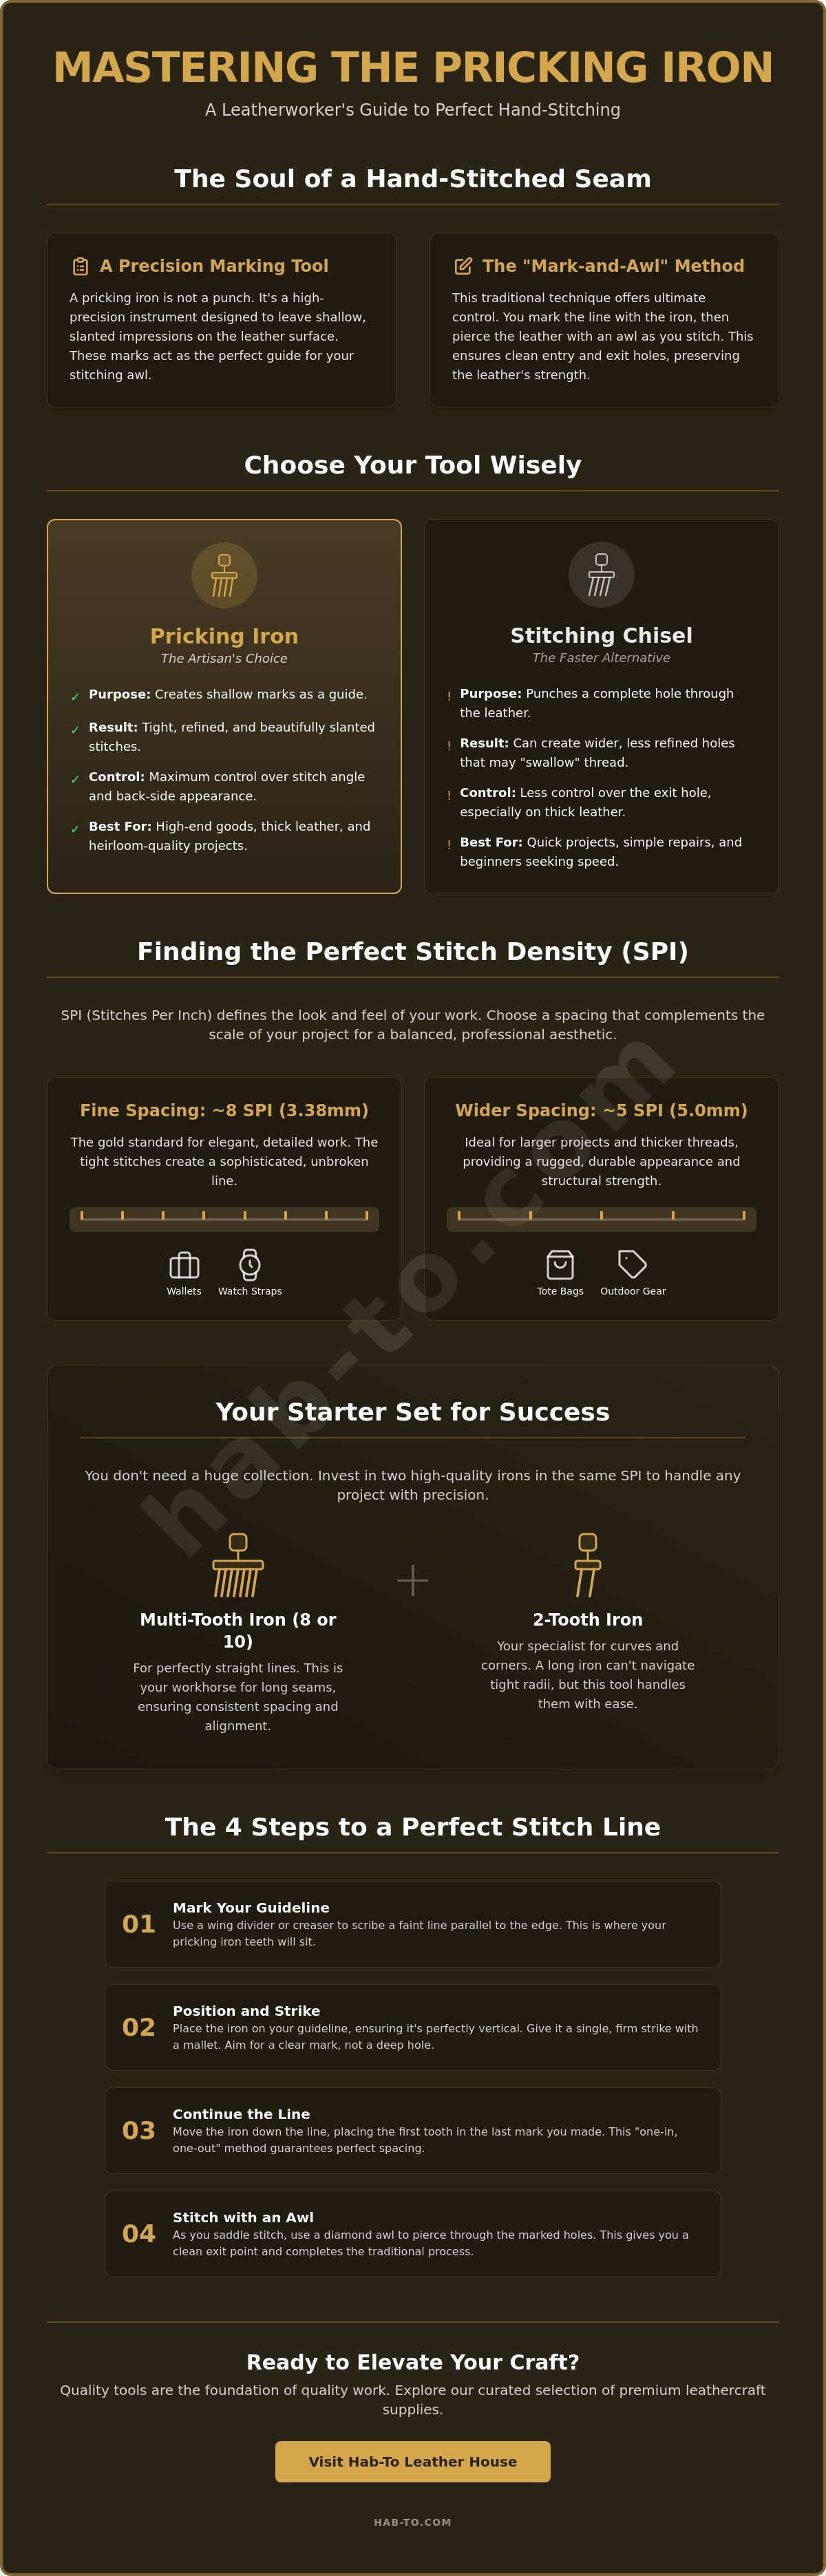
A pricking iron is a precision instrument, not a blunt force tool. To understand What is a Pricking Iron?, you must first look at the intent behind the mark. While a common chisel is built to punch through every layer of your project, a pricking iron is designed to leave a shallow, slanted impression. This mark serves as a perfect guide for your diamond awl. It's the foundation of the traditional 'mark-and-awl' method, a technique used by the world's most prestigious leather houses to achieve flawless, hand-stitched seams.
Tradition matters because it offers control. When you learn how to use a pricking iron, you're not just making holes; you're defining the aesthetic character of your piece. The shallow mark preserves the structural integrity of the leather. By using an awl to complete the hole as you stitch, you ensure that the exit point on the back is as clean and precise as the entry point on the front. This level of detail is what separates a hobbyist's project from a bespoke masterpiece.
The Anatomy of a Quality Iron
Quality starts with the teeth. High-end irons are forged from hardened steel to prevent the teeth from bending under the strike of a mallet. Each tooth should have a consistent taper and a mirror-like polish. This polish is vital; it allows the tool to lift away from the leather without dragging or distorting the grain. The handle needs enough weight to feel balanced, providing the stability required for a perfectly vertical strike every time.
Pricking Iron vs. Stitching Chisel
The core difference lies in depth and purpose. A stitching chisel is a 'punch-through' tool, making it a faster choice for beginners or simple repairs. However, for thick, premium materials like Badalassi Pueblo leather, a chisel can often struggle. The longer teeth of a chisel can create wide, gaping holes that swallow your thread. A pricking iron maintains a tight, refined look. It allows you to choose exactly where the awl exits, which is crucial when working on items with multiple layers or varying thicknesses.
Choosing Your SPI: Teeth Spacing and Iron Selection
Choosing the right spacing is the difference between a refined cardholder and a rugged field bag. SPI stands for Stitches Per Inch, a measurement that defines the density of your seam. While North American makers often use SPI, many European and Asian toolmakers use millimeter spacing. When you're learning how to use a pricking iron, understanding this conversion is vital. A 3.38mm iron is roughly equivalent to 7.5 or 8 SPI, which has become the gold standard for wallets and small leather goods. It offers a tight, elegant slant that looks sophisticated without feeling overcrowded.
Visual balance is the goal. For larger projects like tote bags or outdoor gear, a wider spacing of 4.0mm or 5.0mm is usually preferred. These wider gaps accommodate thicker threads, providing the structural strength needed for heavy-duty items. If you use a fine 3.38mm spacing on a large rucksack, the stitching can look busy and disproportionate. Conversely, wide spacing on a watch strap can make the piece look amateurish. The spacing dictates the "rhythm" of your work.
The Essential Set for Beginners
Don't fall into the trap of buying a cheap 10-piece set. Instead, invest in two high-quality irons in a single size, such as 3.38mm. You need an 8-tooth or 10-tooth iron to handle long straightaways with speed and perfect alignment. However, you also need a 2-tooth iron for navigating corners and tight radii. A long iron cannot follow a curve; it will force your line into a series of jagged segments. Mastering these two tools is a foundational step in building traditional leatherwork skills.
Thread and Leather Synergy
Your thread weight must harmonize with your iron. A 0.6mm polyester or linen thread is a classic pairing for 3.38mm spacing. This combination allows the thread to sit comfortably within the mark without obscuring the beautiful slant of the stitch. The leather itself also plays a role in your success. A firm, vegetable-tanned leather like Badalassi Pueblo is an excellent choice for beginners. Its structure allows it to hold deep, crisp marks from the iron, making it much easier to see your placement when you follow up with your awl. If you're looking to upgrade your kit, our premium leatherworking tools are selected to ensure you get these professional results every time.
Pricking Irons vs. Stitching Chisels: A Comparison
Choosing between these tools defines your entire workflow. A stitching chisel is designed to punch all the way through your leather. It's a one-step process. In contrast, a pricking iron only marks the surface. It creates a slanted indentation that acts as a map for your diamond awl. Understanding this distinction is the first step in learning how to use a pricking iron effectively. While chisels offer speed, irons offer a level of control that's unmatched for high-end work. You'll find that the "pin-prick" look of a traditional iron is far more refined than the larger diamond holes left by a chisel.
Noise and impact also vary significantly. Because a chisel must pierce through multiple layers, you often need a heavy mallet and a sturdy surface. This creates a lot of noise. Pricking irons require only a light tap. You aren't trying to break through the grain; you're just embossing a guide. This makes for a much quieter, more meditative workshop experience. It's also safer for your tools. You won't risk snapping a tooth by forcing it through four layers of heavy hide. When you master how to use a pricking iron, you're embracing a slower, more intentional pace of work.
The Traditional Awl Method
The pricking iron is only half the battle. Once you've marked your line, the real work begins with the diamond awl. This tool must enter the leather at the exact angle set by the iron. If your awl slips or tilts, the back of your stitch will look messy, even if the front is perfect. It takes practice to maintain this 45-degree angle consistently. For those transitioning from chisels, a guide to creating sewing holes can help clarify how to move from punching to piercing. Hand-piercing every single hole is a labor of love, but the result is a seam that's structurally superior and aesthetically perfect.
Modern Stitching Chisels
Chisels have their place. They're efficient for production work where speed is prioritized over traditional aesthetics. However, they have limits. On very thick projects, a chisel can struggle to maintain a straight path through the leather, leading to "wandering" holes on the backside. A pricking iron paired with an awl allows you to pierce each hole individually. This ensures the exit point is exactly where it should be. For projects using Badalassi Pueblo leather, the choice often comes down to the desired thickness of the final seam. Sometimes, a hybrid approach works best: use a chisel for long, hidden seams and an iron for the visible, decorative sections.
Step-by-Step: How to Use a Pricking Iron for Perfect Stitching
Accuracy starts before the mallet ever touches the steel. You need a visible, consistent guide line to ensure your stitches don't wander across the surface of your project. Use a wing divider to score a light line along the edge of your leather. This provides a track for the teeth to follow. If you're working with a premium material like Virgilio Pueblo leather, you'll find the surface accepts a crisp, clear score line with very little pressure.
Once your line is set, place the teeth of the iron directly onto the score. Positioning is the most critical part of learning how to use a pricking iron effectively. The tool must be perfectly vertical, exactly 90 degrees to the leather surface. If the iron leans even slightly to the left or right, your stitch marks will be misaligned, making it impossible to achieve a straight line on the backside when you follow up with your awl. Hold the handle firmly and use your pinky finger against the leather to stabilize the tool.
Strike the iron with a single, confident tap. Use a poly or rawhide mallet; never use a metal hammer, as it will mushroom the head of your expensive tools. You aren't trying to punch through the hide. You're simply embossing a slanted guide. After the first strike, lift the iron and place the first tooth into the very last hole of your previous mark. This overlapping technique is the secret to maintaining perfect spacing over long distances. Before you move to the next section, verify that every mark is deep enough to see clearly. If the marks are too faint, they'll disappear as you handle the leather during stitching.
Managing Corners and Curves
Long irons are for straight lines. When you reach a corner or a tight curve, switch to your 2-tooth iron. This process is often called "walking the iron." It allows you to navigate the radius without distorting the spacing. If the math doesn't perfectly align as you approach a corner, you can "cheat" the spacing by a fraction of a millimeter over the last few stitches. This ensures your final mark lands exactly where it should. For the best results in your workshop, browse our professional leatherworking tool collection to find the right sizes for your next project.
Common Mistakes to Avoid
The "Leaning Iron" is the most common error for beginners. Even a one-degree tilt will ruin the alignment on the backside of your work. Another frequent mistake is over-striking. If you hit the iron too hard and pierce all the way through, you've essentially turned it into a low-quality chisel. This weakens the grain of the leather and creates a messy exit hole. Finally, watch for inconsistent depth. If some marks are deep and others are shallow, your thread will sit unevenly, destroying the professional "rhythm" of your saddle stitch.
Caring for Your Tools and Choosing the Right Leather
A master craftsman is only as good as their tools. If you've invested in professional equipment, you owe it to yourself to keep those teeth in pristine condition. Part of learning how to use a pricking iron is understanding that friction is your enemy. Over time, even the most polished steel can develop microscopic burrs that drag against the leather grain. To prevent this, I recommend polishing the teeth with jeweler's rouge on a scrap of leather. This simple act of maintenance ensures the iron slides out of the hide effortlessly, leaving a crisp, undisturbed mark.
Rust is another silent killer in the workshop. High-carbon steel tools are susceptible to oxidation, especially in humid environments. A light coat of tool oil or a simple wipe-down with a silicone-treated cloth after each session can save your kit from ruin. Our family brings over 160 years of heritage to the selection process, and we've seen how a well-maintained tool can last several lifetimes if treated with respect. It isn't just about the work you do today; it's about preserving the instruments of your craft for the future.
Maintenance for Longevity
Stropping isn't just for your knives. A quick pass of the iron's teeth across a loaded strop keeps the tips needle-sharp. This makes your initial placement much more accurate. For storage, don't just toss your irons into a crowded drawer. The teeth are vulnerable. Use a dedicated tool roll or a wooden stand to avoid chipping the edges. If you happen to bend a tooth, don't panic. Small misalignments can often be corrected with a pair of smooth-jawed pliers and a gentle touch, though severe damage usually warrants a replacement to maintain your SPI accuracy.
The Best Hides for Pricking Irons
Not all leather is created equal when it comes to marking. Vegetable-tanned hides are the preferred choice because they have the 'memory' required to hold a deep, lasting impression. For instance, Virgilio Pueblo is widely considered the gold standard for visible stitch lines. Its unique, buffed surface captures the slant of the iron with incredible clarity, which is a massive help when you're still mastering how to use a pricking iron.
Dense fibers require a different approach. When working with Shell Cordovan, you'll notice the material is much less forgiving than standard cowhide. It's incredibly tight and oily. You might need a slightly firmer strike to leave a lasting mark, but the reward is a stitch line that looks like it was painted onto the surface. Avoid heavily pigmented or synthetic finishes. These tend to self-heal, making your guide lines disappear before you can even reach for your awl.
Master the Art of the Traditional Stitch
Elevating your leatherwork from a simple hobby to a refined craft requires patience and the right foundation. You've learned that a pricking iron is a precision guide for your awl, not a shortcut through the hide. By selecting the correct SPI for your project and ensuring your tool remains perfectly vertical, you create the rhythmic, slanted stitches that define high-end bespoke goods. Mastering how to use a pricking iron is a journey of precision, but it's one that yields results you can be proud of for a lifetime.
The soul of your work lives in the materials you choose. At our Amsterdam-based wholesale house, we bring 160 years of family leather expertise to help you find the perfect match for your tools. Whether you need a single hide or a bulk order, we offer global shipping with no minimum order requirements to support makers at every level. Ready to begin your next masterpiece? Explore our curated selection of premium leathers for your next project and see the difference that quality makes. Keep your tools sharp, your lines straight, and your passion for the craft alive.
Frequently Asked Questions
What is the difference between a pricking iron and a stitching chisel?
A pricking iron is designed to mark the surface of the leather, whereas a stitching chisel is intended to punch all the way through. The iron creates a slanted guide for your diamond awl, offering superior control over the exit point on the backside. Chisels are faster for production work, but irons provide the refined, tight stitch appearance found in bespoke luxury goods. Choosing the right tool depends on your desired aesthetic and skill level.
How do I know which SPI (Stitches Per Inch) to choose for my project?
Selection depends on the scale of your project and the weight of your thread. For small goods like wallets or watch straps, 3.38mm (roughly 8 SPI) is the industry standard for an elegant look. Larger items like tote bags or briefcases benefit from wider 3.85mm or 4.0mm spacing to accommodate thicker thread. Always test your spacing on a scrap piece to ensure the stitch rhythm matches the item's proportions and structural needs.
Do I need to hit the pricking iron all the way through the leather?
You should never hit a pricking iron all the way through the leather. The goal is to create a shallow, slanted impression that defines the spacing and angle. Piercing through the entire thickness is the job of the diamond awl during the stitching process. If you force the iron through, you risk damaging the delicate teeth and losing the ability to precisely control the backside alignment of your seam.
What kind of mallet should I use with my pricking irons?
Use a high-quality poly, nylon, or rawhide mallet to strike your tools. You must avoid metal hammers at all costs. Metal-on-steel contact will eventually mushroom the head of your iron, making it unsafe and difficult to handle. A softer mallet provides a consistent, dampened strike that transfers enough energy to mark the leather without causing excessive vibration or noise in your workshop.
How do I sharpen or polish the teeth of my pricking iron?
Polishing is more common than sharpening for these tools. Apply a small amount of jeweler's rouge to a leather strop and pull the teeth across the surface. This removes microscopic burrs and smooths the steel. A polished iron is essential when learning how to use a pricking iron because it prevents the tool from sticking. If a tooth is truly dull, use a fine ceramic file with extreme care to maintain the original factory angle.
Can I use a pricking iron on chrome-tanned leather?
You can use a pricking iron on chrome-tanned leather, but it is significantly more challenging. Chrome-tanned hides are softer and more elastic, meaning the marks often "self-heal" or disappear before you can stitch them. If you must work with this material, use a heavier strike and stitch immediately after marking. For the best experience, stick to firm vegetable-tanned leathers that hold a crisp, permanent impression.
Why are my stitch lines crooked even when using an iron?
Crooked lines are almost always caused by a "leaning" iron. If the tool isn't held at a perfect 90-degree angle to the leather, the marks will be misaligned. Even a slight tilt causes the spacing to drift. To fix this, stabilize your hand by resting your pinky against the leather surface. Consistently check your vertical alignment before every strike to ensure your how to use a pricking iron technique remains precise and professional.
What is the best leather for beginners to practice pricking on?
Firm vegetable-tanned cowhide is the best material for practice. Leathers like Pueblo or traditional Vacchetta have a dense grain structure that takes a mark beautifully. These hides don't stretch or distort when struck, allowing you to see exactly where your teeth land. Practicing on a firm, 1.5mm to 2.0mm thick piece of veg-tan leather will help you build the muscle memory needed for more complex, expensive projects.
