


How to Use an Edge Beveler: The Artisan Guide to Professional Leather Edges
Imagine you've just finished hours of careful work on a premium piece of full-grain vegetable tanned leather. You reach for your tool to add the final touch, but the blade jumps and chatters across the edge, leaving a jagged scar. It's a heart-sinking moment every artisan knows too well. Understanding how to use an edge beveler is the vital bridge between a rough project and a professional-grade masterpiece. This single technique defines the silhouette of your work and prepares the leather for a glass-like burnish.
We believe that high-quality materials deserve a high-quality finish. It's frustrating when confusion over tool sizes or a dull edge ruins your progress. This guide will give you the clarity and confidence you need at the workbench. We will explore how to select the right beveler for your leather weight, the secret to maintaining a razor-sharp edge, and the exact hand-pressure required for a smooth, consistent cut. You will learn to transform those raw, square edges into the rounded, professional profiles that define true craftsmanship.
Key Takeaways
- Understand why removing the 90-degree corner is essential for preventing "mushrooming" and creating a durable, long-lasting edge.
- Learn how to match specific beveler sizes to your leather weight to ensure a perfectly consistent, rounded profile every time.
- Discover how to use an edge beveler with the "Anchor Finger" technique to maintain total stability and prevent the tool from jumping.
- Troubleshoot common artisan frustrations like tool "chatter" and gouging by mastering grip pressure and blade maintenance.
- Prepare your projects for a glass-like burnish by following a professional sanding and dyeing sequence that prevents grain bleed.
Understanding the Edge Beveler: The Secret to a Professional Finish
A raw, square edge is the hallmark of a project that isn't quite finished. An edge beveler is a specialized cutting tool designed to remove that harsh 90-degree corner, creating a softer, more intentional profile. Learning how to use an edge beveler correctly is one of the first skills I recommend to any artisan looking to level up their work. It's the difference between a hobbyist's craft and a professional's product. This tool doesn't just change the look; it changes how the leather behaves over time.
The primary reason we bevel is to prevent "mushrooming." When a leather item like a wallet or belt is used, the edges are naturally compressed. A square edge has nowhere to go but out, causing the fibers to splay and look messy. A beveled edge is already rounded, so it stays compact and retains its shape under pressure. Beyond durability, there's the visual impact. That smooth, slightly curved silhouette provides the luxury aesthetic found in high-end leatherwork. It creates a refined transition between the grain of the leather and the edge itself.
The Mechanics of the Cut
When you remove those sharp corners, you're creating a radius. This curve is essential for the burnishing process. When you eventually apply friction with a wood slicker and Tokonole or beeswax, the rounded shape concentrates the heat and pressure. This seals the fibers into a solid, glossy unit. Without a bevel, the slicker can't reach the center of the edge effectively, leaving you with a dull, unfinished result. Many traditional leather carving techniques rely on these clean, beveled foundations to ensure the finished piece maintains its structural integrity and resists fraying. You'll typically bevel both the grain side and the flesh side to achieve a perfectly symmetrical, rounded edge.
Anatomy of a Quality Beveler
Mastering how to use an edge beveler effectively means understanding the geometry of the tool itself. A quality beveler consists of a sharp cutting head, a "throat" that guides the leather, and a "tang" that secures the blade into the handle. I always advise looking for tools made from high-carbon steel. While stainless steel options are available, they rarely hold the razor-sharp edge required for a clean pass. You want a blade that glides through the hide like butter. Firm, high-quality materials like Badalassi Pueblo leather are perfect for testing a new tool because their dense fiber structure provides excellent feedback. Finally, don't overlook the handle. An ergonomic grip is vital for maintaining steady pressure during long crafting sessions, ensuring your cuts remain consistent from start to finish.
Choosing the Right Beveler for Your Leather Project
Picking the wrong size is the quickest way to ruin a clean edge. If the tool is too small, it barely makes a dent. If it's too large, it can gouge deep into the grain, leaving a scar that sanding can't fix. Most tool manufacturers use a numbering system from 0 to 5. These numbers correspond to the width of the gap in the cutting head. A lower number removes less material, while a higher number creates a more dramatic, rounded curve. When you are learning how to use an edge beveler, the firm nature of vegetable-tanned leather makes it the gold standard for practice. Its dense fiber structure allows the blade to bite and glide without the leather stretching or bunching up under the tool.
Size Guide for Common Leather Weights
Matching your tool to the thickness of your hide is a science. While every artisan has a personal preference, these general pairings will help you avoid common mistakes:
- Size 0 and 1: These are your precision tools. They are perfect for small goods like cardholders or thin linings such as Virgilio Vaccheta.
- Size 2 and 3: This is the versatile sweet spot. These sizes are ideal for 5-7 oz leathers used in belts and bag straps, like the rugged Badalassi Pueblo.
- Size 4 and 5: Reserved for heavy-duty applications. Think thick harness leather or saddlery where a deep, structural bevel is required to handle heavy wear.
Tool Profiles and Their Uses
Not all bevelers are shaped the same. The Common Beveler is the workhorse you will find in most workshops. It has a flat or slightly curved bottom that works perfectly for straight edges. However, if you are working on tight, rounded corners, a Bisonette Beveler is a significant upgrade. Its circular cutting head allows you to navigate curves without the tool digging in at an awkward angle. For those who need a hybrid approach, the French Edger features a flat, wider blade. It is excellent for skiving edges or creating a wide, shallow bevel on thicker pieces. If you want to ensure your workshop is fully equipped for any project, exploring our range of professional leatherworking tools can help you find the perfect match for your specific style.
Understanding how to use an edge beveler effectively depends on this initial choice. A sharp, correctly sized tool does half the work for you. Once you have the right profile in hand, you can focus on the physical technique of the cut without fighting the material.
Step-by-Step Guide: How to Use an Edge Beveler Like a Pro
A steady hand starts with a steady bench. If your workpiece slides even a fraction of a millimeter during the stroke, your bevel will wave, creating an uneven shadow that no amount of burnishing can hide. Mastering how to use an edge beveler requires more than just a sharp blade; it requires a disciplined sequence of movements. Before you even touch the tool to the hide, ensure your leather is flat against a solid surface. I often use a piece of scrap granite or a heavy cutting mat to provide the resistance needed for a clean, surgical pass.
Preparation and Moisture Control
Artisans often debate the "Dry vs. Cased" approach. Casing, or lightly dampening the leather, can help a slightly duller tool glide, but for maximum precision, dry is best. When working with high-quality Virgilio Pueblo leather, the dense fiber structure responds beautifully to a dry cut. If you find the tool dragging, resist the urge to soak the edge. Instead, ensure your edge is perfectly square. Any overhang from a previous cut will cause the beveler to "hunt" for a track, leading to an inconsistent line. For wider, more decorative bevels, use a wing divider to lightly score a guide line. This provides a visual rail for your tool to follow.
Executing the Cut
To start the cut, seat the tool at a 45-degree angle. This is the sweet spot where the blade removes the corner without digging into the grain or the edge face. Use the "Anchor Finger" technique: place the index finger of your non-dominant hand on the edge of the leather just ahead of the tool. This finger acts as a stabilizer and a guide, preventing the blade from jumping.
Adopt a "One-Pass" philosophy. Your goal is to produce a single, continuous ribbon of leather from one end of the piece to the other. Stopping mid-way is the primary cause of "steps" or "chatter" marks. When you reach a corner, slow your momentum but maintain the same downward pressure. If you are using a firm material like Badalassi Pueblo leather, the tool should provide a satisfying, audible "hiss" as it removes the material. This sound is a great indicator that your angle and pressure are correct.
Beveling the Flesh Side
Don't neglect the flesh side. This "fuzzy" side of the leather requires a lighter touch because the fibers are less dense and more prone to stretching. If you push too hard on thin leathers, you might distort the shape of your project. The goal here is symmetry. You want the bevel on the flesh side to mirror the bevel on the grain side. This creates a perfectly rounded, "bulging" edge profile that is the ideal foundation for a glass-like burnish. Take your time, keep your blade sharp, and remember that how to use an edge beveler is as much about rhythm as it is about force.
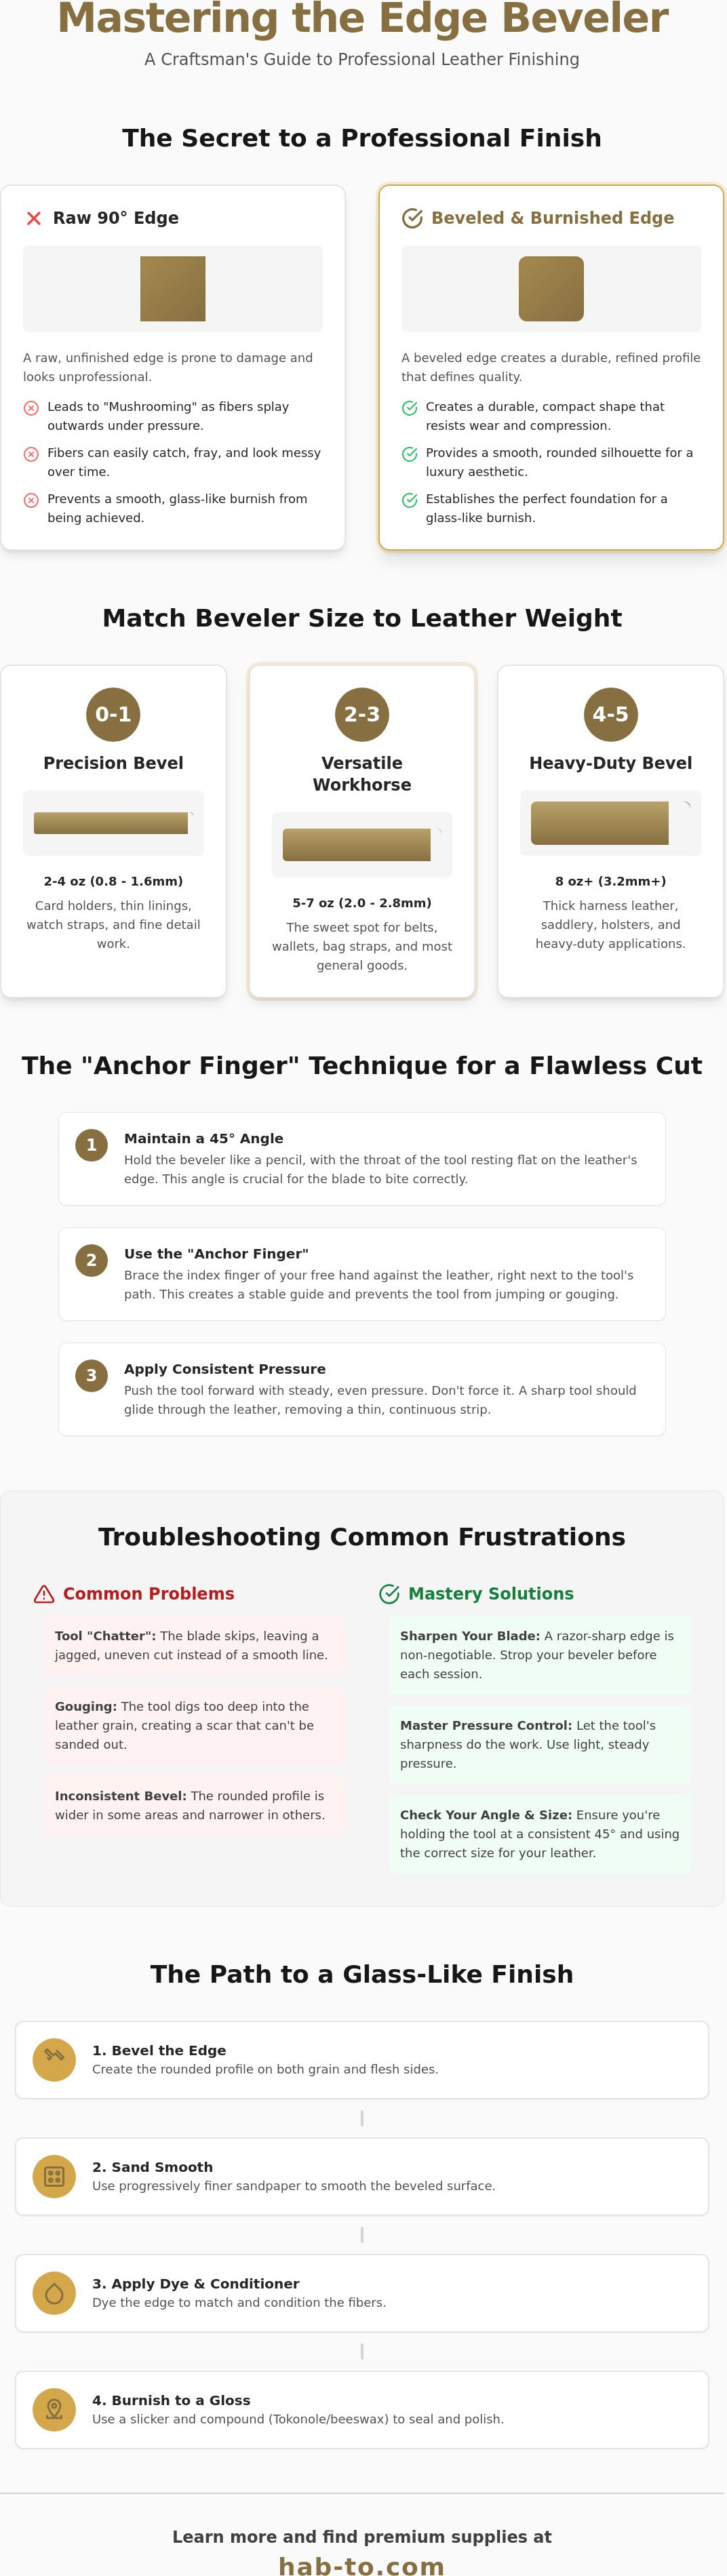
Troubleshooting Common Beveling Mistakes and Sharpening Tips
Even the most experienced artisan occasionally faces a tool that refuses to cooperate. If you notice your blade jumping or skipping across the hide, you're experiencing "chatter." This often happens when you change your grip or lose momentum mid-stroke. Another frequent frustration is "gouging," which occurs when the angle of the tool becomes too steep, causing the blade to dive into the leather rather than skimming the corner. Learning how to use an edge beveler with precision means paying close attention to the "Ribbon Test." Examine the discarded strip of leather. It should be a single, uniform strand. If the ribbon is frayed, broken, or uneven in thickness, it's a clear sign that either your technique or your blade needs adjustment.
Fixing Uneven Bevels
When a mistake happens, don't panic and try to cut deeper to hide it. This usually leads to over-beveling, where the edge becomes so thin it loses its structural integrity and won't burnish properly. Instead, reach for high-grit sandpaper. Starting with a 400-grit and moving up to 800-grit can often smooth out minor "steps" or chatter marks without removing too much material. The goal is to maintain a perfectly centered "round" where the bevels from the grain and flesh sides meet. If you're working on a dense material like Badalassi Pueblo leather, you'll find that the firm fibers respond well to light sanding, allowing you to recover a professional profile even after a slip.
Maintaining the Edge: Sharpening 101
A dull tool is a dangerous tool. It requires more force, which increases the chance of a slip that ruins your project. Mastering how to use an edge beveler is inseparable from mastering the strop. I recommend a quick strop every 10 minutes of active use. For the "back-strop" method, apply jeweler's rouge or a polishing compound to a thick thread or a thin strip of leather scrap. Pull the throat of the tool across the material in a steady, backwards motion. This realigns the microscopic edge without removing significant metal. If your tool is dragging even after stropping, it may need professional honing to restore the primary bevel. A well-maintained blade should glide through Virgilio Pueblo leather with almost zero resistance.
If you find that your current equipment loses its bite too quickly despite regular maintenance, it may be time to invest in higher-quality steel. You can find a selection of high-performance professional leatherworking tools designed to hold a razor-sharp edge through even the longest crafting sessions.
Beyond the Bevel: Prepping for Burnishing and Dyeing
Once you've mastered how to use an edge beveler, your work isn't done; it's just properly prepared. A raw bevel is still a cut surface that needs refinement. To reach a glass-like shine, you must refine the profile through a dedicated sanding sequence. Start with 400-grit sandpaper to level any remaining imperfections. Gradually move to 600, 800, and finally 1000 grit. This progression removes the microscopic ridges left by the blade, turning the edge into a smooth, polished runway for your finishing agents. If you skip this, the grain of the sandpaper will be visible under the burnish.
Beveling also provides a functional advantage when applying edge dye. By removing the corners, you create a subtle "trough" on the edge face. This helps the dye sit where it belongs without spilling over onto the grain or flesh side. It's a small detail that prevents the dreaded dye bleed that can ruin a project's clean lines. During your final inspection, run your fingertip along the length of the piece. You're feeling for "burrs" or any spots where the tool might have skipped. If it feels uniform and looks like polished wood, you've reached the artisan standard. If you feel a rough spot, don't ignore it. A few extra seconds with a high-grit abrasive now will save you from a cloudy finish later.
The Burnishing Process
The radius created by the beveler is designed to fit perfectly into the grooves of a wood slicker or the weave of a canvas cloth. When you apply a burnishing agent like Tokonole, the rounded shape allows for even friction and heat distribution. This heat fuses the leather fibers together into a single, dense unit. Unlike square edges, which often fray at the corners, beveled edges hold wax and burnishing creams much more effectively. The wax has a "pocket" to sit in, which prevents it from being rubbed off during the first few weeks of use. For a deeper dive into which finishing agent suits your style, check out our guide on Tokonole vs Beeswax: Which is Better for Edge Finishing?.
Long-term Durability
A well-finished, beveled edge is your project's first line of defense. Because the fibers are compressed and sealed, they naturally resist moisture, sweat, and oils from daily handling. This is especially vital for items like wallets or watch straps that see constant friction. Over time, even the best finish might dull. Maintenance is simple; a quick re-waxing of the beveled corners and a light buff with a canvas cloth will restore that professional luster. Knowing how to use an edge beveler isn't just about the first day of use; it's about how the piece ages over a decade of service. A beveled edge will never "mushroom" or splay out, keeping the silhouette as sharp as the day it left your bench.
Ready to upgrade your materials? Explore our premium vegetable-tanned leathers to find the perfect hide for your next masterpiece.
Elevate Your Craft with Precision Edges
Mastering how to use an edge beveler is a journey of patience and muscle memory. It's about more than just a single cut; it's about the marriage of a sharp blade and a steady hand. You've learned that selecting the right size for your leather weight and maintaining a consistent 45-degree angle are the secrets to avoiding chatter and gouging. These small adjustments transform a raw hide into a professional masterpiece that stands the test of time. A perfectly beveled edge is the foundation of a glass-like burnish that won't splay after years of service.
At Hab-To Leather House, we bring 160 years of family leather expertise to your workbench. We believe high-quality tools should be accessible to every artisan, which is why we have no minimum order requirements for crafters. Whether you're working with our sustainably sourced vegetable-tanned hides or looking for your next high-carbon steel edger, we're here to support your growth. Ready to refine your finish? Shop Professional Leatherworking Tools at Hab-To Leather House and start creating edges that speak of true quality. Keep practicing, stay patient, and enjoy every stroke of the blade.
Frequently Asked Questions
Do I need to bevel both the grain and flesh sides of the leather?
You should bevel both the grain and flesh sides of the leather to achieve a symmetrical, rounded profile. This balanced removal of material creates the ideal "radius" needed for effective burnishing later. If you only bevel the grain side, the bottom edge remains flat and sharp, which can feel unfinished or even uncomfortable against the skin on items like watch straps or belts.
What is the best size edge beveler for a beginner to start with?
A size 2 edge beveler is generally the best starting point for a beginner because it handles the most common leather weights used in hobbyist projects. Most starter projects like wallets or small bags use leather between 5 oz and 7 oz, and a size 2 provides a clean, visible curve without the risk of removing too much material. As your craft expands, you'll naturally find a need for precision size 0 tools or heavy-duty size 4 blades.
Why is my edge beveler pulling or tearing the leather instead of cutting?
Your tool is likely tearing the hide because the blade is dull or you're pushing at an angle that's too shallow. A sharp beveler should slice through the fibers with almost zero resistance. If the blade is even slightly blunt, it will snag and pull the leather rather than cutting it, which is especially common on softer hides. Regular stropping with a polishing compound is the most effective way to prevent this tearing.
Can I use an edge beveler on chrome-tanned leather?
You can use an edge beveler on chrome-tanned leather, but it requires a significantly sharper tool and a very light touch compared to vegetable-tanned projects. Chrome-tanned hides are much softer and more pliable, meaning they tend to stretch or bunch up under the pressure of the blade. For these materials, many artisans prefer using a specialized thin-profile beveler or a very sharp French edger to get a clean result.
How do I know when my edge beveler needs sharpening?
You know your tool needs sharpening when it requires noticeable physical force to move through the leather or begins to leave a ragged texture behind. A well-maintained edge should glide effortlessly through the fibers. Learning how to use an edge beveler includes recognizing these subtle changes in tactile feedback. If you see tiny "hairs" on the cut surface, your blade has lost its razor-sharp finish and needs a quick strop.
Is there a difference between an edge edger and an edge beveler?
There is no functional difference between an "edge edger" and an "edge beveler" in most modern leatherworking contexts. These terms are used interchangeably by different manufacturers and artisans to describe the same corner-removing tool. However, you should distinguish them from a "creaser," which is a tool used to compress the leather to create a decorative line rather than actually removing any material from the edge.
Should I bevel my edges before or after dyeing the leather?
You should always bevel your edges before applying any dye or edge finish. Removing the corner after dyeing would expose the natural, uncolored core of the leather, forcing you to re-apply the dye and potentially creating an uneven look. By beveling first, you create a smooth, consistent "trough" that accepts the color evenly and helps prevent the dye from bleeding onto the grain surface during application.
What is the "chatter" I hear when I am beveling?
"Chatter" is the rhythmic vibration or skipping sound you hear when the tool isn't cutting smoothly through the hide. This usually happens when you stop your momentum mid-stroke or if your blade is struggling to bite into the fibers due to a dull edge. Understanding how to use an edge beveler involves maintaining a fluid, continuous motion and consistent downward pressure to ensure the blade stays seated in the leather from start to finish.
