


Why is My Leather Dye Blotchy? (And How to Fix It Like a Pro)
Hi, I'm Mike! Last Tuesday, a maker in our Amsterdam workshop spent four hours prepping a premium vegetable-tanned hide, only to watch in frustration as the first coat of walnut dye turned into a chaotic map of dark streaks and pale islands. It's a gut-wrenching moment that leads every crafter to ask: why is my leather dye blotchy? You've followed the tutorials and used the expensive tools, yet your $150 hide looks inconsistent and amateur.
I understand that frustration because I've been there too. At Hab-To, we believe in no compromises when it comes to quality, and that includes your final finish. You can still achieve a smooth, professional-grade result without throwing away your hard work. I'm going to show you the hidden causes of patchiness and the professional techniques used to fix them like a pro.
We'll explore the critical differences between oil and water-based dyes, identify the three prep steps that 85% of beginners skip, and master the buffing rhythm that ensures a flawless finish every time. Let's get your project back on track and restore your confidence in the craft.
Key Takeaways
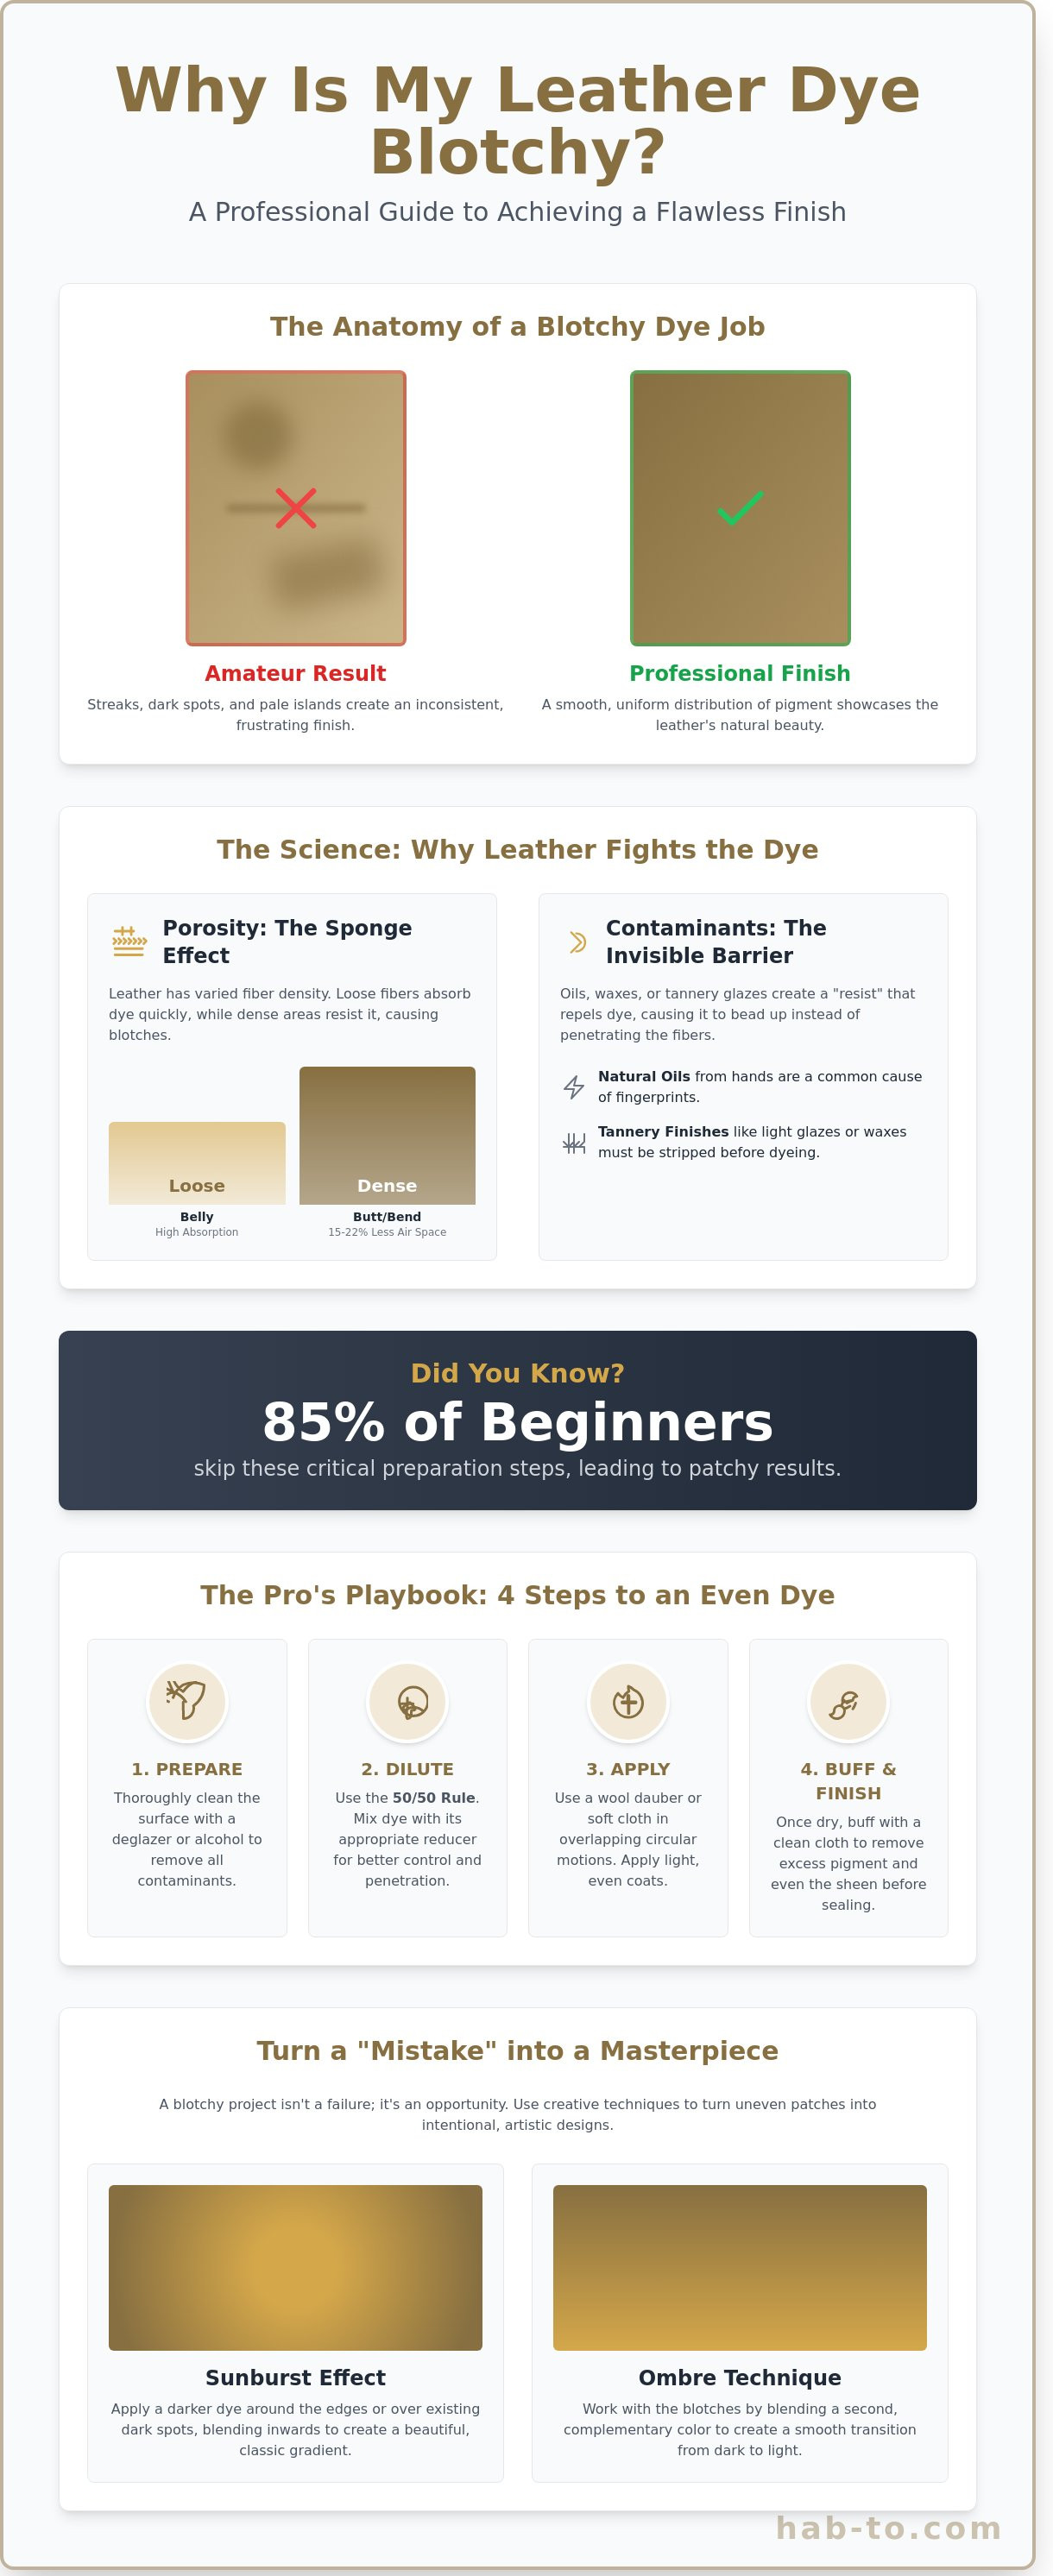
- Understand why high-quality vegetable-tanned leather behaves like a microscopic sponge and how surface tension impacts your dye results.
- Stop wondering "why is my leather dye blotchy" by identifying the common application mistakes that lead to frustrating, patchy finishes.
- Master professional techniques like the 50/50 dilution rule and circular application to ensure a flawless, even distribution of pigment.
- Learn Mike’s pro tips for selecting the right applicators to overcome the natural absorption resistance of premium hides.
- Discover how to salvage a "failed" project by using creative Sunburst or Ombre techniques to turn uneven dye into intentional art.
Understanding Blotchy Leather Dye: The Frustrating Reality of Patchy Projects
Hi, I'm Mike! You've spent hours cutting and burnishing your latest project, only to apply the first coat of dye and see dark spots, streaks, or light patches. You're likely asking, "why is my leather dye blotchy?" and feeling like your hard work just went down the drain. Blotchiness is simply the uneven distribution of pigment across the hide. It happens when certain fibers soak up dye like a sponge while others resist it entirely. This is a common hurdle, especially when working with high-quality vegetable-tanned leather that hasn't been heavily corrected with plastics.
At Hab-To, we believe dyeing is a partnership with the material. Our 160 years of family experience has taught us that every hide reacts differently based on its history. To understand why these variations occur, it helps to look at the foundational leather production processes. During the crusting and dyeing stages of manufacturing, the hide's pH levels and moisture content are established. If these aren't perfectly balanced, your dye won't lay flat. We don't use synthetics and we make no compromises, which means we work with the leather's natural personality, for better or worse.
To better understand this concept, watch this helpful video:
Identifying Blotches vs. Natural Grain Variation
You must distinguish between a technical error and the leather's "soul." Full-grain leathers like Buttero or Pueblo show 100% of the animal's history. Fat wrinkles and range marks absorb dye more deeply, creating darker areas that look like blotches but are actually natural character. A true technical blotch often results from oil contamination or "dye pooling" where excess liquid sits on the surface. If the mark follows the organic flow of the hide, it's character. If it looks like a splash or a fingerprint, it's a dyeing error.
The Emotional Toll of the "Ruined" Hide
It's incredibly frustrating when a 60-euro piece of premium hide looks uneven. We've all been there. However, these "mistakes" are actually your best chemistry lessons in leathercraft. When you ask "why is my leather dye blotchy," you're beginning to learn about surface tension and fiber density. The Hab-To philosophy is simple: we provide the best materials, but the craft is a journey. Don't let a patchy project stop you. Every master crafter has a bin full of "learning experiences" that paved the way to their best work.
The Science of Absorption: Why Some Leathers Fight the Dye
Leather isn't a uniform, synthetic sheet. It's a biological material with a complex history. If you've ever asked yourself why is my leather dye blotchy, the answer usually starts with how the hide's microscopic structure interacts with liquid. Think of the leather grain as a dense forest of collagen fibers. Some areas are packed tight, while others are wide open. When dye hits these different zones, it doesn't move at a single speed. It follows the path of least resistance, leading to the dark and light patches that frustrate every maker.
Porosity and the "Sponge Effect"
Porosity in leathercraft is the ratio of air pockets to fibers. This ratio fluctuates wildly across a single hide. The "butt" or "bend" of a cowhide features a dense, tight fiber structure with 15% to 22% less air space than the belly. When you apply liquid, the loose fibers in the belly section act like a thirsty sponge, drinking the pigment instantly. Meanwhile, the denser butt section resists the liquid, causing the dye to sit on the surface. This mechanical difference in how dye molecules travel through collagen fibers is a fundamental reason why is my leather dye blotchy.
Surface Contaminants: The Invisible Barrier
Surface tension acts as a gatekeeper for your finish. Even a small amount of oil from your hands or a stray drop of tannery wax creates a "resist" that repels dye. Many premium tanneries apply a light "glaze" or acrylic topcoat to protect the leather during transit. If you don't strip this 0.01mm layer away, your dye will bead up rather than penetrate. Professional results depend on preparation; a clean, de-glazed surface represents 90% of a successful dye job. Without it, you're just fighting physics.
Veg-Tan vs. Chrome Tanned Absorption
Vegetable-tanned leather is the true blank canvas of the craft. Its tannins leave the fiber structure receptive to new pigments. In contrast, chrome-tanned leather is processed with chromium sulfates that essentially "shrink-wrap" the collagen fibers. This chemical coating makes chrome-tanned pieces 40% less absorbent than their veg-tan counterparts. At Hab-To, we stick to sustainable vegetable-tanned materials because they offer the predictable absorption needed for deep, rich colors.
Environmental factors also dictate your success. In a dry workshop with 15% humidity, leather fibers contract and "close" the grain. In a more balanced 50% humidity environment, the fibers stay supple and "open," allowing for even travel of the dye. If your leather is bone-dry, the dye will flash-dry on the surface before it can sink into the lower layers, leaving behind visible streaks and uneven spots.
5 Common Mistakes That Lead to Uneven Leather Dye
I've seen many beautiful hides ruined by a few avoidable errors. Most blotchiness isn't caused by the dye itself; it's a result of how the leather was prepared or handled. If you apply a single heavy coat instead of three light ones, you're asking for trouble. Heavy coats saturate the surface unevenly, leading to dark pools and light patches. Using a heat gun to speed up drying is another shortcut that backfires. Forced heat can cause the leather to shrink by up to 10% or create a brittle surface that cracks later.
- Over-applying: One thick layer traps pigment on the surface rather than letting it soak in.
- Wrong Applicator: Using a small wool dauber on a 4-square-foot panel almost guarantees streaks.
- Heat Drying: Sunlight or heat guns pull moisture out too fast, locking in uneven patterns.
Skipping the Deglazing and Cleaning Stage
You can't dye what you haven't cleaned. Most vegetable-tanned leathers from large tanneries arrive with a light wax or acrylic seal. A professional deglazer strips these barriers so the dye can penetrate the grain. If you don't have a pro-grade solvent, 70% isopropyl alcohol works in a pinch. To check if you're ready, try the water drop test. Place a single drop of water on the surface. If it sits there for more than 30 seconds without soaking in, your dye will bounce off and leave a mess.
Applying Dye to Bone-Dry Leather
If you're wondering why is my leather dye blotchy, look at the moisture level. Bone-dry leather acts like a thirsty sponge. It grabs the first drop of pigment and holds it in one spot, preventing it from spreading. Professional crafters use "casing," a process of lightly misting the leather with water until it's cool to the touch. This moisture creates capillary action. It allows the dye to travel through the fibers smoothly instead of crashing into them, resulting in a 40% more uniform color distribution.
The "Stop and Start" Error
Consistency is everything. Why is my leather dye blotchy? Often, it's because the maker stopped mid-panel. You must maintain a "wet edge" at all times. If the dye dries for even 20 seconds before you overlap the next stroke, you'll see a dark line. Plan your path of travel across the hide. Use large, circular motions and never lift your applicator until you reach a natural edge or seam. This ensures the pigment blends into itself while it's still liquid.
How to Apply Leather Dye Evenly: Professional Techniques for Beginners
Stop using dye straight from the bottle if you want a professional finish. Most high-quality dyes are heavily concentrated; applying them at full strength is the fastest way to end up with a muddy, over-saturated mess. At Hab-To, we've seen how a few simple adjustments in technique can transform a project from amateur to artisan quality.
The Power of Dilution and Layering
Dilution is your best friend. For most projects, a 50/50 mix of dye and reducer provides much better control than a concentrated pour. If you're using alcohol-based dyes, choose a dedicated dye reducer or high-grade denatured alcohol. For oil-based pigments, stick to the manufacturer's specific oil reducer to maintain the chemical balance. Three light coats will always look better than one heavy coat. This approach prevents the leather from reaching a "saturation point" where it can no longer absorb pigment, which often explains why is my leather dye blotchy or sticky to the touch.
The Circular Motion vs. Linear Strokes Debate
Linear strokes are a recipe for disaster on large surfaces. They create visible start and stop marks that are nearly impossible to buff out. Instead, use small, tight circular motions to break the surface tension of the leather fibers. This allows the dye to penetrate deeply and evenly across the grain. For edges and small details, a wool dauber works well, but for large panels, a dense sponge or an airbrush is superior. If you're working on a large hide, use the "cross-hatch" method: apply your first diluted layer horizontally, your second vertically, and your third diagonally. This 3-way coverage ensures no fiber is left thirsty.
Wetting the Leather: The Damp Sponge Secret
Professional makers often use a 30-second prep step that beginners skip: casing the leather with distilled water. Lightly wipe the surface with a damp sponge before dyeing. You don't want to soak the hide; it should be damp to the touch but not changing color significantly. This moisture acts as a vehicle, pulling the dye into the grain rather than letting it flash-dry on the surface. To ensure you have the right applicators for this process, Check out our favorite leatherworking tools for the perfect application.
Don't forget to buff vigorously with a clean cotton cloth between every single coat. This removes excess pigment "bronzing" before it has a chance to dry into a metallic, iridescent film. By removing that surface residue, you ensure the next layer of dye can actually reach the leather fibers. If you're looking to upgrade your workshop with premium materials that respond perfectly to these techniques, browse our hand-selected leather collection today.
Salvaging a Blotchy Project: Mike’s Tips from Hab-To Leather House
Hi, I'm Mike! If you're staring at your workbench wondering why is my leather dye blotchy, don't throw that hide away just yet. In my experience, a patchy dye job isn't a failure; it's often the first step toward a high-end, vintage look. Most blotches can be "designed" out of existence by adding layers of depth. You aren't fixing a mistake. You're evolving the piece into something with more character. Knowing why is my leather dye blotchy helps you prevent it next time, but right now, we focus on the fix.
If the blotchiness covers more than 20% of the surface, you might consider the "nuclear option." This involves using a professional deglazer or high-grade acetone to strip back the finish. It's a harsh process that requires re-hydrating the leather with neatsfoot oil or a heavy conditioner afterward, but it provides a clean slate. However, before you reach for the chemicals, try these creative pivots first.
When to Go Darker: The Sunburst and Antique Fix
The easiest way to hide a central patch is the "Sunburst" or "Ombre" technique. By applying a darker shade like Dark Brown or Mahogany to the edges and blending it toward a lighter center, you draw the eye away from inconsistencies. It turns a flat, failed dye job into a professional "mahogany burst" finish. Antique pastes and gels are your best friends here. These thick pigments settle into the lower grain and "low spots," which evens out the visual texture by 50% or more. A darker edge burnish further anchors the piece, making any remaining center variations look like intentional patina.
Starting with Better Leather: The Hab-To Philosophy
At Hab-To Leather House, we rely on 160 years of family experience to select our stock. We've found that blotchiness often stems from inconsistent grain density in lower-grade hides. Premium leathers like Shell Cordovan or Pueblo have a tighter fiber structure. This means they absorb dye with much higher predictability than mass-produced alternatives. When you use hand-selected, vegetable-tanned hides, you're starting with a canvas that wants to cooperate. Our philosophy is simple: No synthetics. No compromises. If you want to avoid the headache of uneven finishes, start with materials that respect the craft. Browse our premium, dye-ready vegetable tanned leathers to see the difference for yourself.
Master Your Next Dye Project
A patchy finish isn't just bad luck. It's usually the result of the 5 common prep mistakes we explored or the hide's natural grain density. By applying Mike's circular buffing techniques and ensuring your leather is properly cased, you can stop asking why is my leather dye blotchy and start producing professional results every time. Great craft requires a solid foundation. At Hab-To Leather House, we use 160+ years of family expertise to hand-select sustainable, vegetable-tanned hides that take dye predictably and age beautifully. We don't do synthetics and we don't make compromises. Whether you're making your first belt or your hundredth bag, we offer no minimum order requirements to support every level of maker. You've got the skills and the tips to salvage your project. Now, give yourself the advantage of premium materials that work with you, not against you. Let's get back to the workbench and make something incredible.
Shop Premium Veg-Tan Leather for Your Next Project
Frequently Asked Questions
Can I fix leather dye that has already dried blotchy?
Yes, you can fix dried blotchy dye by applying a light, circular coat of a 50/50 dye and reducer mix. This helps reactivate the surface pigment and blend the uneven patches together. If the color's already too dark, use a professional deglazer to strip 15% to 20% of the surface finish before attempting to re-dye the area. It's a reliable way to solve the problem of why is my leather dye blotchy without discarding your project.
Does oil-based dye work better than alcohol-based dye for preventing patches?
Oil-based dyes, often labeled as Pro Dyes, penetrate the fibers more slowly and provide a more even finish than alcohol-based alternatives. Alcohol evaporates in under 60 seconds, which often leads to lap marks where strokes overlap. By using an oil-based formula, you gain a 4 minute window to buff and blend the pigment before it sets into the grain, resulting in a professional, uniform look.
Is it better to use a sponge or a wool dauber to apply leather dye?
A damp, high-density sea sponge is superior for large surfaces because it holds more liquid and distributes pressure evenly across the hide. Wool daubers are great for small 1 inch edges, but they often leave streak trails on wider panels. I recommend using a sponge in a circular motion to ensure the pigment reaches every fiber without leaving those frustrating start and stop marks that ruin a clean finish.
Why did my leather turn "bronze" or metallic after dyeing?
Bronzing happens when the leather is oversaturated and excess pigment dries on the surface rather than soaking into the fibers. This metallic sheen appears if you apply more than 3 heavy coats without buffing between layers. To fix this, take a soft cotton cloth and buff the area vigorously for 2 minutes to remove the crystallized pigment and restore the true matte or satin color you intended.
How long should I wait between coats of leather dye?
You should wait at least 20 to 30 minutes between light coats to let the solvents evaporate properly. While the surface might feel dry to the touch in 5 minutes, the internal fibers need more time to stabilize and accept more pigment. For the best final result, let the piece sit for a full 24 hours before applying a finish or top coat to prevent the colors from bleeding or shifting.
Does the grade of leather (Full Grain vs. Top Grain) affect blotchiness?
Full grain leather is more susceptible to uneven coloring because its natural pore structure varies in density by up to 30% across a single hide. Areas near the neck or belly absorb liquid faster than the tight grain of the butt. Understanding this helps explain why is my leather dye blotchy; the material's natural openness dictates how much pigment stays on top versus sinking deep into the material.
Can I use olive oil or mink oil to even out a blotchy dye job?
Avoid olive oil because it can go rancid within 6 to 12 months and damage the leather fibers from the inside out. Instead, use pure Neatsfoot oil or a high quality mink oil paste to hydrate the leather and blend minor color inconsistencies. Applying a light layer of Neatsfoot oil 24 hours after dyeing can darken the lighter patches by about 10%, creating a much more uniform appearance.
What is the "water drop test" and how does it help with dyeing?
The water drop test involves placing a single bead of water on the leather surface to see if it soaks in within 30 seconds. If the water beads up and stays on top, a factory finish or wax is blocking the surface, and your dye will definitely turn out blotchy. If it sinks in and darkens the spot immediately, your leather is thirsty and ready to accept a professional dye job evenly.
