




Artisan Guide to 12mm Snagg Fasteners for Leathercraft
A single loose fastener can transform a bespoke leather wallet from a lifetime heirloom into a drawer-bound disappointment. You've likely spent hours meticulously edge-finishing a piece of premium vegetable-tanned leather, only to have a low-quality snap tarnish or pull right through the grain. It's a common frustration that often stems from the confusing terminology and varying quality of hardware available today. Finding a reliable 12mm snagg shouldn't feel like a gamble when your reputation and your craft are on the line.
I understand that deep respect you have for your materials. You don't want to make concessions on quality after investing in premium hides from world-class tanneries. This guide is designed to help you master the selection and installation of 12mm snagg fasteners; ensuring your work remains both durable and professional. We will explore the mechanical differences between spring and ring snaps, the importance of REACH-compliant finishes, and the specific setting techniques that prevent waste. By the end, you'll have the confidence to pair high-end hardware with the finest leathers to create products that truly last a lifetime.
Key Takeaways
- Discover why the 12mm snagg is the ideal mid-sized fastener for balancing holding power with a sleek, professional aesthetic on small leather goods.
- Learn how to select the perfect hardware finish—from Gold to Gun Metal—to complement the unique aging process of vegetable-tanned hides like Badalassi Pueblo.
- Master the technical requirements of post length and leather weight to ensure your fasteners clinch securely without damaging the grain.
- Follow a precise, step-by-step installation guide using professional-grade punches and setters to eliminate hardware failure.
- Understand the advantage of sourcing professional-grade hardware with no minimum order quantity to maintain artisan standards for every project.
Understanding the 12mm Snagg: The Versatile Choice for Leatherwork
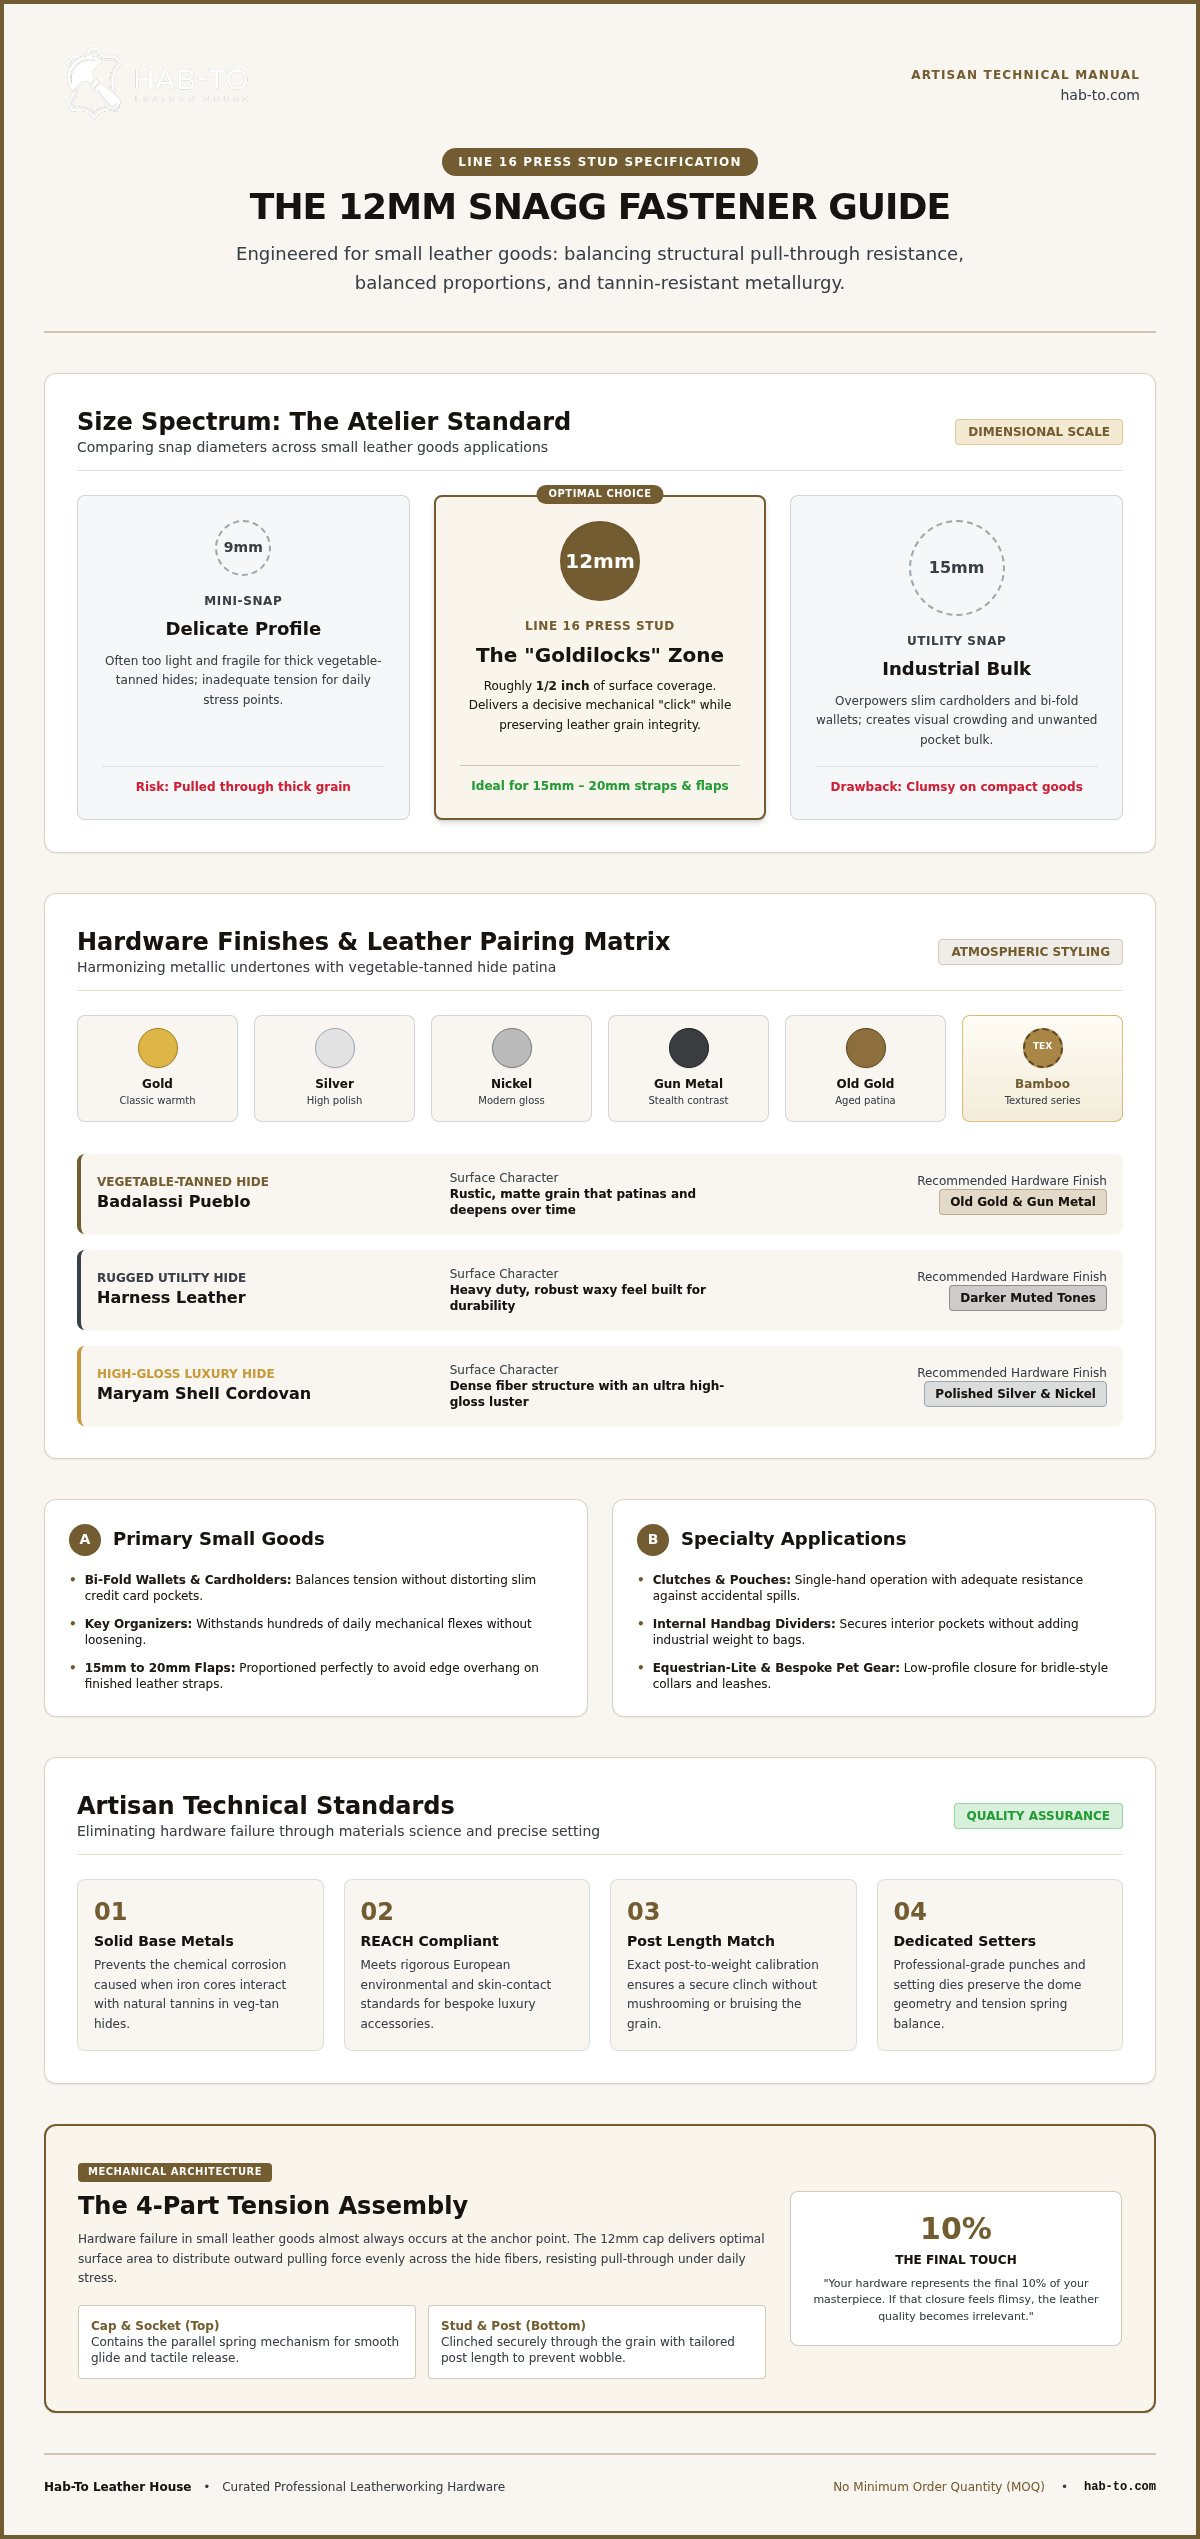
The 12mm snagg is the workhorse of the modern leather atelier. Often referred to as a Line 16 press stud; this mid-sized fastener offers a secure mechanical lock without the industrial bulk of larger alternatives. It's specifically engineered for daily-use goods where reliability is non-negotiable. When you're working with high-quality vegetable tanned leather, the hardware must match the integrity of the hide. A 12mm cap provides enough surface area to distribute tension evenly, preventing the fastener from pulling through the grain over time.
Technically, snap fasteners work through a four-part assembly that relies on precise tension. The 12mm snagg sits in the "goldilocks" zone of leathercraft. While 9mm mini-snaps are often too delicate for thick veg-tan and 15mm utility snaps can look clumsy on a slim wallet, the 12mm size offers a refined silhouette. It provides roughly half an inch of coverage. This is substantial enough for a satisfying "click" but subtle enough to let your stitching and leather choice take center stage.
To better understand how these components come together in a professional build, watch this helpful video:
Why 12mm is the Industry Standard for Small Goods
Professional makers gravitate toward this size for bi-fold wallets, card holders, and key organizers for a reason. It fits perfectly on a standard 15mm to 20mm strap or flap without hanging over the edges. At Hab-To, I believe that your hardware represents the final 10% of your masterpiece. If that closure fails or feels flimsy, the quality of the leather becomes irrelevant. Using a 12mm snagg ensures that the visual proportions remain balanced, keeping the focus on the natural beauty of the material.
Common Applications in Professional Leathercraft
Beyond simple wallets, these fasteners are essential for securing flaps on small clutch bags and pouches. They provide enough resistance to keep contents safe while remaining easy to open with one hand. I often see them used in equestrian-lite applications, such as bespoke bridle-style accessories or premium pet gear, where a secure but low-profile closure is required. For those creating larger handbag leather projects, these snaps serve as excellent internal pocket closures, offering organization without adding unnecessary weight to the overall structure.
Selecting the Right Finish and Type for Your Project
Selecting the finish is an essential step in your design process. Unlike the generic, mixed-color kits found on mass-market platforms, professional hardware must withstand the natural acidity of vegetable-tanned hides. I offer finishes in Gold, Silver, Nickel, Gun Metal, and Old Gold to ensure your 12mm snagg matches your artistic vision perfectly. For those seeking a distinctive, high-end look, my Bamboo collection provides a textured design that adds a layer of sophistication to bespoke pieces. It's these small details that separate an amateur project from a professional-grade accessory.
Matching Hardware to Your Leather’s Character
The patina of your chosen hide should dictate your hardware choice. If you're working with Pueblo leather, the rustic, matte surface pairs beautifully with Old Gold or Gun Metal. These finishes don't just sit on top of the leather; they settle into the aesthetic as the material darkens over time. For rugged Harness leather projects, these darker tones maintain a vintage, lived-in feel. Conversely, the high-gloss finish of Maryam Shell Cordovan often demands the sharp contrast of high-polish Silver or Nickel to highlight its luxury status. I always emphasize using solid base metals for any 12mm snagg application. Low-grade iron cores will eventually rust when they meet the tannins in the hide, which inevitably ruins your hard work.
Spring Snaps vs. Ring Snaps: Which do you need?
Understanding the mechanical action is just as vital as the finish. Spring snaps utilize a parallel spring mechanism for a smooth, effortless glide. These are ideal for lighter projects between 1.0mm and 1.5mm where you want a refined user experience. If you're building a heavy-duty belt or using thick Vaccheta leather, you need the authoritative "click" of a ring snap. Ring snaps offer higher resistance, which is critical for items under constant physical tension. When deciding, consider the snap fastener retention standards required for your specific application. You want a closure that stays shut during movement but remains accessible for the end-user. If you're looking to experiment with different styles, my hardware and tool bundles provide a curated selection to help you find the right mechanical feel for your craft.
Compatibility: Matching 12mm Snaggs to Leather Weights
The mechanical bond of a 12mm snagg relies entirely on the relationship between the post length and the leather thickness. I've seen many beautiful projects ruined because the fastener didn't properly clear the hide. If the post is too short, the clinch will be weak; if it's too long, the snap will wobble. For a professional result, the post should emerge approximately 1.5mm to 2.0mm beyond the flesh side before you strike the setter. This ensures enough material is available to roll over the stud or socket and create a permanent, secure lock.
When working with robust hides like Badalassi Pueblo, which typically measures between 2.2mm and 2.4mm, you're pushing the limits of standard hardware. Adhering to federal leather trade guidelines ensures material integrity, but it doesn't solve the mechanical fit. Here is my "Skiving secret": use a sharp French skiver to thin the leather locally around the hole on the flesh side. By reducing the thickness to roughly 1.8mm just where the 12mm snagg sits, you achieve a flush fit that looks intentional and high-end without compromising the overall strength of the piece.
Working with Thick Vegetable-Tanned Hides
Precision starts with measurement. Don't guess the weight of your leather; use a proper thickness gauge to get an accurate reading in millimeters. A 12mm fastener generally requires a hole diameter between 3mm and 4mm. If the hole is too tight, you risk stretching the grain and creating unsightly stress marks around the cap. If you're working with thinner linings or softer skins, I recommend using reinforcement tapes or Texon. Adding a small circle of Texon between the leather layers provides the structural support needed to prevent the hardware from tearing through over time.
The Role of Leather Density in Fastener Retention
Density is just as important as thickness. A dense material like Shell Cordovan offers incredible resistance, allowing the hardware to bite deeply and stay put. In contrast, "spongy" leathers or softer Vaccheta hides have more give, which can lead to the "spinning snap" syndrome. This happens when the fastener isn't compressed enough to grip the fibers. To prevent this, ensure your anvil is perfectly flat and your strike is vertical. Post-set tension is the key to hardware longevity, representing the constant internal pressure that keeps the fastener from shifting during daily use.
How to Install 12mm Snaggs: A Step-by-Step Guide
Installing a 12mm snagg is the moment where your hours of preparation meet the hammer. This process is binary; the hardware either seats perfectly or it compromises the entire project. Success depends entirely on your preparation and the quality of your tools. Before you strike your first blow, you must ensure your workspace is stable and your components are organized. I always recommend a "dry fit" to confirm that your post length is appropriate for the leather thickness you selected in the previous section.
What You Will Need
- 12mm Snagg fastener sets: Choose from Gold, Silver, or Gun Metal to match your design.
- Setter tool and anvil: Professional grade dies from my tools collection ensure the cap isn't crushed.
- Punching tool: A 3mm or 4mm head from an leather craft tool die punch set.
- Adhesive: EcoStick 1804 glue to keep decorative caps from shifting during the set.
- Mallet: A poly or rawhide mallet. Never use a metal hammer on your setting tools.
Step one involves precise marking. Use a wing divider to ensure your center point is consistent across all panels. Once marked, use your leather craft tool die punch to create a clean, debris-free hole. If any leather fibers remain in the hole, the fastener will sit unevenly. Step two is alignment. Place the cap through the grain side and fit the socket onto the post. For the male side, the stud sits on the post emerging from the flesh side. I often apply a tiny drop of EcoStick 1804 glue to the underside of the cap rim to prevent rotation during the strike.
Step three is the setting strike. Place the cap into the concave anvil and hold the setter perfectly vertical. Strike once with a firm, decisive blow. Avoid multiple light taps, as this can cause the metal to work-harden and crack. Finally, step four is testing. Snap the fastener shut and open it several times. Check for any leather deformation or "spinning" hardware. A successful 12mm snagg installation should feel like a single unit with the leather, offering a crisp, mechanical click every time.
Common Installation Mistakes to Avoid
The most frequent error is setting the hardware too close to the edge. This creates a "blowout" risk where the tension eventually tears through the leather margin. Maintain at least 4mm of space between the hole and the edge. Another common mistake is using a metal hammer. This causes the top of your setter to "mushroom," eventually ruining the tool and potentially glancing off to mar your leather. Lastly, always clear your punch. A hole filled with leather dust prevents the fastener from seating flush against the grain.
Sourcing Professional Hardware with Hab-To Leather House
Finding the right source for your hardware is often the hardest part of the artisan journey. I've spent 25 years selecting components that don't tarnish, flake, or fail under pressure. At Hab-To, I focus on providing a professional-grade 12mm snagg that meets the same rigorous standards as the premium hides I stock. Most wholesalers require massive bulk orders that are inaccessible for small ateliers. I've removed that barrier. I offer a "No Minimum Order Quantity" policy so you can buy exactly what your current project requires without overstocking.
My location in Amsterdam allows me to serve the European community without the headache of customs delays or hidden VAT. If you're a crafter within the EU; you shouldn't have to wait weeks for hardware to arrive from overseas. I source my materials sustainably within the region to ensure consistent quality and ethical production. For those just starting a serious journey in this craft; I recommend the Leathercraft Master Bundle. It provides a foundational set of tools and materials to get your workshop moving in the right direction.
Why Quality Hardware Defines Your Brand
Your brand is built on the tactile experience your customer has with your finished product. A cheap, lightweight snap feels hollow and unreliable. In contrast, a high-end 12mm snagg provides a satisfying resistance that communicates value. Hardware failure is the leading cause of customer returns and permanent brand damage. By pairing premium Italian Leather with matched professional hardware; you position your work as a luxury heirloom rather than a temporary accessory. It's about making no concessions on quality.
Get Expert Advice from Mike
I'm not just a supplier; I'm here to support your growth as a maker. If you're unsure which finish or tension is right for your specific project; you can book a free 1-on-1 video consultation with me. We can look at your design together and find the perfect fit. For those who want to dive deeper into the technical side; the "Leather Hour" podcast offers hours of education on hardware and materials. If you're in the area; visit our Amsterdam showroom at Keienbergweg 97 to feel the weight and quality of the hardware in person.
Elevate Your Craft with Professional Hardware
Mastering the 12mm snagg represents a turning point in your leatherworking journey. It's the moment your design moves from a hobbyist experiment to a professional-grade accessory. By applying the precise installation techniques we've discussed and matching your hardware finishes to the unique patina of Italian hides; you're building products that command respect. I've spent decades learning that the smallest components often carry the heaviest burden of quality. Every click of a fastener should reinforce the value of your work.
Hab-To is built on 160 years of family expertise and a commitment to sustainable, high-end materials. I don't believe in forcing artisans into bulk purchases they don't need. That's why we offer professional hardware with no minimum order quantity and reliable worldwide shipping from our Amsterdam showroom. You get the tools and findings you need to succeed; vetted by someone who shares your passion for the craft. Your dedication deserves hardware that never makes a concession on durability or style.
Your work deserves to be finished with the same care you put into every stitch. I'm excited to see what you create with these professional standards in mind. Keep pushing the boundaries of your craft.
Frequently Asked Questions
What is the difference between a 12mm snagg and a standard press stud?
A 12mm snagg is a specific type of press stud engineered with a lower profile and smoother edges to prevent catching on fabric or skin. While "press stud" is a broad category, the 12mm snagg refers to the medium-sized Line 16 fastener favored for small leather goods. It provides a more refined aesthetic than generic industrial hardware, making it the preferred choice for high-end vegetable-tanned projects.
Can I use 12mm snaggs on leather thicker than 3mm?
Using a standard 12mm fastener on leather thicker than 3mm is generally not recommended without modification. Most hardware in this size has a post length designed for materials between 1.4mm and 2.4mm. If your hide exceeds 3mm, the post won't clear the flesh side enough to roll securely. In these cases, you must skive the leather locally to reduce thickness or choose hardware with an extra-long post to ensure a permanent bond.
Do I need a heavy-duty press to install 12mm metal fasteners?
You don't necessarily need a heavy-duty floor press, though a manual hand press can increase consistency. For most artisans, a high-quality hand-setting tool and a concave anvil are perfectly sufficient for installing a 12mm snagg. The key is using a poly or rawhide mallet to apply firm, vertical pressure. This method allows for greater portability and control, which is often preferred by makers working on bespoke projects in smaller workshops.
Will these snaps rust if my leather project gets wet?
Our hardware is specifically selected to resist corrosion, but the base metal choice is the most important factor. We provide finishes like Old Gold and Gun Metal over solid base alloys to prevent the rusting often seen with cheap iron-core snaps. While vegetable-tanned leather contains natural acids that can react with low-grade metals, our professional-grade fasteners are designed to withstand moisture and atmospheric changes without staining your leather.
Which finish is best for a traditional brown vegetable-tanned wallet?
Old Gold or Antique Brass finishes are the most popular choices for traditional brown vegetable-tanned wallets. These warmer tones complement the natural tannins and the rich patina that develops as the leather ages. If you prefer a more contemporary look, Gun Metal provides a sharp, sophisticated contrast against dark brown hides. I often suggest matching the hardware to your thread color or other metal components like zippers to create a cohesive design.
What happens if I set the fastener too tightly?
Setting a fastener too tightly can crush the internal spring mechanism or deform the surrounding leather grain. If you apply excessive force, the socket may lose its "snap" action, making the closure difficult to open or prone to failure. You might also notice an unsightly ring or depression in the leather surface. Aim for a firm clinch where the hardware doesn't spin, but stop before the metal begins to bite into the fibers.
Can I remove a 12mm snagg if I make a mistake during installation?
Yes, you can remove a 12mm fastener using specialized nippers or by carefully drilling out the center of the post. However, removal often leaves a slightly enlarged hole or marks on the leather surface. To minimize damage, work from the flesh side and avoid prying against the grain. If the leather is marked, you might need to use a decorative washer or a slightly larger fastener to hide the previous installation point.
Are your 12mm fasteners compatible with the KAMsnaps DK93 press?
Our metal fasteners are generally compatible with universal hand presses, but they require specific dies designed for 12mm hardware. The KAMsnaps DK93 press usually requires an adapter to fit standard metal snap dies. Before installation, ensure your die set matches the cap diameter and the post style of our snaps. If you're unsure about your specific setup, I recommend booking a free video consultation to verify tool compatibility before starting your project.
Disclaimer
All our blog articles are made for information purposes only we dont take responsability for any content from third parties.