




Designing a Minimalist Leather Cardholder: A Practical DIY Guide
What if the slimmest cardholder isn’t the one with the fewest pockets, but the one designed around the cards you actually carry? Designing a minimalist leather cardholder starts with that question. It’s easy to add extra slots “just in case,” then end up with a wallet that feels bulky or lets cards shift around.
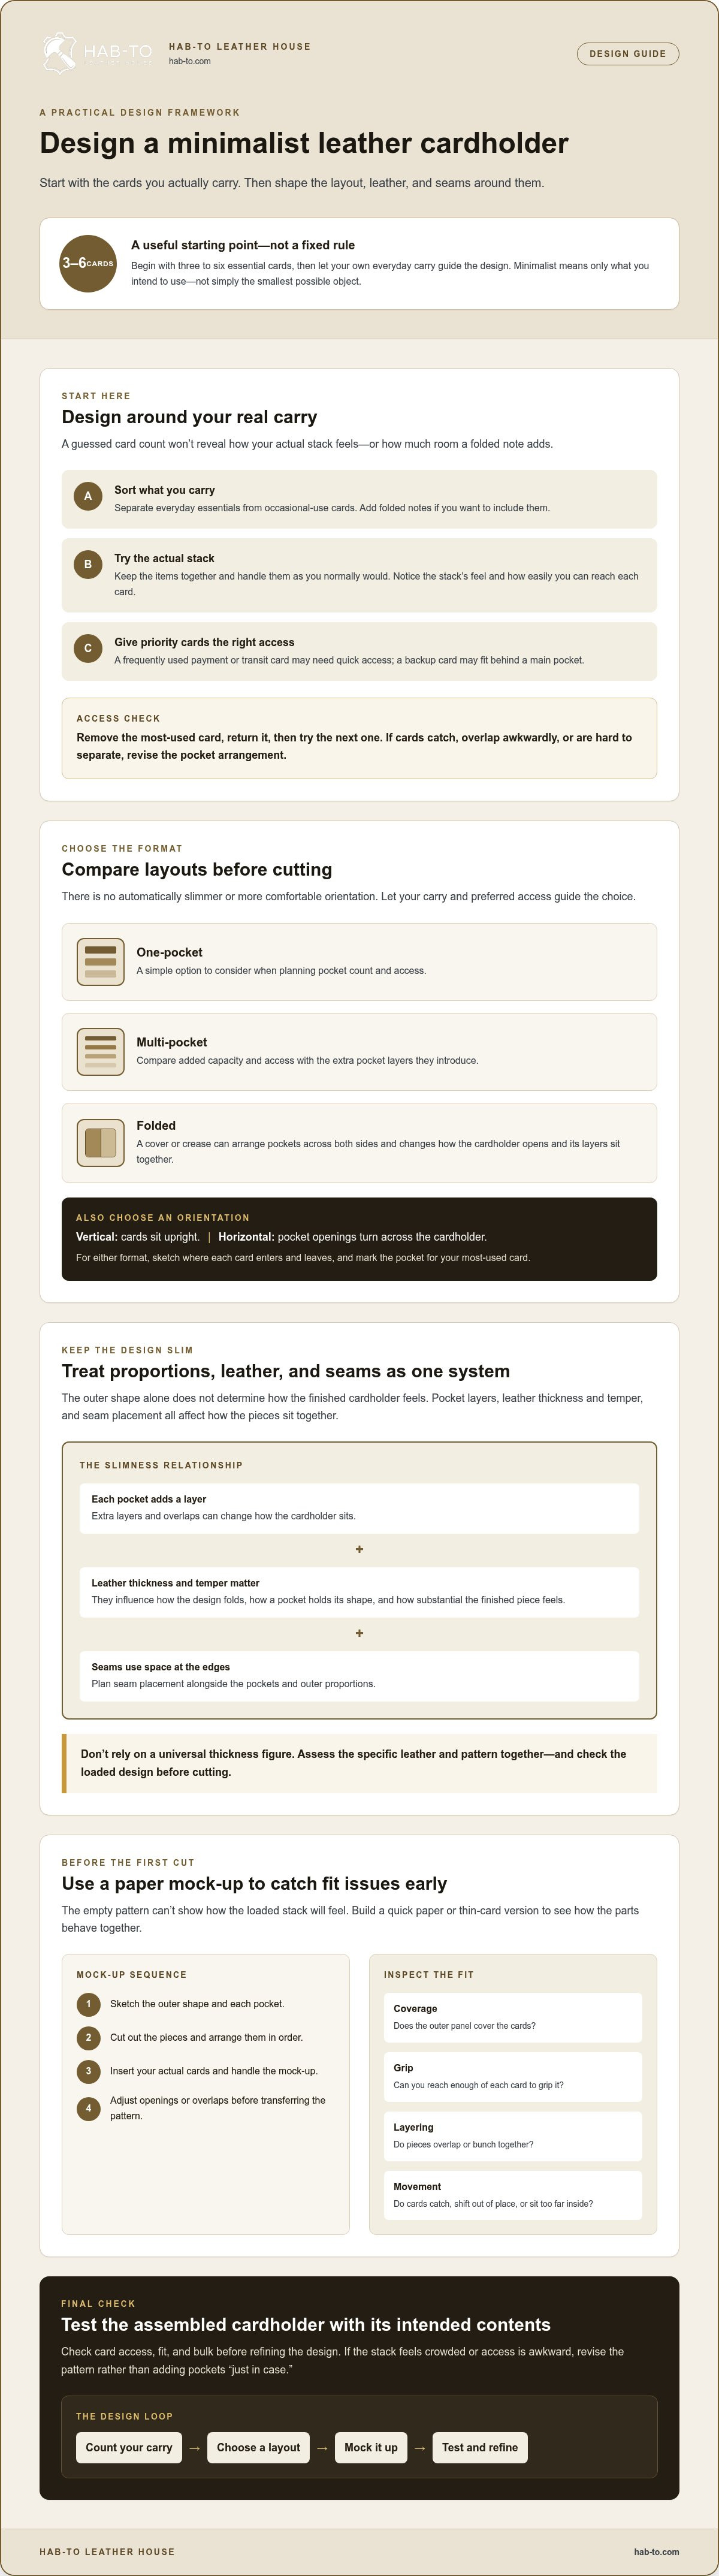
You don’t need a complicated pattern to make a practical cardholder. Start by counting your everyday cards, then plan the layout and test its proportions with a paper mock-up before cutting leather. Three to six essential cards can be a useful starting point, but let your own carry guide the design.
In this guide, you’ll learn how pocket layout, leather temper, and seam placement work together to shape a slim, useful cardholder. You’ll also compare common layouts and make material and construction choices before the first cut. Small details matter. Plan them well, and your finished piece can feel thoughtfully made rather than overbuilt.
Key Takeaways
- Start with the cards and essentials you plan to carry, then use that list to choose your pocket count and layout.
- When designing a minimalist leather cardholder, consider how pocket layers, leather temper, and seam placement affect bulk.
- Compare one-pocket, multi-pocket, and folded layouts to balance access, capacity, and construction complexity.
- Test your paper mock-up and revise the pattern before cutting leather to catch fit issues early.
- Test the assembled cardholder with its intended contents, checking card access, fit, and bulk before refining the design.
Start designing a minimalist leather cardholder by defining what it must carry
Decide what the cardholder needs to hold before choosing its pocket count or dimensions. Minimalist doesn’t mean making the smallest possible object. It means carrying only the cards and essentials you intend to use, in a layout that makes them easy to reach.
Gather the cards you carry now and sort them into everyday essentials and occasional-use cards. Add any folded notes you want to include. Stack the items together and handle them as you normally would. A guessed card count won’t show how the actual stack feels or how much room a folded note adds. Capacity affects the finished cardholder’s thickness, proportions, and how easily you can access each card.
For a little context, the modern bi-fold wallet reflects the shift toward dedicated card slots, which developed in the 1950s. Your design can be simpler, but it still needs to suit the way you use it.
Watch this small-wallet project for a visual look at the making process:
List the cards and essentials your design needs to hold
Separate the cards you reach for often from those that can sit behind a main pocket. Your primary payment or transit card may need quick access; a backup card may not. This distinction helps you decide which pocket goes on the outside and which items can share a deeper layer.
Keep the stack together while you test it. Try removing the most-used card, then return it and access the next one. If cards catch, overlap awkwardly, or are difficult to separate, adjust the pocket arrangement before committing to a pattern.
Choose a starting format: vertical, horizontal, or folded
A vertical format places cards upright, while a horizontal one turns the pocket openings across the cardholder. Either can put frequently used cards within easy reach; the better choice depends on how you prefer to hold and access your wallet. A folded format adds a cover or crease and can arrange pockets across both sides, changing how the cardholder opens and how its layers sit together.
Sketch each option simply. Mark where every card enters and leaves, and show which pocket holds your most-used card. Imagine pulling it out with one hand. No orientation is automatically slimmer or more comfortable, so let your everyday carry and preferred access guide the choice.
Choose cardholder proportions, leather, and seams to keep the design slim
A slim result comes from several decisions working together. Each pocket adds a layer, the leather’s thickness and temper affect how those layers sit, and seams take up space along the edges. Designing a minimalist leather cardholder means planning these details as one system, rather than drawing an outer shape first and hoping the finished piece stays slim.
Test the cardholder at its intended loaded thickness before you cut leather; the empty pattern can’t show how the finished stack will feel. Keep that principle in mind as you refine the proportions. Even a small overlap or an extra pocket layer can change how the cardholder sits in a pocket.
Test proportions with a paper or card mock-up
Sketch the outer shape and each pocket on paper or thin card. Cut out the pieces and arrange them in the order they’ll sit. Check whether the outer panel covers the cards, whether the openings leave enough room to grip a card, and where layers overlap. The mock-up doesn’t need to look polished. It needs to show how the design behaves.
Put your actual cards into the mock-up and handle it as you would the finished piece. Try accessing each pocket. If a card catches, shifts out of place, or sits too far inside to grip, adjust the opening or overlap. If several layers bunch together, simplify the pocket arrangement before transferring the pattern to leather.
Match leather choice and seam placement to the design
Leather thickness and temper influence how a design folds, how well a pocket holds its shape, and how substantial the finished cardholder feels. Firmer leather may support a pocket differently from more flexible leather, while a folded layout needs to bend comfortably at its crease. Don’t rely on a universal thickness figure: assess the specific leather and pattern together, and check the supplier’s details before settling on dimensions.
Hab-To Leather House focuses exclusively on vegetable-tanned leather. Browse its vegetable-tanned leather options and consider which flexibility, thickness, and construction your mock-up calls for. If you’re sourcing materials for a project, its leather crafting bundles are another option to explore.
Plan seam lines before cutting. Keep them clear of the card’s path so stitching doesn’t obstruct insertion or removal. Check how the seam allowance affects the pocket edge and overall outline, then revisit the loaded mock-up with the stitch lines marked. The pattern is ready for the next stage when the cards move easily, the layers sit flat, and the proportions suit the way you’ll carry it.
Compare minimalist leather cardholder layouts before cutting your pattern
Now that you’ve mapped your carry, compare how different layouts organize it. Pocket count affects separation and access, while folds and overlapping panels change the number of layers. No format is automatically the slimmest: the loaded design, leather, and construction all matter.
Layout, capacity, and seam placement are linked decisions. Change one, and the balance of the whole cardholder can change. Use this comparison to narrow your options, then test the leading design with your actual cards before cutting leather.
| Layout | Access | Capacity | Layers and complexity |
|---|---|---|---|
| One-pocket | Cards share an opening, so the card you need may take a little sorting. | Best suited to a compact carry list that can share one space. | Fewer pocket pieces can simplify the pattern; construction still depends on the chosen shape and seams. |
| Multi-pocket | Separate pockets let you assign cards by use and reach for a specific one. | Supports more separation, but useful capacity depends on the pattern and intended contents. | Additional pockets add layers and planning; openings must remain accessible. |
| Folded | Cards can be arranged across the inside, with access depending on the pocket layout. | Can organize cards on more than one side of the fold. | The fold and interior pockets affect layers and construction; careful pattern planning is important. |
Compare one-pocket and multi-pocket cardholder designs
A one-pocket design keeps the arrangement straightforward, but cards sit together rather than in separate slots. That may suit a maker who carries a small, consistent set and doesn’t mind sorting. Multi-pocket layouts make it easier to give a quick-access card its own place, but each added pocket introduces another layer. Choose separation you’ll use, not extra pockets added only for appearance.
Decide whether a folded or flat cardholder suits your use
A flat cardholder keeps its pockets on one plane; a folded design organizes them around a crease. Think about how you retrieve a card and where you carry the wallet. Sketch the openings and simulate reaching into each pocket. A closure or hardware can be included if it serves your design, but neither is required. Compare both mock-ups loaded with your intended cards; their feel depends on the pattern and materials.
When designing a minimalist leather cardholder, choose the format that makes your everyday cards easy to reach without adding layers you don’t need. Let function lead, then refine the look.
Plan your pattern and gather what you need before making a leather cardholder
A little preparation makes the first cut more deliberate. Follow this order: finalize your carry list, build a mock-up, revise the pattern, choose materials, then cut. Designing a minimalist leather cardholder is easier when the pattern has already been tested with the cards it’s meant to hold.
Make and revise a pattern before cutting leather
Draw the outer shape and each pocket piece. Mark any fold or overlap, then add the planned stitch lines so you can see where the layers meet. Use the paper or card mock-up with your intended cards. Check that pockets cover them as planned and that you can slide each card in and out without catching.
Make changes on the mock-up first. Once the layout works, transfer the pattern and label every piece, including its position and orientation. Clear labels help prevent a pocket from being cut or assembled the wrong way around. Base dimensions on your tested pattern and the leather you select, not guesswork.
What you will need for a simple cardholder project
Gather supplies to suit your pattern and preferred construction method. Use these categories as a starting point, then check that each material or tool fits the task:
- Leather: Choose vegetable-tanned leather that suits your pattern. Hab-To Leather House offers leather in smaller quantities, including cuts and panels, for makers planning individual projects. Browse the vegetable-tanned leather selection and review the details before choosing.
- Pattern and marking supplies: Keep your tested pattern and a way to mark its outlines, pocket positions, and stitch lines on hand.
- Cutting and stitching tools: Select tools suitable for your leather and construction method, along with thread if you’re stitching the piece. Browse the leatherworking tools and check individual tool details. If your chosen edge method calls for an edge beveler, confirm that the tool is appropriate before use.
- Finishing materials: Choose these based on the finish you plan to use. If Tokonole suits your edge-finishing method, explore the Tokonole bundles and review their contents.
A closure or other hardware is optional. If you add one, mark its position on the pattern and make sure it won’t obstruct card access or interfere with a fold. Beginner makers can also review the contents of the beginner starter bundles when deciding which supplies may suit their project.
Before cutting, check that your pattern, leather, and chosen tools work together. This makes the making process clearer and helps you avoid discovering a mismatch partway through.
Build, test, and refine your minimalist leather cardholder
With the pattern and materials ready, assemble the pieces in the order your design requires. First, check that each cut piece matches its pattern and arrange the layers in their intended positions. If your method calls for adhesive to hold pieces in place, use it as directed. Then stitch according to your pattern and experience, taking care not to close a pocket opening by mistake. The right sequence depends on your layout, so plan it before joining the layers.
Work steadily, not hurriedly. Small alignment differences can affect how a pocket opens or how the finished edges meet. Pause between steps to compare your work with the pattern. If a technique is unfamiliar, consult a trusted leatherworking resource before proceeding.
Check fit, access, and bulk with the cardholder loaded
Once assembled, add the cards and any folded note the design is meant to hold. Try removing the cards you reach for most, then return them to their pockets. Check the fit in your hand and, if relevant, in the pocket where you plan to carry it.
- Do the pockets stay close to the cards, or do they gape?
- Do cards shift, catch, or feel awkward to remove?
- Do the layers feel thicker than you expected when the cardholder is loaded?
Use what you notice as feedback, not as a reason to force a poor fit. A pocket that feels too tight or loose may call for a pattern adjustment in a future version. Record what you’d change while the details are fresh. Those adjustments are specific to your pattern, leather, and carry, not guaranteed fixes for every design.
Finish the project and choose a useful next step
Before calling the project complete, inspect the seams for missed or uneven stitching, check that the edges are finished as intended, and test each pocket again. Confirm that cards can be inserted and removed without stitching obstructing the opening. If you included optional hardware, check that it works as planned and doesn’t interfere with access.
For a future build, compare the leather and supplies to your pattern before choosing materials. Hab-To Leather House supplies vegetable-tanned leather in smaller quantities, including cuts and panels, as well as crafting bundles. Browse the vegetable-tanned leather selection when planning another project.
Each handmade piece offers a chance to refine your pattern and process. Keep your notes, make one considered adjustment at a time, and let your next project build on what you learned.
Put your cardholder plan into practice
A useful cardholder begins with a clear carry list and a pattern tested before cutting. Consider how pocket layout, leather, and seam placement affect access and bulk, then check the finished piece with its intended contents. Designing a minimalist leather cardholder is a process of making choices, testing them, and refining the details to suit your everyday use.
For your next reading session, explore these related topics:
- Choosing leather for a small handmade project
- Planning pocket layouts and stitch lines
- Selecting optional hardware for leathercraft
Materials for your next project
Hab-To Leather House offers vegetable-tanned leather in small quantities, with no minimum order requirements, plus over 160 years of family leather expertise. If you’d like help choosing leather, Mike offers free one-on-one video consultations.
Browse vegetable-tanned leather
Start with a simple design, work carefully, and let each project teach you something. Your next handmade piece is ready to take shape.
Frequently Asked Questions
How many cards should a minimalist leather cardholder hold?
Design it for the cards you actually carry, rather than a maximum you might rarely need. Three to six essential cards can be a useful starting point, but your everyday carry should determine the capacity. Gather your cards, add any folded notes you want to include, and test the stack together. That shows how much room your design needs and helps you avoid adding pockets that create bulk without serving a purpose.
What leather is best for designing a minimalist cardholder?
Vegetable-tanned leather is a practical material to consider for a handmade cardholder. Look for a piece whose thickness and firmness suit your pattern: a design with a fold may need to bend comfortably, while pocket pieces need to suit the intended construction. There isn’t one specification that suits every pattern. Check the details of the leather you choose, and, if you’re unsure, ask a knowledgeable supplier for guidance.
Is a vertical or horizontal leather cardholder better?
Neither orientation is automatically better. A vertical layout places cards upright, while a horizontal design turns the pocket openings across the cardholder. Your choice comes down to how you hold it, where you carry it, and how you prefer to retrieve cards. Sketch both options and mark how cards enter and leave each pocket. Then test your preferred layout with the actual cards you plan to carry.
Can a beginner design and make a leather cardholder?
Yes. A cardholder can be a manageable first project if you keep the pattern clear and choose a construction method that fits your experience. Start with a paper or card mock-up, label each piece, and test the pockets before cutting leather. Work in a deliberate order, following your pattern and the instructions for your tools. Beginner crafting bundles can also help makers explore supplies suited to learning leathercraft.
How do I make a leather cardholder without making it bulky?
Plan the loaded design, not just the empty outline. Limit pockets to the separation you’ll use, test the stack of intended cards in a mock-up, and consider how pocket layers, leather, and seam placement affect the finished shape together. Look for overlapping layers that add bulk without improving access. If the loaded mock-up feels too thick, revise the layout before cutting leather rather than trying to force an unsuitable pattern to fit.
What tools do I need to make a leather cardholder?
Your tools depend on the pattern and construction method. Most projects call for a way to mark and cut leather, plus suitable stitching tools and thread if your design is sewn. You may also want materials for your chosen edge finish. Check that each tool suits the leather and technique you plan to use; there’s no universal tool list for every cardholder. Beginners can start with a simple pattern and add tools as needed.
Can I buy leather for just one cardholder project?
Yes. Hab-To Leather House has no minimum order requirements for leather purchases, and leather is available in smaller quantities such as cuts and panels. That can help you plan materials for a single project instead of buying a whole hide. Review the leather’s details against your pattern before choosing. If you’d like help deciding which leather may suit your cardholder, Mike offers free one-on-one video consultations.
Disclaimer
All our blog articles are made for information purposes only we dont take responsability for any content from third parties.