




Essential Leatherworking Tools: The Artisan’s Guide to Professional Crafting in 2026
Why do so many aspiring artisans spend hundreds on "complete" starter sets only to find their edges frayed and their stitches uneven? It's a common trap. You buy a beautiful piece of Shell Cordovan or a rustic Pueblo hide, but your budget leatherworking tools end up tearing the fibers instead of gliding through them. I've spent 25 years working with these materials. I've seen too many beginners lose heart because their gear didn't match their ambition.
You probably already know that quality leathercraft is a conversation between the artisan and the hide. If the tool is blunt or poorly designed, that conversation stops. I promise that this guide will help you master the art of leathercraft with an expert-led selection of gear designed for professional results. We will decode the confusion between pricking irons and chisels, explore the essential kit for 2026, and show you how to achieve that coveted artisan finish. You'll finally understand the tool-to-material relationship so you can produce professional results every time you step to the workbench.
Key Takeaways
- Learn why high-carbon steel is essential for dense vegetable-tanned hides and how it impacts your long-term crafting precision.
- Discover the specific cutting techniques and workspace setups that prevent costly material waste when working with premium leathers.
- Understand the technical superiority of the hand-sewn saddle stitch and the specific leatherworking tools required to achieve a professional seam.
- Master the step-by-step burnishing process to create the signature glass-like edge finish found in high-end artisanal goods.
- Gain insight into building a professional-grade workshop by leveraging 160 years of family expertise and curated European sourcing.
Foundational Leatherworking Tools for Vegetable-Tanned Hides
Think of your tools as the physical manifestation of your intent. A raw hide, such as a premium Badalassi Pueblo, is a masterpiece of nature. However, it only becomes a functional piece of art through the precise intervention of steel and skill. Professional leatherworking tools act as the essential bridge between that organic material and your finished design. Without the right gear, you're not crafting; you're struggling.
Quality Steel vs. Mass-Market Kits
I often see beginners fall for the allure of the "36-piece starter kit" found on giant online marketplaces. These sets are frequently filled with what I call "tool-shaped objects." They look the part, but they're made from soft, mystery metals that lose their edge after three cuts. Vegetable-tanned leather is dense and fibrous. Using a dull, cheap blade on a premium hide is like trying to perform surgery with a butter knife. You'll end up with jagged lines and crushed fibers that no amount of sanding can fix.
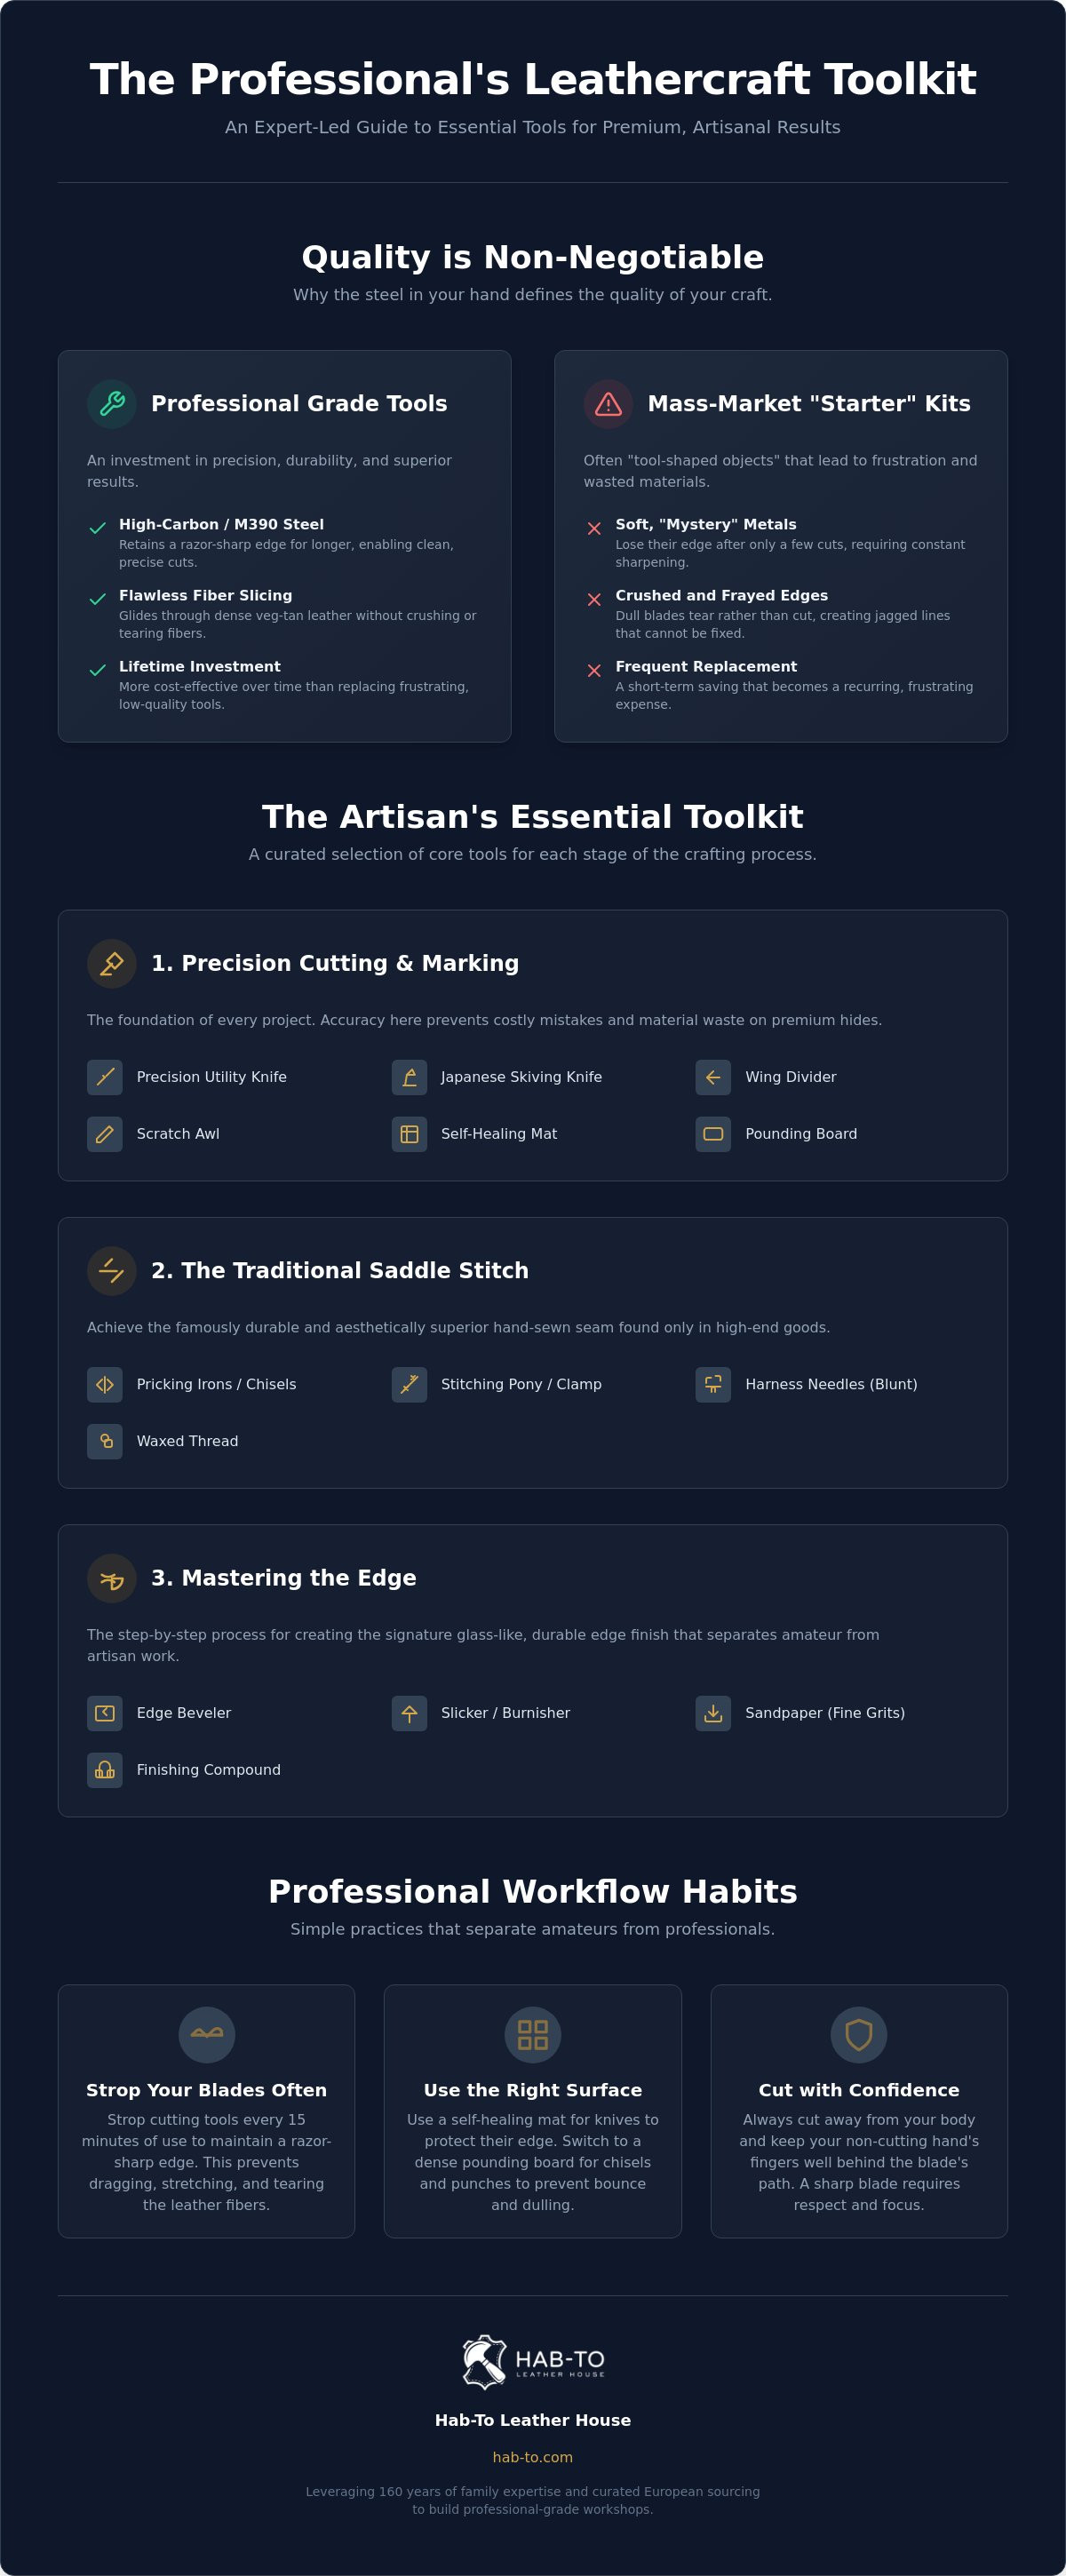
High-quality steel, typically high-carbon or M390, retains its edge far longer. This allows you to focus on mastering complex leather crafting techniques rather than constantly fighting your equipment. Investing in a few premium items from a curated leatherworking tools collection is more cost-effective than replacing a frustrating kit every few months. Quality tools aren't an expense. They're an investment in your sanity and your results.
Why Veg-Tan Requires a Specific Approach
Vegetable-tanned leather isn't like the soft, stretchy chrome-tanned hides used for mass-produced jackets. It has a firm temper and a high density of tannins. This firmness is exactly why it's so prized for its "burnish-ability" and structural integrity. Because the material is so resilient, your tools must be sharper and more robust. For example, a wing divider needs a hardened, needle-sharp point to leave a crisp, permanent mark on a hide like Maryam Vacchetta. If the steel is too soft, the points will splay, leading to uneven stitch lines that ruin the professional aesthetic.
I always suggest starting small. You don't need fifty gadgets to make a world-class wallet. You need five or six tools that will last a lifetime and respect the material. If you're just starting, our Master Bundle focuses on these essentials. To understand why the material matters so much, read our Vegetable Tanned Leather: The Complete Guide for Crafters. It will help you see how the hide's characteristics dictate every tool choice you make.
Precision Cutting and Marking: The First Steps of Mastery
The moment your blade touches the grain of a premium hide, there's no turning back. Whether you're working with a rich Badalassi Pueblo or a piece of Shell Cordovan, accuracy is your best friend. A single slip doesn't just waste material; it wastes the hours of labor already invested in the design. Professional leatherworking tools ensure that your first cut is as confident as your last.
Your choice of cutting surface is just as vital as the blade itself. I always recommend using a high-density self-healing mat for general cutting. It provides enough "give" to protect the edge of your knife without allowing the leather to shift. However, when it's time to use punches or chisels, switch to a pounding board. This prevents your tools from bouncing or dulling prematurely against a hard table. It's a simple change that saves your edges and your tabletop.
Essential Knives for Every Artisan
A precision utility knife is ideal for long, straight cuts because you can easily swap for a fresh tip. For curves and skiving, a Japanese-style skiving knife is unmatched. Its single bevel provides extreme control when thinning Virgilio Vacchetta. I strop my blades every fifteen minutes. A razor-sharp edge prevents the leather from stretching or bunching as you cut.
Marking and Measuring for Professional Results
Marking your path prevents permanent grain damage. A scratch awl traces patterns cleanly, while the wing divider is the most versatile of all leatherworking tools. It scribes perfect stitch lines or measures hardware placement with mathematical precision. Use a metal ruler with a non-slip backing to protect smooth surfaces. This prevents the tool from sliding and causing accidental scratches on your premium hides.
Safety is a habit that separates the amateur from the professional. Always cut away from your body and keep your fingers well behind the line of the blade. If you're looking to simplify your workshop setup, our curated starter bundles include the essential measuring and cutting gear I personally trust. Precision is a discipline that starts with respect for your materials and your safety.
The Traditional Saddle Stitch: Tools for Hand Sewing
Machine sewing uses a lockstitch. If one thread breaks, the whole seam can unravel like a zipper. For an artisan working with premium materials, this is unacceptable. The hand-sewn saddle stitch uses two needles on a single length of thread that cross each other within every hole. If a stitch ever fails, the remaining thread remains locked in place. It's the most durable bond in the world of craft. To achieve this look, your leatherworking tools must be chosen with an eye for geometry and tension.
A stitching pony is your most important ally here. It acts as a third hand, holding your project at a consistent height and angle. This allows you to focus entirely on the rhythm of your needles. When your work is clamped securely, you can apply even tension to every stitch. This consistency creates that beautiful, slightly slanted "rope" effect that signifies a handmade luxury item. Without a pony, your hands will tire, and your stitch lines will inevitably wander.
What You Will Need: The Stitching Kit
Building a professional sewing kit doesn't require dozens of items. It requires the right ones. I always suggest starting with our Stitching Bundles to avoid the guesswork. You will need:
- John James Needles: These are the industry standard for a reason. They have a blunt harness tip that prevents you from piercing your thread as you sew.
- European Style Pricking Irons: These mark the leather with a traditional slant.
- Waxed Thread: Waxed linen thread offers a classic, matte look. Bonded polyester is often better for high-stress items like bags because it won't rot or fray over time.
Pricking Irons vs. Stitching Chisels
Terminology often confuses beginners. Pricking irons are designed to mark the spacing and angle of your stitches. You then use a diamond awl to pierce through the leather. This method gives you the most control, especially on thick projects. Stitching chisels, however, are designed to punch all the way through the hide in one go. They are faster but offer slightly less finesse on curved edges.
Spacing is a matter of aesthetics and scale. For small goods like watch straps or slim wallets, a 3.0mm or 3.38mm spacing looks refined. For larger items like totes or messenger bags, a 3.85mm spacing provides a bolder, more rugged appearance. Choosing the right leatherworking tools for the specific scale of your project is what separates a hobbyist from a master crafter. If you aren't sure which spacing fits your design, feel free to book a free video consultation with me to discuss your project.
Mastering the Edge: Finishing Tools and Techniques
The edge of a leather piece is where the artisan’s patience is most visible. It's the signature of a master craftsman. A raw, fuzzy edge makes even the most expensive hide look unfinished. Conversely, a polished, glass-like edge elevates the entire piece to a professional standard. Achieving this isn't about magic; it's about the right leatherworking tools and a deep understanding of how vegetable-tanned fibers react to heat and friction.
Burnishing is essentially a chemical and physical transformation. When you apply friction, the heat causes the natural tannins and fibers in the leather to bond and collapse. This creates a hard, sealed surface that resists moisture and wear. Without a proper burnishing agent, you're just scuffing the surface. This is why professional finishers rely on specific compounds to bridge the gap between "smooth" and "perfect." It's a rhythmic process that requires a steady hand and a bit of grit.
What You Will Need: The Finishing Kit
To achieve a professional result, your kit must include more than just a wooden stick. I recommend these essentials for any serious workbench:
- Tokonole: This is the gold standard of burnishing agents. It's a water-based gum that penetrates deep into the fibers without making the leather brittle.
- Edge Bevelers: These tools remove the sharp 90-degree corner of the leather. For most wallets and watch straps, sizes 0, 1, or 2 provide the most refined profile.
- Wood Slickers or Canvas: Friction is the goal. A dense wooden slicker works well for heavy belts, but many pros prefer a heavy canvas cloth for a more controlled heat buildup on delicate items.
- Fine-Grit Sandpaper: You can't burnish a bumpy edge. Use a progression from 400 to 1000 grit to level the surface before you apply any finishing agent.
Beveling, Skiving, and Burnishing
Before you even touch the edge, consider the bulk of your project. Skiving is the process of thinning the leather, usually at the edges where it folds over or where multiple layers meet. This prevents your project from becoming unnecessarily chunky. Once your layers are bonded with a quality adhesive like EcoStick, bevel the edges to create a rounded profile. Apply a thin layer of Tokonole and wait for it to become slightly tacky before you start slicking.
If your edges won't burnish, check your sanding first. Fibers that aren't leveled correctly will never lay flat. If you're ready to upgrade your finishing game, our professional crafting bundles include the specific leatherworking tools you need to transition from raw edges to a mirror finish. Patience is the most important tool in this stage, so don't rush the friction.
Building Your Workshop with Hab-To Expertise
A workshop is more than just a room with a bench. It's where your legacy begins. At Hab-To, we don't just sell steel and wood. We share a 160-year family tradition of leather expertise. I'm Mike, and I've spent 25 years selecting the right gear so you don't have to waste money on tools that fail. Our philosophy is simple. We provide professional-grade leatherworking tools to everyone, from the weekend hobbyist to the full-time artisan.
Most wholesalers demand huge orders and complex accounts. We don't. Our "No Minimum Order Quantity" (MOQ) policy means you can buy one specific beveler or a single hide of premium Italian leather without the overhead. In 2026, efficiency is everything. Our European-based sourcing ensures you avoid the customs delays and hidden fees associated with overseas shipping. Much like how global designers rely on the Turkish Marble Company for high-quality natural stone, we ensure you get the world's best materials delivered directly to your bench, allowing you to focus on the craft rather than the logistics.
Curated Bundles: The Smart Way to Start
I see many crafters buy specialized tools they will never use. It's a waste of resources. Our Starter Bundles solve this problem. These sets are curated based on decades of bench experience. They include the essential leatherworking tools required to produce professional results on bags, belts, or watch straps. By starting with a bundle, you ensure that every piece of gear in your shop has a purpose. You can then customize your kit as your skills evolve and your projects become more complex.
The Hab-To Ecosystem: Education and Support
Having the best tools is only half the battle. You also need the knowledge to use them. Our Masterclasses offer hands-on training for those ready to transition from basic assembly to true artisanry. We cover everything from advanced skiving to complex construction techniques. We believe in being a source of inspiration, not just a supplier.
If you're feeling stuck or confused by terminology, don't guess. Book a Free Video Consultation with me. We can look at your current setup, discuss your project goals, and identify exactly which tools will help you reach the next level. We're here to support your journey every step of the way. Build your dream workshop today and start creating pieces that will last for generations.
Step Into the Future of Your Craft
Mastering leatherwork is a journey that rewards patience and precise gear. You now understand that high-quality steel is non-negotiable for vegetable-tanned hides. You know that the traditional saddle stitch provides a bond that machines simply can't replicate. Most importantly, you've seen how a glass-like edge serves as the true signature of a master. These results aren't accidental. They're built through consistent practice and the use of professional leatherworking tools that respect the organic nature of the hide.
Hab-To is here to support your evolution from hobbyist to artisan. We bring 160 years of family heritage to every tool we select. Our "No Minimum Order Quantity" policy ensures you can grow your shop at your own pace without unnecessary overhead. If you're still deciding which path to take, I'm always available for a free video consultation to help you refine your setup. Explore our curated crafting bundles today to find the perfect foundation for your next project. The bench is waiting, and I can't wait to see what you create.
Frequently Asked Questions
What are the absolute minimum tools I need to start leatherworking?
You only need a few high-quality essentials to complete your first project: a precision knife, a cutting mat, a wing divider, a set of pricking irons, harness needles, waxed thread, and a burnishing agent. I always tell beginners that it's better to own five professional-grade leatherworking tools than a box full of cheap substitutes. This core kit allows you to cut, mark, stitch, and finish a wallet or belt to an artisan standard.
Why should I use vegetable-tanned leather instead of chrome-tanned?
Vegetable-tanned leather is the only choice for artisans who want to burnish edges and achieve a natural patina over time. Unlike chrome-tanned hides, which use harsh chemicals to stay soft, veg-tan leather is firm and holds its shape. This structural integrity makes it far more durable for daily-use items. It's also a more sustainable choice, as the tanning process relies on organic tree barks and plant extracts.
What is the difference between a pricking iron and a stitching chisel?
A pricking iron is designed to mark the spacing and angle of your stitches, while a stitching chisel is meant to punch all the way through the hide. Many professionals prefer pricking irons because they offer more control, especially on thicker projects where you finish the hole with a diamond awl. Chisels are faster for production work, but they can occasionally cause the exit hole on the back of the leather to look less refined than a hand-pierced hole.
How do I sharpen my leather knives and bevelers?
Regular stropping with a polishing compound is the best way to keep your edges razor-sharp. You don't need to use whetstones every day. Instead, run your blade across a leather strop every fifteen minutes of active cutting. For bevelers, you can use a thin piece of scrap leather or a specialized sharpening rod loaded with compound. If you let a tool get truly dull, it becomes dangerous and will likely tear your expensive hides.
Can I use a regular hammer for leatherworking?
You should never use a metal-faced hammer on your leatherworking tools because it will mushroom the steel and ruin your punches. Instead, use a high-density poly mallet or a weighted maul. These tools provide the necessary force without damaging the handles of your irons or chisels. A poly mallet also reduces the noise in your workshop, which your neighbors will certainly appreciate during long crafting sessions.
What size thread should I use for a wallet versus a bag?
Small goods like wallets usually look best with 0.4mm to 0.6mm thread, while larger bags require 0.8mm to 1.0mm thread for proper scale and strength. Using thread that's too thick for a wallet can make the piece look bulky and amateur. Conversely, thin thread on a heavy tote bag may not provide the structural support needed for heavy loads. Always match your thread weight to the spacing of your stitch line for a balanced aesthetic.
Is Tokonole better than beeswax for edge finishing?
Tokonole is superior for achieving a glass-like finish because it penetrates the leather fibers and bonds them together. Beeswax simply coats the surface and can eventually flake off or become dull. While beeswax is excellent for a rustic, traditional look, Tokonole provides a more durable and professional seal that resists moisture. Many artisans use a light coat of beeswax on top of burnished Tokonole for an extra layer of protection and shine.
Do I need a stitching pony for hand sewing?
A stitching pony is essential if you want to achieve consistent tension and professional-looking saddle stitches. It acts as a third hand, holding your work securely so you can use both hands to manage your needles and thread. This stability prevents your hands from cramping and ensures that every stitch is pulled at the exact same angle. It's one of the few pieces of shop infrastructure that will immediately improve the quality of your work.
Disclaimer
All our blog articles are made for information purposes only we dont take responsability for any content from third parties.