




How to Case Leather for Stamping: A Practical Guide
What if the key to clean leather impressions isn’t soaking for a set amount of time, but learning to read the leather? If you’re unsure how much water to apply, you’re in good company. Too little moisture can leave stamps looking shallow; too much can make impressions soft or uneven. Learning how to case leather for stamping starts with a repeatable process, not guesswork.
In this practical guide, you’ll learn how to dampen vegetable-tanned leather evenly, let it rest, and test its moisture before committing to a design. You’ll also learn what ready-to-stamp leather looks and feels like, so you can work with more confidence and reduce the risk of wasting a good piece.
We’ll walk through the casing sequence, explain how to make a useful test impression, and cover suitable leather and basic supplies for practice. Start with patience, pay attention to the leather, and let each test guide your next step. That’s the foundation for clear, controlled stamping.
Key Takeaways
- Understand why controlled moisture helps vegetable-tanned leather take a clearer stamp impression.
- Learn how leather thickness and firmness can affect dampening and resting, without relying on a fixed wait time.
- Use visual and tactile clues to judge readiness, and avoid leather that looks waterlogged or feels saturated.
- Follow a repeatable approach to how to case leather for stamping, then make a test impression before stamping your design.
- Gather suitable leather and basic tools for practice, and build confidence by checking each impression.
What Does It Mean to Case Leather for Stamping?
Casing is the controlled dampening of vegetable-tanned leather before tooling so it can respond to a stamp with a clear, defined impression. The aim isn’t to soak the hide. It’s to introduce moisture in a measured way, then let it settle before you begin stamping.
Learning how to case leather for stamping means paying attention to the material rather than following a universal soak time. Dry leather may resist the stamp, while saturated leather can feel spongy and take an uneven mark. Casing sits between those extremes. The right moisture level helps the leather compress under pressure, but each piece can respond differently.
This short video offers a visual look at leather casing:
Why Does Moisture Affect a Stamped Impression?
A stamp presses its shaped face into the leather. When the leather is lightly and evenly dampened, its surface can yield under pressure, allowing the tool’s details to register. As the leather dries, the compressed area holds its shape. If the surface is too dry, a stamp may leave a faint or inconsistent impression. If it’s too wet, the leather can feel soft and the impression may lack definition.
Even moisture can help impressions look more consistent across a piece, but it can’t guarantee identical results. Leather varies naturally, and the stamp, striking force, and stability of the work surface also matter. Casing is one part of good technique, not a fix for every stamping issue.
Which Leather Is Suitable for Casing and Stamping?
Traditional stamping guidance focuses on vegetable-tanned leather used for tooling. Its structure can take impressions from stamps, though individual pieces still behave differently. Leather construction, thickness, and firmness affect how quickly water is absorbed and how the surface responds when pressed. A firm piece may feel different under a stamp than a softer one, even when both have been dampened carefully.
Choose a suitable piece from our vegetable-tanned leather selection and test on an offcut when possible. That small trial helps you learn how a particular piece responds before you stamp a finished project. Look closely at the impression and surrounding surface. The leather, your tools, and your technique all contribute to the result.
How Leather Thickness and Firmness Change the Casing Process
Two pieces of vegetable-tanned leather can take up water differently, even if they look similar. Thickness affects how far moisture must travel; firmness affects how the surface yields when pressed. A quick surface check may not tell you what’s happening through the whole piece, so use gradual dampening and observation rather than trying to match someone else’s timing.
Adapt casing to the leather in front of you: apply water gradually, observe how it spreads, and adjust only after checking the result. Small applications are easier to assess than a heavy wetting. They give you a chance to notice uneven areas before adding more, helping reduce guesswork and the risk of oversaturating the surface.
What Should You Adjust for Thicker or Firmer Leather?
Check more than the face. Look at an edge or a discreet area to judge whether moisture seems to have spread, and compare the surface feel across the piece. Thicker or firmer leather may need more observation before you decide it’s ready. If you can still see uneven dampness, give it time to settle rather than adding water automatically.
Think in small steps: dampen, observe, reassess. Don’t treat thickness as a formula or assume every firm hide needs the same adjustment. The leather’s response is your guide.
How Can a Practice Scrap Help You Adapt?
If you have an offcut from the same piece, use it to test your approach. Apply water in the same careful way, let it settle, then make a test impression. Compare how clearly the stamp registers and how the leather feels under pressure. If the result is weak or soft, adjust gradually and test again before working on the project piece.
Use the same stamp and a stable work surface for each trial so you can better judge the leather’s response. Our leatherworking tools can help you prepare for these tests. If you’re gathering supplies for practice, browse our leathercraft bundles for a grouped starting point.
How to Tell When Cased Leather Is Ready for Stamping
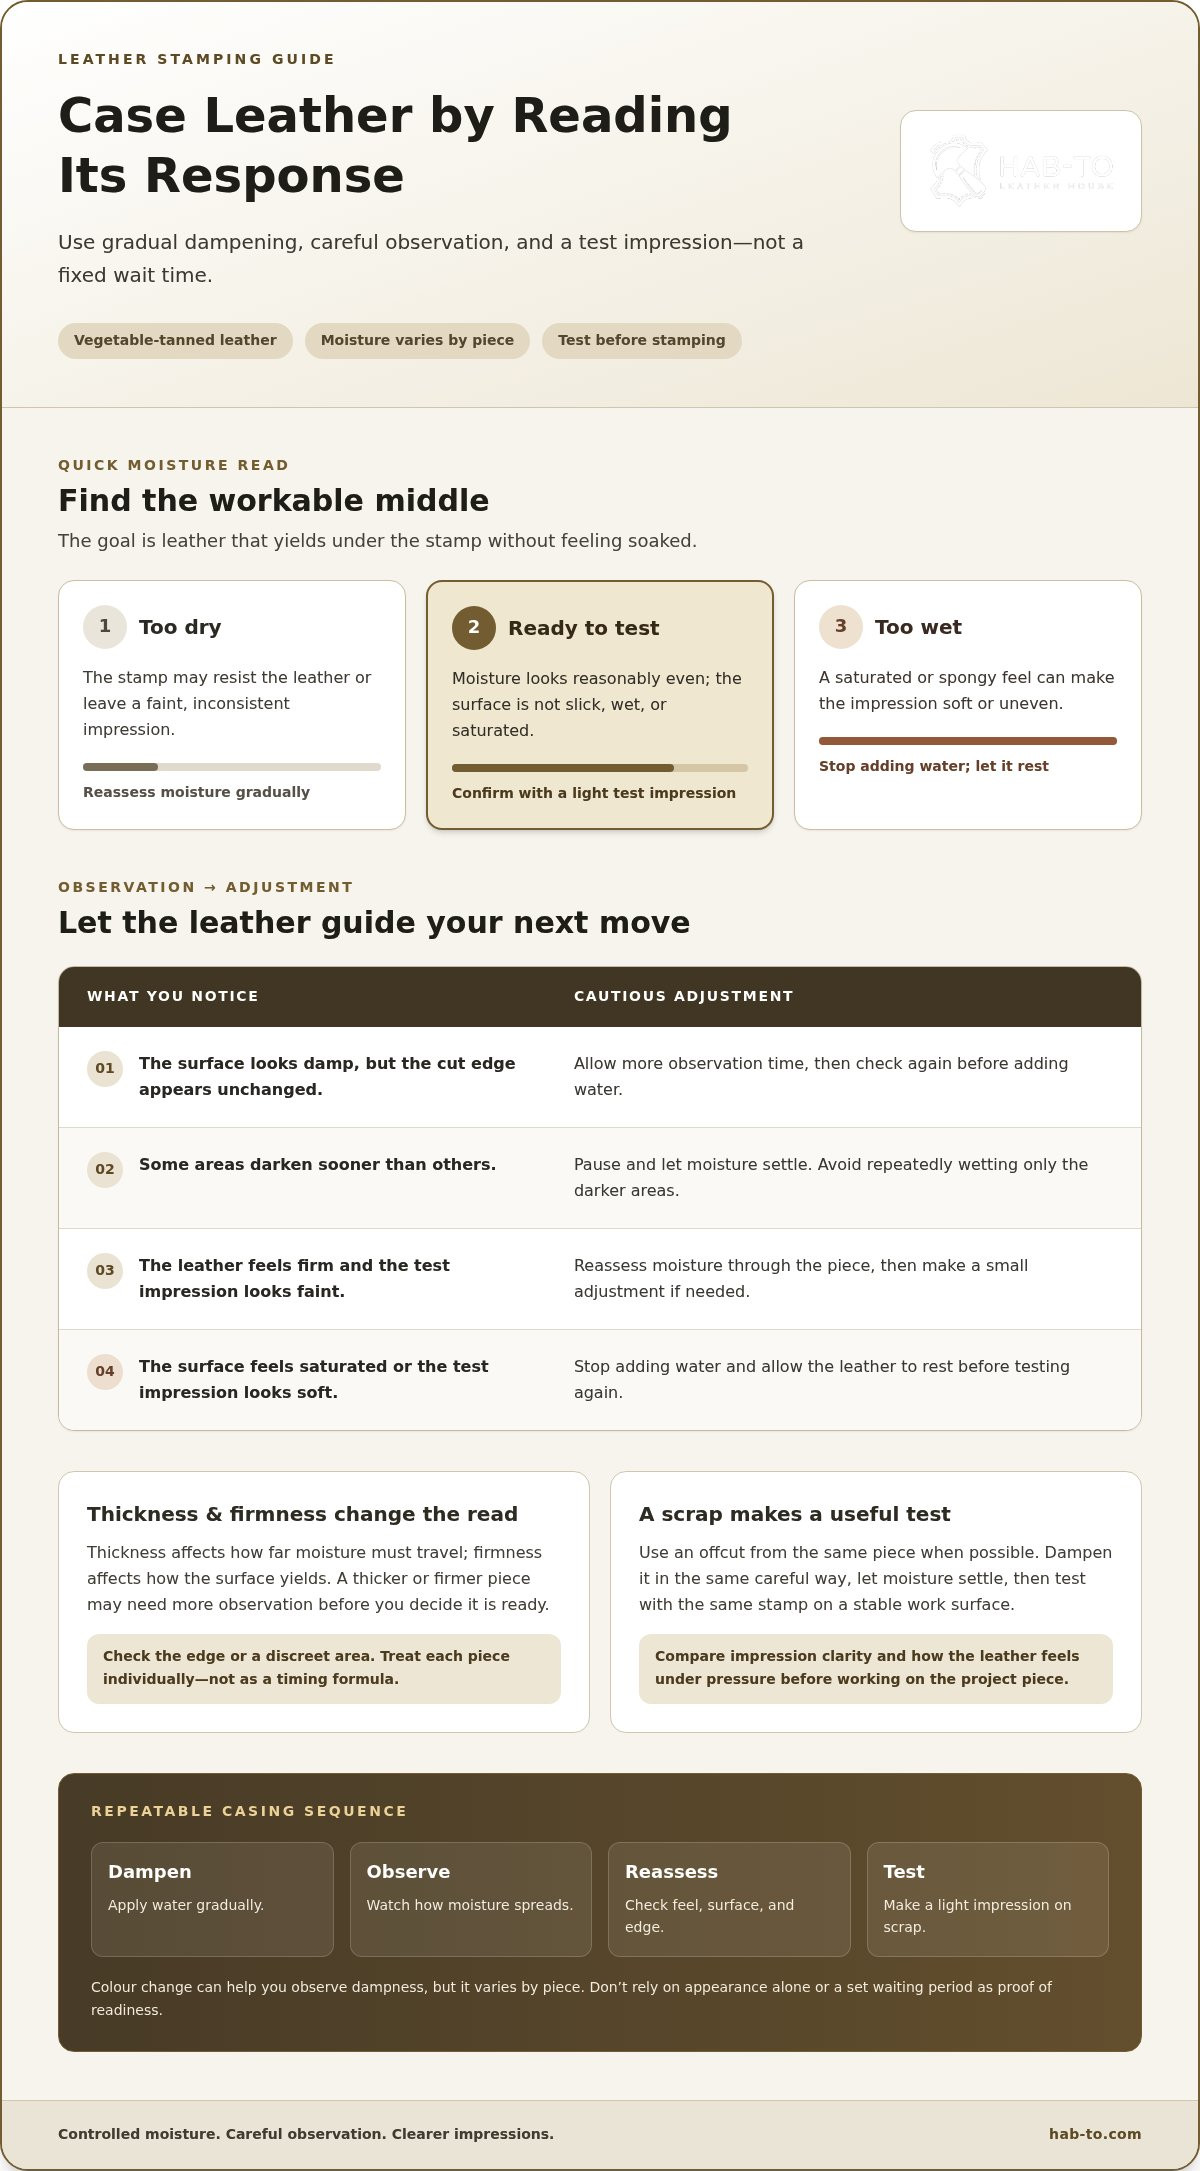
Readiness isn’t a single colour, temperature, or number of minutes. Those clues can vary with the leather and the conditions in your workspace. Instead, use a few observations together, then confirm them with a light test impression on scrap. The goal is leather that responds cleanly to pressure, not a surface that looks or feels soaked.
What Does Ready-to-Stamp Leather Look and Feel Like?
Look for moisture that appears reasonably even across the area you plan to stamp. The surface may look darker than when dry, but colour change isn’t a universal measure. Some pieces show dampness clearly; others show it subtly. Don’t rely on appearance alone, and don’t use a set temperature or waiting period as proof that the leather is ready.
Touch the surface lightly. It should not feel slick, wet, or saturated. If moisture is visibly pooling or the leather feels waterlogged, hold off. Check a few spots, including the area where you intend to stamp, because one part can be ready while another still feels different.
Use a Quick Readiness Checklist
Before stamping the finished piece, run through these practical checks:
- Appearance: Dampness looks reasonably even across the stamping area, without obvious wet patches.
- Surface feel: The leather doesn’t feel saturated, slick, or waterlogged.
- Test impression: A light stamp on a scrap or discreet test area leaves a clear impression without a soft, mushy edge.
- Consistency: Similar test impressions in different spots look reasonably alike.
Think of each check as a clue, not a guarantee. The small test impression is especially useful because it shows how that particular piece responds to your stamp and pressure.
What If the Leather Is Too Wet or Too Dry?
If the surface feels overly wet, stop adding water. Let the moisture settle, then reassess with a light touch and another test impression. Avoid trying to correct a saturated area by pressing harder; excess softness can make the mark less defined rather than improving it.
If the leather seems too dry and the test mark is faint, apply a small, even amount of water to the relevant area. Give it a chance to spread, then test again. This measured adjustment is more informative than wetting the whole piece heavily at once.
Uneven impressions don’t always point to moisture. Check whether dampness is distributed consistently, then consider your stamping technique: use a steady strike and keep the tool aligned. As you learn how to case leather for stamping, make one adjustment at a time. That way, each test tells you more about what the leather needs, and you’re less likely to risk the finished project.
How to Case Leather for Stamping: A Step-by-Step Method
Keep the process simple: prepare a clean workspace, dampen the leather in controlled stages, let the moisture settle, then test a stamp before working on your project. This sequence gives you opportunities to check the leather’s response and make careful adjustments instead of relying on a fixed soak time.
- Prepare the leather and workspace. Start with clean, unfinished vegetable-tanned leather suitable for stamping. Clear a stable work surface and make room for the piece to rest without touching dusty or damp materials. Set out clean water, a suitable applicator, a scrap from the same piece if available, and your stamping tools. Having everything ready makes it easier to keep the leather clean while you work.
- Apply moisture gradually. Use the applicator to distribute water across the area you plan to stamp. Aim for even coverage, not puddles. A light, gradual application is easier to assess and adjust than flooding the surface. If one spot looks noticeably wetter, pause rather than repeatedly adding water to the rest of the piece.
- Let the moisture settle. Set the leather on the prepared surface and give the moisture time to spread. There’s no universal resting period: thickness and firmness influence how the leather responds. Check the face and, where practical, an edge or discreet area for signs that dampness is becoming more even. Keep waiting if you can still see obvious wet patches.
- Check the surface before testing. Touch the leather lightly and look over the stamping area. It shouldn’t feel saturated or slick. If it does, stop adding water and let it rest before reassessing. If it seems too dry, add a small, even amount and let that settle. Make one adjustment at a time so you can tell whether it helped.
- Test a stamp on scrap. Place the offcut on the same firm work surface you’ll use for the project. Make a light test impression with the stamp and inspect the mark. Look for clear detail and a defined edge, rather than a faint impression or a soft, mushy-looking result. If the mark isn’t suitable, adjust the moisture or technique and test again.
- Stamp the project piece. Once the test impression looks right, move to the intended area and use a steady, controlled strike. Keep checking the results as you work, since moisture can vary across a piece. If the impressions become inconsistent, pause and reassess rather than pressing harder by default.
Full submersion is one traditional way to wet leather, but it isn’t mandatory for every piece. If you use it, treat it as an alternative approach, then let excess surface water drain away and assess the leather before stamping. The same checks still apply: judge the material itself and confirm your results with a test impression.
For your next practice session, prepare suitable leatherworking tools and a stable work surface. You can also browse our leathercraft bundles for supplies grouped for a project.
What You Will Need to Case and Stamp Leather
A tidy, modest setup is enough to begin. Focus on the materials that let you dampen carefully and make a test impression, rather than buying a large assortment before you know what you enjoy stamping. A small practice piece and a few dependable tools can teach you a great deal.
A Beginner-Friendly Casing and Stamping Setup
Gather these basics before you start:
- Suitable leather: Choose vegetable-tanned leather appropriate for tooling. A small cut is useful for practice and helps you learn how the material responds. Browse our vegetable-tanned leather for project material.
- Clean water: Keep water within reach so you can dampen the leather in measured applications.
- Applicator: Use a clean sponge or another suitable applicator to spread moisture across the surface.
- Stamping tools: Choose stamps for your design. Our leatherworking tools can help you build a practical setup.
- Mallet or maul: Use an appropriate striking tool to drive the stamp with controlled force.
- Stable work surface: Set the leather on a firm, level surface so it stays supported during stamping.
- Scrap leather: Keep an offcut nearby for testing moisture and checking the impression before working on the final piece.
Keep the work area clear, too. Dust, loose scraps, or a wet surface can distract from the test and leave marks where you don’t want them. A clean space makes it easier to assess the leather itself.
Choose Practice Leather and Supplies Without Overbuying
You don’t need a whole hide to learn. A small piece or usable offcut gives you room to test dampening, try a stamp, and compare impressions without putting your project at risk. If possible, take your test scrap from the same piece you plan to use, since leather can vary in firmness and response.
Start with the stamps and basic striking tool needed for the designs you want to practise. Add more tools as your projects call for them. Beginner bundles can also be a useful starting point when you’d rather browse a grouped selection of supplies. Explore our starter bundles as you plan your practice setup.
A Practical Starting Point
For a focused first practice session, set out one vegetable-tanned leather piece, a matching scrap, clean water, an applicator, a stamp, and a mallet. Keep your setup simple. You can learn from each test and add supplies as your stamping skills develop.
Related Resources
- Vegetable-tanned leather for tooling practice
- Leatherworking tools for stamping projects
- Leathercraft bundles for your next project
Make Your Next Stamp a Confident One
Your next improvement can come from a simple habit: keep a practice scrap and note how the leather responds to each adjustment. Over time, those small observations help you develop a feel for how to case leather for stamping without treating every piece as if it will behave exactly the same way. Let the test impression guide your next move, then build your confidence one project at a time.
At Hab-To Leather House, we focus on vegetable-tanned leather and draw on more than 160 years of family leather expertise. If you’re building your practice setup, our beginner bundles and leatherworking supplies can help you take the next step at your own pace.
Start with a small practice piece, stay curious, and enjoy the craft. Clean impressions come from patience as much as pressure.
Frequently Asked Questions
Is casing leather necessary for stamping?
Casing is a common preparation for stamping vegetable-tanned leather, but the results depend on the particular piece and your technique. The goal is to help the leather respond to a stamp, not to soak it for its own sake. Before using your preferred approach on a project, try it on an offcut and compare the impression with one made on dry leather. That test helps you decide how to case leather for stamping.
Can you case leather by spraying it with water?
Yes, you can dampen leather gradually by spraying, as long as you distribute the water evenly and let it settle before stamping. Traditional submersion is another approach, but neither method suits every piece in the same way. Avoid judging by the method alone. Check the leather’s condition, then try a stamp on a scrap from the same piece to see whether the result is clear enough for your project.
How long should leather rest after casing?
There’s no single resting time that works for every piece. Thickness, firmness, and the way you applied water all affect how moisture spreads. Rather than setting a timer as your only guide, inspect the leather and test an offcut with the stamp you plan to use. The useful endpoint is a clear, suitable impression while the surface doesn’t feel saturated. If the test isn’t right, wait or adjust and check again.
What happens if leather is too wet for stamping?
Too much surface moisture can make it harder to judge the leather and may lead to impressions that vary across the design. Don’t add more water or try to compensate by striking harder. Set the piece aside so the moisture can settle, then check its condition and test again on scrap. How quickly it changes depends on the leather and how much water it received, so avoid relying on a fixed recovery time.
Can you case any type of leather for stamping?
Casing guidance for traditional tooling is intended for vegetable-tanned leather. Other leather types and finishes can respond differently to water and pressure, so don’t assume the same preparation will work across materials. Before using a casing method on a finished project, take a scrap from that same leather and test it. The offcut gives you a more relevant indication of how the material behaves than a trial on a different piece.
How can you tell when leather is ready for stamping?
Look for moisture that seems reasonably even, and check that the surface doesn’t appear or feel saturated. These are clues, not absolute rules: leather can differ in colour and feel. Make a light test impression on an offcut and inspect its edges and detail. If the mark looks unclear, pause and reassess the leather and your stamping approach. Testing first is especially helpful before decorating a visible or difficult-to-replace area.
Should leather be wet again if stamp impressions look faint?
Not automatically. A faint mark can point to dry leather, but it may also come from uneven tool alignment, a light strike, or differences in the leather itself. Repeat the test on scrap and change one factor at a time so you can identify what affects the impression. If the leather seems dry, apply a small amount of moisture evenly, let it settle, and test again before adding more or moving to the project piece.
Ready to practise? Choose vegetable-tanned leather for your next stamping project, and use an offcut to test your casing technique first.
Disclaimer
All our blog articles are made for information purposes only we dont take responsability for any content from third parties.