


How to Dye Vegetable Tanned Leather: The Artisan’s Guide to Perfect Colour
Most leatherworkers think the secret to a perfect finish is hidden in the bottle of dye. They're looking at the wrong end of the process. Professional dyeing isn't just about the pigment you choose; it's about the synergy between your preparation and your final finish. Mastering how to dye vegetable tanned leather requires more than just a steady hand. With premium hides costing up to $9.95 per square foot, you can't afford to waste material on splotchy absorption or a finish that feels brittle and dry. You want a deep, professional patina that highlights the natural character of the hide rather than masking it like a coat of thick paint.
Welcome to the workshop. I understand that frustration deeply. We've all dealt with "crocking" where the colour rubs off on clothing, or leather that loses its beautiful, supple feel after a dye job. You deserve a result that looks as good as it feels. This guide will teach you the professional techniques to achieve even, vibrant colours that stay permanent. We'll walk through the essential steps from surface preparation to the final seal, ensuring your projects maintain their soft hand-feel and gain a lasting, artisan quality.
Key Takeaways
- Learn why natural russet leather provides the ideal canvas for custom work and how specific tanning processes impact your colour absorption.
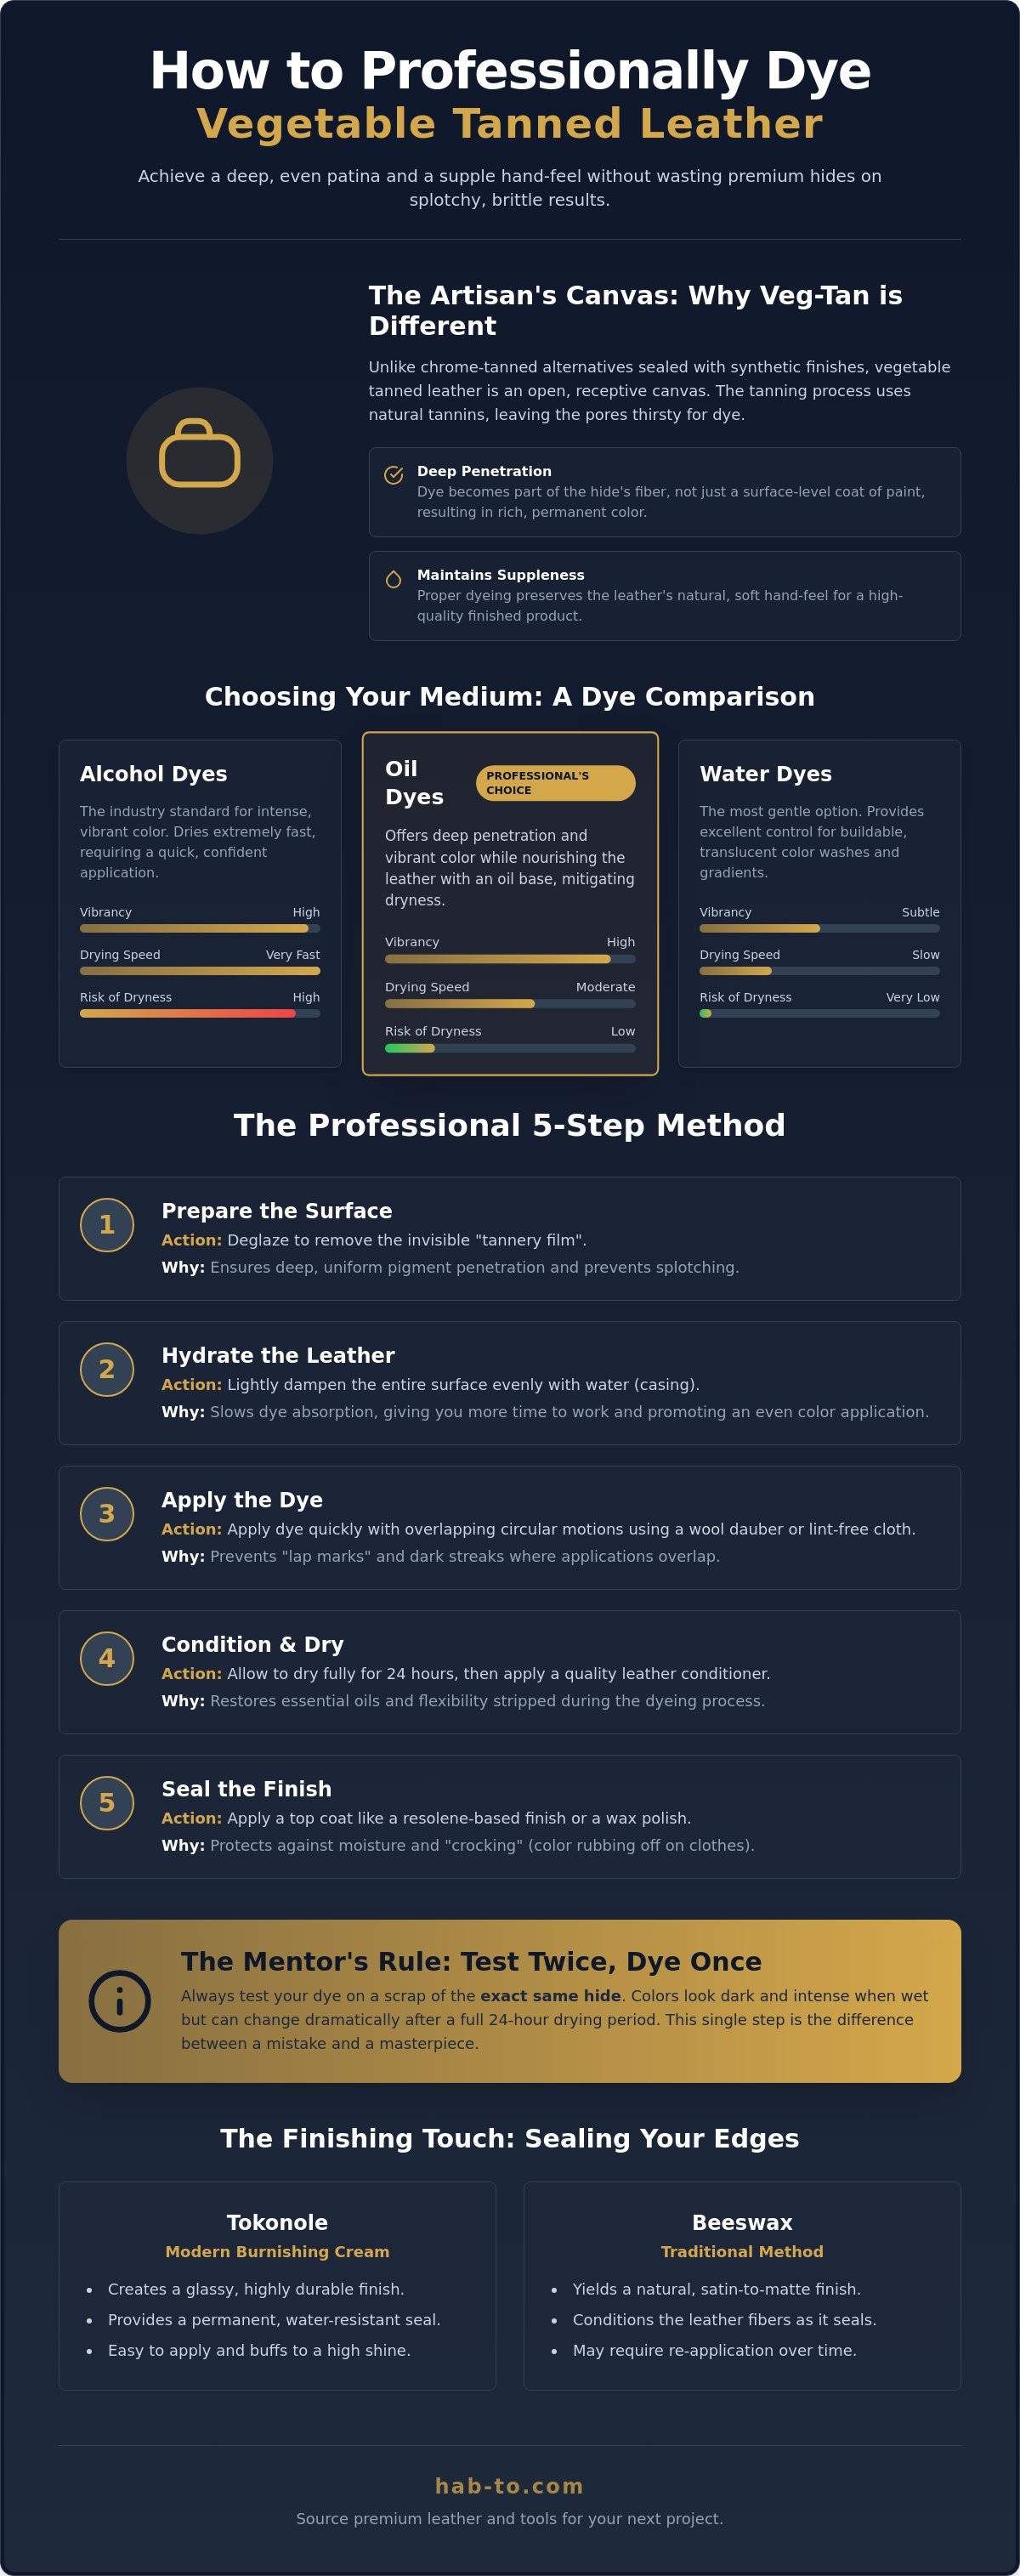
- Explore the differences between alcohol and oil-based dyes to select the right medium for vibrant results and a soft, supple hand-feel.
- Master our professional 5-step method for how to dye vegetable tanned leather, featuring techniques like pre-dye hydration to eliminate splotchiness.
- Discover how to properly remove "tannery film" and deglaze your surface to ensure deep, even pigment penetration every time.
- Compare modern burnishing creams like Tokonole against traditional beeswax to achieve a professional, permanent seal on your dyed edges.
Understanding the Canvas: Why Vegetable Tanned Leather Dyes Differently
Think of vegetable tanned leather as a living canvas. Unlike chrome-tanned alternatives that often come sealed behind a wall of synthetic finishes, veg-tan remains open and receptive. This organic nature is exactly why learning how to dye vegetable tanned leather is so rewarding for the artisan. You aren't just painting a surface; you're inviting the pigment to become part of the hide's fiber. The results are deeper, more permanent, and far more soulful than any mass-produced factory finish.
The secret to this receptivity lies in the vegetable tanning process. This traditional method uses natural tannins from tree bark and leaves, leaving the pores of the leather clear and thirsty. Because there's no synthetic topcoat or heavy pigment layer applied at the tannery, the leather is ready to drink. When you dye at home, you control the saturation, the highlights, and the shadows, creating a level of character that factory machines can't replicate.
Premium hides behave with their own distinct personalities. For instance, Badalassi Pueblo is famous for its unique, slightly scuffed surface texture. This deliberate "napping" creates a varied absorption rate across the hide. It drinks dye differently than a smooth russet hide, often resulting in a rich, marbled effect that looks incredibly sophisticated. Understanding these nuances is the first step toward mastering the craft.
Anatomy of a High-Quality Hide
Success starts with the grain. Full-grain leather retains the entire top layer of the hide, which is where the densest fibers live. This layer dictates how the dye "bites" into the material. Corrected grain leathers, which have been sanded down to remove imperfections, often lose this consistent, thirsty quality. You also need to consider the natural oil content. Some varieties are "oil-stuffed" at the tannery. These oils can act as a natural resist, preventing dye from penetrating too aggressively. Identifying whether your leather is a dry, pale russet or a supple, oil-heavy variety is vital for an even finish.
The Mentor’s Rule: Test Twice, Dye Once
Your scrap bin is your most valuable tool in the workshop. Before you touch your main project, you must test your dye on a piece of the exact same hide. Leather thickness drastically impacts saturation. A thick belt strap will absorb and hold pigment differently than a thin wallet interior. Be patient during this phase. Dyes look dark and intense when wet, but they shift significantly as the solvent evaporates over 24 hours. Only after a full day of drying will you see the true, permanent colour. This simple test is the difference between a splotchy mistake and a professional masterpiece when learning how to dye vegetable tanned leather.
Choosing Your Medium: Alcohol, Oil, or Water-Based Dyes
Selecting the right liquid medium is a pivotal step in learning how to dye vegetable tanned leather. The dye you choose acts as the bridge between the raw hide and your final vision. Each type of dye interacts differently with the tannins and pores we explored in the previous section. Your choice doesn't just change the colour; it fundamentally alters the physical "hand" or suppleness of the finished project. A mistake here can turn a premium hide into a stiff, brittle piece of cardboard.
Alcohol-based dyes remain the industry standard for sheer vibrancy and speed. They dry almost instantly, which is excellent for production, but they carry a specific risk. The solvent can strip away the natural oils that keep your leather flexible. Oil-based dyes, often marketed as "Pro" dyes, mitigate this by carrying the pigment in a more nourishing base. Then there are water-based options. These are the gentle giants of the workshop. They offer a buildable, translucent wash. Many artisans are now exploring plant-derived leather colorants as a sustainable alternative that yields a softer, more organic finish.
Alcohol Dyes: Speed and Intensity
Alcohol dyes are unmatched for small goods like cardholders or watch straps where you need high contrast. Speed is your primary challenge here. Because the solvent evaporates so quickly, you must apply it with rapid, circular motions. Fail to do so, and you'll end up with "lap marks", those dark streaks where the dye applications overlapped. While they provide intense colour, be prepared to follow up with a heavy conditioner to restore the moisture the alcohol removes.
Oil and Water Dyes: Control and Sustainability
For larger surfaces like messenger bags or totes, professionals often lean toward oil-penetrated dyes. The slower drying time allows the pigment to settle deeply and evenly without hardening the hide. This ensures the leather remains supple even after multiple coats. Water-based dyes are your best bet for a "vintage" or sun-faded look. They allow for light, layered applications that let the natural grain peek through beautifully. This buildable nature gives you immense control over the final shade.
Regardless of your choice, safety is paramount. Always work in a well-ventilated space and use skin protection to avoid absorbing solvents. Understanding these chemical differences ensures you know how to dye vegetable tanned leather without ruining its natural charm. If you're starting with a premium base like Maryam Vaccheta leather, your choice of dye becomes even more significant to preserve that luxury feel.
How to Dye Vegetable Tanned Leather: A 5-Step Professional Process
Mastering how to dye vegetable tanned leather is where the artisan separates themselves from the amateur. It's a tactile dance that requires patience and respect for the material. You've selected your hide and your dye; now we move into the physical transformation. This five-step process ensures your finish is deep and professional rather than splotchy. It begins with preparation and ends with nourishment.
The first step is often overlooked: deglazing. Most premium hides arrive from the tannery with a thin film of oils or waxes. This "tannery film" acts as a barrier to your pigment. Use a professional deglazer or high-grade rubbing alcohol to gently wipe the surface. This opens the pores. Next, apply a very light coat of neatsfoot oil. It sounds counterintuitive to add oil before dye, but this "hydration" step creates a uniform highway for the pigment to travel. Understanding the chemistry of leather tanning helps you realize that the fibers need to be receptive, not dry and brittle, to accept the dye evenly.
Once hydrated, apply your dye using a wool dauber or a high-density sponge. After the dye dries, you must buff the surface vigorously with a clean cotton cloth. This removes excess pigment that hasn't bonded with the fibers, preventing "crocking" or colour rub-off later. Finally, you must condition. Dyeing is a drying process. Restoring the fats and waxes lost during solvent evaporation is the only way to maintain that supple, luxury hand-feel found in materials like Virgilio Pueblo leather.
The Secret to Even Colour: Circular Application
Straight lines are the enemy of a professional leather finish. They create visible seams and streaks that are impossible to hide. Instead, use tight, overlapping circular motions. This technique ensures that every fiber is coated from multiple angles. Managing the "wet edge" is vital. Don't stop in the middle of a panel; keep moving until the entire piece is covered. If you want a darker shade, don't try to get there in one go. Diluting your dye and applying three light coats will always yield a more sophisticated result than one heavy, saturated coat.
Post-Dye Buffing and Curing
Patience is your most important tool during the curing phase. Follow the 24-hour rule. You must wait a full day before applying any final sealers or topcoats. This allows the solvents to fully evaporate and the pigment to settle. During this time, you'll notice the colour shift and soften. After the wait, give the leather a final "drink" of conditioner. If the leather feels thirsty or stiff, it hasn't been properly nourished yet. A clean cotton cloth used for buffing should come away clean; if it picks up colour, keep buffing until the pigment is fully burnished into the grain.
Finishing the Project: Tokonole vs. Beeswax for Dyed Edges
The edge is the artisan's signature. It's the final detail that separates a hobbyist project from a professional masterpiece. When learning how to dye vegetable tanned leather, you quickly realize that a raw, pale edge against a deep dyed surface creates a jarring contrast. Dyeing the edge requires a perfect seal to prevent pigment from migrating onto the user's clothing. This is where the choice between modern chemistry and traditional heritage becomes vital. Your choice of finishing agent dictates the final aesthetic. Do you want a high-gloss, mirror-like finish that looks modern and sleek? Or do you prefer a soft, satin glow that speaks of centuries-old tradition? Both paths require the edge to be dyed first, but the chemical reaction that follows differs significantly between Tokonole and beeswax.
Dyeing the edge first is a critical step. The dye penetrates the fibers and provides the base colour, but it also slightly dries out the grain. This makes the leather more receptive to the burnishing agent. If you apply your finish before the dye, the wax or resin will act as a resist, leaving your edges looking patchy and unfinished. Mastering how to dye vegetable tanned leather means respecting this order of operations to ensure a permanent, professional bond.
Tokonole: The High-Performance Choice
Tokonole is a modern Japanese burnishing cream that has revolutionized the craft. It's a water-based blend of natural waxes and synthetic resins that penetrates deeply into dyed fibers. This makes it exceptionally good at locking in colour and preventing bleed. When applied with a glass slicker, it creates a durable, mirror-like finish that won't crack or peel. It works exceptionally well on tight-grained leathers like Maryam Vaccheta; the cream bonds perfectly with the dense fibers to create a factory-level finish with artisanal soul. It's fast, efficient, and provides a level of durability that stands up to heavy daily use.
Beeswax: The Heritage Finish
Beeswax is the heritage method for those who value natural materials and traditional processes. It relies on friction and heat rather than chemical bonding. You rub the block of wax directly onto the dyed edge, then use a wooden burnisher to melt the wax into the grain. This creates a waterproof, resilient seal that is incredibly easy to repair. If the edge gets scuffed over time, a quick buffing with a soft cloth restores the shine. However, it requires significant elbow grease. If you don't buff it correctly, the wax can look dull or feel tacky in the hand. It remains the top choice for artisans who love the tactile process and the traditional scent of a classic workshop.
Ready to put these techniques into practice? Browse our collection of premium Maryam Vaccheta leather to find the perfect canvas for your next dyed and burnished masterpiece.
Sourcing the Right Leather for Your Dyeing Project
Your results are only as good as your foundation. You can master every professional technique for how to dye vegetable tanned leather, but if the hide itself is poor, the finish will never reach its potential. Every tannery has a unique recipe. Some use specific blends of chestnut or mimosa tannins that change how the grain accepts pigment. Others use higher oil contents that can resist even the most aggressive alcohol dyes. Understanding these nuances is what separates a frustrating afternoon from a masterpiece.
Natural russet leather remains the ultimate blank slate for the artisan. It hasn't been pre-dyed or heavily oiled at the tannery, giving you total control over the final shade and depth. At Hab-To Leather House, we don't just sell material; we curate it. We source hides from legendary Italian tanneries like Maryam and Badalassi because their standards match our own. With 160 years of family leather expertise in the trade, we've learned exactly which hides take colour most beautifully. We look for tight grain, consistent thickness, and that specific "thirsty" quality that ensures your dye penetrates deep into the fibers rather than sitting on the surface.
Premium Italian Options for Custom Colour
If you're looking for built-in character, Virgilio Pueblo is a fascinating choice. Its unique, scratched surface texture holds dye in the "valleys" of the grain, creating a natural depth and marbled effect that smooth leathers can't match. On the other end of the spectrum is Shell Cordovan. This material is incredibly dense and non-porous. It requires specialized dyeing techniques and plenty of patience to ensure the pigment bonds correctly. We believe every artisan should have the chance to experiment. That's why we offer no-minimum orders on our premium hides. You can buy exactly what you need for a single wallet or watch strap without the burden of industrial-scale quantities. This same appreciation for material quality is what drives collectors of premium footwear; if you're curious about how iconic leather designs translate to the sneaker world, you can explore Air Jordan Sneakers to see curated examples of high-demand craftsmanship.
Start Your Next Project with Hab-To Leather House
Quality materials are the foundation of every heirloom-quality piece. When you're learning how to dye vegetable tanned leather, you're bound to have questions. Is this specific hide too oily for a water-based wash? How will this thickness affect the saturation? We're here to help. Expert advice is just a message away, and we pride ourselves on providing that personal, mentor-like touch. Explore our curated selection of vegetable tanned leather today. Let's build something beautiful that stands the test of time.
Elevate Your Craft with Professional Colour
Mastering the nuances of how to dye vegetable tanned leather transforms a simple hobby into a true artisanal pursuit. You've learned that success begins long before the first drop of pigment touches the hide. It's found in the careful deglazing of the surface, the hydration of the fibers, and the patient curing process that allows a rich patina to develop. Whether you choose the mirror-like finish of Tokonole or the traditional satin glow of hand-rubbed beeswax, your dedication to these professional steps ensures an heirloom-quality result that lasts for generations.
The foundation of every great project is the material you choose. At Hab-To Leather House, we bring 160 years of family leather expertise to your workshop. We source our hides from world-renowned Italian tanneries like Maryam and Badalassi, ensuring you start with a canvas that accepts colour beautifully. With no minimum order requirements for crafters, you're free to experiment with new shades and techniques on any scale. Shop our Premium Veg-Tan Leather Collection and find the perfect hide for your next masterpiece. We can't wait to see what you create.
Frequently Asked Questions
Can I dye chrome-tanned leather using the same process?
No, chrome-tanned leather cannot be dyed using this method. These hides are already treated with mineral salts and synthetic finishes that seal the pores of the material. This coating acts as a permanent barrier, preventing any new dye from penetrating the fibers. If you try to apply dye, it will simply pool on the surface and eventually flake off. Always choose vegetable tanned leather for your custom dyeing projects.
How do I prevent leather dye from rubbing off on my clothes?
You prevent rub-off, or "crocking," by vigorously buffing the leather with a clean cotton cloth once the dye is dry. This critical step removes excess pigment that hasn't fully bonded with the grain. Following up with a high-quality sealer or topcoat is also essential. This final layer creates a physical barrier that locks the colour in place, protecting your clothing and ensuring a professional finish.
Should I dye the leather before or after I cut my pattern pieces?
Most artisans find it best to dye their leather after cutting the pattern pieces but before final assembly. Dyeing a whole hide is often wasteful and makes it harder to achieve a perfectly even coat on the specific areas you'll actually use. By dyeing individual pieces, you can also ensure the edges are properly saturated. Just remember to allow for the slight shrinkage that can occur during drying.
Is it possible to dye dark leather to a lighter colour?
It is not possible to dye dark leather to a lighter colour. Leather dye works much like a wood stain; it is translucent and adds to the existing colour of the hide rather than covering it. If you start with a dark brown base, adding a tan dye will only result in a slightly darker, muddier brown. For vibrant, custom results, always start with a natural russet or pale hide.
What is the best way to clean my leather before applying dye?
The best way to clean your leather is to use a professional deglazer or high-grade rubbing alcohol. This step is vital for how to dye vegetable tanned leather successfully because it removes the "tannery film" of oils and waxes. Simply wipe the surface with a lint-free cloth dampened with the deglazer. This opens the pores and ensures the pigment can penetrate deeply and evenly across the piece.
How long does it take for leather dye to fully dry and cure?
While leather dye may feel dry to the touch within an hour, you must allow it to cure for a full 24 hours. This window gives the solvents enough time to evaporate completely and allows the pigment to settle into its permanent shade. Rushing into the finishing or conditioning stages too early can lead to splotchiness or poor sealer adhesion. Patience is a key part of the artisan's process.
Can I mix different colours of leather dye to create a custom shade?
Yes, you can mix different colours to create a custom shade, provided the dyes share the same base. You can mix alcohol-based dyes with other alcohol-based colours, but you should never mix an alcohol dye with a water-based one. When experimenting with custom blends, always use a glass jar and keep precise measurements. Test your new shade on a scrap piece of the same hide to see how it cures.
Do I need to apply a finish or sealer after dyeing my leather?
You absolutely need to apply a finish or sealer after you finish how to dye vegetable tanned leather. Dyeing is a drying process that leaves the fibers exposed and the pigment vulnerable to moisture and friction. A sealer like carnauba wax or a synthetic topcoat protects the leather from the elements and prevents the colour from fading. It also adds that final professional sheen that defines high-quality leatherwork.
