




How to Make Leather Goods That Sell: A Maker’s Guide
A beautiful leather product isn’t automatically a product people will buy. The difference often starts before you cut the leather: with a clear idea of who needs the item and why. If you’re wondering how to make leather goods that sell, start by defining the buyer, not by making a large batch and hoping it finds an audience.
It’s sensible to consider material costs, hours at the bench, and whether a price will feel fair to customers. It’s also easy to spend weeks refining a design before finding out whether anyone wants it. Good craft needs a sound plan as well as careful cutting, stitching, and finishing.
In this guide, you’ll learn how to match a useful product to a reachable audience, test interest with a prototype or small run, and calculate a price that accounts for leather, hardware, labour, overhead, and selling fees. You’ll also learn how to choose materials and build a repeatable process, so you can grow one considered step at a time.
Key Takeaways
- To learn how to make leather goods that sell, define a specific buyer and the practical need your product will meet.
- Compare product ideas by function, construction difficulty, production time, material yield, and sizing consistency before choosing a prototype.
- Build a full-cost worksheet that includes materials, usable leather yield, labour, packaging, and operating overhead.
- Test demand with a prototype and a limited batch, then track buying signals such as reservations and completed sales.
- Plan material purchases around prototypes and small batches. Hab-To Leather House offers vegetable-tanned leather, hardware, tools, and bundles with no minimum order requirement.
How to Make Leather Goods That Sell Starts with a Specific Buyer
There’s no pattern, leather thickness, or product category that guarantees a bestseller. A design has a better chance of selling when it fits the needs and priorities of the people it’s made for. That makes “everyone who likes handmade goods” too broad a target. To learn how to make leather goods that sell, give your idea a buyer, a setting, and a reason to exist.
Picture a commuter who carries a few cards, keys, and earbuds but doesn’t want a bulky bag. That routine could point toward a compact organiser. Or consider someone whose everyday belt is worn out and wants a durable replacement. These are clearer starting points than “I want to make a wallet” because they describe a situation the product could improve.
A sellable product is a useful item made for an identifiable customer, with a clear purpose in that customer’s life.
Turn a broad leathercraft idea into a customer problem
Before drawing a pattern, look at the routine around the product. What does a potential buyer carry? What do they use every day, repair often, or struggle to keep organised? Ask people who fit your intended customer group. Listen for recurring frustrations and the words they use to describe them.
Your enthusiasm matters, but it isn’t proof of demand. Separate “I’d enjoy making this” from “people have shown interest in this solution.” Write a short product brief that narrows the concept to one user, one use case, and one benefit. For example:
- User: someone who carries a few everyday essentials.
- Use case: keeping those items together during a daily commute.
- Benefit: a compact, easy-to-carry organiser.
This brief keeps later choices focused. Construction and finishing should serve the intended use, not add complexity just because a technique looks impressive. Once you know what the item needs to do, Leather Crafting Techniques offers a general overview to explore as you consider how to make it.
Choose a niche you can reach and serve
A promising audience is one you can learn from. Look to existing customers, craft and hobby communities, work-related groups, and online spaces where people discuss the routines your product might support. You don’t need the biggest market. Compare gifting, everyday-use, fashion, and specialist needs by how well you understand the buyer and can reach them.
- Gifting: What occasion is the item for, and what would make it useful beyond the moment it’s received?
- Everyday use: Which repeated task or carry habit could the design serve?
- Fashion or specialist use: What preference, activity, or practical requirement shapes the buyer’s choice?
Record the exact phrases people use when describing what they want, what bothers them, or what they already carry. Those words can sharpen product descriptions and guide design details. They also give you specific questions to explore as you develop a prototype and test whether interest turns into buying intent.
Choose and Prototype a Leather Product You Can Make Consistently
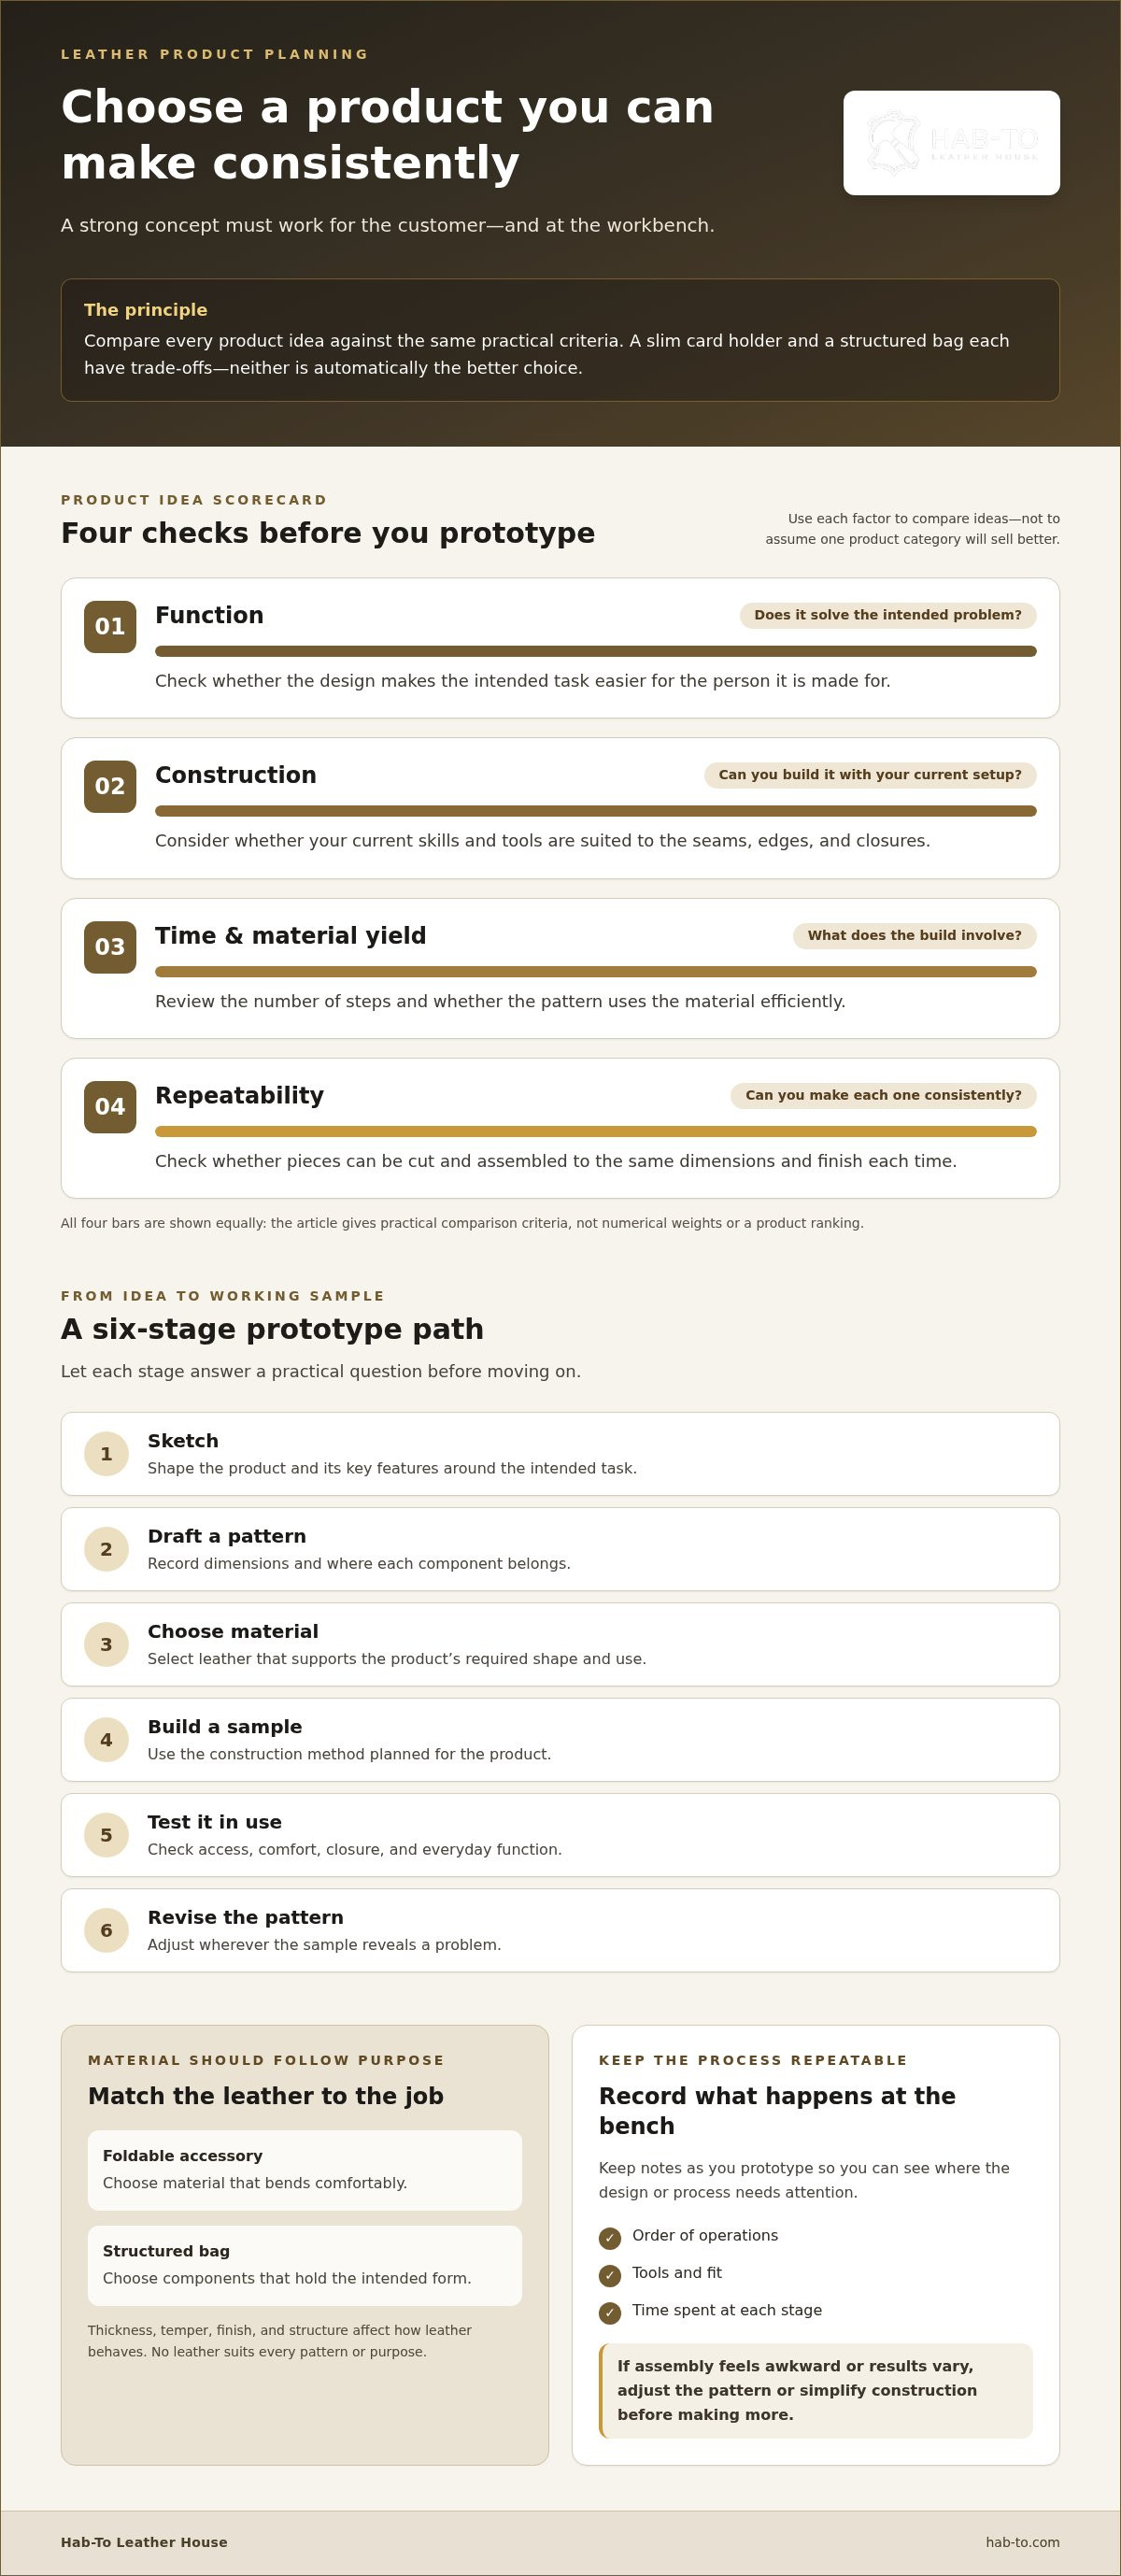
A promising concept still has to work at the workbench. Before committing to a design, check whether it solves the intended problem and whether you can produce it reliably. A prototype helps uncover awkward construction, unclear dimensions, and material choices that don’t suit the item’s use. It’s a working test, not a miniature version of a finished product launch.
Compare ideas against the same practical criteria. A slim card holder may be quick to assemble and simple to size consistently, while a structured bag can involve more panels, reinforcement, and assembly steps. Neither is automatically the better choice. Consider:
- Function: Does the design make the intended task easier?
- Construction: Can you complete the seams, edges, and closures with your current skills and tools?
- Time and material yield: How many steps are involved, and can the pattern use the material efficiently?
- Repeatability: Can you cut and assemble each piece to the same dimensions and finish?
Make a prototype that answers practical questions
Work through the design in order, and let each stage answer a question before you move on:
- Sketch the product and its key features around the intended task.
- Draft a pattern with dimensions and component locations.
- Choose material that supports the required shape and use.
- Build a sample using the planned construction method.
- Test it in use for access, comfort, closure, and everyday function.
- Revise the pattern wherever the sample reveals a problem.
Keep notes on the order of operations, tools, fit, and time spent at each stage. If assembly feels awkward or results vary between attempts, adjust the pattern or simplify the construction before making more. A repeatable design is easier to produce consistently and evaluate fairly.
Match leather and construction to the intended use
Thickness, temper, finish, and structure all affect how a leather piece behaves. A foldable accessory needs to bend comfortably; a structured bag needs components that hold its intended form. Choose material after considering the design, not just its appearance. Pueblo vegetable-tanned leather is one option to explore, but no leather suits every pattern or purpose. Compare it with other vegetable-tanned choices, including Vaccheta, based on your project’s requirements.
Natural variation matters during layout. Differences across a hide can affect how pattern pieces fit, so don’t assume every section will cut identically or yield the same usable area. Plan around the pattern, inspect the material, and allow flexibility for flaws or irregular edges. For bags, consider how the leather’s structure works with the construction method. If you’re gathering tools and supplies for a first sample, a leathercraft bundle can help bring materials together.
Price Leather Goods by Calculating the Full Cost of Making Them
A product can attract interest and still be difficult to sustain if you leave out part of the cost of making it. Price from the work and materials actually required, not just the visible piece of leather. Start by recording every input for one finished item, then check whether the resulting price fits the customer and market you have in mind.
A product price must account for materials, labour, and business overhead. Revenue is the money brought in by sales; profit is what remains after the costs of producing and selling those goods are accounted for. If you leave out your own time, a popular design can keep you busy without making the work sustainable. A full calculation helps you decide how to make leather goods that sell without undercounting the effort behind each piece.
Calculate the real material and labour input
Use a completed prototype as your costing reference. Measure what it consumes, track active work time by task, and record costs consistently. Leather yield deserves particular attention: a pattern may not fit neatly across a hide because of layout, defects, irregular edges, offcuts, or natural variation. Note reusable offcuts separately, but don’t assume every remaining piece can serve another project.
- Leather: Record the amount needed for the pattern, and account for usable yield rather than charging only for the area of the finished item. Compare material choices, such as those in this vegetable-tanned leather selection, with your prototype’s requirements.
- Hardware and thread: Include every buckle, snap, rivet, fastener, and thread used in the piece.
- Consumables: Add supplies used during construction and finishing, even when each item seems minor.
- Packaging: Count the materials used to prepare each order for the customer.
- Labour: Track time spent cutting, assembling, finishing edges, inspecting, and packing. Apply a consistent value to that time.
- Operating and selling overhead: Allocate relevant business costs, such as workspace and equipment expenses, plus any platform or payment fees that apply to a sale.
Check whether the product economics are workable
Once the worksheet is complete, compare the price it requires with the value the product offers and the position you want in the market. A more involved design may need a price that reflects its construction time and material use. If that price doesn’t make sense for the intended customer, revisit the product, not just the arithmetic.
Look for changes that preserve the item’s purpose while reducing unnecessary effort: simplify a seam or closure, adjust the pattern to improve cutting yield, or standardise components. Recalculate after each revision. The goal isn’t to guarantee a particular profit. It’s to know what each piece costs to make, what your price needs to cover, and whether the design can work for both the buyer and the maker.
Test Demand and Prepare a Small, Repeatable Leathercraft Launch
A prototype proves you can make the item. A small launch helps show whether people want to buy it. Keep the test manageable: present the prototype to your intended audience, ask focused questions, then offer a limited batch before committing to more material or production time. This makes learning part of the making process.
Gather evidence before making a larger batch
Show clear photos from useful angles, and explain what the item is designed to do. Ask potential buyers what they’d use it for, which size or feature matters most, and what would influence their decision to purchase. Questions about function, comfort, finish, and design can reveal specific improvements. General questions such as “Do you like it?” often invite encouragement without showing whether the product meets a real need.
Keep reactions and buying actions in separate records. A compliment is pleasant, but an enquiry about ordering, a reservation, or a completed sale offers stronger evidence. Note repeated questions too. If several people ask about the same dimension, closure, or material, that may point to a gap in your product description or design. After the small batch, review what people asked, reserved, and bought before deciding what to change or make next.
Build a repeatable workflow and product presentation
Write down the pattern version, materials, construction order, and final quality checks for each batch. A simple checklist helps you catch inconsistent dimensions, missed stitching, or uneven edge finishing before an item is packed. Keep the workflow clear enough to follow again without relying on memory.
Present the product honestly. Use clear photos, describe its intended use and materials, and explain care in practical terms. If natural material variation affects appearance, say so plainly. Accurate descriptions help customers understand what they’re considering and give you a consistent way to present each batch.
What You Will Need
Prepare supplies before starting the small batch, and use the same materials and tools for each piece where possible. Your checklist may include:
- Chosen leather that suits the design and intended use.
- A tested pattern with the current dimensions and component placement.
- Cutting and stitching tools suited to the construction steps.
- Hardware and thread selected for the prototype.
- Finishing supplies, including Tokonole and edge-finishing tools if the design calls for them.
- Packaging that’s ready for the finished pieces.
Use a written list to keep each run consistent. Choose tools and finishing materials that suit the specific steps in your design.
Start small, record what happens, and let actual customer actions guide the next run. Explore leathercraft starter bundles for materials and tools to support a first project.
Source Materials and Grow a Leather Goods Business One Step at a Time
Once your prototype and small batch have shown you what the design needs, use those findings to guide your next material order. Buying for a tested pattern helps you assess how the leather cuts and handles before increasing stock. It also keeps your decisions tied to real production needs rather than assumptions about what a broader product range might require.
Source for the design and batch size you have tested
Match the leather type, cut, and quantity to the pattern and intended use. For a bag project, compare the design’s needs with the vegetable-tanned leather selection. Hab-To supplies vegetable-tanned leather, hardware, tools, and crafting bundles with no minimum order requirement. Small cuts and panels let makers source material for a prototype or modest batch before deciding whether to expand.
Keep a record of what you ordered, what the pattern used, and which offcuts remain usable. That information can make the next order more accurate. Bulk discounts are available on product pages. Review the product details as you plan, rather than assuming the same terms apply to every material or quantity. VAT is included for purchases within the Netherlands and VAT exclusive for other countries.
Use trusted material guidance as the business develops
As designs evolve, review material choices alongside the pattern and the item’s intended use. Hab-To focuses on materials and craft supplies for makers. For guidance on material choices, you can book a free 15-minute video consultation. Bring your project details and questions from the prototype stage to make the discussion useful.
Building a leathercraft business is a practice of steady decisions: learn from each run, refine your process, and expand when the work and customer response support it. Hab-To’s leathercraft masterclasses offer a learning resource as you develop your skills and projects.
Related resources
- Leather for bag-making projects
- Leathercraft learning and masterclasses
- Guidance on choosing materials for a project
For your next project: Choose materials and tools that suit the prototype or small run you’re preparing.
Let Your Next Prototype Set the Pace
Your first launch doesn’t have to define the whole business. Treat each design as a chance to learn, then let customer response and your own making experience shape the next decision. That steady approach keeps the craft at the centre while you build a business around work you can stand behind.
If you’re still working out how to make leather goods that sell, begin with one considered project. Hab-To brings more than 160 years of family leather experience to its range of maker supplies, including vegetable-tanned leather, hardware, tools, and curated craft bundles. Choose what supports the work in front of you, and grow from there.
Good leathercraft takes patience. So does building a thoughtful product line. Each careful test can bring you closer to designs that serve customers well and feel right to make.
Make the next piece with care, curiosity, and confidence.
Frequently Asked Questions
What leather goods sell best?
No single leather item sells best for every maker. The right opportunity depends on the audience, the product’s purpose, and how clearly buyers can understand its value. As you explore how to make leather goods that sell, look for a specific use case, such as an organiser for a particular set of everyday essentials or a replacement for an accessory people use regularly. Popular categories can spark ideas, but test your own design rather than assuming category popularity proves demand.
How do I find customers for handmade leather goods?
Start with people who already share the routine your product is designed for. A maker of travel accessories might learn from frequent travellers; a maker of equestrian items could listen in relevant riding communities. Ask what features matter in real use, then share a prototype where that audience already gathers. Keep notes on the phrases people use and the questions they ask. Those details can help you explain the product in language customers recognise.
Can I make money selling leather goods?
Yes, it’s possible, but sales alone don’t show whether the business is worthwhile. Look at what remains after each sale’s direct costs, then consider how much of your available making time the product consumes. A design that sells occasionally but takes a long time to produce may behave differently from a simpler item customers buy repeatedly. Review results over several small production cycles before deciding whether to expand or adjust your product range.
How much should I charge for handmade leather goods?
There’s no universal price for handmade leather goods. After calculating your production costs, consider who the item is for, what practical value it offers, and how its materials and finish position it in the market. You can test customer response by presenting a clear offer and observing whether people ask about ordering, not only whether they praise the design. Don’t copy another maker’s price without understanding how their construction, materials, and process compare with yours.
Is leathercraft a good business for beginners?
Leathercraft can be explored on a small scale, but learning a technique and running a reliable business are separate skills. Begin with a manageable design that lets you practise accurate cutting, stitching, and finishing without juggling too many construction challenges at once. Use practice pieces to refine your technique, and keep notes on where mistakes occur. A focused first product can help you understand your tools and workflow before you take on more complex designs.
Can I sell custom leather goods as well as standard designs?
Yes, custom work can sit alongside standard designs, but each variation can add planning and communication. Set clear boundaries before taking an order: decide which details can change, such as colour or initials, and which dimensions or construction choices remain fixed. Record the extra design and making time for each variation. This helps you decide whether a request fits your workflow and keeps one-off adjustments from disrupting production of your core designs.
How can I photograph leather goods so customers understand them?
Arrange photos to answer the questions a buyer might have while viewing the listing. Show the item closed and open, include a familiar object for scale, and photograph important construction details such as seams or hardware. Use consistent lighting and a simple background so the leather’s colour and finish are easy to judge. A sequence of purposeful images, paired with a precise description, can make the product easier to assess without relying on decorative styling.
Ready to prepare your next prototype? Browse Hab-To’s leathercraft bundles for materials and tools to support your project.
Disclaimer
All our blog articles are made for information purposes only we dont take responsability for any content from third parties.