




How to Measure Leather: The Complete Crafter’s Guide to Area and Thickness
Imagine standing over a pristine piece of Shell Cordovan, knife in hand, only to realize your pattern won't fit because you miscalculated the usable area. It's a heart-sinking moment every crafter wants to avoid. We've all been there, staring at an irregular hide and wondering how those natural curves translate into the square footage required for a new bag. Dealing with "ounces" when you're thinking in millimeters only adds to the frustration. At Hab-To Leather House, we believe that understanding how to measure leather accurately is the secret to professional results and cost-effective crafting.
I want to help you master this skill so you can buy with total confidence and ensure you always order exactly what you need. This guide covers the math behind decimeters and square feet, demystifies the weight-to-thickness conversion, and introduces the essential tools for verification. By the end, you'll be able to calculate your needs for any project, from a slim wallet to a complex handbag. Let's turn that confusion into craft-ready expertise.
Key Takeaways
- Distinguish between total hide area and actual usable yield so you never run out of material mid-project.
- Discover how to measure leather area using square feet or decimeters (dm²) to accurately estimate costs for premium Italian leather.
- Decode the "weight" paradox by understanding the relationship between traditional ounces and precise millimeter measurements.
- Learn which specialized leatherworking tools are required to verify thickness and maintain professional standards in your workshop.
- Use your measurements to shop smarter by sourcing specific panels or shoulders without the burden of minimum order quantities.
Understanding Leather Measurements: Why It’s Not Like Fabric
Leather isn't produced on a loom; it is grown. This biological origin changes everything about how we approach patterns and material orders. Unlike a consistent roll of denim, a hide arrives with a story told through irregular edges. You'll find curves where the legs were and narrower sections near the neck. This natural geometry is why learning how to measure leather is the first skill any serious crafter should master. It's about respecting the material and ensuring precision in your workshop. This same dedication to exact dimensions is found in other high-end crafts; for instance, you can check out Maatkracht Trappen to see how precision measurements are essential for bespoke wooden staircases.
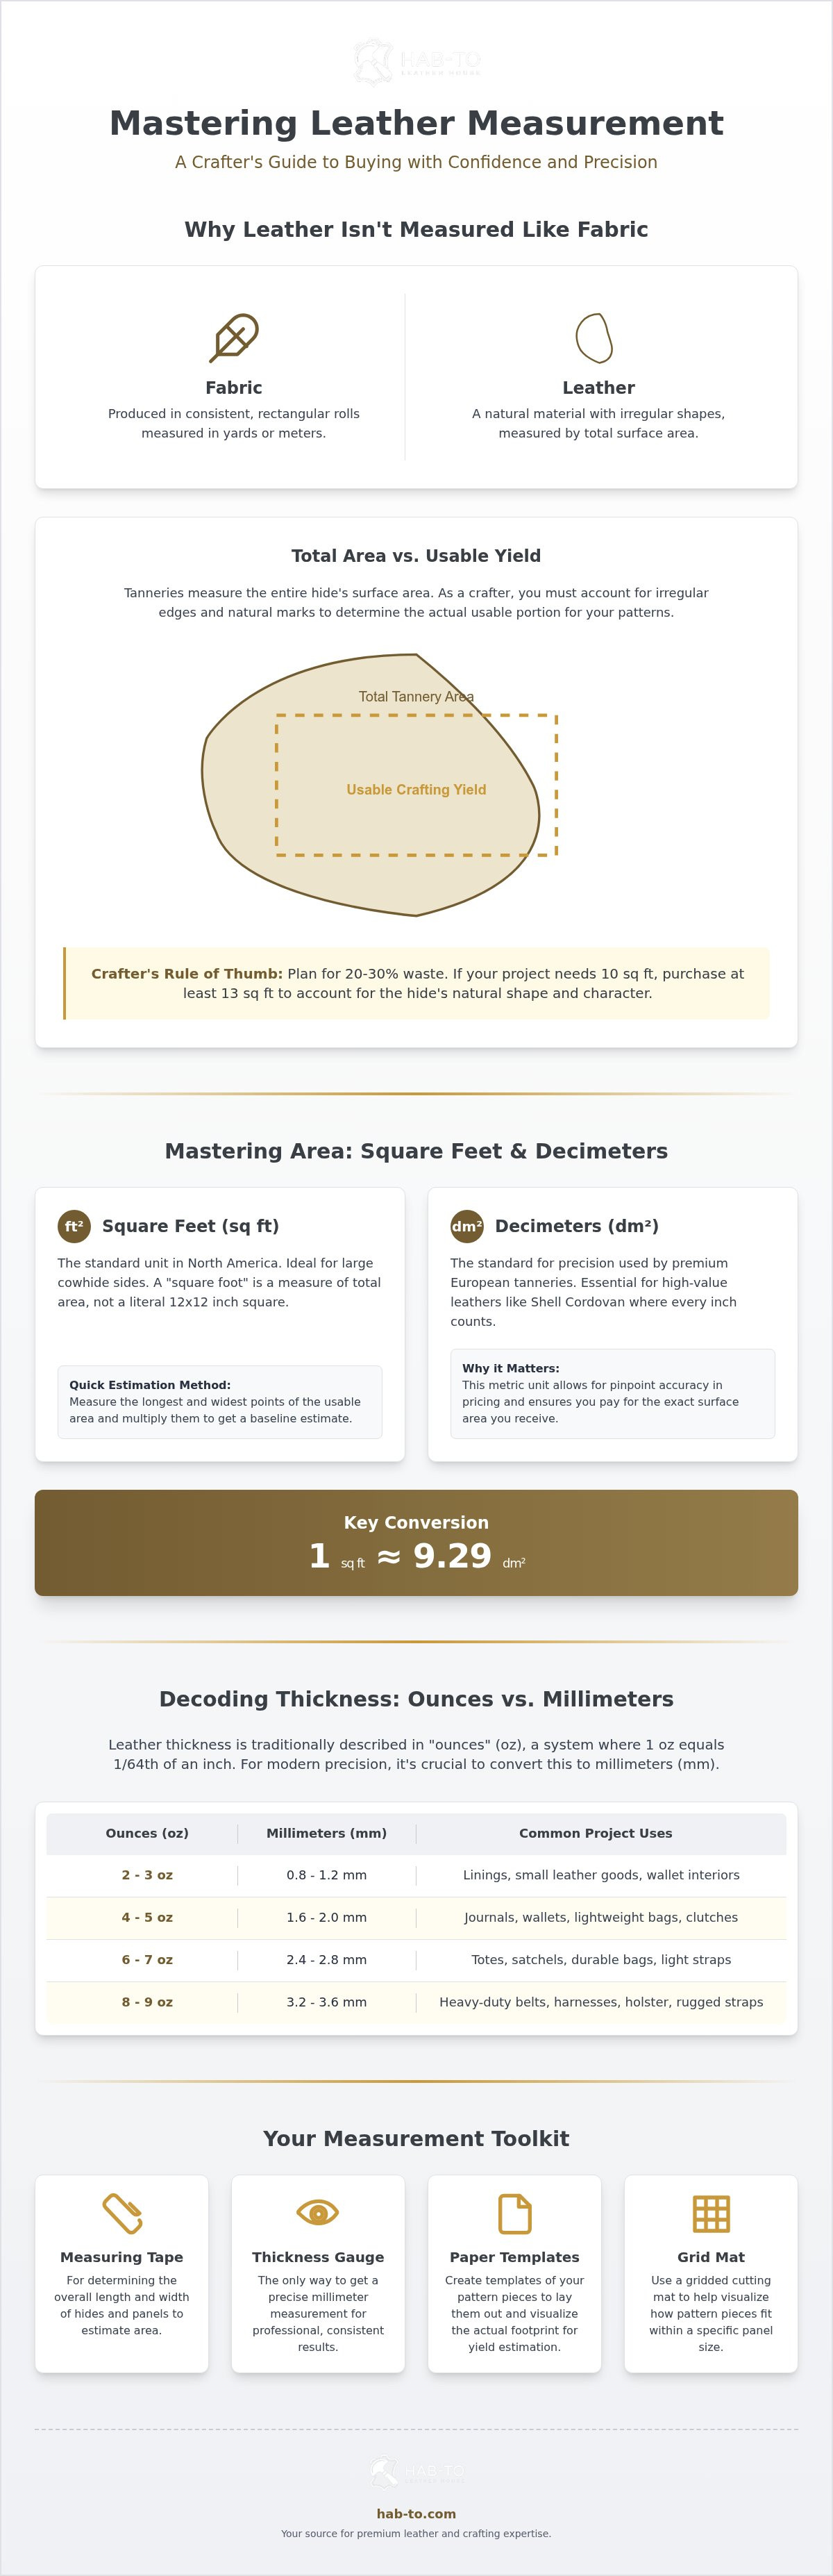
Modern tanneries use laser scanners to calculate total surface area, but as a crafter, you can't use every square centimeter. There is a distinction between the "Total Area" stamped by the tannery and the "Usable Area" you can actually cut into a bag. Mastering this difference is one of the two pillars of measurement, alongside Leather thickness measurement. At Hab-To Leather House, we've spent over 160 years working with these materials. We know that no two hides are identical, which is why you must understand the hide's anatomy before making your first cut.
The Challenge of Irregular Shapes
A hide is divided into sections: the belly, the shoulder, and the butt. Each has different properties. The belly is often stretchy, while the butt is firm and dense. When you buy vegetable tanned leather, you aren't getting a perfect rectangle. You're getting a map of an animal's life. Natural defects like scars or brand marks are part of the authentic charm of premium hides, but they dictate where your pattern pieces can go. A "square foot" in leather is a measure of total surface area, not a literal 12x12 inch square.
Yield Estimation for Beginners
If you're coming from the world of textiles, you must transition from yards to square feet or decimeters. A good rule of thumb is the 20-30% waste rule. If your pattern pieces total 10 square feet, buy at least 13 square feet. This buffer accounts for irregular edges and natural character marks. I always recommend creating paper templates of your project first. Laying them out on a flat surface is the best way to see the actual footprint they take up. This simple step takes the guesswork out of how to measure leather for your specific project needs.
Measuring Leather Area: Square Feet, Decimeters, and Panels
Understanding units is the bridge between a creative design and a finished product. Most North American suppliers talk in square feet, which is the standard for large cowhide sides. However, if you're sourcing from world-renowned European tanneries, you will encounter the decimeter (dm²). This metric unit is the language of precision. Knowing how to measure leather across these different systems prevents costly ordering mistakes. At Hab-To Leather House, we believe in accessibility. We specialize in selling by the panel or shoulder. This means you don't have to invest in a massive hide for a small project. It is about getting exactly what you need without the waste.
Calculating Square Footage at Home
You don't need a professional laser scanner in your workshop. Use the rectangle method for a solid estimate. Measure the longest and widest points of the usable area on your hide. Multiply these numbers to find the total area. It gives you a rough baseline. For intricate items like watch straps or wallets, a grid system works better. Lay your patterns on a grid to see how they fit into a shoulder or a smaller panel. This visualization helps you decide between buying a whole hide or a specific cut. If you're making a single bag, a shoulder is often the most economical choice.
The Decimeter (dm²) Explained
Premium Italian tanneries like Conceria Maryam use decimeters for a reason. It allows for pinpoint accuracy in pricing and selection. One square foot is approximately 9.29 decimeters. This granularity is vital for high-value materials. When you're working with Shell Cordovan, every square inch matters. While the ASTM leather thickness standard guides physical thickness tests, the dm² ensures you pay for the precise surface area you receive. This level of detail is why we offer these premium leathers in smaller, manageable sizes. It makes luxury materials accessible to every crafter. If you're just starting to explore these units, our leather bundles are a great way to practice how to measure leather without a massive initial investment. You get to feel the quality and see the measurements firsthand.
Measuring Leather Thickness: Ounces vs. Millimeters
Understanding thickness is where many crafters feel the most confusion. You'll often hear us talk about the "weight" of a hide. It sounds like we're putting it on a scale to see how heavy it is. In a way, we are. Leather weight is the weight of one square foot of material. This traditional system can be a bit of a paradox. You might ask why we don't just use a ruler. The answer lies in history. But for modern precision, especially when sourcing from European tanneries, millimeters (mm) have become the gold standard. Learning how to measure leather thickness correctly ensures your needles don't snap and your wallet doesn't end up looking like a brick.
You also have to account for the natural taper of the animal. A hide isn't a manufactured board. It's an organic material. The thickness often varies slightly as you move from the dense butt toward the softer belly. When I'm selecting pieces for you at Hab-To, I look for these nuances. Knowing how to measure leather means checking multiple points on a hide to find the most consistent section for your specific pattern pieces. It is about finding the sweet spot for your design. I've spent 25 years feeling these differences. I want you to feel that same confidence when you pick up your tools.
The Ounce-to-Millimeter Conversion
The math is simpler than it looks once you know the ratio. One ounce (1 oz) equals approximately 0.4 mm. If you remember this baseline, you can translate any listing. For example, a 2-3 oz leather is roughly 0.8 mm to 1.2 mm. This is ideal for delicate linings or small pockets. On the other end of the spectrum, an 8-9 oz leather sits between 3.2 mm and 3.6 mm. This is what you'd want for a heavy-duty belt that lasts a lifetime. Most projects fall somewhere in between. Knowing these numbers helps you visualize the final feel of your work before the leather even arrives at your door.
Choosing Thickness by Project Type
The right thickness depends entirely on the structure you want to achieve. If you're using Badalassi Pueblo, the 2.2-2.4mm weight is fantastic for unlined bags or sturdy wallet exteriors. It has a rugged, tactile feel that develops a beautiful patina. However, if you're building a refined bifold, you'll need something much thinner for the interior. This is where lining leather comes in. You generally want consistent sub-1.0mm thickness for linings to keep the project slim. Don't be afraid of thicker hides, though. You can always use a skiving knife to thin down the edges of your seams. This technique allows you to use a durable 2.0mm leather while maintaining a professional, flush finish where the pieces overlap.
What You Will Need: Essential Tools for Measuring Leather
Precision isn't a luxury in leathercraft; it is a requirement. You can have the most beautiful piece of Shell Cordovan on your bench, but if your measurements are off by even half a millimeter, your project will suffer. Mastering how to measure leather requires more than just a sharp eye. It requires instruments that can handle the unique texture and compressibility of animal hides. A professional crafter is only as accurate as their measuring tools. If you're serious about your work, you need to move beyond the basic school ruler. It simply can't provide the data you need for high-end construction.
What You Will Need
- Leather Calipers: These are the workhorses of the shop. They allow for precise millimeter readings at any point on the hide, helping you identify the "natural taper" discussed earlier.
- Passers or Dividers: Essential for checking edge thickness and marking consistent stitch lines based on your area measurements.
- L-Square and Tape Measure: Vital for mapping out usable area on larger cow hides and calculating square footage for bag patterns.
- Leathercraft Starter Bundle: A curated set that often includes basic measuring guides and essential tools to get you moving in the right direction.
Digital vs. Analog: Choosing Your Caliper
When you're learning how to measure leather, you'll quickly realize that a standard office ruler is practically useless for checking the center of a large hide. It can only measure what's at the edge. To get a true reading of the thickness across the entire skin, you need tools that can reach into the middle of the material. Digital calipers offer instant millimeter to inch conversions, which is helpful when switching between European and American patterns. Analog calipers, however, never run out of batteries and provide a tactile connection to the material that many traditionalists at Hab-To Leather House prefer. Both have a place on a well-equipped workbench. The key is consistency in your readings.
Sourcing Quality Tools
I always tell my students that buying cheap tools often means buying them twice. You want instruments that stay calibrated through years of intensive use. Explore the Hab-To Leather House Tools Collection for precision instruments that we use in our own workshop every day. Remember to maintain your tools properly. Keep your calipers clean and zero them out before every session. This simple habit ensures that your 1.0mm lining is actually 1.0mm, every single time. Accuracy starts with how you treat your gear and how you respect the material.
From Measurement to Sourcing: Getting Exactly What You Need
You've done the math. You've checked the thickness with your calipers. Now comes the moment of truth: hitting that "buy" button. Strategic sourcing is about more than just finding a beautiful color. It is about matching your project's technical requirements to the right cut of material. Learning how to measure leather is only half the battle. The other half is applying those numbers to a smart purchase that minimizes waste and maximizes your budget. At Hab-To, we want to ensure that every decimeter you buy serves a purpose in your workshop.
The biggest mistake most crafters make is buying a full hide for a small project. If you are making a few watch straps or a slim wallet, you don't need a 20-square-foot side. You need a specific cut. This is where many suppliers fall short by requiring large minimum orders. We believe that premium material should be accessible to everyone, regardless of the project's scale. Our goal is to bridge the gap between industrial supply and the individual workbench.
The No-MOQ Sourcing Strategy
Our "No Minimum Order Quantity" (MOQ) policy is designed for the precise crafter. Because you now know how to measure leather area and usable yield, you can shop for specific panels or shoulders. This is the ultimate way to source premium Italian Leather without a massive bulk commitment. Our 160-year family heritage ensures that when we cut a panel for you, it meets the highest standards of accuracy. We understand that a 30x60cm panel needs to be exactly that. By buying only what your pattern requires, you can afford higher-quality skins like Shell Cordovan or specialized Olivenleder that might otherwise be out of reach.
Expert Advice from Mike
Sometimes, even with the best tools, a little bit of doubt creeps in. Is that 1.4mm Virgilio Pueblo actually the right choice for a turned edge? I'm here to help you clear that up. I invite you to book a Free Video Consultation. We can look at your patterns together and verify your measurements before you place your order. My personal rule of thumb is simple: always buy 10% more than your "perfect" layout. It accounts for those small mistakes that happen to the best of us. For those ready to move into Advanced Leathercraft, our masterclasses offer a deeper dive into these technical details.
Final Checklist Before You Buy:
- Have you added 20-30% to your total area for cutting waste?
- Is the millimeter thickness compatible with your stitching irons?
- If buying Italian skins, have you double-checked the sq ft to dm² conversion?
- Do you have enough Ecostick 1804 leather glue for the assembly?
Elevate Your Craft with Precision Sourcing
Mastering how to measure leather transforms the way you approach every new project. You now have the technical skills to calculate usable area accurately and convert between decimeters and square feet without hesitation. By understanding the relationship between traditional ounces and precise millimeters, you can select the perfect weight to give your designs the structure and durability they deserve. These fundamentals ensure that every piece of material you buy is used to its full potential.
We are here to support your journey with over 160 years of family expertise and a principled commitment to quality. Our "No MOQ" policy means you can source exactly what you need without the burden of unnecessary waste or excess inventory. We ship our premium vegetable tanned leathers worldwide directly from Amsterdam, bringing the world's finest materials to your workbench.
Frequently Asked Questions
How do I convert square feet to square decimeters?
One square foot is approximately 9.29 square decimeters. To convert, simply multiply your square footage by 9.29. For example, a hide marked as 10 sq ft is roughly 92.9 dm². This conversion is vital when you're sourcing premium Italian leather from tanneries like Conceria Maryam. Understanding these units helps you compare material costs across international suppliers without any guesswork or errors.
What is the best leather weight for making a bifold wallet?
For a standard bifold, a weight between 1.0mm and 1.5mm is usually ideal for the exterior. If you're using something like Badalassi Pueblo, a 1.4mm panel provides excellent structure without being too bulky. For the interior card pockets, you should aim for a thinner lining leather around 0.5mm to 0.8mm. This combination ensures the wallet remains slim even when it's fully loaded with cards and cash.
Why does the thickness of my leather hide vary from edge to center?
This variation is known as the natural taper of the hide. Leather is an organic material, and the skin is naturally denser and thicker along the spine and butt. As you move toward the belly or neck, the fibers become looser and the material thins out. Understanding this is key to learning how to measure leather effectively. Always check multiple points on your hide to find the most consistent section for your pattern pieces.
Can I measure leather thickness without a professional caliper?
You can use a standard ruler or a slotted gauge for quick checks, but these methods lack the precision of a professional caliper. A ruler only allows you to see the edge thickness, which might not represent the entire hide. If you don't have a caliper, try stacking a known thickness of paper next to the leather to get a rough estimate. For professional results, investing in quality leatherworking tools is always the best path.
How many square feet of leather do I need for a standard tote bag?
A standard medium sized tote bag typically requires between 5 and 7 square feet of leather. However, you should always account for the 20-30% waste rule mentioned earlier in this guide. This extra material allows you to work around irregular edges and natural defects. If you're buying a shoulder or a large panel, ensure the dimensions can accommodate your largest pattern pieces, such as the main body panels and straps.
What does "oz" mean in leather thickness, and is it related to weight?
In the leather world, "oz" refers to the weight of exactly one square foot of the material. One ounce of leather weight is equivalent to 1/64 of an inch, or approximately 0.4mm. It isn't a measurement of the hide's total weight on a scale. Instead, it's a traditional way to describe thickness. A 4 oz leather will always be roughly 1.6mm thick, regardless of whether you're buying a small scrap or a full side.
How do I account for scars and brands when measuring a hide?
Scars and brands are part of the hide's story, but they can't always be included in your project pieces. When you're figuring out how to measure leather for a specific design, lay your templates on the hide to map out these areas. This is why we recommend buying 10% to 20% more than your exact pattern area. Using these character marks in non-structural areas can add an authentic, rugged charm to your finished goods.
Is vegetable-tanned leather measured differently than chrome-tanned leather?
Both types are measured using the same international standards for area and thickness. However, vegetable tanned leather is often sold in more specific cuts like shoulders or butts because of its firmness. Chrome tanned leather is frequently sold as full sides due to its softer drape. Regardless of the tanning method, you'll still use square feet or decimeters for area and ounces or millimeters to verify the thickness before you start cutting.
Disclaimer
All our blog articles are made for information purposes only we dont take responsability for any content from third parties.