




How to Prevent Thread from Tangling: A Leathercraft Hand-Sewing Guide
When a hand-sewn seam knots, the thread may not be the problem. Twist can build as you stitch, then gather into loops and tangles. If you’ve had to stop, unpick stitches, or worry about marking the leather, you know how quickly a small snag can break your rhythm. Learning how to prevent thread from tangling starts with managing twist and watching how the thread moves.
A few steady habits can help thread pass smoothly and keep your seam neat. This guide explains why thread twists and knots, how to prepare it before sewing, and what to inspect if tangling keeps happening.
You’ll learn how to relax the thread, let your needles hang to release twist, and choose a suitable thread conditioner. We’ll also look at how needle choice and stitching technique can contribute, so you can troubleshoot one cause at a time instead of changing everything at once.
Key Takeaways
- Identify whether you’re seeing a twist, a loose loop, or a tightened knot before deciding what to do.
- Prepare a manageable length of thread and check that it moves freely through the needle before you begin.
- Guide each thread end deliberately and keep the ends separate as you saddle stitch.
- If a knot starts to form, pause and ease the tension. Pulling both ends can tighten the loop into a harder knot.
- Choose thread and hand-sewing needles that suit your leather and project for smoother, more controlled stitching.
Why Does Leathercraft Thread Tangle During Hand Sewing?
A tangle usually has a cause you can identify. A twist is rotation building along the thread. A loop is slack curling back on itself. A knot forms when the thread crosses and catches. Recognising which one you’re dealing with helps you respond without pulling harder and making it worse.
Thread has a construction and twist of its own. As it passes through a needle and leather, movement can add or redistribute twist, especially if the needle or thread rotates as you pull. For an overview of how thread is made and how its construction affects its properties, see Understanding Thread Properties. To prevent a tangle, notice when and where you first feel resistance or see the thread curl.
A stitching clamp can steady the leather and leave both hands free to guide the thread. This video shows a leather stitching clamp in use:
How twist turns into loops and knots
Each needle pass draws thread through a stitch hole. Depending on how you pull and whether the needle or thread turns, existing twist can gather in one section or spread along the working length. Slack may then form a loop. It can catch on the leather edge, a needle, or the other thread end. If you keep pulling, the loop can cinch into a knot. More force tightens the tangle; it doesn’t remove the twist that caused it.
Which signs point to handling, thread, or a snag?
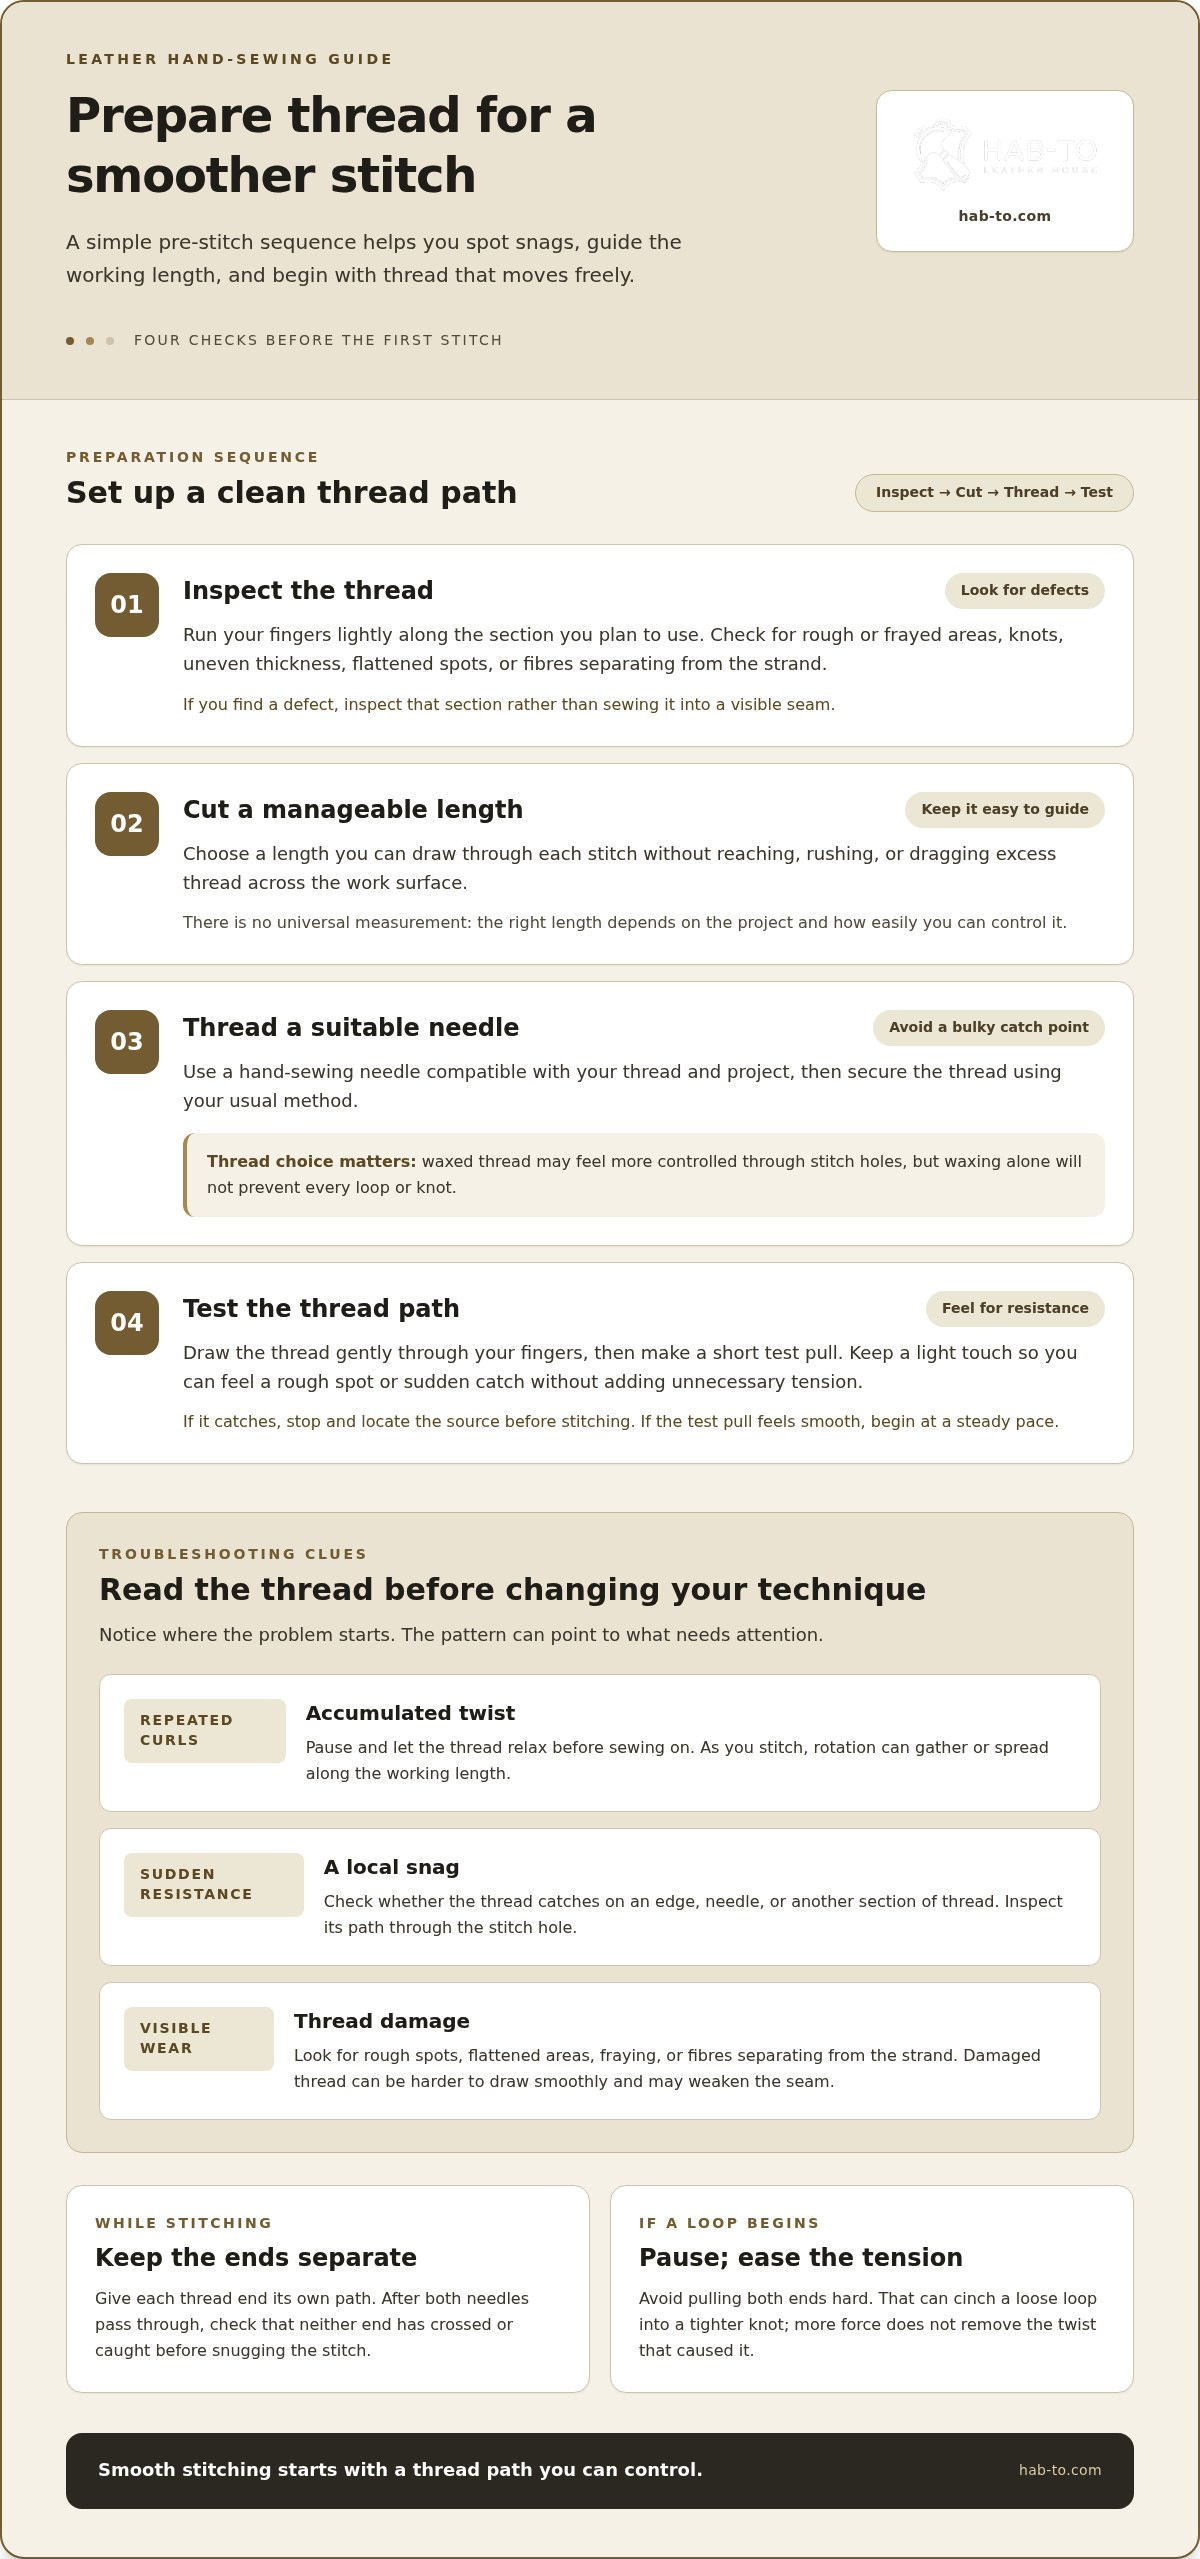
Notice when the problem starts. Repeated curls along the thread suggest accumulated twist, so pause and let it relax before sewing on. Sudden resistance in one spot may mean the thread has snagged on an edge, needle, or another section of thread. If it happens while sewing vegetable-tanned leather, inspect the thread’s path through the hole. For example, Pueblo vegetable-tanned leather is one material makers may work with. The useful clue is where the thread catches, not the leather’s name.
Consider the working length too. Long thread has more opportunity to brush the work surface, loop around nearby objects, or snag as it moves. A quick pull can leave slack behind the needle, where it may catch before you notice. If the thread is damaged or frayed, stop and inspect that section rather than sewing it into the seam. Look for rough spots, flattened areas, or fibres separating from the strand. Damage can make thread harder to draw smoothly through a stitch hole and may weaken the seam.
Use the pattern to narrow down the cause. Twists recurring along the length point to handling; one abrupt catch suggests a local snag; visible fibre damage means the thread needs closer inspection. A pause to identify the sign can save time and help protect the leather and seam.
How to Prepare Thread and Control Twist Before Stitching
A clean start makes thread easier to manage as it moves through the leather. Twist is the rotation built into or added to a strand. Too much accumulated twist can interrupt smooth hand sewing. You don’t need to eliminate every turn; aim to spot snags early and keep the working thread easy to guide.
Thread construction affects how a strand behaves. The Science of Thread Twist explains how fibres are twisted together to form yarn. Choose thread to suit the leather, project, and stitch plan. Waxed thread may feel more controlled as it passes through stitch holes, but waxing alone won’t prevent every loop or knot. Careful handling still matters.
Choose and inspect thread before beginning
Before threading a needle, lightly run your fingers along the section you plan to use. Look for fraying, uneven thickness, knots, or damaged areas that could catch during sewing. Don’t sew a defect into a visible seam. Choose thread for the project and stitch rather than expecting one type to prevent every tangle.
Set up a manageable thread length and needle
Cut a length you can draw through each stitch without dragging excess thread across the work surface. There’s no universal measurement: the right length depends on the project and how easily you can control it. Use compatible hand-sewing needles and secure the thread using your usual method. A short test pull can reveal resistance before you begin on the project.
Use this simple preparation sequence:
- Inspect: Check the thread along its length for rough, frayed, knotted, or uneven sections.
- Cut: Choose a working length you can guide without reaching or rushing your pulls.
- Thread: Attach the needle securely without creating a bulky catch point.
- Test: Draw the thread gently through your fingers, then make a short test pull. If you feel a snag, stop and locate its source before stitching.
As you draw the thread through your fingers, use a light touch rather than pinching tightly. You’ll be able to feel roughness or a sudden catch without adding unnecessary tension. Keep the thread from winding around your hand, the leather edge, or nearby tools. If the test pull feels smooth, begin at a steady pace and watch for changes in resistance.
Preparation won’t replace careful stitching, but it helps you distinguish a thread problem from a handling problem. If the thread repeatedly catches during the test, inspect the strand and needle before continuing. If you’re gathering materials and tools for hand sewing, explore stitching bundles for related supplies.
Which Sewing Habits Keep Thread from Twisting as You Stitch?
A reliable rhythm helps you spot where each thread end is going before slack turns into a loop. Pull the thread through deliberately, keep the ends apart, and check their position before snugging each stitch. These small, repeatable movements are easier to control than quick pulls.
Keep both thread ends under control
In saddle stitching, each needle passes through the same hole from the opposite side. Hold one thread end in each hand and give them separate paths. After both needles pass through, check the stitch hole to make sure neither end has crossed or caught around the other. Then draw the ends evenly to set the stitch. This brief check helps the thread sit neatly in the seam.
Keep your hand positions consistent from stitch to stitch. For example, guide one end to the left and the other to the right until both have passed through the hole. If an end starts to sag into a loop, pause and lift or feed the slack through by hand. Don’t try to fix it by pulling both ends harder. Once the thread paths are clear, continue.
Use a steady rhythm and watch for resistance
Draw the thread through in a smooth, even motion. Avoid a sharp jerk at the end of each pull, which can make loose thread whip around the project or nearby tools. Keep your hands close enough to the stitch line to guide the thread, but leave room to see both ends and the hole. Rest your forearms comfortably and position the leather so the thread doesn’t drag across its edge.
If you’re using a stitching pony, secure the work so it stays steady while you manage the needles. A pony holds the leather in place and leaves both hands available to guide the thread, but it won’t remove twist by itself. If the thread begins coiling or pulling unevenly, pause, let the needles and thread relax, and release any visible twist before continuing.
Before tightening each stitch, check the thread’s route. Make sure the ends haven’t crossed, a loop isn’t caught against the leather, and the thread moves freely through the hole. This is especially useful at a corner or wherever your hand position changes, since these moments can redirect slack or bring the thread against an edge.
Steady pulls and timely untwisting help keep the thread’s path controlled, reducing loops, snags, and knots as you stitch. If you’re bringing together supplies for hand sewing, explore the stitching bundles as a convenient starting point.
What to Do When Thread Starts Tangling Mid-Stitch
A forming loop is easiest to handle before it tightens. Stop sewing as soon as you notice it. Ease off the tension and leave some slack; don’t yank both ends, because that can cinch the loop into a hard knot against the leather. Find where the loop begins and which thread end is caught. A patient pause is safer than forcing the stitch.
Release a loose loop before it becomes a knot
Hold the thread without pulling it taut. Gently separate the loop from the needle, leather edge, or other thread end. Ease the caught end back through the loop instead of dragging the whole tangle through the stitch hole. Once the loop opens, smooth the thread between your fingers and check that both ends have a clear path. Tighten the stitch only when the loop is gone.
Use this quick check to match the symptom to your next move:
| What you notice | Check | Immediate response |
|---|---|---|
| A loose loop beside the stitch | Which end has slack or is caught? | Keep tension light and ease the loop open. |
| A sudden catch as thread passes through | Inspect the needle, stitch hole, and thread path. | Stop pulling and free the snag gently. |
| Twists gathering along the thread | Has the working thread coiled or turned? | Pause and let accumulated twist relax. |
| Fraying or visible damage | Is the damaged section moving through the stitch? | Stop and replace compromised thread. |
Decide when to replace thread or undo a stitch
If the thread is frayed, flattened, or still catches after inspection, replace it rather than hiding the damaged area in the seam. If a knot has tightened against the leather, don’t force it through the hole. Carefully ease back the last stitch to give the knot room to loosen. Work slowly so the needle or thread doesn’t scrape the leather or enlarge the stitch hole.
Before restarting, look for the cause. Check the needle for a rough spot, see whether the thread snags at the hole, and make sure the stitch path is clear. If twist caused the loop, let the thread relax before sewing again. These steps help prevent thread from tangling without risking a damaged seam through rushed pulling.
Stay methodical: stop, release tension, locate the catch, then decide whether to smooth, unpick, or replace the thread. If a knot won’t loosen with gentle handling, undoing the stitch is usually kinder to the leather than pulling harder.
What You Will Need for Smoother Leather Hand Sewing
A dependable setup doesn’t need to be complicated. Thread and a needle suited to your leather and stitch plan, scissors, and a clear place to work are a solid starting point. Organized tools also make it easier to tell when thread catches on the work surface rather than in the stitch.
What you will need: a simple hand-sewing setup
- Suitable thread: Choose thread that works with your leather and seam. Consider how it moves through the stitch holes and whether you can guide it comfortably.
- Compatible hand-sewing needles: Use needles suited to your thread and sewing method. A needle that passes smoothly through the prepared stitch path helps avoid unnecessary resistance.
- Scissors: Keep scissors nearby to cut thread cleanly or remove a damaged length when needed.
- An organized work surface: Clear away scraps, loose materials, and tools that could catch the thread as you pull it through.
Match the thread and needle to the project instead of relying on one combination for every piece of leather. If the thread struggles to pass through the stitch holes, pause and inspect the fit and path rather than pulling harder. Keep the working thread away from the edge of the workbench and other tools. A tidy work area helps prevent avoidable snags.
Leatherworking tools from Hab-To Leather House can support hand-sewing tasks across different projects. Keep the tools you need within reach and put the rest aside so the thread has fewer obstacles to catch on.
Build a repeatable routine for your next seam
Before each seam, inspect the thread, prepare a manageable length, and check that it moves freely. As you sew, guide the thread steadily and notice any change in resistance. If twist begins to build, pause and release it before continuing. This routine helps you work out whether tangling comes from the thread, its path, or the way you’re handling it.
After sewing, note what happened. Did the thread catch at one stitch hole, coil after repeated pulls, or fray as it passed through the leather? A brief note about the thread, needle, and point where the snag appeared can help you adjust your setup next time. Change one thing at a time so you can tell what improves the process.
If you’re gathering supplies for hand sewing, stitching bundles are one option for related materials. Keep the essentials close, the work area clear, and the thread moving at a pace you can control.
Explore stitching bundles to find everything you need in one convenient package.
Carry a Smoother Stitching Rhythm Into Your Next Project
Use your next seam to build a steadier hand-sewing rhythm. Notice how the thread responds, and treat a forming loop as a cue to pause rather than pull harder. With practice, you’ll spot the signs earlier and spend less time unpicking stitches. Learning how to prevent thread from tangling comes down to a thoughtful pace that protects your work and your enjoyment of the craft. If you're also exploring custom textile projects beyond leathercraft, Just T-Shirt Quilts offers bespoke quilts crafted from your favorite shirts.
At Hab-To Leather House, Mike brings over 25 years of personal leather expertise to a maker-focused range of leathercraft tools and curated stitching bundles. Choose supplies that suit your project, then put these careful handling habits to work.
Take your time, trust your hands, and enjoy every clean, even stitch.
Frequently Asked Questions
Why does my hand-sewing thread keep twisting?
Thread often twists because each pass through the needle can rotate or redistribute the strand’s existing twist. If it coils along the length, twist may be building gradually; if resistance appears at one spot, inspect for a local catch. During a long seam, pause at a natural stopping point and let the thread hang freely so the twist can relax. Then resume with a smooth pull. This helps you see whether handling or damage is contributing.
Does waxed thread prevent tangling?
Waxed thread may feel easier to guide, but it can’t guarantee a tangle-free seam. The needle still carries thread through repeated passes, and slack can catch regardless of its coating. Pair suitable thread with controlled handling. Try a few stitches on a scrap of the same leather first and notice whether the thread lies smoothly and moves without snagging before sewing the finished piece.
How long should thread be for hand sewing leather?
Choose a length you can move comfortably between your hands and the stitch line rather than using one measurement for every project. A seam on a small panel may be easier to manage with a shorter length than a longer run. Consider the size of the piece, your sewing position, and your experience. If thread repeatedly catches or coils before you finish a seam, shorten the next length and compare.
What should I do if a knot forms in my sewing thread?
Stop sewing and avoid pulling the knot tight. Leave some slack, then check whether the loop is caught around the needle, another thread end, or the leather edge. Work it loose gently. If it won’t open without force, carefully back out the affected stitch and inspect the hole before sewing again. Forcing a tight knot through can scrape the leather or distort the stitch.
Can the needle cause thread to tangle?
Yes. Thread can catch at the needle’s eye or snag as it passes through a stitch. Look for fraying near the eye and test whether the thread moves freely through it. Then check the stitch hole for resistance. If the thread catches at the same point on each pass, focus on that spot instead of replacing several tools without first finding the cause.
Should I replace thread that keeps tangling?
Not automatically. First inspect the strand for fraying, knots, or worn areas, and check whether it catches at a specific point. If it looks sound, accumulated twist or a difficult working length may be contributing. Try a shorter piece on a test seam. Replace the thread if it’s visibly damaged or still snags after inspection. A new strand won’t by itself correct a handling habit.
How can I stop both ends of thread tangling during saddle stitching?
Give each thread end a consistent route and keep track of which end is in each hand. Before setting a stitch, check that neither strand has crossed over the other or wrapped around a needle. If one end begins to loop, pause and reposition it while the stitch is still loose. This check is especially useful when changing hand position along a curved seam.
Related Leathercraft Reading
- Choosing leather for a hand-sewn project
- Planning a clean saddle-stitched seam
- Preparing vegetable-tanned leather for stitching
Supplies for Your Next Sewing Project
Explore stitching bundles for curated leathercraft supplies to support your next hand-sewing project.
Disclaimer
All our blog articles are made for information purposes only we dont take responsability for any content from third parties.