




How to Use a Stitching Pony: The Complete Masterclass for Precision Leatherwork
Your stitching pony isn't just a wooden clamp. It's a third hand. It's the silent partner that transforms your workflow from a struggle into a rhythmic, meditative art form. If you've ever battled with inconsistent tension or watched your thread snag on the base, you know that learning how to use a stitching pony correctly is the secret sauce of high-end craft. It defines the quality of your finished piece. I'm Mike, and after 25 years at the bench, I've learned that the right setup makes all the difference.
I understand the frustration of a long session. Have you ever felt that familiar ache in your shoulders or seen jaw marks ruin a beautiful piece of Italian vegetable tanned leather? You want perfectly aligned stitches on both sides without the physical toll. This masterclass is designed to solve those exact problems. We'll explore the essential techniques for mounting your leather, maintaining ergonomics, and mastering the fluid motions required for a flawless saddle stitch every time.
Key Takeaways
- Discover why a stitching pony acts as a "third hand," freeing your workspace to master the professional saddle stitch technique.
- Learn the precise setup steps for how to use a stitching pony to ensure consistent tension and perfectly aligned stitches on every project.
- Master ergonomic positioning to eliminate back and neck pain during long crafting sessions at the bench.
- Find out how to protect your premium vegetable tanned leather from jaw marks while maintaining a rock-solid grip.
- Gain expert troubleshooting tips to prevent common issues like thread snagging and inconsistent stitch slants.
What is a Stitching Pony and Why Do You Need One?
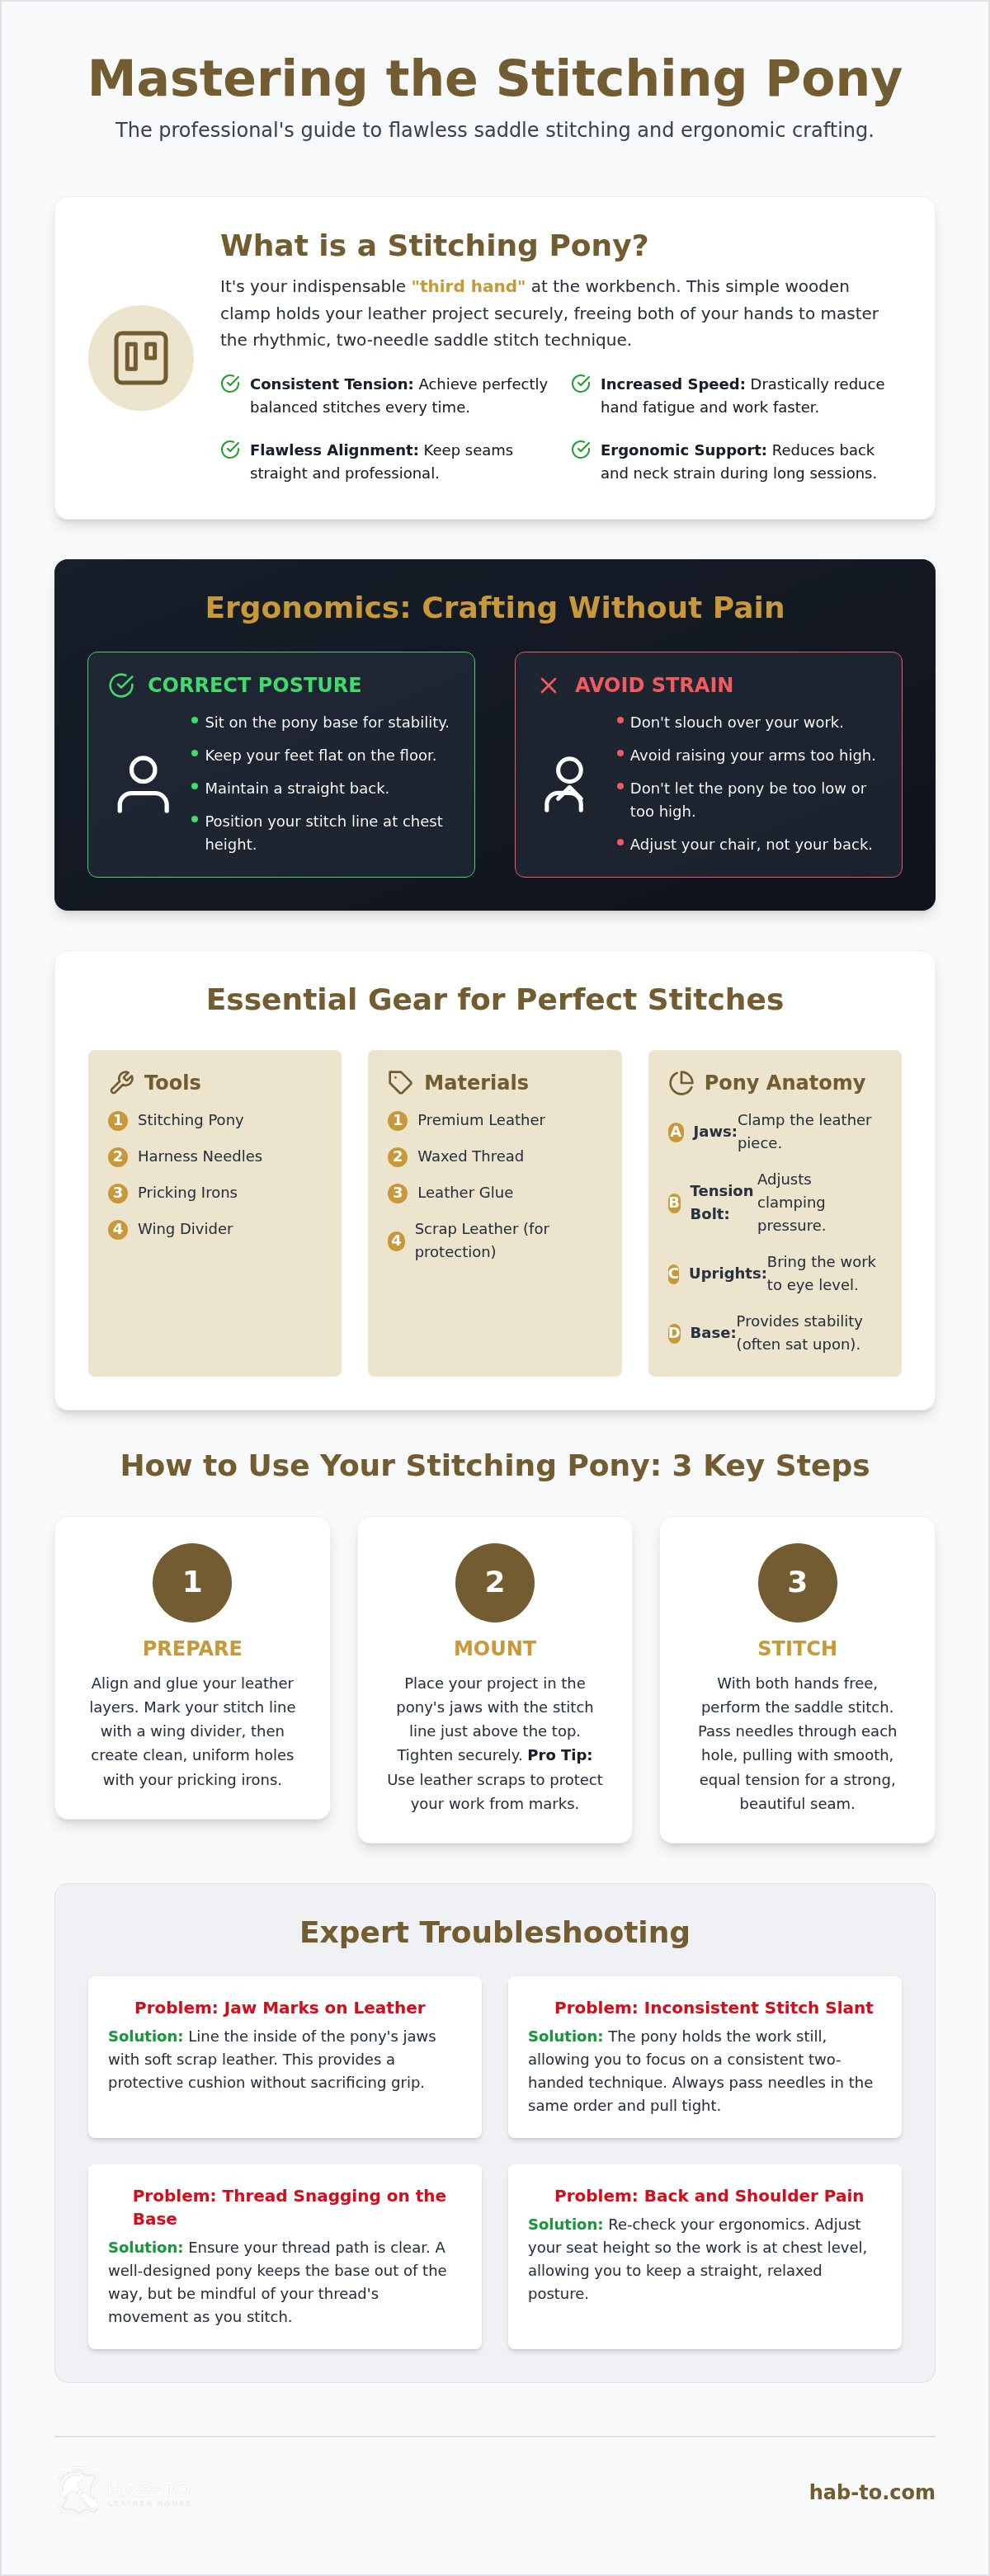
A stitching pony is a wooden clamping device designed to hold your leather project stationary while you sew. Think of it as a "third hand" that stays perfectly still, allowing your other two hands to focus entirely on the needles. This tool is the foundation of the traditional saddle stitch. Without it, you are forced to hold the leather with one hand while trying to manage two needles with the other. That approach is a recipe for frustration and uneven seams. When you understand how to use a stitching pony, you unlock the ability to create the rhythmic, consistent stitches that define high-end leatherwork.
Professional artisans prefer ponies because they provide a mechanical advantage. By securing the leather, you can pull your threads with equal tension on every single stitch. This consistency is vital when working with world-class materials like Maryam Vacchetta Leather or other premium Italian hides. Beyond the aesthetics, using a pony significantly increases your stitching speed and reduces hand fatigue. You aren't constantly adjusting your grip or fighting to keep the leather upright. You just sew.
The Anatomy of a Professional Stitching Pony
Most professional leatherworking tools are built for durability and precision. A standard pony consists of a flat base, two upright "jaws," and a tensioning bolt or lever. The base is often designed to be sat upon, using your body weight to keep the tool stable. The uprights are the arms that reach up to eye level, ending in the jaws that clamp your work. Some versions are bench-mounted, which are excellent for permanent workshop setups, but the seated version remains a favorite for its portability and comfort.
Wood is the preferred material for these tools for a specific reason. Unlike metal clamps, wood is forgiving. It provides enough grip to hold the leather firm without crushing the delicate grain of Badalassi Pueblo Leather. Many crafters even glue scraps of soft lining leather to the inside of the jaws to add an extra layer of protection against scratches.
Ergonomics: How to Sit with Your Pony
Poor posture is the enemy of a long crafting session. To avoid neck and back strain, your seat height is critical. You should sit on the base of the pony with your feet flat on the floor. This positions the jaws between your thighs, creating a rock-solid foundation. If the pony is too low, you'll find yourself slouching. If it's too high, your arms will tire quickly. Adjust your chair so the stitch line is roughly at chest height. This allows you to maintain a straight back while keeping the work in your natural line of sight. Small adjustments to the jaw angle can make a massive difference in how long you can comfortably work at the bench.
Essential Gear: What You Will Need
Mastering how to use a stitching pony begins with selecting the right components for your workbench. A pony is only as effective as the materials it holds. For beginners and seasoned pros alike, I recommend starting with Badalassi Pueblo Leather. Its unique, slightly roughened surface provides excellent natural grip within the wooden jaws. This prevents the leather from slipping even under the high tension required for a tight saddle stitch. You also need properly sized harness needles and a high-quality waxed polyester or linen thread. Before the leather even touches the pony, the layers must be perfectly aligned. Using Ecostick 1804 Leather Glue ensures a strong, temporary bond that keeps your stitch holes perfectly registered. A sturdy wooden pony with a reliable lever or bolt mechanism completes the kit, providing the rock-solid foundation needed for precision work.
Recommended Stitching Bundles
Choosing the right combination of thread, needles, and irons can be overwhelming. This is why Stitching Bundles are often the smartest investment for any crafter. These curated sets from Hab-To Leather House are designed to ensure every tool works in harmony. A professional-grade bundle typically includes matching thread weights and needle sizes, preventing the common mistake of using thread too thick for your punched holes. By starting with a balanced kit, you eliminate the guesswork and focus entirely on your technique. If you want to skip the trial and error, exploring these professional crafting bundles is the fastest way to achieve consistent results at the bench.
Project Preparation: What You Will Need
Preparation is half the battle. You cannot learn how to use a stitching pony effectively if your leather isn't ready for the needle. To ensure your seams are clean and your edges are professional, you will need the following tools and materials:
- Pricking irons: Essential for creating uniform, slanted holes that allow for the traditional saddle stitch look.
- Wing divider: Used for marking a perfectly straight guide line, ensuring your seam doesn't wander across the leather surface.
- Edge bevelers: These are used to remove the sharp corners of the leather edge, preparing it for a smooth, rounded finish.
- Tokonole: Applying this burnishing cream to your edges before or during the clamping process allows you to achieve a glass-like finish while the leather is held securely.
Using these tools in the correct sequence saves time and results in a much higher quality final product. When your edges are beveled and prepped with Tokonole, the pony provides the stability needed to burnish with high friction without the project moving.
Step-by-Step: How to Use a Stitching Pony for the Saddle Stitch
Before the leather even touches the wood, your preparation must be flawless. Start by bonding your layers with Ecostick 1804 Leather Glue. Once the adhesive sets, punch your holes using a pricking iron or chisel. Now you are ready to mount the work. Open the jaws and slide your leather in so the stitch line sits roughly 1/2 inch above the top of the wood. This height is the sweet spot. It provides enough clearance for your needles to pass through easily while keeping the leather from flexing under the pressure of your thread. Tighten the clamp firmly. You want the project stationary, but be careful not to crush the grain of premium Badalassi Pueblo Leather. Mastering how to use a stitching pony is about finding that balance between a rock-solid grip and respecting the material.
With the leather secured, begin your saddle stitch. The pony allows for a perfect 90-degree needle entry every time. Because the tool holds the work at chest height, you can see exactly where the needle exits on the back side. This visibility is what creates those straight, professional seams. As you pull the thread through, pull both hands outward and slightly downward simultaneously. This ensures equal tension on both sides of the leather, preventing the puckering that often ruins handheld projects.
Loading Your Project Correctly
When working on long seams, such as a bag gusset, don't try to clamp the entire length at once. Position the section you are currently sewing in the center of the jaws. To keep your stitch slant consistent, follow the "Clockwise Rule." Always load your project with the "show side" facing the same direction, typically to your right if you are right-handed. If you are handling a large item, don't let it dangle. Gently fold or roll the excess leather and secure it with a soft clip or a piece of scrap leather to avoid permanent creasing while it sits in the pony.
The Mechanics of the Two-Handed Stitch
True speed comes from efficient hand positioning. Rest your pinky fingers against the upright jaws of the pony. This provides a physical anchor point, allowing your other fingers to manage the needles with precision. When passing the second needle through the hole, use your thumb to hold the first thread out of the way. This prevents you from piercing the thread, a common mistake that creates knots. To get that signature slanted look, use the "Cast" technique. Loop the thread over the needle before pulling it tight. This small maneuver, made possible by having both hands free, is what separates amateur work from artisan quality. If you want to ensure you have the right tools for this technique, our curated stitching bundles provide the perfect needle and thread combinations to get started.
Advanced Techniques and Troubleshooting
Precision matters. Once you've mastered the basic rhythm, you'll encounter projects that test your setup. Complex 3D shapes like box corners or deep gussets require a more strategic approach to how to use a stitching pony. One common frustration is the thread snagging on the base or the tension bolt. Professional crafters often sand the base of their pony to a glass-smooth finish. I often apply a thin layer of beeswax as well. This allows the thread to glide over the wood. It won't catch on tiny splinters or rough grain. If you're working with heavy harness leather or stacked layers exceeding 4mm, don't just force the jaws shut. Back off the tension bolt first. Clamping thick leather requires firm, distributed pressure. This ensures the stitch line remains perfectly vertical without the piece tilting.
Protecting Premium Vegetable-Tanned Leather
Premium materials like Maryam Vacchetta are prized for their natural finish. This makes them susceptible to jaw marks. Bare wooden jaws can leave permanent indentations if the pressure is too high. Don't risk your work. The best solution is the "Scrap Leather Trick." Glue pieces of soft, vegetable-tanned scrap leather to the inside of your pony jaws using Ecostick 1804 Leather Glue. This creates a padded, "soft touch" grip. It holds the work securely without marring the surface. If you do leave a slight pressure mark, you can often "massage" it out. Use a smooth bone folder. Apply a tiny amount of friction-generated heat. This gently compresses the fibers back into place and restores the grain.
Stitching 3D and Complex Shapes
Sewing a flat wallet is straightforward. Gussets and box corners present a geometric challenge. When stitching a 90-degree corner, the pony's jaws often get in the way. Use a small "filler" block of wood inside the corner. This provides a solid surface for the jaws to clamp against. It keeps the gusset perfectly square while you work. In some cases, you may only clamp one side of the 3D project. This allows the other side to "float" while you maintain tension with your hands. It takes practice to master how to use a stitching pony for these complex puzzles. If you want to dive deeper, our Professional Leathercraft Workshops offer hands-on guidance. We focus on advanced geometry and traditional vegetable-tanned leather construction.
Shop curated stitching bundles for professional results
Elevate Your Craft with the Right Materials
The transition from a hobbyist to a serious artisan isn't just about speed. It's about the harmony between your tools and your materials. Once you master how to use a stitching pony, your hands are free to appreciate the tactile quality of the hide you're working with. High-end vegetable-tanned leather reacts differently under the pressure of a saddle stitch than mass-produced alternatives. The way the thread seats into the grain and the way the leather holds its shape are determined by the tanning process. At Hab-To Leather House, we specialize in sourcing world-class Italian hides from legendary tanneries like Badalassi and Maryam. Because we offer no minimum order quantity, you can experiment with professional-grade materials without the overhead of buying a full hide.
After you've finished the stitching in your pony, the final refinement happens at the edges. Applying Tokonole is the standard for achieving a glass-like finish. While the pony holds your project securely, you can perform the initial edge prep, but the final burnishing brings the whole piece together. This attention to detail is what separates a handmade item from a truly artisanal one.
Sourcing the Best Leather for Stitching
Badalassi Pueblo Leather is often called a "cheat code" for beginners. Its unique texture makes it incredibly easy to grip within the pony jaws, and it develops a breathtaking patina over time. For those looking to push their craft further, choosing between the high-gloss finish of Shell Cordovan or the rugged durability of Italian Vacchetta is a rite of passage. If you're looking to stock your bench efficiently, our curated Leather Bundles provide a cost-effective way to access premium cuts.
Get Personal Advice from Mike
Leatherworking is a journey of continuous learning. My family has been in this trade for over 160 years, and that heritage informs every piece of advice I give. We choose vegetable-tanned leather because it respects tradition and the environment. If you're unsure which hide or tool is right for your next project, you can book a Free Video Consultation with me directly. We'll discuss your goals and ensure you have exactly what you need to succeed. Ready to start? Shop our curated bundles today and see the difference that professional materials make in your hand-stitching.
Master the Art of the Perfect Saddle Stitch
You have moved beyond the basic mechanics to understand the deeper logic of the bench. By mastering how to use a stitching pony, you have transformed a physically demanding task into a controlled, rhythmic art form. We have covered everything from the initial ergonomic setup to the advanced "scrap leather trick" for protecting your grain. These small refinements are what allow your focus to shift away from the tool and toward the masterpiece currently in your hands. Precision is no longer a struggle; it's a habit.
At Hab-To Leather House, our mission is to support your growth as an artisan. With 160 years of family heritage and a commitment to providing premium Italian leathers with no minimum order quantities, we are here for every stage of your journey. Use these techniques to push the boundaries of your craft. The precision you have cultivated today will be visible in every seam you sew tomorrow. Keep pushing, keep stitching, and enjoy the meditative flow of the craft.
Continue Your Leatherworking Journey
- Professional Masterclasses: Deepen Your Technical Skills
- Meet Mike: 25 Years of Expertise at the Bench
- Explore Our Collection of Premium Italian Vegetable-Tanned Leathers
Recommended for Your Bench: The Stitching Essentials
Achieve the perfect stitch slant with our curated Stitching Bundles. Each kit is hand-selected to ensure your thread weight, needle size, and adhesives work in perfect harmony with premium hides like Badalassi Pueblo or Maryam Vacchetta.
Frequently Asked Questions
Do I really need a stitching pony for small projects like wallets?
Yes, using a pony for small items like cardholders is essential for achieving professional results. While you can technically hold a wallet in your hand, you lose the ability to apply equal tension with both needles simultaneously. This leads to inconsistent stitch slants and hand fatigue. By learning how to use a stitching pony even for the smallest projects, you ensure that every seam looks like it came from a high-end atelier.
How do I prevent the stitching pony from marking my leather?
You can prevent jaw marks by gluing scraps of soft vegetable-tanned leather to the inner surfaces of the jaws. This creates a protective cushion between the wood and your project. It's also important to tighten the clamp only as much as necessary to hold the leather stationary. Over-tightening is a common mistake that can crush the grain of delicate hides, even with padded jaws in place.
What is the difference between a stitching pony and a stitching horse?
The primary difference is size and how you sit. A stitching pony is a compact tool that you usually sit on or clamp to a table. A stitching horse is a much larger, self-contained bench with a built-in seat and a foot-operated clamping mechanism. Horses are traditionally used for large equestrian gear or heavy bags, while ponies are the go-to choice for modern leather crafters working on accessories.
Can I use a stitching pony for 3D shapes like bags or pouches?
Yes, a stitching pony is surprisingly versatile for 3D construction. You can clamp gussets or box corners by using a wooden filler block inside the shape to provide a flat surface for the jaws to grip. For larger pouches, you might only clamp one side of the seam at a time. This flexibility allows you to maintain the "third hand" advantage even when the project's geometry becomes complex.
How high should the leather sit above the jaws of the pony?
Your stitch line should sit approximately 1/2 inch above the top of the jaws. This height provides enough clearance for your needles to pass through without hitting the wood, but it's low enough to prevent the leather from wobbling. If you position the project too high, the leather will flex every time you pull the thread tight. This movement ruins your stitch consistency and slows down your rhythm.
Why does my thread keep getting caught on the pony bolt?
Thread snagging is usually caused by rough wood grain or exposed hardware on the tensioning bolt. To fix this, sand the base and uprights of your pony until they are perfectly smooth. You can also apply a thin layer of beeswax to the wood to help the thread glide. If the bolt itself is the problem, consider switching to a model with recessed hardware or a cam-lever mechanism.
What is the best type of wood for a stitching pony?
High-density hardwoods like beech, oak, or maple are the best choices for a stitching pony. These woods are heavy enough to provide stability and hard enough to resist warping over years of use. More importantly, they can be sanded to a very fine finish. This smooth surface is vital to ensure your thread doesn't snag while you are learning how to use a stitching pony for long seams.
Is it better to sit on the pony or bolt it to a workbench?
It depends on your workshop space and personal comfort. Sitting on the base of a pony uses your body weight for stability and allows you to work anywhere. Bolting a pony to a workbench is better for dedicated craft spaces where you prefer a fixed height. Most beginners find the seated version more intuitive because it naturally aligns the work with their line of sight while keeping their posture upright.
Disclaimer
All our blog articles are made for information purposes only we dont take responsability for any content from third parties.