


How to Use a Strap Cutter: The Artisan's Guide to Perfect Leather Straps
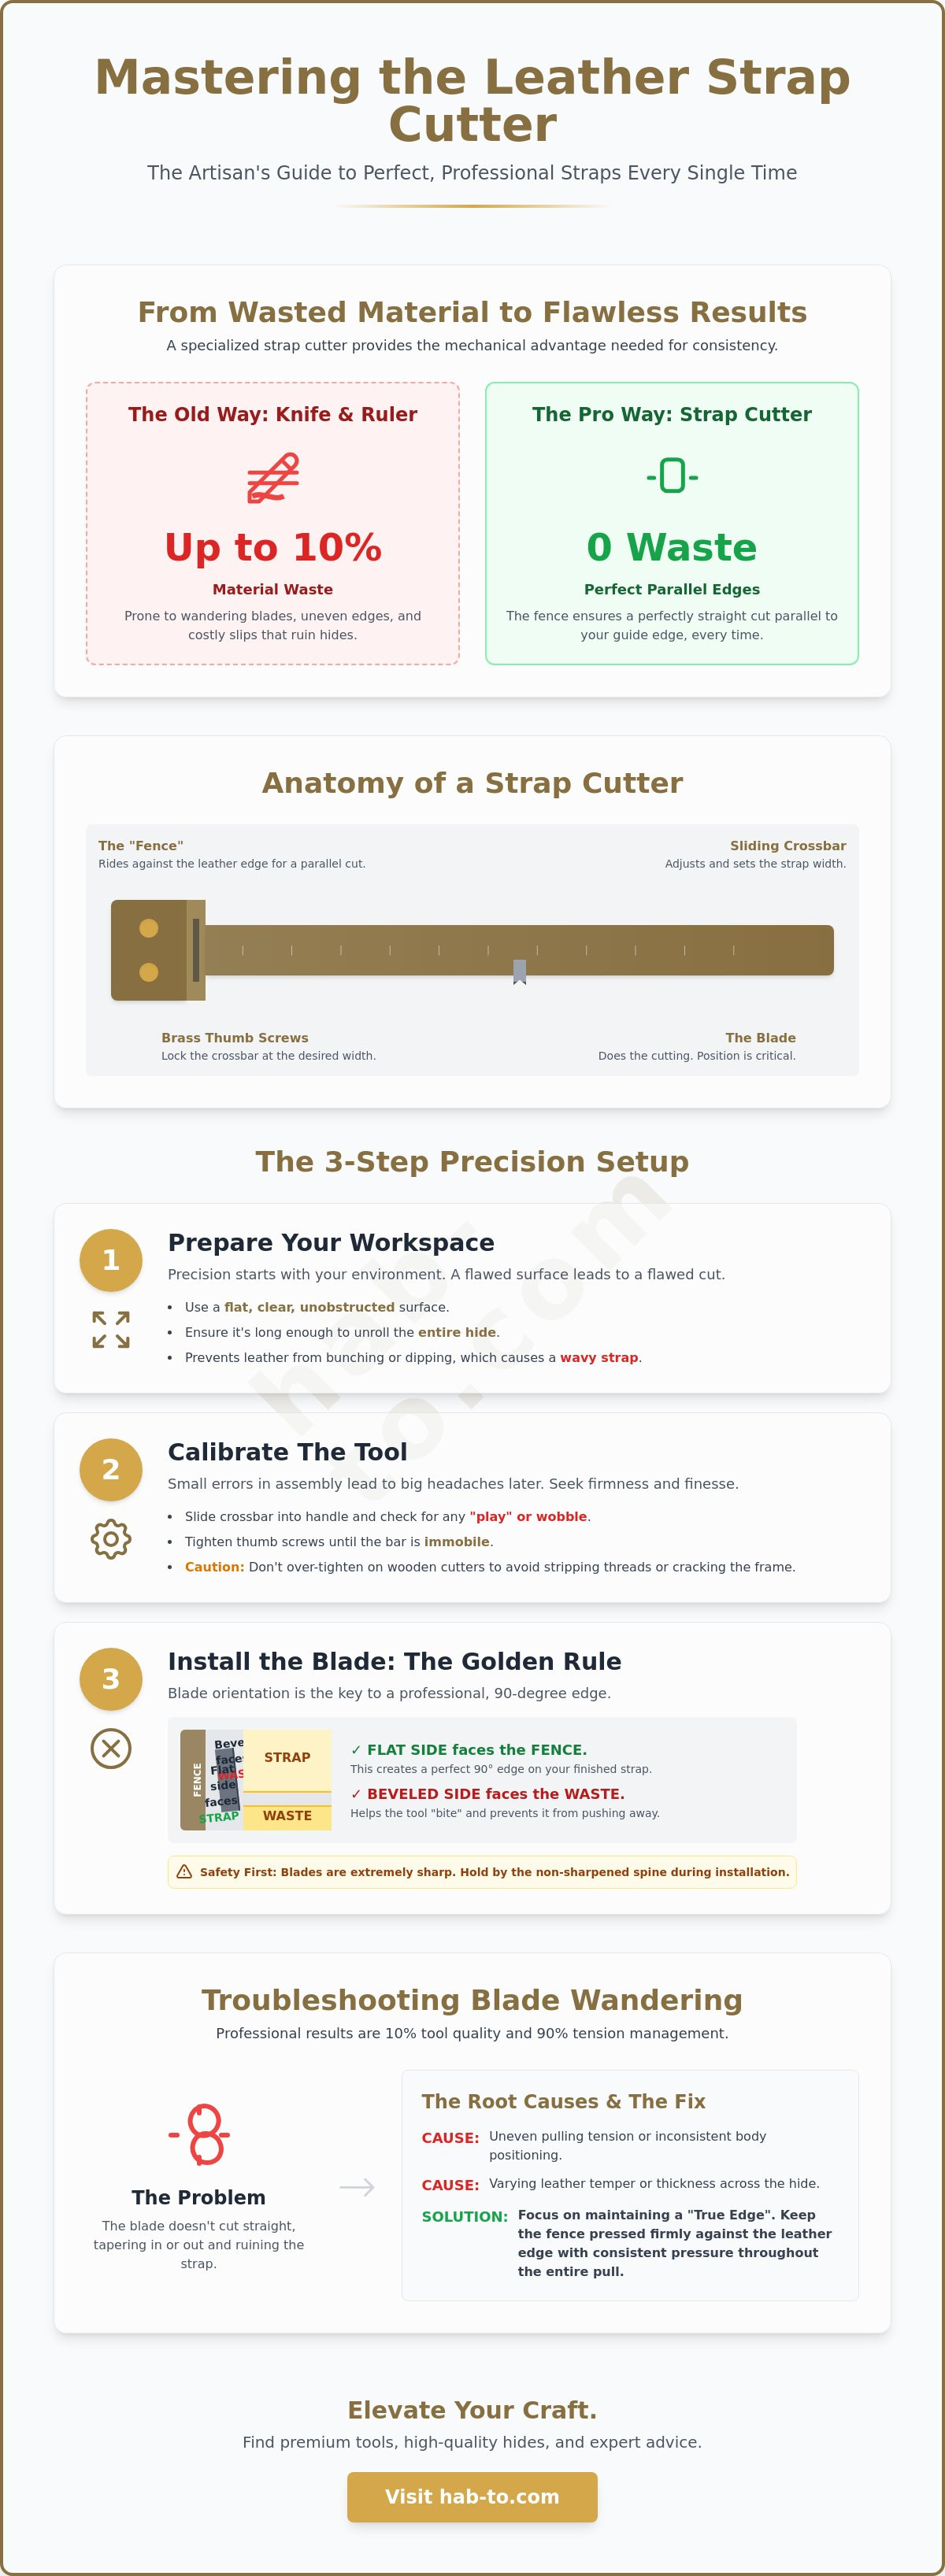
Have you ever stared at a beautiful, expensive side of vegetable-tanned leather and felt a pang of hesitation before making that first cut? You aren't alone. Many artisans lose up to 10% of their premium material to uneven edges or wandering blades. When you're working with high-quality hides, every millimeter counts. The fear of a jagged strap or a slip of that exposed blade can turn a creative session into a stressful ordeal. Mastering how to use a strap cutter correctly is the bridge between wasted scraps and professional, consistent results.
I believe that professional strap cutting is 10% tool quality and 90% tension management and preparation. I'll help you master the setup and technique needed to produce perfectly parallel edges for belts and bag straps every single time. You'll gain the confidence to handle thick veg-tan hides without the blade tapering or wandering. We'll explore everything from initial tool calibration and safety protocols to advanced troubleshooting for those moments when the tool feels unpredictable. It's time to stop fearing the blade and start trusting your hands. Let's get to work.
Key Takeaways
- Learn why a specialized strap cutter provides a mechanical advantage over a knife and straight edge for achieving perfectly parallel edges.
- Discover the essential steps for assembling and calibrating your tool to ensure consistent precision across long lengths of leather.
- Master the professional technique of how to use a strap cutter by focusing on body positioning and maintaining a "True Edge" throughout the pull.
- Identify the root causes of blade wandering and learn how to adjust your tension to handle varying leather tempers and thicknesses.
- Understand how to select the highest-density sections of a hide to produce durable, professional-grade belts and bag straps.
What is a Strap Cutter and Why is it Essential for Leathercraft?
A strap cutter is a simple, hand-held gauge tool designed to cut long, straight strips of leather with mathematical precision. While it might look like a humble assembly of wood and steel, it’s a powerhouse for any artisan’s workshop. If you’re making belts, bag straps, or guitar slings, this tool is essential for leathercraft. It turns a tedious, error-prone task into a swift and satisfying motion. You won't have to worry about a ruler slipping halfway through a cut anymore.
The real magic lies in its mechanical advantage. When you use a ruler and a utility knife, you’re fighting the leather’s resistance and your own hand’s tendency to wobble. One tiny slip can ruin a whole hide. A strap cutter eliminates this risk by using a "fence" that rides against the edge of the leather. This ensures your cut is perfectly parallel to the original edge from start to finish. For small workshops, this means you can batch-produce twenty belt blanks in the time it would take to cut two by hand. Learning how to use a strap cutter effectively is the fastest way to elevate your production quality and reduce material waste.
The Anatomy of a Traditional Wooden Strap Cutter
The sliding crossbar is the heart of the tool. It’s usually marked with measurements so you can set your width without needing a separate ruler. You lock your desired width in place using brass thumb screws. Artisans often prefer wood for the body because it offers a natural, warm grip and a balanced weight that doesn’t fatigue your hand during long cutting sessions. The "fence" is the vertical part of the handle that stays flush against the leather. It keeps the blade at a fixed distance, preventing the wandering that often plagues manual cutting.
Strap Cutter vs. Draw Gauge: Choosing Your Weapon
A draw gauge is often considered the professional’s upgrade, but it isn't always the best choice for every project. These metal tools often have fully exposed blades, which can be intimidating and require a higher level of skill to control. A wooden strap cutter is much more forgiving and beginner-friendly. It’s also specifically designed to handle the resistance of heavy, high-quality vegetable tanned leather. While some tools might struggle with 10oz hides, a well-tuned strap cutter glides through them. Understanding how to use a strap cutter properly gives you a safer, more reliable way to manage thick materials without sacrificing the accuracy your customers expect.
Preparation: Setting Up Your Cutter for Precision
Before you make your first pull, you need a workspace that respects the material. Clear your bench completely. You need a flat, unobstructed surface long enough to unroll your entire hide. If the leather bunches or dips during the cut, the blade will follow that curve, resulting in a wavy strap. Precision starts with your environment. A survey of leather craftspeople showed that 65% prioritize accuracy over speed. Setting up your station correctly is the first step toward that goal.
Assembling the tool is straightforward, but small errors here lead to big headaches later. Slide the crossbar into the handle and check for any "play" or wobbling. If the bar moves even a fraction of a millimeter inside the handle, your strap width will fluctuate. Tighten the thumb screws until the bar is immobile, but be careful. Most traditional cutters are made of wood. If you over-tighten, you risk stripping the threads or cracking the frame. It’s a balance of firmness and finesse.
The "Golden Rule" of blade orientation is often debated, but for the most professional results, the flat side of the blade should face the fence. This ensures the strap you’re keeping has a perfectly square, 90 degree edge. The bevel, or the slanted side of the blade, should face the waste side of the leather. This orientation helps the tool "bite" into the hide without pushing the tool away from your guide edge. Handling these industrial-style blades requires focus. They’re incredibly sharp and can cause deep injuries if they slip during installation. Always hold the blade by the non-sharpened spine and keep your fingers clear of the slot as you slide it in.
Installing and Aligning the Blade Safely
For standard 3mm leather, set your blade so it protrudes approximately 5mm from the bottom of the crossbar to ensure it passes completely through the hide without dragging the tool body. You must verify that the blade is perfectly perpendicular to the crossbar. If it leans left or right, the edge of your strap will be undercut or flared. Tighten the securing screws just enough to prevent the blade from shifting; the goal is a rock-solid lock that doesn't compress the wood fibers to the point of failure.
Calibrating the Width Scale for Consistency
Don't trust the printed ruler on the wooden crossbar. Wood is a natural material that expands and contracts with humidity, which can throw off the factory markings. Instead, use a digital caliper or a high-quality steel ruler to measure the distance from the fence to the blade. Once you think you’ve reached the perfect width, use a small test scrap. Cut the first 2 inches of a strip and measure it. This "test scrap" method is the only way to verify your calibration before you commit to a full length of Badalassi Pueblo leather or another premium hide. Learning how to use a strap cutter starts with this disciplined approach to measurement.
Step-by-Step: How to Use a Strap Cutter Like a Pro
You've calibrated your tool and prepped your workspace. Now comes the moment of truth. Mastering how to use a strap cutter is as much about your body's rhythm as it is about the blade's sharpness. I've seen many artisans struggle not because their tool was dull, but because they treated the cut like a test of strength rather than a test of tension. Success in strap cutting relies on a steady, fluid motion that keeps the leather from buckling or shifting under the blade's pressure.
Before you begin, consider your stance. You should always stand, never sit, when cutting long straps. Standing allows you to use your entire arm and core to pull the tool in one continuous motion. If you sit, your range of motion is limited to about 18 inches, forcing you to stop and regrip. Every time you stop, you risk creating a small "hitch" or "step" in the leather edge. By standing, you can walk backward or pull through a three-foot section with ease, ensuring the cleanest possible finish.
Preparing the Straight Edge (The Reference Line)
The strap cutter is a follower tool. It only works if the edge it's following is perfectly straight. Never assume the "factory edge" of a hide is true. These edges are often wavy from the tanning and drying process. Use a long steel square or a 48-inch metal ruler to establish your first straight line. Cut this "True Edge" manually with a sharp knife. If this reference line has even a slight curve, the strap cutter will replicate that error across every subsequent strap you cut, leading to belts that look like rainbows rather than straight lines.
The Pull Technique: Maintaining Constant Pressure
Stability comes from what I call the "Three Points of Contact." Your first point is the fence flush against the leather edge. The second is the bottom of the handle resting on the table. The third is your leading hand keeping the leather flat. As you pull, your trailing hand should focus on the tool's handle, while your leading hand stays about six inches ahead of the blade, holding the hide down to prevent it from lifting. Maintain a gentle inward pressure against the guide edge to prevent the leather from buckling or creating gaps.
Don't yank the tool. A jerky movement causes the blade to "stutter," leaving visible marks on the leather's grain. Instead, focus on a slow, consistent draw. When you reach the end of the hide, don't speed up. Keep your pressure constant until the blade completely clears the leather. This prevents the corner from tearing or fraying at the finish. Once you find that rhythm, you'll see why this tool is the secret to faster production in a professional workshop.
Common Mistakes and How to Avoid Blade Wandering
"Blade Wander" is the artisan's nightmare. You start with a one inch strap and end with something significantly thinner. This happens when the blade drifts away from the fence, usually because the leather is too soft to resist the blade's "bite" or because you're pulling at an angle. If you notice your strap tapering, stop immediately. Check your tension. Most of the time, wandering is a symptom of inconsistent pressure or a dull blade. Learning how to use a strap cutter effectively means recognizing these subtle shifts before they ruin an entire hide.
Leather temper plays a massive role in tool performance. Firm, high-density hides like shoulders or butts are a joy to cut. Spongy belly sections are a different story. These areas contain "fat wrinkles" and loose fibers that stretch as you pull. This stretching distorts the line. A dull blade makes this worse. Instead of slicing, it drags the leather, which is the number one cause of both tool failure and accidental slips. A sharp blade is your best safety feature. It allows the tool to glide through the fibers without requiring excessive force.
Dealing with Thin or Stretchy Leather
Cutting leather under 1.5mm thickness can be tricky. The leather often wants to slip under the fence rather than stay flush against it. I recommend the "Support Strip" trick. Place a firmer piece of scrap leather, about the same thickness, behind your workpiece. This adds the necessary rigidity to guide the fence properly. When working with these lighter weights, lighten your grip. Too much force will only cause the leather to bunch. For those just starting out, Badalassi Pueblo leather is the ideal training material. Its firm temper and consistent density make practicing how to use a strap cutter much more intuitive.
Sharpening and Maintenance for a Clean Cut
Don't wait for the blade to get dull. Strop the small blades frequently using a leather strop and polishing compound. This extends the life of the edge and ensures a buttery-smooth cut. If you see nicks or feel the blade "catching," it's time to replace it. These blades are inexpensive compared to the cost of a ruined hide. Keep the wooden tracks of your tool clean as well. Dust and leather fibers can build up, making it difficult to adjust the width scale smoothly. If you're ready to start your next project with premium materials, consider our Maryam Vaccheta leather for a durable finish.
Choosing the Right Leather for Perfect Straps
Selection is the final piece of the puzzle. You can master how to use a strap cutter with perfect form, but if the leather is poor, the strap will eventually fail. A hide isn't uniform. The shoulder and butt areas offer the tightest fiber density. This is where you get the structural integrity needed for a load-bearing belt. In contrast, the belly is loose and stretchy. If you try to cut a long strap from the belly, it will likely deform or "creep" over time, regardless of your cutting technique. Choosing the right section of the hide is just as important as the tool itself.
Understanding measurements is vital for a professional finish. In the workshop, we often switch between ounces and millimeters. A good rule of thumb is that 1 ounce equals roughly 0.4mm. For a heavy-duty belt, you'll want something in the 8 to 10 ounce range, which is about 3.2mm to 4.0mm. For lighter bag straps or camera slings, 4 to 5 ounces (1.6mm to 2.0mm) is usually sufficient. Matching the weight to the project ensures the strap isn't too bulky or too flimsy for its intended hardware.
Why Vegetable Tanned Leather is the Gold Standard
Vegetable tanned leather is the preferred choice for strap work because of its stable fiber structure. The tanning process results in a firm material that doesn't compress or buckle easily under the pressure of a blade. This firmness provides the perfect "bite" for your cutter, allowing the blade to slice through without dragging the leather along with it. For high-end bag handles that need to maintain their shape for decades, I highly recommend Maryam Vaccheta. It offers the durability and authentic aesthetic that Hab-To Leather House is known for.
Hab-To Leather House's Recommended Hides for Belts and Straps
If you're looking for color consistency and a firm hand, Virgilio Vaccheta is an excellent choice for professional strap work. It’s reliable and takes a burnished edge beautifully. You might be tempted by the prestige of Shell Cordovan, but remember that this material is better suited for small accents or watch straps. It rarely comes in lengths long enough for a standard belt. When you finally understand how to use a strap cutter on a high-quality shoulder, you'll feel the difference immediately. If you're unsure about which hide fits your vision, come visit us at the Hab-To Leather House Amsterdam warehouse. There’s no substitute for the tactile experience of feeling the leather's temper before you make your selection. We're always here to help you find the perfect match for your craft.
Elevate Your Craft with Every Cut
You now have the foundational knowledge to turn a raw hide into professional, consistent straps. We have explored the mechanical advantage of the tool, the vital "True Edge" preparation, and the physical rhythm required for a perfect pull. Mastering how to use a strap cutter is a rite of passage for any leatherworker. It marks the transition from manual struggle to effortless workshop precision. When your tool is calibrated and your stance is steady, the leather almost seems to cut itself.
At Hab-To Leather House, we're passionate about providing the materials that do justice to your skills. we bring 160 years of family expertise in leather sourcing directly to your workbench. We specialize in sustainable, vegetable-tanned Italian hides that offer the perfect fiber density for long-lasting straps. We don't believe in barriers for artisans, which is why we have no minimum order requirements. You can access the world's finest leather exactly when you need it.
Explore Hab-To Leather House's Premium Vegetable Tanned Leather for Your Next Project
I'm here to support your journey and help you find the perfect hide for your vision. Trust your tools, respect the material, and keep your blades sharp. Happy crafting.
Frequently Asked Questions
Can I use a strap cutter on very thin leather (under 1mm)?
You can, but it requires extra care to prevent the leather from buckling. Soft hides under 1mm lack the structural integrity to stay flat against the tool's fence. I suggest placing a firmer scrap piece or a strip of heavy cardstock behind the leather. This provides the necessary rigidity to keep the workpiece flush against the guide during the cut.
How do I stop the blade from digging into the wooden crossbar?
Adjust the blade depth so it only protrudes about 2mm deeper than the leather you're cutting. If the blade is set too deep, it can bite into the wood of the crossbar or the table underneath. Ensure the blade is sitting perfectly flush in its slot. If it tilts, it will naturally want to dive into the wood instead of slicing through the hide.
Is it better to pull the strap cutter toward me or push it away?
You should always pull the tool toward you for maximum control and safety. Pulling allows you to use your core strength and keep a steady eye on the fence's contact with the leather edge. This is a fundamental part of learning how to use a strap cutter effectively, as pushing away often leads to the tool tilting and the blade wandering.
Why does my strap cutter keep getting stuck halfway through a pull?
Sticking is usually a sign of a dull blade or excessive friction from an improper angle. If the blade is sharp, check the leather's thickness. On very heavy hides, ensure you aren't accidentally tilting the tool, which causes the crossbar to bind against the leather's surface. A smooth, continuous motion is key to preventing the blade from catching on dense fibers.
How often should I change the blade on my strap cutter?
Replace your blade the moment you notice any dragging or visible fuzz on the cut edge. While stropping can extend the life of a blade, industrial-style blades are designed for disposal. In a busy workshop, changing the blade every 10 to 15 long straps ensures your cuts stay crisp. It's a small price to pay to protect your premium materials.
What is the widest strap I can cut with a standard wooden tool?
A standard wooden tool typically cuts straps up to 4 inches wide. This is perfect for most belts and bag straps. If your project requires wider panels, you'll need to use a long steel ruler and a knife. The physical leverage required for wider cuts often exceeds what a hand-held crossbar can handle safely without the blade wandering or the tool binding.
Can a strap cutter handle chrome-tanned leather?
Yes, but it requires a very sharp blade and a steady hand because chrome-tan is more elastic. Chrome-tanned leather is much softer than vegetable-tanned hides, which can lead to width inconsistencies as the leather stretches. Mastering how to use a strap cutter on these softer materials often involves using a sacrificial piece of firmer leather to help the tool track straight.
Do I need to case (moisten) the leather before using a strap cutter?
Never case your leather before cutting straps. Casing is for tooling and carving, not for cutting. Moistening the leather makes the fibers swell and stretch easily. If you cut while the leather is damp, your straps will likely warp or shrink unevenly as they dry. This ruins your carefully measured width and can lead to a wavy, unprofessional edge on your finished project.
