




Leather That Lasts a Lifetime: How to Make a Durable Leather Product
What if the weakest point in a leather project isn’t the hide, but a seam, closure, or stress point you barely noticed while making it? Choosing leather that lasts a lifetime takes more than picking the thickest piece or trusting a bold quality claim. Start with the material, but remember that durability also depends on how well every choice suits the product and the way it will be used.
In this guide, you’ll learn how to match vegetable-tanned leather to your project, design for everyday wear, and build carefully around seams, edges, hardware, and other high-stress areas. You’ll also find practical ways to assess material details, inspect your work, and care for the finished piece. A lifetime isn’t a guarantee stamped onto a hide. It’s the aim behind considered material choices, sound construction, and regular care. We’ll look at how those decisions work together, and how to source project-sized quantities and supplies without committing to a whole hide.
Key Takeaways
- Match leather to how the finished piece will be handled, how much structure it needs, and the wear it will face.
- Plan seams, edges, and attachment points carefully, especially where handles, straps, and closures take repeated strain.
- Use a practical workflow to plan, make, inspect, and maintain leather projects before small weaknesses become failures.
- Build leather that lasts a lifetime by treating material, design, construction, use, and care as connected choices.
- Source vegetable-tanned leather in project-sized quantities and consider a curated bundle to gather supplies for your next make.
What makes a leather product last a lifetime, and what can makers control?
A durable handmade piece is the result of a chain of decisions, not a property you can buy in one hide. Materials matter, but so do the pattern, the way parts are joined, the loads the item carries, and the care it receives. A belt worn daily faces different demands from a journal cover kept on a desk. Neither needs to look untouched to keep doing its job.
Before you start, assess four factors: material, construction, intended use, and ongoing care. You can influence each one, though you can’t control every condition the finished item will encounter. Frequent use, damp storage, neglect, or a load beyond the design’s capacity can affect how leather and hardware wear. Thoughtful maintenance and timely repair can help address wear, but they can’t make an unsuitable design fit its purpose.
What does “built to last” mean for a handmade leather good?
Lasting function doesn’t mean an item will keep its original colour, surface, or shape. Leather may soften, mark, and develop a patina as it’s handled. A daily-use belt can continue to serve well as its surface changes; a bag can show signs of use while its handles and closures remain functional. A journal cover may show scuffs without losing its ability to protect the pages. Judge durability by whether the piece continues to work as intended, not by whether it stays pristine.
Think about the item’s routine before drawing your pattern. Will it be carried outdoors, opened repeatedly, or stored for long periods? These details help set realistic expectations for wear, storage, and upkeep. You can design a handmade piece with longevity in mind, but no leather or construction choice guarantees a fixed lifespan.
Why thick or premium leather is not enough by itself
More thickness isn’t automatically better. A stiff, heavy material may not suit a project that needs to bend comfortably, while a design that must hold its shape needs suitable structure. Explore the vegetable-tanned leather selection with the project’s intended use in mind, and compare relevant properties rather than treating thickness or a premium label as a complete durability test. For background on leather types and uses, see What is Leather?
Then assess the whole assembly. A weak seam can open even when the leather is sound. An overloaded closure or poorly secured handle can fail under repeated strain. Edges that rub constantly, corners that catch, and folds that bend again and again all deserve attention during design. The strongest material can’t compensate for a poorly placed seam or hardware that isn’t suited to its job.
Make a quick risk check before cutting: identify where the piece will bend, pull, rub, open, and carry weight. Consider whether those areas will be easy to inspect and maintain once the item is in use. Longevity comes from connected choices, supported by sensible use, appropriate storage, routine care, and repair when needed. That’s the practical meaning of making leather that lasts a lifetime: design for continued function, not a promise of forever.
Choosing leather for long-lasting products
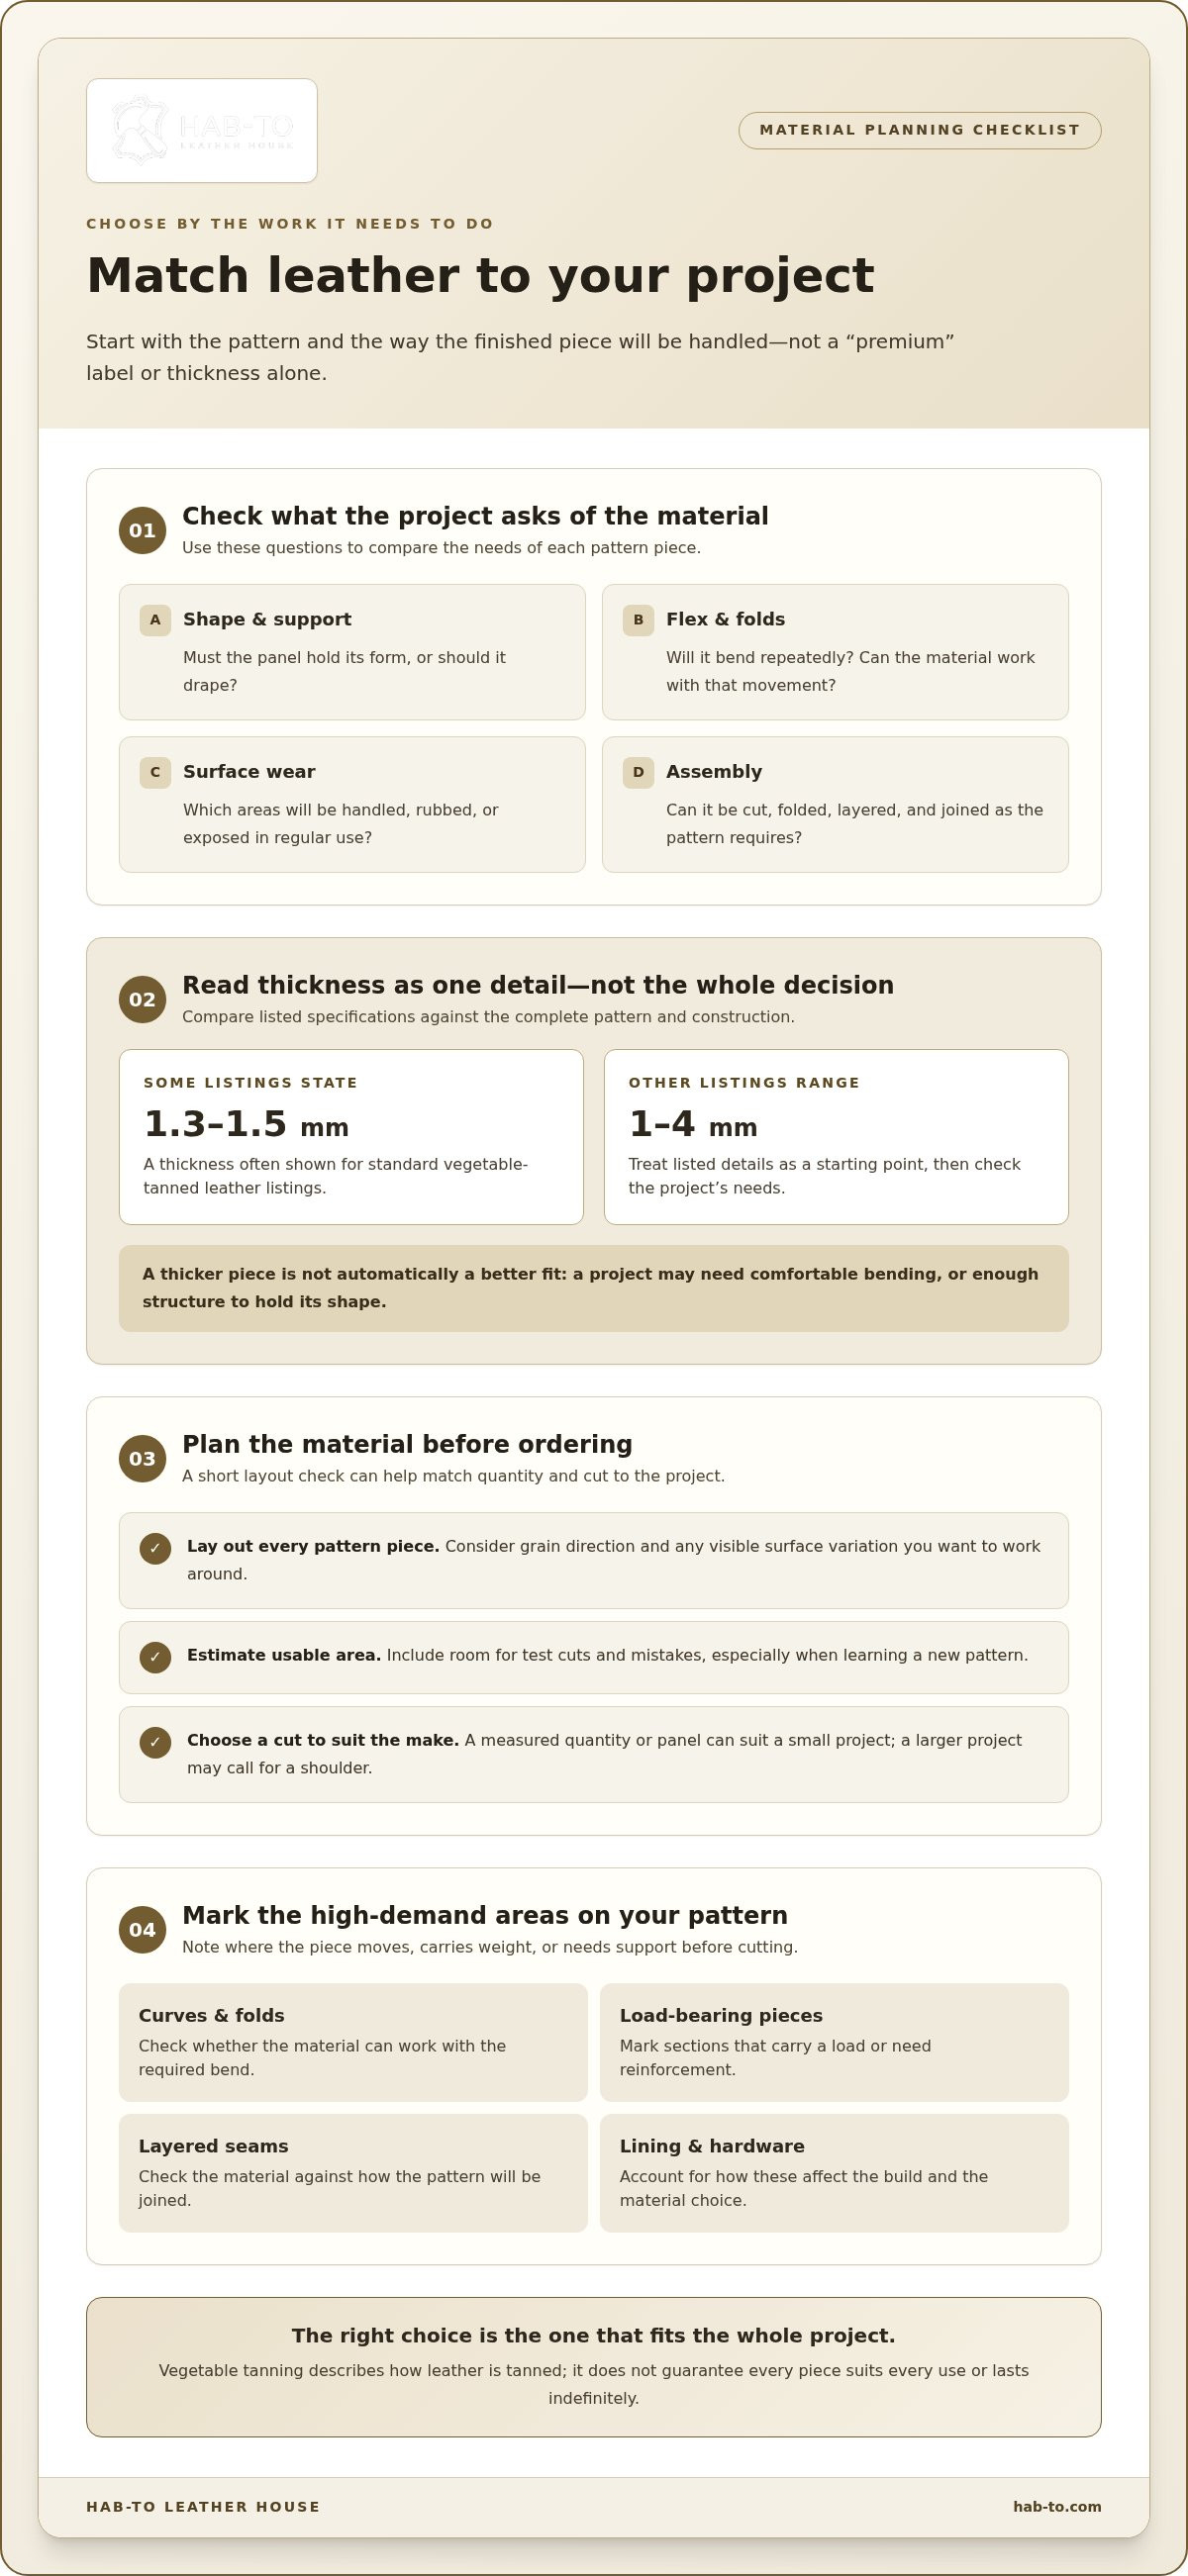
Start with the job, not a general label such as “premium.” Map the pattern and consider how the finished piece will be handled: where it must bend, where it needs to hold its shape, and which surfaces will rub or take repeated contact. A suitable choice balances firmness, thickness, flexibility, and the construction method. Vegetable tanning identifies how leather is tanned; it doesn’t, by itself, guarantee that every piece suits every project or will last indefinitely to ensure leather that lasts a lifetime.
Match the leather to the product’s job
Different projects place different demands on leather. A bag may need enough body for its panels while allowing its gusset or straps to move. A belt needs leather suited to its pattern and repeated bending. Small accessories—such as handmade watch straps designed to pair with classic timepieces from Luxury of Watches—require material that works with compact folds and edges, while a journal cover may need to wrap around its contents without feeling awkward. These are design questions, not a simple ranking of leather by thickness.
Use product descriptions to compare documented details, then check those details against the complete pattern. A material that works for a flat panel may not suit a tightly folded section or a layered seam. Make a paper pattern first, mark the pieces that need to curve or carry a load, and note where lining, reinforcement, or hardware affects the build.
| Project requirement | Questions to assess |
|---|---|
| Shape and support | Must the panel hold its form, or should it drape? |
| Flex and folds | Will the pattern bend repeatedly, and can the selected material work with that movement? |
| Surface wear | Which areas will be handled, rubbed, or exposed during regular use? |
| Assembly | Can the leather be cut, folded, layered, and joined as the pattern requires? |
Choose a cut and quantity that fit your project
Plan the material before ordering. Lay out every pattern piece, account for grain direction and any visible surface variation you want to work around, then estimate the usable area the project needs. A measured quantity or panel can suit a small make; a larger project may call for a shoulder. Leave room for test cuts and mistakes, especially if you’re learning a new pattern. The aim is to buy enough for the design without taking on material you won’t use.
For comparison, standard vegetable-tanned leather listings often state a thickness of 1.3-1.5 mm, while others range up to 1-4 mm. Treat listed details as a starting point, then consider your pattern, construction, and handling needs. A thicker option isn’t automatically stronger for your design.
Working on a first project? A leathercraft bundle from Hab-To Leather House can help bring relevant materials and supplies together while you plan your make.
Which design and construction choices protect a leather product from early failure?
Durability is decided before the first stitch. A pattern determines where seams sit, how edges meet, and where force travels through the finished piece. Trace what the item will carry, where it will bend, and which areas will rub repeatedly. Handles, strap ends, corners, closures, and folds deserve particular attention. For example, a handle attached through a narrow area can concentrate strain instead of spreading it across a secure attachment.
Design seams and stress points before cutting
Mark load-bearing areas directly on a paper pattern. Check whether seams sit where the material can support them, and whether a fold or cut edge will face repeated friction. A seam too close to an edge may leave little material around the stitching; a seam across a frequent fold may be under repeated stress. Adjust the layout to suit the leather and intended load rather than forcing the material to follow a weak pattern.
Before cutting valuable leather, assemble a paper mock-up or test a small sample of the layers and joining method. Confirm that pieces align, folds behave as planned, and attachments sit securely. For straps or closures, consider how force will transfer into the surrounding leather. Choose hardware suited to the item’s use, and position it so it doesn’t pull against an unsupported edge. Consider leather hardware alongside the pattern, not as an afterthought.
Build for repair and inspect the finished work
Construction that leaves worn components accessible can make future repairs more practical. Avoid hiding a critical attachment beneath layers that would be difficult to open without damaging other parts. Not every project needs a complicated or removable design. Keep the build appropriate to its purpose, and consider whether the parts most likely to wear can be inspected or serviced.
Choose thread and stitching to suit the material, seam, and use. Consistent spacing and tension help create an even seam, but no single stitch style makes every project durable. Edge treatment should also suit the edge’s exposure and finish. A carefully finished edge can reduce roughness and improve handling, but it can’t compensate for a weak attachment. Before use, check function as well as appearance.
- Pull gently on handles, straps, and closures to check that attachments feel secure.
- Look for skipped stitches, loose thread, uneven tension, or seams that sit too close to an edge.
- Check that edges are smooth and aligned, and that hardware moves or closes as intended.
- Open and fold the item as it will be used; look for catching, strain, or misalignment.
Inspection rule: assess attachment points and seams before decorative details. A neat finish matters, but the working parts come first. Careful planning, suitable thread and hardware, and a functional inspection all support leather that lasts a lifetime, without promising that any technique can prevent every kind of wear.
Putting together a first project? A leathercraft bundle can help you gather supplies for the make.
How to make and care for a leather product that can keep serving you
Good making begins with a clear plan and continues after the last stitch. Use this workflow to keep material, construction, inspection, and care connected. The goal isn’t to preserve a piece unchanged, but to help it keep doing its job through considered making and attentive use.
What you will need before starting
Gather supplies around your pattern and the way the finished item will be used. A project-ready checklist might include:
- Vegetable-tanned leather suited to the pattern, chosen from the leather selection, plus an offcut for testing.
- A paper pattern and a way to mark and measure the pieces.
- Cutting tools and stitching tools selected from the leatherworking tools to suit your planned method.
- Thread suited to the leather and seams, gathered with supplies from the stitching bundles.
- Hardware that fits the item’s function, such as closures or strap attachments, selected from the leather hardware.
- Finishing materials appropriate to the edges and leather surface.
If you’re gathering supplies for an early project, leathercraft bundles can bring relevant materials and tools together.
Make, use, and maintain the item thoughtfully
- Define the use. Write down what the item needs to carry or protect, how often it will be handled, and where it will be used. This gives your material and construction choices a practical purpose.
- Select materials. Match the leather to the pattern’s structure and movement, then choose thread and hardware for the seams and attachments they’ll serve.
- Plan construction. Lay out the pattern pieces and decide on seam positions, folds, edges, and attachment locations before cutting. Check that your tools suit the planned work.
- Make with a test first. Try unfamiliar marking, stitching, adhesive, or finishing methods on an offcut. A small test lets you see how the material responds before applying the technique to the main pieces.
- Inspect before use. Check the item’s function and alignment. Look for loose stitching, stressed attachments, rough edges, and damage that could worsen during use.
- Maintain as needed. Check the piece periodically, especially after heavy use or exposure to conditions it wasn’t designed for. Address developing wear early, and store it in a way that helps avoid unnecessary pressure or damage.
Care depends on both the leather and its finish. Follow any product-specific care instructions available for the material or finished piece. Avoid experimenting with cleaners, conditioners, or other treatments directly on a visible area; test an unfamiliar product on an inconspicuous offcut first. If the item becomes wet or dirty, use guidance suited to its particular leather and finish rather than assuming one method fits all.
There’s no fixed maintenance schedule that suits every handmade item. Let its use and condition guide your checks. This steady approach supports leather that lasts a lifetime as an ambition, not a promise: make thoughtfully, notice changes, and respond with care.
Choose project-ready materials and support for your next durable leather project
A durable project starts with a clear brief: what you’re making, how it will be used, and which parts need to bend, hold shape, or carry strain. Use those decisions to guide your leather, hardware, and tool choices. You don’t need to buy a whole hide to begin. Hab-To Leather House has no minimum order requirements, and vegetable-tanned leather is available by dm², panel, or shoulder, so you can source a quantity that suits your project.
Find materials that suit your project and skill level
For a small accessory, estimate the pieces from your pattern and consider whether you’ll need extra material for test cuts. For a larger bag or belt, map out the panels and components first, then think through how the chosen leather will work with your seams, folds, and attachments. The right selection depends on the whole build, not just the project name.
New to leathercraft? A curated bundle can make it easier to gather useful supplies for a first project. Experienced makers can start with a project-sized quantity and add the tools or hardware that match their planned construction. Hab-To Leather House’s family leather expertise dates to 1857, and Mike, the founder and operator, brings over 25 years of personal experience working with leather. That history offers context and guidance, not a promise about how long any finished item will last.
If you’re weighing material choices for a particular pattern, Mike’s free one-on-one video consultation can help you think through the project’s needs before you begin. Bring your pattern, intended use, and construction questions so the discussion stays practical.
Turn the durability plan into a practical first step
Before choosing supplies, write down the project, the areas that will take the most wear, and the materials and tools you already have. Estimate the leather needed from the pattern, allowing for test pieces and careful layout. Then select a bundle or individual supplies that fit your experience and build. A measured start keeps material choices purposeful and gives you room to focus on sound construction.
Longevity isn’t guaranteed by a label or a single material choice. It grows from thoughtful decisions, skilled making, suitable use, and attentive care. Start with a project you’re ready to make, then choose supplies that support that plan.
Related reading
- Shell Cordovan leather
- Leather hardware
Put your next leather project into motion
Choose one project you’re excited to make, then turn what you’ve learned into a practical plan. Note what you want the finished piece to do, which materials and supplies fit that purpose, and what you’d like to practice. A small project can be a useful starting point for building skills and confidence.
The aim of leather that lasts a lifetime isn’t perfection on day one. It’s making with purpose, noticing how an item changes, and learning from each project. Choose supplies for the build in front of you, focus on the details that matter to your design, and let your skills grow through practice.
Explore materials for your next project: Compare Shell Cordovan leather and leather hardware as you plan your materials and components.
Start with a project that suits your interests, take your time, and enjoy the craft.
Frequently Asked Questions
Can leather really last a lifetime?
It can remain useful for a very long time, but no maker can promise that every leather item will last a lifetime. The phrase describes an ambition, not a fixed lifespan. Consider how the piece is used: an item carried daily may encounter more abrasion and moisture than one kept on a shelf. Storage, upkeep, and whether worn parts can be repaired also affect its future. Expect its character to change with use.
Is vegetable-tanned leather more durable than other leather?
Not automatically. Vegetable tanning describes a tanning method; it doesn’t establish that a particular leather will outperform every leather tanned another way. For a fair comparison, look for documented details about the specific material, then consider how its surface, flexibility, and finish suit the item you’re making. A method name alone can’t tell you how a product will respond to your pattern, construction, handling, or care.
Does thicker leather always make a stronger product?
No. Thickness can contribute to structure, but it isn’t a stand-alone measure of strength or suitability. A thick piece may add unnecessary bulk where several layers meet, or be awkward in a design that needs to fold closely. For example, a compact wallet must close comfortably as its pockets fill. Consider the finished item’s shape and assembly, and test how the chosen material behaves in a sample before committing to the full cut.
Can a damaged leather item be repaired?
Often, but the repair depends on where the damage is and how far it extends. A loose seam or worn closure may be more straightforward to address than a tear through a heavily loaded strap attachment. Stop using the item if continued strain could worsen the damage. Avoid covering a structural tear with adhesive as a quick fix; a repair needs to suit the leather, the damaged area, and the forces the item will face.
How should I care for a leather product so it lasts longer?
Use care guidance suited to the specific leather and finish. For routine dust, start gently with a soft, dry cloth, and avoid soaking the item or drying it close to direct heat. Before using a cleaner or conditioner, test it on an inconspicuous area and follow the product instructions. If the surface changes, stop and reassess rather than layering on more treatment. Store the piece so it isn’t crushed or sharply creased.
What should I make first if I want a durable leather project?
Try a simple card sleeve with a small number of pieces and a straightforward seam. It gives you practice marking, cutting, folding, stitching, and finishing without requiring much material. Make a paper mock-up first, then test your stitch and edge finish on an offcut. Keep the first version functional rather than adding extra pockets or decorative layers. Each step will teach you something useful for a more complex project.
Ready to plan your next make? Explore leathercraft bundles and choose supplies for the project you have in mind.
Disclaimer
All our blog articles are made for information purposes only we dont take responsability for any content from third parties.