


Mastering the Compass of the Craft: How to Use a Wing Divider Like a Pro
A wing divider isn't just a simple measuring tool. It's the silent architect of every high-end leather piece. You've likely felt the frustration of a metal point skipping across a beautiful piece of vegetable tanned leather, leaving a jagged scratch where a crisp stitch line should be. Learning how to use a wing divider correctly is the difference between a project that looks homemade and one that looks truly artisanal. It's discouraging when your edges look uneven despite your best efforts to stay steady. I've been there, and I know how much those small details matter to the integrity of your craft.
I'm going to show you exactly how to master this tool to achieve a professional finish every time. We're moving beyond basic marking to master the anchor-and-drag technique that keeps your lines deep and true. You'll learn the precise methods to calibrate, scribe, and layout your leather projects for results that command respect. We'll explore how to mark perfect curves, find centerlines on straps, and build your confidence with this essential hand tool.
Key Takeaways
- Calibrate with precision using the "Ruler-to-Point" method to eliminate parallax error and ensure exact spacing for every project.
- Master the 45-degree grip and anchor technique to learn how to use a wing divider for flawless, parallel stitch lines that don't slip.
- Adapt your scribing pressure based on leather temper and oil content to achieve crisp marks without damaging the grain.
- Maintain your tool's professional edge by learning how to sharpen and balance the steel tips for lifelong accuracy and symmetry.
What is a Wing Divider in Leathercraft?
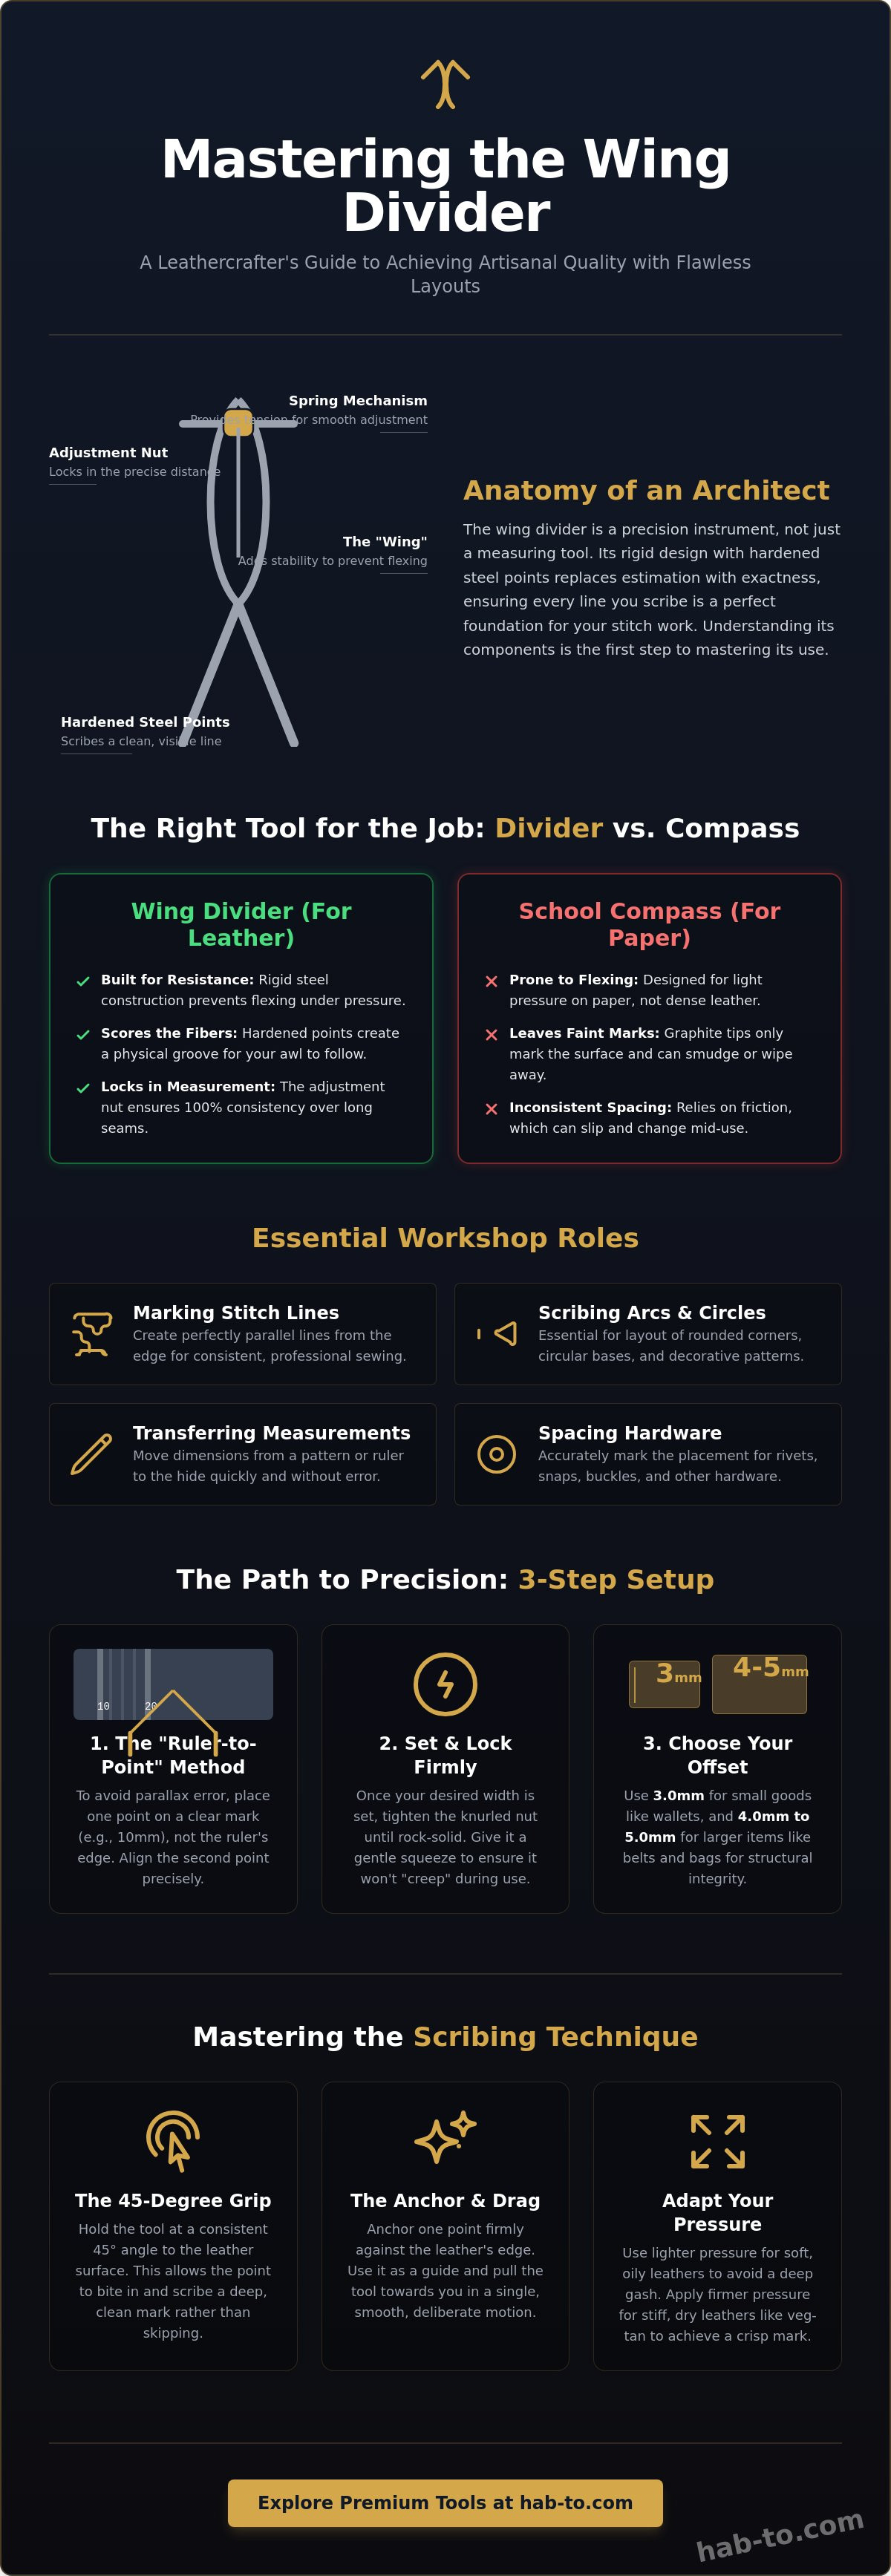
Precision is the heartbeat of fine leatherwork. A wing divider is a specialized marking tool featuring two adjustable steel legs, designed specifically for layout and scribing. Unlike a standard pencil or a simple scratch awl, this tool allows you to maintain a fixed distance with absolute certainty. It is the foundation of professional craft because it replaces estimation with exactness. Learning how to use a wing divider starts with understanding its architecture. The tool consists of two hardened steel points, a spring mechanism at the top, and a knurled adjustment nut that travels along a threaded rod.
The "wing" itself is the arched metal brace that gives the tool its name. This isn't just for show. In leathercraft, you are often dragging these steel points across dense, fibrous materials like Badalassi Pueblo leather. The wing provides the lateral stability needed to resist the natural pull of the grain. Without it, the legs would flex, and your stitch lines would waver. When you lock that adjustment nut, you are ensuring that the distance stays exactly the same from the first inch of your belt to the last.
Wing Divider vs. Compass: The Critical Difference
Many beginners mistake a school compass for a professional divider. While it shares a lineage with the traditional Compass (drawing tool), the wing divider is built for resistance. A standard compass is designed for lead on paper; it flexes under the slightest pressure. A wing divider is rigid. Its tips are made of hardened steel, specifically shaped to score the fibers of the leather rather than just leaving a faint surface mark. This scoring creates a physical track for your stitching irons or awl to follow. The locking screw is the hero here. It maintains 100% consistency, ensuring your measurements don't drift during a long session at the workbench.
Essential Roles in Your Workshop
You'll find yourself reaching for this tool constantly. It's not a "one-trick pony" for stitch lines alone. Its versatility makes it a staple for any serious maker. Here is how it earns its keep:
- Marking Stitch Lines: Setting a perfect, parallel distance from the edge for consistent sewing.
- Scribing Circles and Arcs: Essential for rounding off wallet corners or laying out circular bag bases.
- Transferring Measurements: Moving dimensions from a paper pattern directly onto your hide without using a ruler every time.
- Spacing Hardware: Accurately marking the placement for rivets, snaps, or buckles.
Mastering how to use a wing divider means you no longer have to guess where your needle goes. You are creating a roadmap for your hands to follow, ensuring every project carries the mark of a master.
Setting Up and Calibrating Your Divider for Accuracy
Precision is not an accident; it's the result of a disciplined setup. Learning how to use a wing divider effectively begins with calibration. If your tool is off by even half a millimeter, that error will compound over the length of a long seam. Start by loosening the knurled adjustment nut. You want the legs to move freely before you lock in your final dimension. Grab a high-quality steel rule. This is the only way to ensure your measurements are grounded in reality rather than guesswork.
Place one tip of the divider into the "10mm" mark on your ruler rather than at the very end. Starting at the edge of a ruler often leads to "parallax error," where the angle of your eye causes a slight misread. By starting at a known graduation mark, you can align the second tip with absolute certainty. This guide to marking leather highlights the necessity of a sharp, well-set point for professional results. Once you've reached your desired width, tighten the wing nut firmly. Give the legs a gentle squeeze. If they move, your tension is too loose. You need that setting to be rock-solid to prevent "creep" while you work.
Determining Your Stitching Offset
Your offset distance should never be a random choice. It's dictated by the scale of your project and the weight of your thread. For small goods like cardholders or wallets, 3.0mm is generally considered the sweet spot. It keeps the stitching close enough to the edge to look refined without risking the thread "blowing out" the side of the leather. If you're working with a premium material like Virgilio Vacchetta leather, you'll want to ensure your divider is perfectly set to avoid wasting a single inch of hide. For larger items like tote bags or belts, increase your offset to 4.0mm or 5.0mm to provide the structural integrity required for heavier use.
The "Ghost Mark" Test
Never take your tool directly to your final workpiece. Once you understand how to use a wing divider for basic layout, you must develop the habit of testing. Take a scrap piece of the same hide you are using for your project. Perform a light "ghost mark" by dragging the divider with minimal pressure. You are looking for two things: visibility and depth. On soft-tempered leathers, the points can easily dive too deep, potentially weakening the grain. On firmer leathers, you might need a second pass. Adjust your hand pressure until the mark is clear enough to follow but shallow enough to be covered by your stitching.
Step-by-Step: How to Scribe Perfect Stitch Lines
The moment of truth arrives when steel meets hide. I've seen many artisans throw their tools in frustration because the divider "jumped" across the grain, leaving a permanent scar. This usually happens because of improper leverage or a lack of anchoring. Mastering how to use a wing divider requires more than just setting a width; it's about the physical connection between your hand, the tool, and the leather edge. It's about finesse, not force.
Start with your grip. Hold the divider much like you would a heavy fountain pen. Tilt the tool at a 45-degree angle in the direction of your movement. This angle prevents the tips from digging too deep and catching on the fibers. If you hold it vertically, you're essentially inviting the tool to skip. These precise hand-tool techniques are foundational in any professional Craft and Design curriculum, where control is prioritized over speed. When you're ready, apply a consistent downward pressure and move in a single, fluid motion. Staccato movements create jagged lines that are visible even after you've finished stitching.
Preventing the "Slip": The Pro Anchor Technique
The secret to a rock-solid line is the "hook." To prevent the tool from sliding inward, keep your guide leg slightly lower than your scribe leg. This allows the guide leg to hug the side of the leather like a rail. Use your index finger as a stabilizer. Place it firmly on the head of the divider to provide downward force while your other fingers control the lateral path. I always recommend scribing towards your body. This direction gives you much better leverage and a clearer line of sight than pushing the tool away. If you're working on a dense material like Badalassi Pueblo leather, you'll find this anchor technique essential to stay on track.
Marking Curves and Radii
Rounded corners are where most layout errors occur. When you reach a 90-degree corner, don't stop. Instead, slow your pace and pivot the tool around the radius. You must keep the guide leg firmly pressed against the edge of the curve. Think of the guide leg as the center point of a circle. If you lose contact for even a fraction of a second, your stitch line will flatten out. For complex bag gussets where the edge isn't straight, you might need to rotate the leather piece itself rather than moving your arm. This keeps your wrist in a neutral, strong position. Once the scribe is complete, review the entire line. It should be a deep, consistent "ghost track" ready for your stitching irons.
By following these steps, you'll learn how to use a wing divider with the confidence of a seasoned master. No more skipping. No more ruined hides. Just crisp, professional results.
Nuances of Scribing: Working with Different Leather Types
Leather is a living material, and no two hides react to steel in quite the same way. The temper of the leather, which refers to its degree of stiffness or softness, is the primary factor in how to use a wing divider successfully. A soft-tempered hide will stretch and deform under the tool, while a firm vegetable-tanned hide offers the perfect resistance for a clean, permanent line. When you're working with high-fat leathers, the natural oils can act as a lubricant. This causes the tool to glide almost too easily, which increases the risk of the scribe leg wandering if your grip isn't rock-solid.
Textured surfaces present their own set of challenges. Scribing across pebbled grains or embossed patterns requires a slower pace to keep the line straight. If you move too fast, the point will naturally want to "track" into the valleys of the grain rather than staying on its intended path. You might also find yourself needing to scribe on the flesh side for internal pocket layouts. Because the flesh side is more fibrous and "fuzzy," you'll need to apply slightly more downward pressure to leave a mark that is visible enough to follow with your stitching irons.
Scribing Dense Hides: Shell Cordovan and Vacchetta
Dense leathers require a specific touch. Maryam Shell Cordovan is incredibly compact. Its fibers are so tightly packed that your divider tips must be needle-sharp to make a meaningful mark. If your tips are even slightly dull, they'll just slide across the surface without biting into the grain. On the other hand, Maryam Vacchetta has a remarkable "memory." Even a very light pass creates a permanent impression that won't fade as you handle the piece during construction. Vegetable-tanned leather is the ideal canvas for wing dividers because its fibers are firm enough to hold a crisp, permanent impression without the "spring-back" found in chrome-tanned hides.
Textured Challenges: Pueblo Leather
The scuffed surface of Badalassi Pueblo presents a unique hurdle for layout work. This intentionally distressed finish can "swallow" a shallow scribe line, making it nearly invisible under workshop lights. You'll often find that a deeper scribe is necessary on Virgilio Pueblo just to see where your irons should land. The danger here is that the divider point might try to follow the existing scuff marks. To combat this, keep your anchor leg pressed firmly against the edge and maintain a steady, slow drag. This ensures your stitch line remains a professional guide rather than a jagged mess.
Ready to put these techniques to the test? Explore our premium vegetable tanned leather collection and find the perfect canvas for your next project.
Maintenance: Keeping Your Divider Sharp and Precise
A master craftsperson is only as good as the state of their tools. Over months of heavy use, even the highest quality steel tips will begin to dull or develop microscopic burs. If you don't maintain your equipment, you'll find that learning how to use a wing divider becomes a struggle against the tool itself rather than a smooth layout process. The most critical aspect of maintenance is tip symmetry. If one leg is even a fraction of a millimeter shorter than the other, your divider will sit at an awkward angle. This imbalance ruins your measurements and makes the tool prone to skipping across the grain.
Rust is the second silent enemy of carbon steel tools. In humid workshops, oxidation can quickly form on the wing, the spring, and the adjustment threads. This doesn't just look unprofessional; it creates friction that makes fine adjustments difficult. A well-maintained tool is a joy to use and a sign of respect for the craft. When your divider is sharp and clean, it glides effortlessly across premium vegetable tanned leather, leaving a mark that is both precise and beautiful. Taking ten minutes a month for tool care will save you hours of frustration on your future projects.
How to Sharpen Wing Divider Tips
To sharpen your tips, use a 1000-grit sharpening stone or high-grit sandpaper on a flat surface. I recommend the "Pencil Sharpener" rotation technique. Hold the divider leg at a consistent angle and rotate it between your fingers as you draw it across the stone. This ensures the point remains conical and centered rather than developing flat spots. Once sharpened, polish the tips to a mirror finish using a leather strop loaded with polishing compound. A smooth, polished tip prevents the tool from dragging or tearing the delicate grain of the leather. Always check for burs by running your fingernail along the point. A burr will cause a "double-line" mark that can ruin your layout's clarity.
Long-term Care and Storage
After each workshop session, wipe down the steel components with a light coat of machine oil or camellia oil. This simple step prevents oxidation and keeps the spring mechanism fluid. When you're finished, store the tool in a closed position. This protects the needle-sharp points from being blunted by other tools in your drawer and prevents accidental injuries. If your divider has a locking screw, leave it slightly loose during storage to avoid putting unnecessary tension on the spring for long periods. Your tools are an investment in your skill. Treat them with the same care you give to your most expensive hides.
Ready to upgrade your hardware? Explore our Solid Brass Hardware Guide to find the perfect components that match the precision of your handiwork.
Elevate Your Craft with Timeless Precision
Mastering the nuance of how to use a wing divider is a milestone in any maker's journey. It transforms your workflow from estimation to intentional design. By calibrating your tool with a steel rule and perfecting the anchor-and-drag grip, you ensure that every stitch line reflects the quality of the hide itself. Remember that a sharp, polished tip is your best defense against slips and jagged marks. Consistent maintenance keeps your layout crisp and your results professional.
At Hab-To Leather House, we bring 160 years of family expertise to your workbench. Based in Amsterdam, we are a dedicated wholesaler shipping world-class Maryam and Badalassi leathers to artisans across the globe. We believe that professional results require both mastered technique and uncompromising materials. Whether you're scribing dense Shell Cordovan or textured Pueblo, the right foundation makes all the difference. We're here to support your growth as a craftsman with the same passion we've held for generations.
Shop Premium Leatherworking Tools and Hides at Hab-To Leather House and start your next project with the confidence of a pro. Your craft deserves nothing less than perfection. Keep practicing, keep scribing, and enjoy every mark you make.
Frequently Asked Questions
Can I use a wing divider on chrome-tanned leather?
Yes, you can use it, though the results differ from vegetable-tanned hides. Chrome-tanned leather is more resilient and often "heals" the mark because of its flexible fibers. You'll need to use slightly more pressure or follow the scribe line immediately with your stitching irons before the mark fades. It's a useful technique for temporary layout, but for permanent guides, vegetable-tanned leather remains the superior choice for this specific tool.
How do I stop my wing divider from scratching the leather too deeply?
Reduce your downward pressure and check the polish on your tips. If the points are too sharp or have burs, they will cut rather than scribe. Tilting the tool at a 45-degree angle also helps the steel glide over the surface. Mastering how to use a wing divider involves finding that perfect balance where the mark is visible but the grain remains intact and undamaged.
What is the best size wing divider for wallet making?
A 4-inch or 6-inch wing divider is the most practical choice for small leather goods. These smaller frames provide the nimbleness required to navigate tight radii on card slots and wallet exteriors. Larger 10-inch dividers are better suited for bag panels or belts where reach is more important than agility. For most workshop tasks, the 6-inch model offers the best balance of reach and precision control.
How often should I sharpen my wing divider tips?
You should touch up the tips whenever you notice a decrease in line clarity or feel the tool dragging. In a busy workshop, a weekly stropping session is usually enough to maintain the edge. If you drop the tool or notice the points are no longer symmetrical, use a 1000-grit stone to reshape them. Sharp tools are safer and produce much cleaner results on high-end hides.
Can a wing divider replace a stitching groover?
It certainly can, and many high-end artisans prefer it over a groover. A stitching groover actually removes a thin strip of leather, which can weaken the edge over time. A wing divider simply compresses the fibers to create a guide. This method preserves the full strength of the leather grain while still providing a professional, recessed path for your stitches to sit in.
What happens if the wing nut on my divider becomes loose?
A loose wing nut leads to "measurement creep," which ruins the symmetry of your project. If the nut doesn't stay tight, your legs will slowly spread apart as you apply pressure. This is often caused by worn threads or a weak spring. Always double-check your calibration against a steel rule if you suspect the tool has shifted during a long run to avoid inconsistent stitch lines.
Is it better to scribe before or after dyeing the leather?
It's best to scribe your lines after the leather has been dyed and fully dried. Dyeing can cause the leather to slightly expand or contract, which might throw off a pre-marked layout. Scribing on the dyed surface also ensures the mark is crisp and easy to see. This is a key part of learning how to use a wing divider for professional, multi-step finishing on luxury goods.
How do I use a wing divider to mark hole spacing for rivets?
Set the divider to your required interval and "walk" the points along your scribe line. By pivoting the tool from one point to the next, you create a series of perfectly spaced indentations. These marks serve as the exact center points for your hole punch. This technique ensures that your rivets or snaps are aligned with mathematical precision every single time, regardless of the project's length.
