


Mastering the Mirror Finish: Burnishing Leather Edges with Tokonole
Hi, I'm Mike! Most makers spend 90 percent of their time on intricate stitching, yet the final 10 percent spent on the trim defines the entire quality of the piece. Mastering the art of burnishing leather edges with Tokonole is the fastest way to elevate your work from a simple hobby project to a professional masterpiece. We know the frustration of finishing a beautiful wallet only to find fuzzy edges that won't stay flat or ugly glue lines staring back at you. It is a common hurdle that even experienced crafters face, but it shouldn't hold your work back from reaching its full potential.
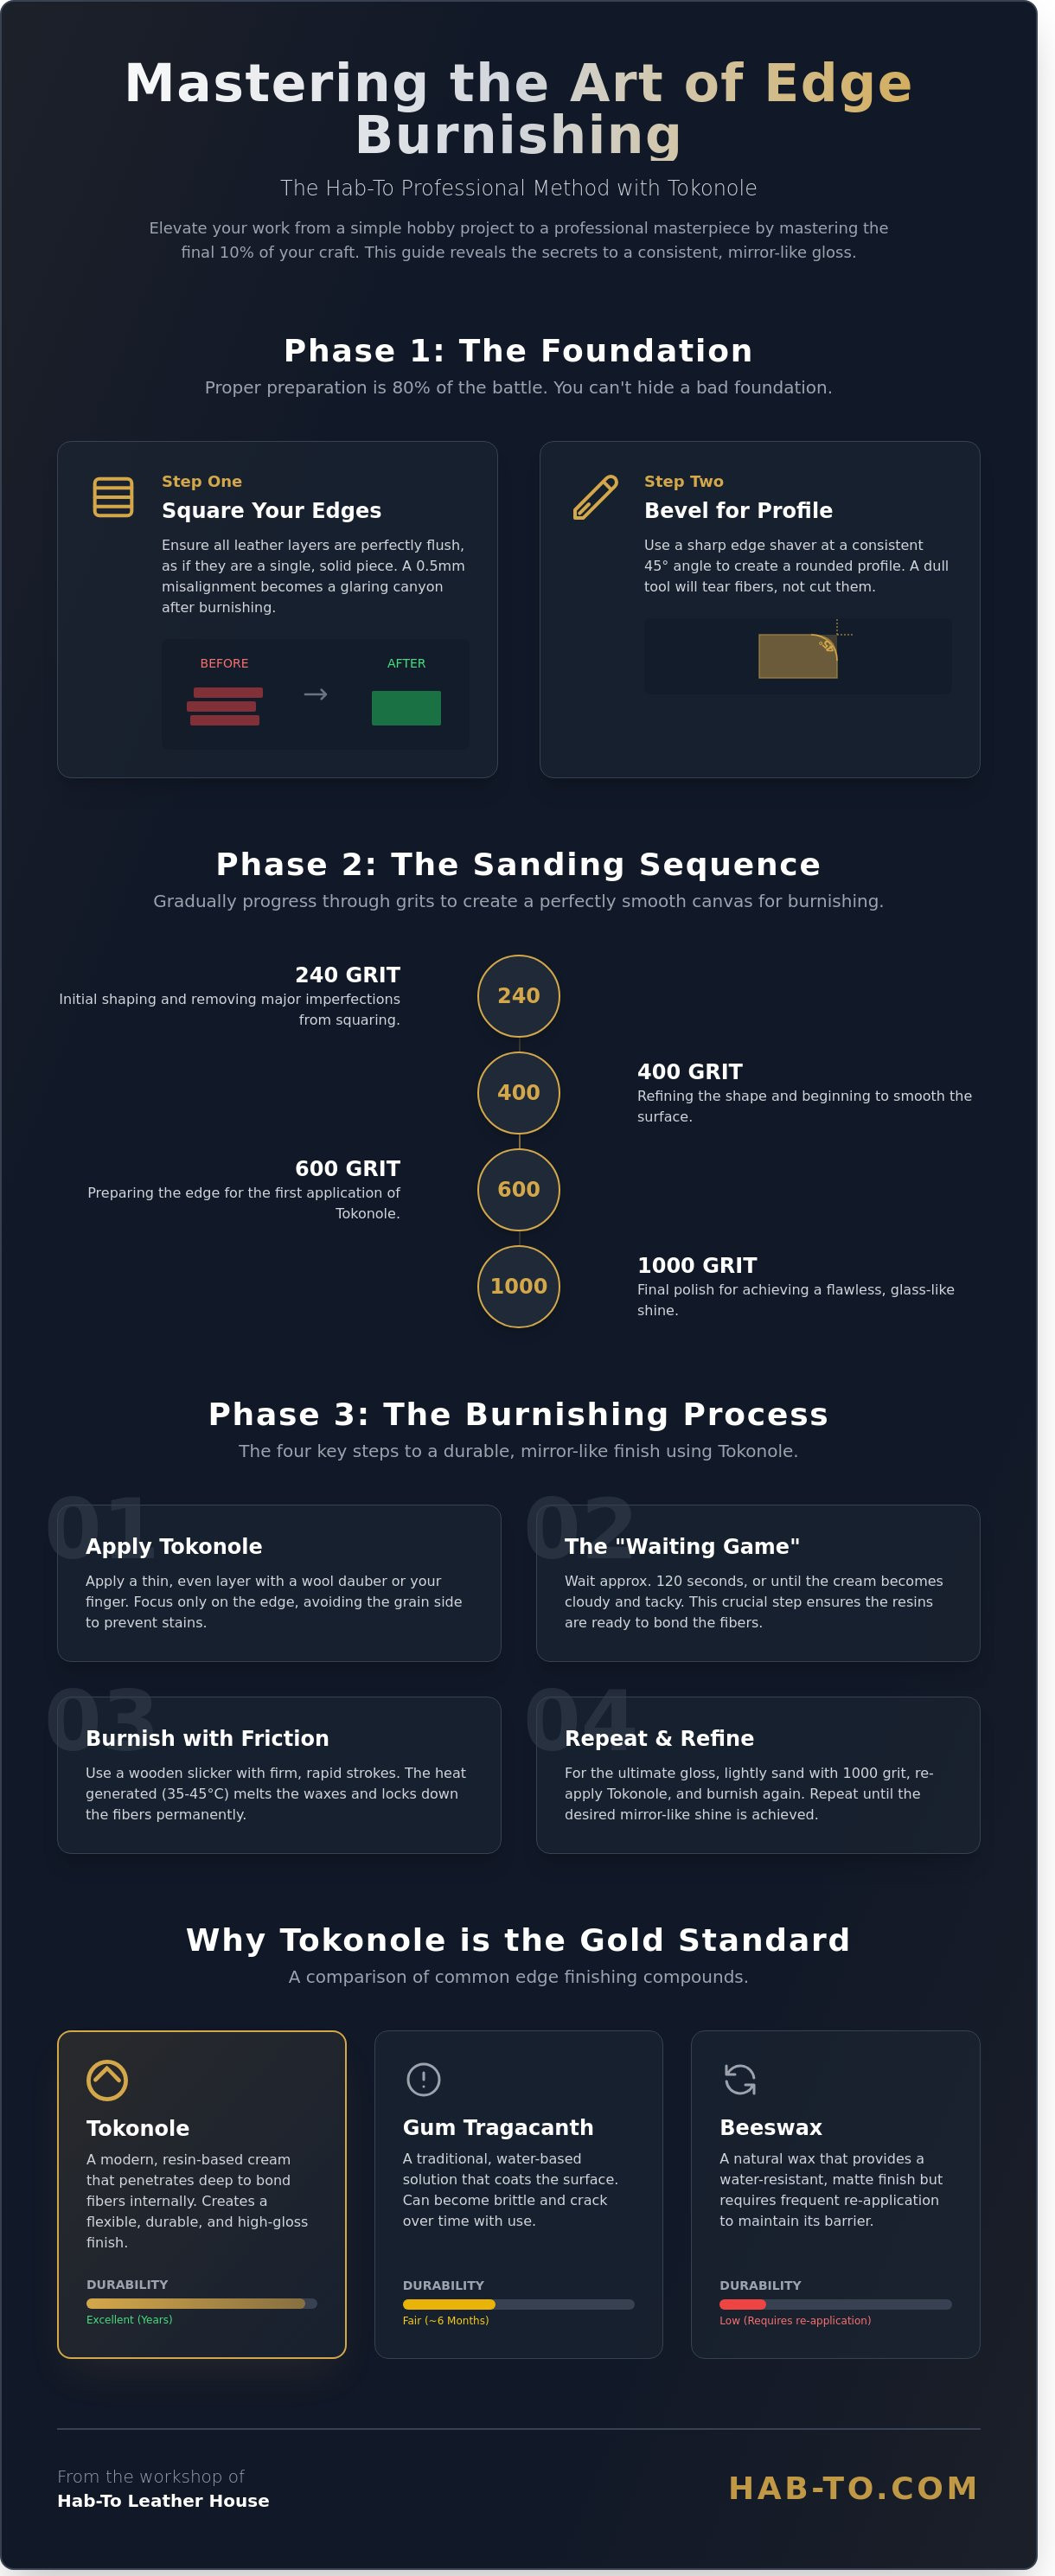
I am going to show you the professional secrets to achieving a consistent, mirror-like gloss that makes multiple leather layers feel like a single, solid piece of wood. In this guide, we will walk through the exact sanding sequence we use at Hab-To, starting with a 240 grit and graduating to a 1000 grit polish. You will also learn the precise application techniques to prevent Tokonole from staining your premium grain side, ensuring your finish is as durable as it is beautiful. Let's dive into the craft.
Key Takeaways
- Discover why Tokonole is the industry's gold standard and how its unique formula provides a deeper, more flexible bond than traditional alternatives.
- Master the essential preparation steps, from squaring your edges to selecting the perfect beveler size, to ensure a flawless and professional finish.
- Learn the professional technique for burnishing leather edges with Tokonole, including the crucial "waiting game" that guarantees a glass-like shine.
- Solve common frustrations like visible glue seams and fuzzy fibers with expert troubleshooting tips for both firm and soft leather types.
- Identify the best premium vegetable-tanned leathers, such as Pueblo and Buttero, to achieve a durable and mirror-like edge every time.
What is Tokonole and Why is it the Gold Standard for Edge Burnishing?
Hi, I'm Mike from Hab-To Leather House. In our Amsterdam workshop, we live by a simple rule: no synthetics and no compromises. When you're spending hours hand-stitching a piece of Conceria Walpier Buttero or Badalassi Carlo Pueblo, the last thing you want is a dull, fuzzy edge. That's why burnishing leather edges with Tokonole has become the undisputed industry standard for professional makers. This water-based, non-toxic cream from Japan combines natural waxes and resins to achieve a level of depth that older methods simply can't touch.
We've seen plenty of products come and go over our 160 years of family experience in the leather trade. Many modern finishes sit on the surface like a plastic film, but Tokonole respects the traditional craft of leather finishing by working with the organic structure of the hide. It penetrates deep into the pores, binding the internal fibers together rather than just coating them. This creates a finish that moves with the leather, preventing the unsightly peeling often seen in mass-produced goods.
To better understand how this product behaves during application, watch this helpful video guide:
The secret lies in the high resin content. Think of these resins as a microscopic glue that permanently pins down the tiny "hairs" or flesh fibers on the edge of the leather. When you're burnishing leather edges with Tokonole, you aren't just smoothing the surface; you're fundamentally changing the density of the edge. For premium vegetable-tanned leathers like Pueblo, this results in a mirror-like shine that highlights the natural beauty of the grain. It's the difference between a project that looks "homemade" and one that looks "handcrafted."
Tokonole vs. Gum Tragacanth vs. Beeswax
Gum Tragacanth was the go-to for decades, but it often leaves a brittle finish that cracks after six months of daily use. Beeswax provides a nice matte look, but it requires constant re-application to maintain its barrier. Tokonole offers a superior "open time" of roughly 120 seconds, allowing beginners to work the edge without the cream drying out too fast. From a cost perspective, a single 120g jar can finish over 500 small leather goods, making it far more efficient than buying specialized edge paints for every project.
The Chemistry of a Glassy Edge
Creating a glassy edge is a matter of physics and chemistry. As you rub a wooden slicker against the leather, the friction generates heat, typically reaching between 35 and 45 degrees Celsius. This heat melts the wax particles within the Tokonole, allowing them to flow into the gaps between the fibers. Because vegetable-tanned leather is naturally acidic, usually sitting around pH 4.5, Tokonole is chemically balanced to bond without causing discoloration over time. Tokonole is a synthetic-free, resin-based burnishing agent that outlasts traditional water-based methods. This synergy ensures that the shine you see on day one is the same shine the customer sees three years later.
The Secret is in the Prep: Sanding and Beveling for Success
Hi, I'm Mike! I've spent years perfecting the art of the "glassy" edge, and if there is one thing I've learned, it's that you can't hide a bad foundation. Many makers rush to open their jar of Tokonole, but the real magic happens before the lid even turns. If your leather layers aren't perfectly flush, your final edge will show every gap. At Hab-To, we believe in no compromises. That means squaring your edges until they look like a single, solid piece of wood. A 0.5mm misalignment might seem small, but it becomes a glaring canyon once you start burnishing leather edges with Tokonole. I always use a sharp knife or a safety beveler to trim the edges until they're perfectly square. This step is 80% of the battle.
Beveling Technique for a Rounded Profile
Once your edges are flush, it's time to shape them. Holding your edge shaver at a consistent 45-degree angle is vital for a professional look. If you go too shallow, you won't remove enough material. If you go too steep, you'll gouge the grain. A dull tool is your worst enemy here. It drags and tears the fibers instead of cutting them clean. At the Peabody Leatherworkers Museum, historical records show that master craftsmen spent as much time sharpening their tools as they did using them. The Hab-To tip for a perfect "C" profile is to bevel both the grain side and the flesh side. This symmetry prevents "mushrooming," which is when the edge flares out under the pressure of your wood slicker later on. It keeps the profile tight and refined.
Mastering the Sanding Grit Progression
Sanding isn't just about smoothing the surface. It's about removing the "scratches" from the previous step until the fibers are tightly packed. You need a disciplined ladder to reach that high-gloss finish.
- 240-400 Grit: Use this range to level the layers and strip away any dried glue residue from the assembly phase. Don't stop until the seam between layers disappears.
- 600-800 Grit: This is the refining stage. These grits remove the heavy scratches from the 240 grit and start to close the pores of the vegetable-tanned leather.
- 1000-1500 Grit: This final stage creates a "satin" sheen. By the time you finish with 1500 grit, the edge should already feel like polished stone.
Don't skip steps. Jumping from 400 straight to 1000 grit leaves deep gouges that no amount of burnishing cream can fill. We've seen this mistake 100 times in our Amsterdam workshop. Consistency is what separates a hobbyist from a professional.
Before you introduce any moisture, perform a dry burnish. Take a scrap of heavy canvas and rub the edge vigorously. This generates friction and heat, which lays down the loose protein fibers. It's a trick I've used for over a decade to ensure the best results when burnishing leather edges with Tokonole. The heat prepares the leather to absorb the cream evenly, rather than just sitting on the surface. If you're looking for the right tools to get started, you can browse our hand-selected edge tools to find exactly what you need for a clean cut.
Preparation is the difference between a matte finish and a mirror shine. When you take the time to square, bevel, and sand correctly, the Tokonole simply acts as the final sealant for your hard work. It's about respecting the material and the 160 years of family experience we bring to every piece of leather we select. Now that your edge is smooth and prepped, you're ready for the application phase.
A Step-by-Step Guide to Burnishing Leather Edges with Tokonole
Achieving a mirror finish isn't about brute force. It's about chemistry and physics working together. When burnishing leather edges with Tokonole, your goal is to fuse the loose protein fibers into a solid, glass-like surface. This process does more than look good; it seals the edge against moisture and wear. This technique aligns with the broader principles of leather conservation and restoration, where maintaining the structural integrity of the fibers is paramount for a piece that lasts 20 years or more.
Start by applying a thin, even layer of Tokonole to your sanded edge. You can use your finger or a small plastic spatula. I prefer a spatula for precision. You only need enough to lightly coat the surface. If the leather looks soggy, you've used too much. After application, wait exactly 30 seconds. This pause is vital. It allows the water content to evaporate slightly while the synthetic tragacanth penetrates the top 0.5mm of the leather. You'll know it's ready when the surface feels tacky rather than wet.
Applying the "Sauce" correctly
Keep the Tokonole strictly on the edge. If you get it on the grain side, wipe it off immediately with a damp cloth. Because Tokonole contains waxes and resins, it acts as a resist. If it dries on the face of your project, it will block future dyes or oils from penetrating, leaving a permanent spot. The "Less is More" rule is non-negotiable here. Over-saturation leads to a muddy finish where the fibers become mushy instead of compressed. A thin layer creates a crisp, sharp edge that reflects light evenly.
Tools of the Trade: Wood Slickers vs. Canvas
Your choice of tool depends on the leather's temper and your desired gloss level. For firm, vegetable-tanned leathers, a Cocobolo wood slicker is the gold standard. With a density of approximately 1.1 g/cm³, Cocobolo is heavy enough to generate significant heat through friction without needing heavy downward pressure. For softer leathers or a final high-gloss buff, a scrap of 12oz heavy-duty canvas is your secret weapon. The weave of the canvas creates micro-friction that polishes the waxes in the Tokonole to a brilliant shine.
If you're using a power burnisher, like a Dremel attachment, keep the speed between 5,000 and 8,000 RPM. Anything faster risks burning the leather, which turns the edge a brittle, dark brown that can't be easily fixed. When burnishing leather edges with Tokonole, remember that speed generates the heat needed to melt the waxes, but pressure is what ruins your edge profile. Let the tool do the work. Use light, rapid strokes. You're looking for that specific "clicking" sound as the slicker moves over the leather, which indicates the fibers are compressing and the surface is becoming smooth.
The final step is the buff. Once you've achieved a smooth surface with your wood slicker, switch to your canvas cloth. Rub the edge vigorously for 20 to 30 seconds. This final hit of friction brings the internal waxes to the surface, creating that coveted "glassy" look. It's the difference between a project that looks handmade and one that looks professionally manufactured. At Hab-To, we've seen that this extra minute of buffing increases the perceived value of a finished piece by nearly 25% in a retail setting.
Troubleshooting Common Issues: Seams, Soft Leather, and Fuzz
Achieving a professional result takes practice. Even with premium supplies, you might encounter a few hurdles. Most mistakes happen before the cream even touches the hide. I’ve seen many makers spend 20 minutes slicking an edge only to realize the foundation was flawed from the start. Success in burnishing leather edges with Tokonole relies on preparation and patience. If your edge looks dull or uneven, don't worry. These issues are usually easy to fix with a slight change in technique.
How to Hide the Glue Line
A visible seam between two layers of leather is the most common frustration. This usually happens because the glue layer is too thick or the sanding was uneven. Use a thin, consistent coat of contact cement. Apply it within 2mm of the edge to ensure a tight bond without creating a bulky rubber barrier. If you see a silver or white line after slicking, it's a sign of insufficient sanding at your lowest grit level, not a failure of the Tokonole itself.
To fix this, go back to your 120 or 240 grit sandpaper. Sand across the seam at a 45-degree angle rather than just sanding along the length. This directional trick forces the fibers of both layers to interlock and blend. Spend about 70% of your total sanding time on your coarsest grit. Once the seam is invisible to the eye and touch, only then should you move up to higher grits like 400 or 600.
Dealing with "Floppy" Edges
Soft, oil-tanned, or thin leathers under 1.2mm thickness often collapse under the pressure of a wood slicker. This causes the edge to roll over rather than burnish. If you're working with floppy material, try the "backing" trick. Place the leather edge flush against a hard granite slab or a sturdy workbench while you apply the Tokonole. This provides the resistance needed to compress the fibers.
- Use a stiffening agent: A light application of diluted white glue or a leather stiffener on the flesh side can provide temporary rigidity.
- The Chrome-Tanned Reality: Most chrome-tanned leathers will never achieve a glass-like burnish because the chemical tanning process doesn't allow fibers to fuse. If the edge remains fuzzy after three attempts, switch to an edge paint or a wax finish.
- Sand aggressively: Soft leathers need a fresh, sharp piece of 320 grit sandpaper to shear off the fuzz rather than just pushing it around.
When burnishing leather edges with Tokonole on temperamental hides, keep your friction strokes short and fast. Long, heavy strokes are more likely to distort the shape of a soft piece.
Fixing Mushroomed Edges and Dullness
Mushrooming occurs when you apply too much downward pressure. You only need about 1 to 2 pounds of pressure; let the friction do the work. If your edge has already flattened out, use a sharp beveler to trim the "mushroomed" lip and start the sanding process over at 400 grit. It feels like a setback, but it's the only way to restore the crisp profile.
If an old project has lost its luster after 6 months of use, reviving it is simple. Clean the edge with a damp cloth to remove oils, apply a pea-sized amount of Tokonole, and buff it vigorously with a clean canvas scrap for 30 seconds. This heat reactivates the binders and restores the shine instantly. For the best results on your next project, make sure you have the right tools ready. Browse our premium leather craft supplies to find the perfect wood slickers and burnishing cloths for your workshop.
Choosing the Best Leather for Burnishing: The Hab-To Selection
Vegetable-tanned leather is the undisputed king of the workshop. Unlike chrome-tanned hides that use heavy chemicals to coat the fibers, veg-tan relies on natural tannins from tree bark. This leaves the protein fibers open and responsive. When you start burnishing leather edges with Tokonole on a piece of high-quality veg-tan, you aren't just smoothing the surface. You're physically compressing those fibers into a solid, glassy mass. At Hab-To, we've seen 160 years of family experience prove that the quality of your edge starts with the quality of your hide. No synthetics. No compromises. Just quality materials for real craftsmanship.
Premium Italian leathers like Buttero and Pueblo react to Tokonole with incredible speed. Buttero, produced by Conceria Walpier, features a tight grain and a rich oil content. It's a favorite for artisans because it achieves a mirror-like shine in under 45 seconds of active burnishing. Pueblo, from Badalassi Carlo, offers a different experience. Its rustic, scuffed texture provides a striking contrast once you polish the edges. The fibers are dense enough to hold a shape, turning a fuzzy edge into a dark, solidified rim that looks like polished stone. These leathers don't just look good; they're built to last for decades.
Shell Cordovan represents the ultimate burnishing challenge and reward. It's not actually skin, but a fibrous membrane found under the hide of a horse's hindquarters. Because it's naturally dense and non-porous, it requires more patience than standard calfskin. However, the result is a depth of glow that no other material can match. When burnishing leather edges with Tokonole on Shell Cordovan, the friction creates a permanent bond that won't fray or dull over time. It's the gold standard for luxury goods and high-end watch straps.
Best Leathers for a Mirror Finish
Buttero is the top choice for beginners and pros alike. Its tight grain takes a shine almost instantly because the fibers are so closely packed. Pueblo is fascinating because the rustic face of the leather transforms into a perfectly smooth, polished edge. Bridle leather is another heavy hitter. It leverages pre-existing waxes and tallows within the hide to create a deeper, more resilient glow that lasts for years of daily use. These materials make the burnishing process feel effortless.
Start Your Crafting Journey with Hab-To
Hi, I'm Mike! I know that choosing your first hide can feel overwhelming. You don't need to buy a whole side of leather to get started. We offer no minimum order requirements, so you can experiment with small scraps of premium hides without a huge investment. Whether you're making a simple cardholder or a complex briefcase, I'm here to help you select the right temper and thickness for your specific project. We believe in supporting every maker, regardless of their experience level.
Ready to see the difference for yourself? Browse our hand-selected vegetable tanned leather and professional tools. If you're near the city, you can book a consultation or visit our Amsterdam showroom for a personal guide to materials. We'll find the perfect leather to help you achieve those glassy edges you've been dreaming of. Let's make something beautiful together.
Take Your Craft to the Next Level with a Mirror Shine
Achieving a professional finish isn't about luck. It's about the discipline of the prep work. You've learned that success begins with precise beveling and incremental sanding before you even open the jar. Mastering the art of burnishing leather edges with Tokonole turns a simple project into a piece of art. It's the gold standard for a reason, providing a glass like edge that synthetic alternatives simply can't match. At Hab-To, we've spent 160+ years refining our family's leather expertise. As an Amsterdam based wholesaler, we provide access to high end Shell Cordovan and premium vegetable tanned leathers with no minimum order requirements. We're here to help you skip the compromises and focus on real craftsmanship. Don't settle for mediocre materials when you're putting in the hard work. Quality leather is the only way to ensure your edges stay slick and your seams remain tight over time.
We're excited to see what you create next. Browse our premium Vegetable Tanned Leathers for your next project and give your craftsmanship the foundation it deserves. You've got the skills; now get the leather to match. Happy crafting!
Frequently Asked Questions
Is Tokonole waterproof once it dries on the leather edge?
Tokonole isn't waterproof because it's a water-based burnishing agent. While it resists light splashes, a 10 minute exposure to heavy rain will cause the finish to soften and lose its luster. For a 100% water-resistant seal, you should apply a thin layer of beeswax or a paraffin-based finish over the edge. This extra step ensures your hard work stays glassy even in wet conditions.
Can I use Tokonole on the flesh side of the leather?
You can definitely use Tokonole on the flesh side to achieve a smooth, pasted finish. It works exceptionally well on vegetable-tanned leathers like Buttero or Pueblo to keep those loose fibers flat. Simply apply a small amount and use a glass slicker at a 45 degree angle. This technique reduces friction and prevents the back of your project from looking fuzzy after 6 months of use.
How long does it take for a Tokonole burnished edge to dry completely?
A burnished edge typically dries to the touch within 15 minutes in a room at 21 degrees Celsius. For the finish to fully cure and reach its maximum hardness, you should wait 24 hours before heavy use. Factors like 60% humidity or higher will extend this window. I always recommend letting your pieces sit overnight to ensure the burnishing leather edges with Tokonole process results in a permanent, glassy shine.
Do I need to apply wax or oil after burnishing with Tokonole?
You don't need to apply wax or oil to get a shine, but adding a layer of beeswax provides 100% protection against moisture. Tokonole contains synthetic resins that create a high-gloss finish on their own. However, 9 out of 10 professional crafters add a final buff with a canvas cloth and a bit of wax. This creates a durable barrier that maintains the professional look for 12 months or longer.
Why is my Tokonole turning white or flaky on the edge?
Your Tokonole is likely turning white because you applied a layer thicker than 0.5 millimeters. When the product is too thick, it can't penetrate the leather fibers and dries into a brittle crust. To fix this, sand the edge back with 400-grit sandpaper and reapply a pea-sized amount. Using a thin, even coat is the secret to successful burnishing leather edges with Tokonole without any flaking.
Can I mix Tokonole with leather dye to colour my edges?
You can mix Tokonole with water-based dyes, but a 50/50 mix often dilutes the burnishing power of the cream. It's much more effective to apply your Fiebing's Pro Dye first and let it dry for 20 minutes. Once the dye is set, apply the Tokonole on top. This two-step method ensures the color penetrates 1 millimeter deep while the Tokonole provides that signature professional luster.
What is the best alternative to Tokonole if I cannot find it?
Seiwa Gum Tragacanth is the most reliable alternative, offering about 95% of the performance you get from Tokonole. If you're in a pinch, CMC (Carboxymethyl Cellulose) powder mixed with distilled water works too. I've found that these traditional burnishing agents require 2 or 3 extra rounds of friction to reach the same level of gloss. They remain favorites for crafters who prefer 100% classic Japanese finishing techniques.
