


Why My Hand Stitching Looks Messy: A Leatherworker’s Troubleshooting Guide
What if the reason your seams look amateurish has nothing to do with your hands and everything to do with your geometry? You've spent hours carefully cutting your vegetable tanned leather, only to find yourself wondering why my hand stitching looks messy the moment you pull the thread. It's a common frustration for every maker. You see those beautiful, slanted saddle stitches on professional work and wonder why your own thread loops are loose or your holes don't line up.
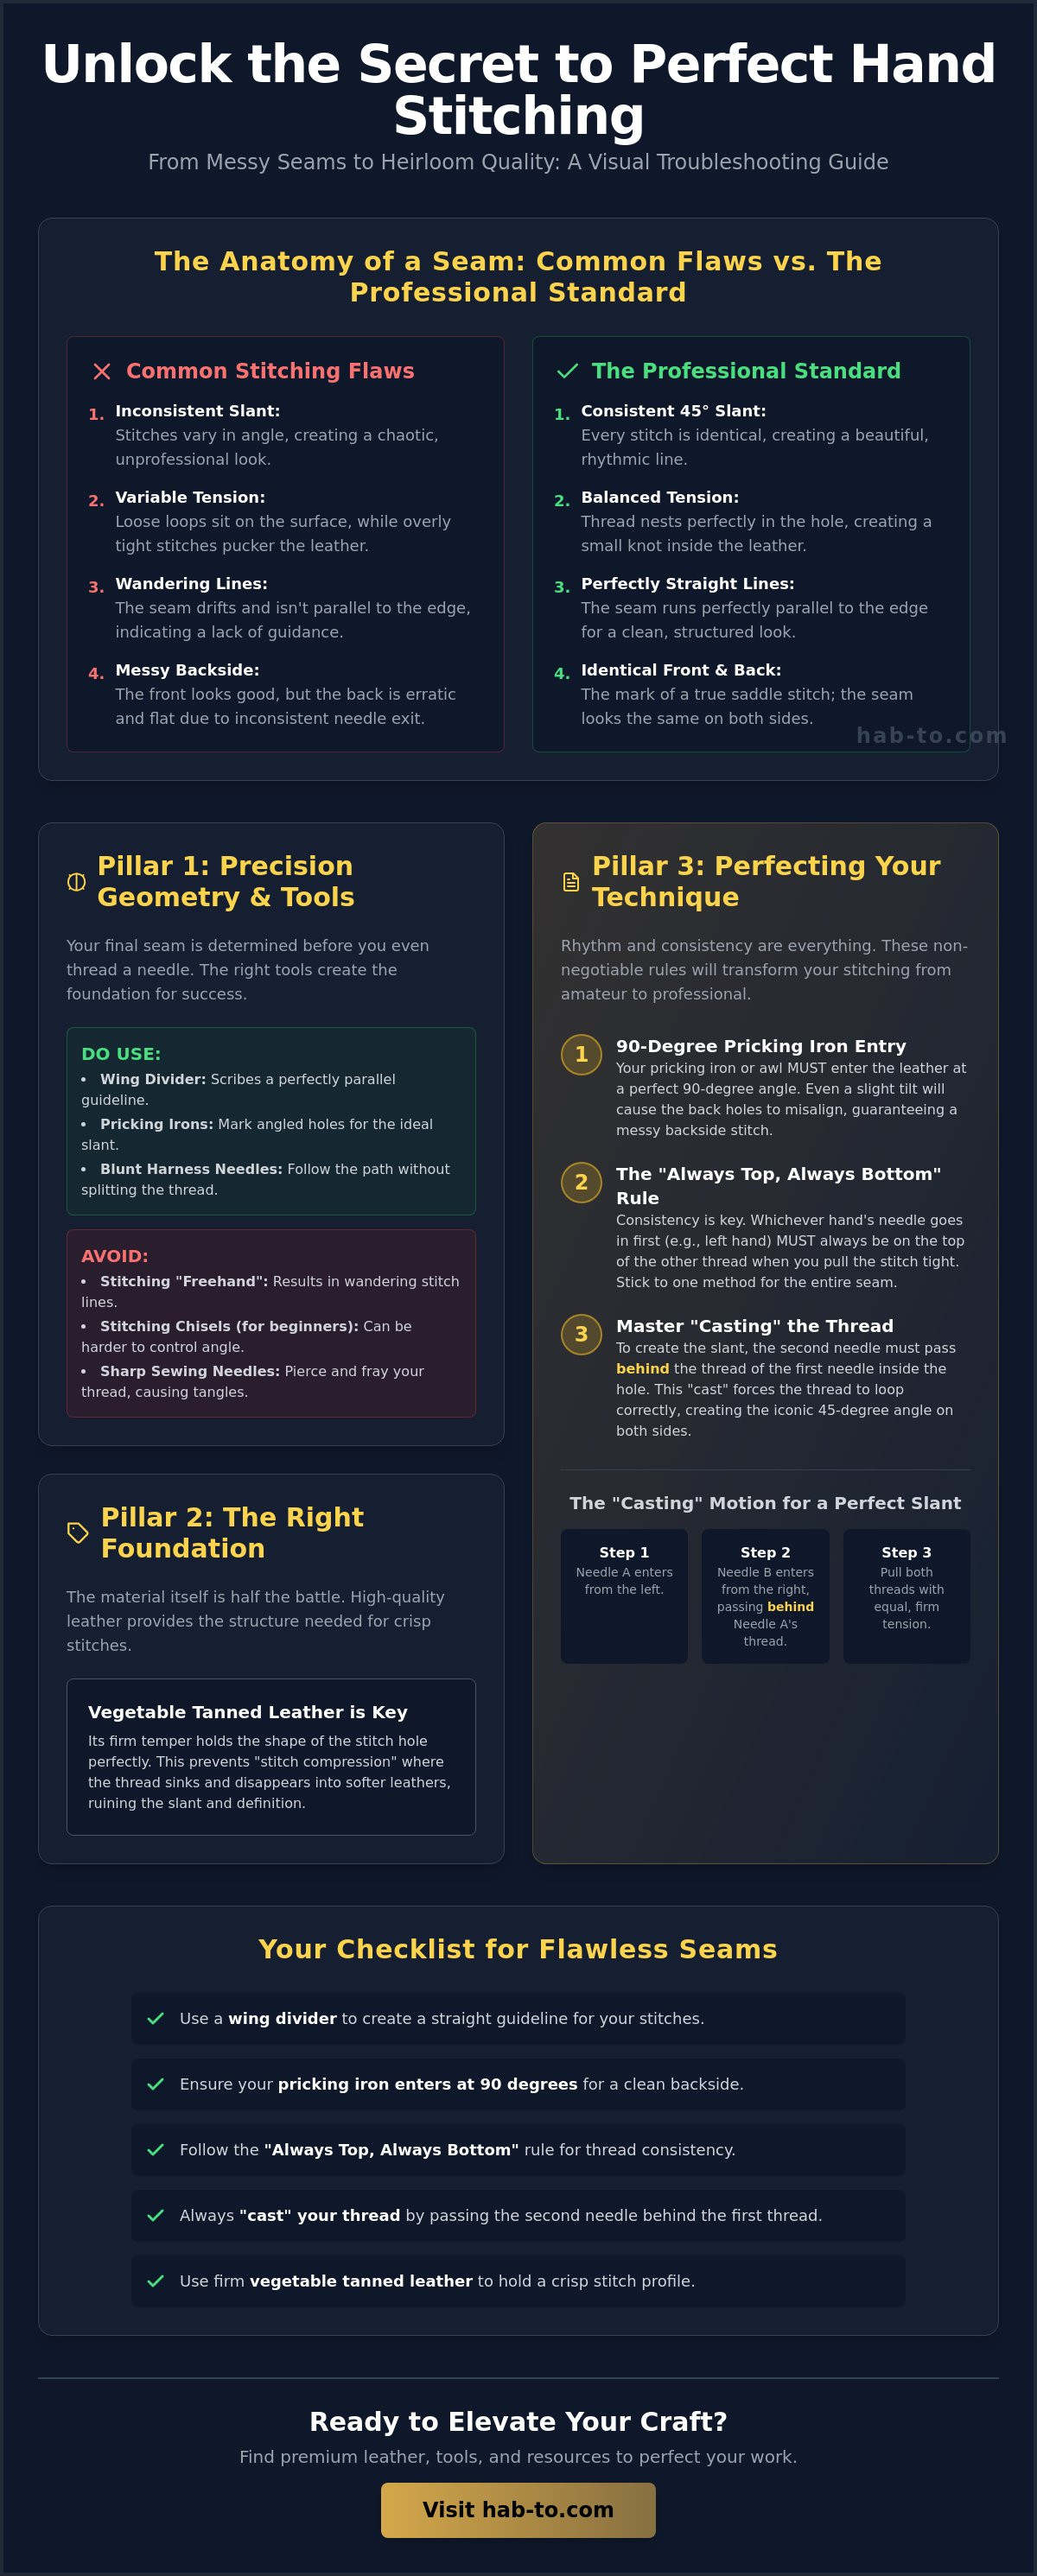
I've spent years perfecting the art of the stitch, and I can tell you that a perfect seam is within your reach. In this troubleshooting guide, we'll identify the technical flaws ruining your work. You'll learn the professional secrets to achieving a consistent 45-degree stitch slant every single time. We'll explore the mechanics of thread tension and the proper way to use your pricking irons. By the end, you'll have the tools and knowledge to transform your craft into something truly heirloom quality. Let's get your needles back on track.
Key Takeaways
- Learn how the specific geometry of your pricking irons and the use of a wing divider create the foundation for perfectly straight, professional lines.
- Discover the "Always Top, Always Bottom" rule to fix the common dilemma of why my hand stitching looks messy on the back side of your leather.
- Understand the impact of thread twist and material choice, ensuring your seams don't unravel or lose their traditional aesthetic.
- Identify why high-quality vegetable tanned leather is essential for holding a crisp stitch profile and preventing stitch compression issues.
- Master the art of "casting" your thread to ensure a consistent 45-degree slant that looks identical on both sides of the seam.
The Anatomy of a Messy Seam: Why Leather Stitching Fails
A beautiful seam is the signature of a master. It's the first thing people notice when they pick up your work. Yet, for many makers, the question of why my hand stitching looks messy remains a persistent shadow over their workbench. A messy seam is rarely the result of a single mistake. It's usually a combination of three distinct hallmarks: inconsistent stitch slant, variable thread tension, and wandering lines that refuse to stay parallel to the edge. Understanding these flaws is the first step toward fixing them.
Leather is an unforgiving medium. Unlike fabric, where fibers can shift and hide a misplaced needle, leather is a permanent record of every movement. When you pierce a hide, you're creating a structural void. There's no "undo" button in traditional leatherwork. Every hole is permanent. Every error is highlighted by the material's natural rigidity, especially when working with firm, high-quality hides like Badalassi Pueblo leather. Even your own body works against you. Muscle memory often shifts during a long stitching session. Your first ten stitches might be tight and precise, while the last ten reflect the fatigue in your hands and shoulders.
To better understand how these small errors accumulate into an "ugly" seam, watch this helpful video on avoiding common pitfalls:
Perhaps the most common frustration is the "Front vs. Back" dilemma. Your show side looks like a professional Saddle stitch, with beautiful, angled slants. Then you flip the piece over. The back side is erratic, with threads jumping out of line or lying flat. This happens because the exit point of your needle is just as important as the entry point. If your awl or iron isn't perfectly perpendicular to the leather surface, the back will always look like an afterthought.
The Problem of Inconsistent Tension
Tension is a silent killer of aesthetics. If you pull too hard, you'll see the leather pucker and distort. This creates a wavy edge that ruins the silhouette of your project. On the flip side, the "loose loop" trap occurs when your needles don't pull through with equal force. This leaves gaps where the thread sits on top of the leather rather than nesting into the hole. If you're still wondering why my hand stitching looks messy, check your thread thickness. If the thread is too bulky for your hole spacing, it will never sit flush, no matter how hard you pull.
Misaligned Holes and Path Drift
When you're stitching through three or four layers of leather, path drift becomes your biggest enemy. A slight two-degree tilt at the entry point can result in a massive misalignment by the time the needle exits the back. This is why a 90-degree entry with your pricking iron is non-negotiable. Without a perfectly straight path, your stitch line will wander. This ruins the professional aesthetic you've worked so hard to build. Precision at the start prevents chaos at the finish.
Geometry Matters: How Your Tools Dictate the Stitch Profile
Achieving a professional finish starts long before the needle touches the leather. If you are struggling with why my hand stitching looks messy, the culprit is often found in your tool kit. The geometry of your tools dictates the final profile of your seam. Many beginners make the mistake of using sharp sewing needles. In reality, blunt harness needles are superior. They don't pierce the existing thread as you pass through a hole; they follow the path of least resistance. This prevents the tangled, frayed look that occurs when thread is split mid-stitch.
The Colorado 4-H Leathercraft manual highlights that structural assembly relies on precision marking. This is where the wing divider becomes your secret weapon. It creates a perfectly straight baseline parallel to your edge. Without this guide, your stitch line will inevitably drift. There's also a significant difference between pricking irons and stitching chisels. Pricking irons mark the leather, requiring an awl to complete the hole. This traditional method offers the most control over the stitch slant. Stitching chisels punch all the way through, which is faster but can lead to larger, less refined holes if the thread weight doesn't match the TPI (teeth per inch). To get that refined look, you might want to practice on a piece of firm Virgilio Pueblo leather to see how the holes react.
Setting the Line with Precision
Your stitch line is only as good as your layout. Using a wing divider to create a guide groove is essential because it "seats" the thread. This small indentation allows the stitch to nestle into the leather, protecting it from wear and ensuring a straight path. Marking the line is actually more important than the actual punching. If your marks are off, your stitches will be too. You can learn more in our guide on how to use a wing divider for professional results.
The Pricking Iron Angle
Maintaining a consistent vertical strike is the only way to ensure the back side mirrors the front. If your iron tilts even slightly, your exit holes will wander. I recommend "walking" your iron by placing the first tooth in the last hole of the previous punch. This ensures seamless transitions, especially around corners. Additionally, don't overlook tool maintenance. Polished tool teeth create cleaner holes and prevent the leather from dragging, which is a common reason why my hand stitching looks messy. A little bit of stropping goes a long way to keep those teeth gliding through the grain.
Thread Mechanics: Choosing and Prepping Your Materials
Your thread is the soul of your seam. Even with the best tools, poor material choice or lazy preparation will lead you back to the same question: why my hand stitching looks messy. In the world of high-end leathercraft, the debate usually settles between waxed linen and braided polyester. While polyester is incredibly durable and resistant to rot, it often has a synthetic sheen that can look "plastic" on natural hides. We almost always prefer waxed linen thread for bespoke work. Linen has a traditional, matte finish that compresses slightly into the leather, creating a flush, organic profile that polyester simply can't match.
Before you start, you must understand the "Twist" factor. Most threads are plied with a specific direction. If you don't handle your needles correctly, you can actually un-spin the thread as you work. This leads to unravelling and a fuzzy, weak appearance. To prevent mid-project knots or running out of material, follow the "four times the seam" rule. Measure out four times the length of the area you intend to sew. This gives you enough lead to finish the seam comfortably without the thread becoming too worn from repeated passes through the leather.
The Importance of Thread Tensioning
Professional makers don't just pull thread off the spool and start sewing. Pre-stretching your thread is a vital step. By giving the thread a firm tug before you begin, you prevent it from "settling" or stretching after the project is finished. If the thread stretches later, your stitches will become loose and erratic. I also recommend re-waxing your thread with a bit of natural beeswax. This lubricates the fibers, keeping them from fraying as they rub against the internal walls of the stitch holes. When choosing colors, remember that high contrast thread acts as a spotlight for errors. If you're still perfecting your technique, a tonal thread that matches the leather will help hide minor inconsistencies.
Threading the Needle for Leathercraft
A common reason why my hand stitching looks messy is needles that slip or thread that bunches at the eye. You must use the "Locking" technique. Pass the thread through the eye, then pierce the long end of the thread with the needle point and pull it back over the eye. This locks the thread in place. Using two needles for a proper saddle stitch is non-negotiable. It allows you to maintain equal tension from both sides of the leather. If you are unfamiliar with this process, studying fundamental leather sewing techniques can help you visualize the rhythm. Managing thread "fuzz" is also key; if the eye of your needle is too small, it will strip the wax and fray the thread, leading to a cluttered, amateurish finish.
Mastering the Saddle Stitch Rhythm: A Step-by-Step Correction
Stitching is a dance between your hands and the hide. If you're still wondering why my hand stitching looks messy, the answer is likely found in your lack of a repeatable rhythm. A perfect saddle stitch isn't about speed; it's about doing the exact same movement five hundred times in a row. Consistency is king. Unlike the backstitch used in garment sewing, a saddle stitch uses two independent needles that interlock inside the leather. This creates a seam that won't unravel even if a thread is cut. To achieve this, you must establish a needle entry hierarchy.
The Needle Entry Sequence
I always teach my students the "Always Top, Always Bottom" rule. This means you decide which needle enters first and from which side. By sticking to this sequence, every stitch nests in the exact same way as its predecessor. Follow these steps for every single hole:
- Step 1: Needle A enters from the front (show side) through the top of the slanted hole.
- Step 2: Pull Needle A through, but keep the thread held in a sharp "V" shape toward the top corner. This keeps the path clear for the second needle.
- Step 3: Needle B enters from the back through the bottom of the same hole, ensuring it doesn't pierce the first thread.
Casting for Perfection
Most beginners ignore the "cast," which is the single most important movement for the back side of your project. If your front side slants beautifully but your back side looks straight or erratic, you're likely skipping this step. Looping the thread over the needle before pulling it through "casts" the slant. This forced loop ensures the thread exits the back at the same 45-degree angle as the front. Without it, the thread will naturally want to lie flat against the leather grain. This small adjustment is the secret to a professional profile that mirrors itself on both sides.
When you finish the stitch, the final pull is critical. Don't just pull outward; pull slightly back and down. This seats the thread into the bottom of the diamond shape created by your iron. It prevents the leather from puckering while ensuring the thread stays flush with the surface. Practice this rhythm on a scrap of premium Italian Vacchetta leather to see how the fibers respond to consistent tension. Ready to upgrade your materials? Explore our range of vegetable tanned leather to give your new stitching skills the canvas they deserve.
Remember that your needles should never "pierce" the existing thread inside the hole. If you feel a snag, stop. Back the needle out and try again. Piercing the thread creates a knot inside the leather that will eventually cause the thread to fray or the stitch to sit at a wonky angle. This attention to detail is what separates a hobbyist from a craftsman. Once you master the "S" vs "Z" twist of your stitch pattern, the question of why my hand stitching looks messy will be a thing of the past.
Quality Leather: The Hidden Secret to Professional Stitch Lines
You can have the steadiest hands in the world, but if your canvas is working against you, your work will suffer. This is the final, often overlooked answer to why my hand stitching looks messy. Many beginners start their journey with scrap chrome-tanned leather. While it's accessible, it is often too soft and "mushy" for high-end hand sewing. The thread simply sinks into the surface, losing its definition and creating a sunken, erratic appearance. The material lacks the structural integrity to hold a crisp hole.
In contrast, vegetable tanned leather is the undisputed gold standard for hand stitching. It possesses a structural density that chrome-tanned hides lack. When you use a firm, high-quality hide like Badalassi Pueblo, the leather fibers compress around the thread rather than collapsing. This "compression factor" allows the diamond-shaped holes from your pricking irons to hold their profile. This gives your stitches that crisp, professional "pop" that defines master-level craft.
Density and Stitch Definition
The density of the hide dictates the definition of every single stitch. High-tannin hides like Maryam Vacchetta offer a level of detail that thinner garment leathers can't match. The natural oils found in premium Italian leather act as a natural lubricant. This allows your needles and thread to pass through with minimal friction. It reduces thread fraying and ensures each loop sits exactly where you intended. A dense grain structure provides the resistance needed to pull your thread tight without distorting the leather's silhouette.
Closing the Pores
Once the last stitch is cast, the work isn't done. The final secret to a professional seam lies in the finishing touches. I always recommend using a smooth-faced cobbler’s hammer to gently tap along the stitch line. This mechanical pressure closes the holes around the thread and flattens the stitches into the groove you created with your wing divider. It seats the thread into the leather. If a hammer feels too aggressive for a delicate project, a bone folder can achieve a similar effect by seating the thread firmly into the grain. The result is a seam that looks like a single, cohesive unit. When you combine the right material with the right rhythm, the mystery of why my hand stitching looks messy disappears. You're no longer just sewing; you're building an heirloom.
Refining Your Craft: From Messy Seams to Masterful Stitches
Refining your craft is a journey of small, intentional adjustments. You now know that a perfect saddle stitch isn't magic. It's the result of consistent tool geometry, a disciplined stitching rhythm, and the casting technique that ensures both sides of your work look identical. If you've been wondering why my hand stitching looks messy, you've seen today that the answer often lies in the materials you choose. Soft hides simply can't hold the crisp diamond profile that high-quality vegetable tanned leather provides.
At Hab-To Leather House, we bring 160 years of family heritage in leathercraft to your workbench. We're Amsterdam-based experts supplying makers worldwide with the finest materials. Whether you need premium Shell Cordovan or the rugged texture of Pueblo, we offer no minimum orders to support your unique journey. Ready to transform your projects? Elevate your craft with professional-grade vegetable tanned leather and tools from Hab-To Leather House. Your next project deserves the quality that only tradition and expertise can provide. Keep practicing, keep piercing, and watch your seams become the signature of your success.
Frequently Asked Questions
Why is my hand stitching straight on the front but slanted on the back?
The most common reason for this imbalance is that you aren't "casting" your thread. When you perform a saddle stitch, the thread naturally wants to lie flat as it exits the back of the leather. By looping the thread over the needle before pulling it through, you force the exit path into a 45-degree angle. This simple mechanical adjustment ensures the back mirrors the professional slant of the show side.
How do I keep my stitch line from wandering off the edge?
A wing divider is your best defense against wandering lines. By scribing a guide groove parallel to the edge, you create a physical track that keeps your pricking irons perfectly aligned. This groove also seats the thread below the surface of the hide, protecting it from wear. If you find yourself asking why my hand stitching looks messy, check your baseline first; a straight track is the foundation of a professional seam.
What is the best thread size for 3.0mm (9 TPI) stitching irons?
For 3.0mm irons, 0.6mm thread provides the most balanced aesthetic. Thread that is 0.8mm or thicker will crowd the holes, causing the leather to pucker and distort the stitch profile. Conversely, 0.4mm thread often looks too thin and fragile for this spacing. Matching your thread diameter to your teeth per inch is vital for a seam that looks intentional and proportional to the project size.
Do I really need a stitching pony to get neat stitches?
A stitching pony acts as your third hand, and it's vital for achieving professional consistency. It holds your leather project at a fixed, comfortable angle, which frees both of your hands to manage needle entry and tension. Without a pony, your hands must constantly shift position to hold the leather. This leads to variable tension and a repeatable rhythm that is much harder to maintain over a long seam.
Why does my thread keep fraying or breaking while I sew?
Fraying happens when the friction between the thread and the leather grain is too high. This often occurs if your thread is under-waxed or if your needle eye is too small, which strips the wax away as you pull. If your thread breaks, it's a frustrating reason why my hand stitching looks messy. Always re-wax your thread tips with natural beeswax to lubricate the pass and protect the fibers from the internal walls of the hole.
How can I fix a single messy stitch without undoing the whole seam?
You can often correct minor tension issues with a scratch awl or a blunt needle. Gently hook the loose or wonky stitch and pull the excess tension through to the neighboring stitches until the line looks even. If the slant is completely wrong, you may need to back out that single stitch and re-cast it. Often, a light tap with a smooth-faced hammer will seat a slightly raised thread and hide the error.
Should I wax my own thread or buy pre-waxed?
Starting with pre-waxed thread is the most efficient choice for most makers because the wax is evenly distributed throughout the fibers. However, I always recommend keeping a block of natural beeswax at your workbench. Re-waxing the last few inches of your thread as you work prevents the tips from fraying. This extra layer of protection is especially important when you are sewing through multiple layers of dense vegetable tanned leather.
How do I make the start and end of my stitch line look professional?
Professional starts and ends rely on the backstitch technique. When you reach the end of your line, sew two or three stitches back over your previous work. Ensure the needles pass through the existing holes without piercing the old thread. Pull the thread tails through to the back side of the project before trimming them. For synthetic threads, a quick melt with a lighter creates a permanent, hidden bead that won't unravel.
