
Choose a Leatherwork Mallet by Task and Material
The heaviest mallet isn’t automatically the best choice. Choosing the right mallet for leatherwork means matching its material and weight to the task: a 9 oz. poly mallet is suggested for stamping, tooling, and setting rivets, while a 1-1/2 to 2 lb. maul delivers more force for leather punches. The right feel in your hand matters, too.
If you’re new to leathercraft, it’s easy to focus on weight alone. But the striking face affects how the tool meets a stamp or punch, and an awkward tool can make repeated work tiring. Small differences in control matter when you’re aiming for clean impressions and evenly spaced holes.
This guide explains how weight and material affect stamping, carving, punching, folds, glue-ups, and stitching. You’ll compare mallets, mauls, and leather hammers, see what each is suited to, and get a practical starting point for choosing a tool. You don’t need every type of striking tool. Choose one that fits your work and feels steady in your hand.
Key Takeaways
- Match the tool’s weight to the work: lighter options suit controlled stamping, while heavier mauls bring more force to demanding punches.
- Choose the striking material with your tools in mind; a softer surface can help protect metal stamps and punches.
- Use a leather hammer for shaping, flattening stitches, and pressing glued pieces, rather than for tooling or punching.
- Consider how a rawhide head wears over time and whether its feel and maintenance suit your routine.
- For a first mallet, prioritize a comfortable grip and controlled strikes, then choose a style that fits the tasks you do most.
Choosing mallet weight for different leathercraft tasks
Choose a striking weight that suits the tool and the force your task requires. Your grip and the tool’s balance matter, too, especially during repeated work. The figures below are useful starting points, not a substitute for controlled practice on scrap.
Task-Matched Mallet and Hammer Weights
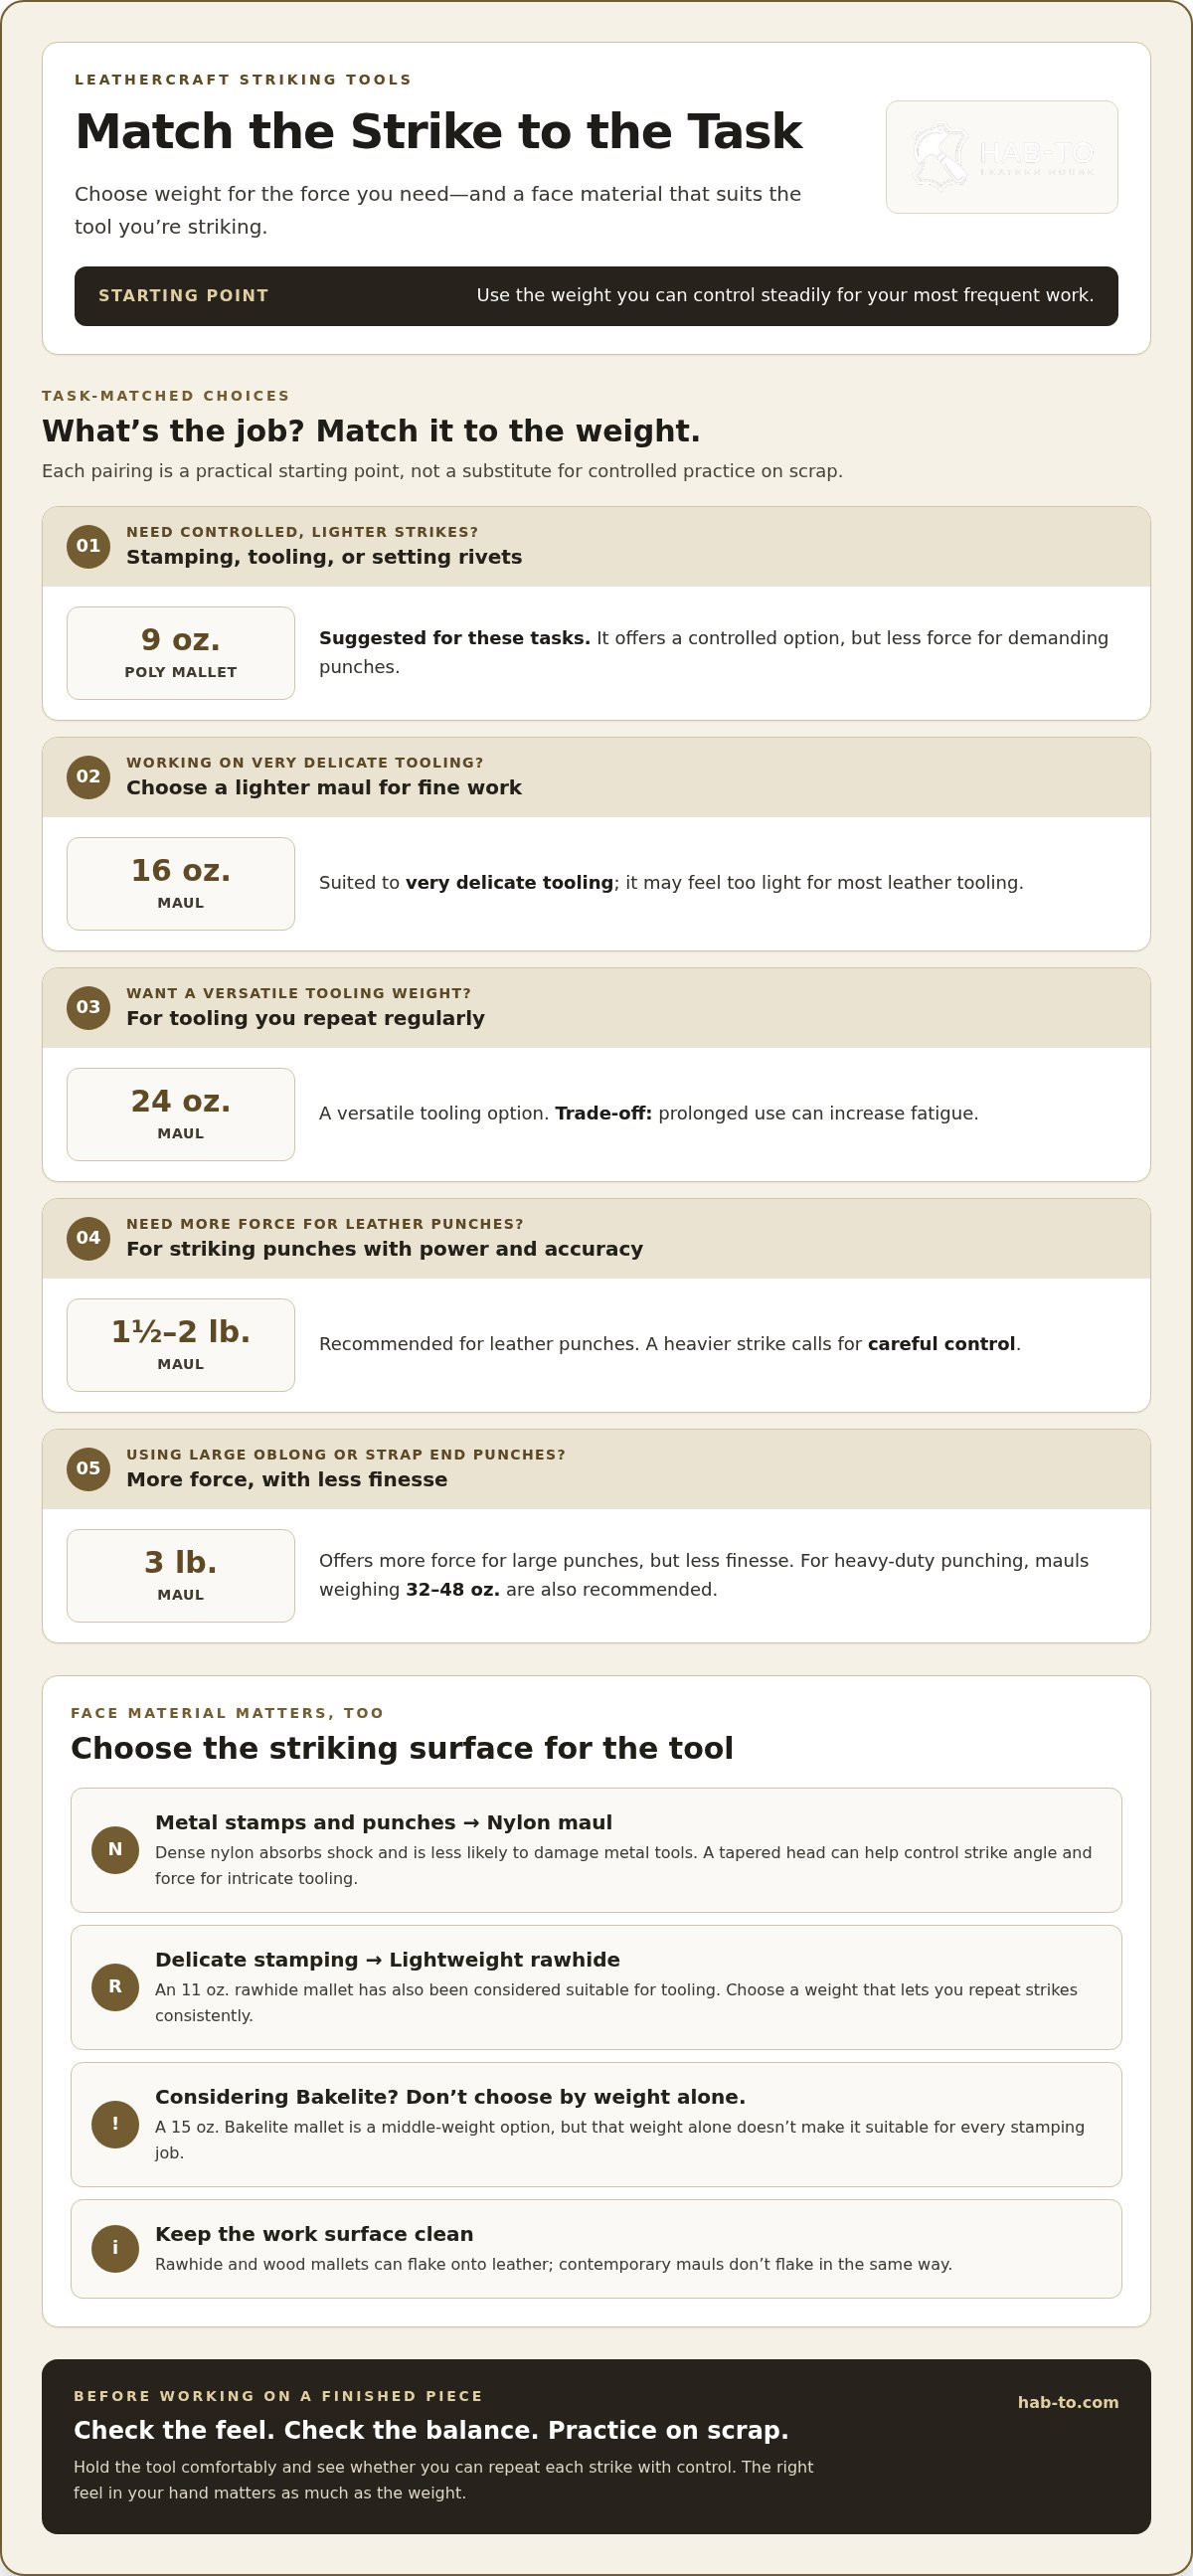
A 1-1/2 to 2 lb. maul is recommended for striking leather punches with power and accuracy. For large oblong and strap end punches, a 3 lb. maul offers more force but less finesse. Rivets, eyelets, grommets, and snaps call for control; a mid-weight rawhide mallet is a practical option for setting them.
For a BOWEN PP Mallet, assess how its weight, grip, and balance feel during the task you plan to do. Hold it comfortably and practice on scrap before working on a finished piece. If your bench also needs stamps, punches, or chisels, the leatherworking tools collection can help you assemble tools for the same project.
Maul Weights for Tooling and Stamping
A 16 oz. maul suits very delicate tooling, but may feel too light for most leather tooling. A 24 oz. maul is a versatile tooling weight, though prolonged use can increase fatigue. A 9 oz. poly mallet is suggested for stamping, tooling, and setting rivets. Choose based on the work you repeat, not weight alone.
Leatherworkers have different preferences. Some value a mallet’s broad striking face; others prefer the feel and versatility of a maul. Try the motion on scrap and notice whether you can repeat each strike comfortably.
| Option | Weight | Typical task | Trade-off |
|---|---|---|---|
| Poly mallet | 9 oz. | Stamping, tooling, rivets | Less force for demanding punches |
| Maul | 16 oz. | Very delicate tooling | May feel light for general tooling |
| Maul | 24 oz. | Versatile tooling | Can cause fatigue during long sessions |
| Maul | 1-1/2 to 2 lb. | Leather punches | Needs a controlled swing |
How do you choose a mallet size for leather punches and chisels? Match its weight to the force the tool requires, then practise controlled strikes on scrap. Check that the tool stays aligned before moving on to your project.
How do you use a leatherworking mallet without damaging tools or leather? Support the leather on a stable surface, align the mallet with the tool, and use five even strikes instead of one heavy blow.
What safety precautions should you follow? Keep your fingers clear of the strike path, secure the work, and make sure there’s room to swing. Stop if the mallet head or striking tool is damaged.
How much do leatherworking mallets cost in the United States? Cost depends on the material, weight, construction, and head design. Compare these features with your main tasks when weighing your options.
Choose a weight you can control steadily for the work you do most.
Bakelite mallets for stamping, carving, and punching
Bakelite, rawhide, and nylon behave differently on impact. Match the face material to your stamp, carving tool, or punch, then consider how much force the task requires when choosing the right mallet for leatherwork.
Choose a mallet suited to the task, since different materials and weights can affect stamping results. For lighter jobs, a lightweight rawhide mallet is a suitable choice. Nylon mauls suit metal leatherworking tools because dense nylon absorbs shock and is less likely to damage them.
Bakelite for Tooling and Punching
Keep the task in mind before choosing Bakelite. A 15 oz. Bakelite mallet may seem like a middle-weight option, but its weight alone doesn’t make it suitable for every stamping job. For carving or tooling, consider how controlled each strike needs to be and whether the tool’s face meets the stamp squarely.
For heavy-duty punching, mauls weighing 32 oz. to 48 oz. are recommended with large oblong and strap end punches. These options trade finesse for greater force. One leatherworker reported using mauls up to 3 pounds for heavy work, illustrating how punch size and resistance can change the preferred weight.
Rawhide for Delicate Stamping
Rawhide suits stamping when a lightweight strike helps preserve control. An 11 oz. rawhide mallet has also been considered suitable for tooling. That gives leatherworkers an option for detailed impressions without automatically moving to a heavier head. Choose the weight that lets you repeat strikes consistently across a pattern.
Rawhide and wood mallets can flake onto leather, while contemporary mauls use materials that don’t flake in the same way. That difference matters when you’re working on a clean, visible surface. Keep the striking face clean, and pause if you notice debris around the tool or leather.
Nylon for Metal Tools
Nylon mauls are useful for striking metal stamps and punches. Their dense surface absorbs shock, reducing the chance of damaging the metal tool. A tapered maul head can also help you control the angle and force of each strike during intricate tooling. That control is useful when a carving tool needs to follow a curved or detailed design.
What mallet face shape and material work best for leathercraft? A nylon striking face is a sound choice for metal tools, while lightweight rawhide suits stamping. For intricate work, a tapered maul head helps you adjust the strike angle and force.
- Set the leather on a stable work surface before striking.
- Hold the stamp or punch upright and keep fingers clear.
- Start with controlled taps, then increase force only as needed.
- Check each impression or hole before repeating the strike.
These steps help maintain clean impressions without relying on one forceful blow. If you’re assembling a setup around stamps and punches, browse the leatherworking tools available at Hab-To Leather House to find options suited to your project.
Leather hammers for folds, glue-ups, and stitches
Leather hammers, mallets, and mauls suit different jobs. Choose based on the surface you need to shape, the tool you’ll strike, and the force you can control.
Leather Hammers
A leatherworking hammer is used to form leather, especially in shoemaking and saddlery. Use it to flatten stitches, tighten corners, tap sharp folds, or press glued pieces together. These tasks involve shaping and flattening, rather than the strikes used to work with tooling stamps or drive punches.
Hammer styles also suit particular tasks. A tap-off hammer’s wide, flat steel head imprints tap-off patterns across leather, while a shoemaker’s hammer can be an alternative. A saddler’s hammer has a tapered end for lighter strikes and hard-to-reach spots. A fitting hammer is suited to seams and flattening leather pieces.
Leather Mallets
Mallets are generally used for punching and tooling, making them a better match than leather hammers for stamps, stitching chisels, and hole punches. Their striking surface meets the tool directly; a metal hammer can damage a metal punch, while softer mallet materials help absorb impact.
What types of mallets are used for leatherwork? Common choices include rawhide, nylon, poly, and wood. Rawhide offers a softer face that absorbs shock; nylon is dense and less likely to damage metal tools; poly mallets deliver force but can feel heavy during repetitive work. Wooden mauls used with stamps can eventually chip, and wood or rawhide can flake onto leather.
How do rawhide, nylon, poly, and wooden leatherworking mallets compare? Rawhide suits controlled strikes, nylon works well with metal tools, and poly provides a firm impact. Wood offers another striking surface, but repeated stamping may chip it.
Leather Mauls
A maul is another striking tool for tooling and driving chisels. Polyurethane mauls deliver a precise, powerful impact to stitching chisels and similar tools. Mauls are typically shorter and more head-heavy than mallets. Some people find that balance comfortable, while others prefer a more balanced feel.
That balance changes how a strike feels. A maul can deflect if it misses the centre of the tool, while a mallet’s flatter striking face offers a larger sweet spot. For repeated rivet setting or stitching, choose the tool that lets you strike squarely without forcing a heavier swing.
Use this simple distinction: reach for a hammer to form folds, flatten stitches, and join glued leather; choose a mallet for stamping, punching, and tooling; use a maul when its concentrated, head-heavy strike suits chisels or detailed tooling. Test each tool on the work it’s meant for, starting with light strikes and adding force only as needed.
For a clean glue-up, tap across the joined area rather than repeatedly striking one spot. For stitching, follow the chisel line and keep the tool upright. For a difficult corner, a tapered saddler’s hammer can reach where a broad head cannot. Each choice puts control first.
Rawhide mallet stability and durability
A rawhide mallet’s head is a working surface, so inspect it as carefully as the leather beneath your tool. Worn rawhide can become damaged and crack. Rubber mallets can also develop marks and chips over time. These changes affect the striking face, so check its condition before it interferes with controlled work.
Start with a visual check. Look across the rawhide head for cracks, loose or damaged areas, and an uneven face. Then check that the head is secure on its handle. If you spot a crack, stop using the mallet for stamping or punching until the head is addressed. A damaged face can make each strike less predictable.
Rawhide mallet heads can be replaced when they wear out, giving the tool a repair option rather than making a worn head an automatic reason to discard the whole mallet. Before replacing a head, consider the work you do: a mallet used repeatedly for stamping may show wear differently from one used occasionally for setting hardware.
- Inspect the head before a leatherworking session.
- Check the face for cracks, chips, marks, or uneven wear.
- Stop if the head is damaged or no longer secure.
- Consider a replacement head when a rawhide face wears out.
Face condition matters to the leather, too. Rawhide and wood mallets can flake onto leather, so check the work surface for debris during stamping. Contemporary mauls use materials that don’t flake onto leather in the same way. If a rawhide mallet leaves particles near an impression, pause, clean the surface, and inspect the head before continuing.
Durability isn’t only about how long a mallet lasts. Its condition must also suit the task. A sound, even face supports consistent contact with a stamp or punch. Inspect a cracked rawhide head or chipped rubber face closely, especially before working on a visible panel or a carefully aligned row of holes.
Stability depends on the whole tool. Hold the handle firmly, align the mallet face with the stamp, and use a controlled swing. If the head shifts or your strikes land inconsistently, stop and inspect the tool instead of correcting the result with extra force. This pause can prevent repeated marks on a finished piece.
For a practical routine, inspect the mallet before each project and again after heavy use. Compare the head with its earlier condition, particularly after long stamping sessions or repeated punching. Replace worn rawhide heads when needed, and set aside damaged rubber mallets. Regular checks help keep the striking surface dependable and your leather free of avoidable debris.
Choosing a beginner leatherworking mallet
Start with the projects you actually plan to make, not a large tool collection. A beginner making stamped key fobs has different needs from someone punching belt holes or marking stitch lines. Write down your first project, identify the striking tools it requires, then choose a mallet suited to those tasks without adding equipment you won’t use.
Before buying, test the motion on practice leather. Make a short row of impressions or holes, then check whether the spacing and depth stay consistent. A steady rhythm is more useful than a forceful swing. If your marks drift, slow down and adjust your grip before changing mallet weight.
What You Will Need
Build a compact practice setup around one project. You’ll need:
- A piece of practice leather, such as vegetable-tanned leather, for testing strikes before working on your finished piece.
- A mallet and the stamp, punch, or stitching tool your project calls for. Browse leatherworking tools to assemble the tools around that specific task.
- A stable work surface and a way to mark your intended pattern, so you can compare placement and results as you practice.
If you’re starting from scratch, a leathercraft starter bundle can help bring project materials and tools together. Use the contents to support a first project rather than treating a bundle as a reason to buy tools for every technique.
Choose for Your First Projects
Keep a simple practice record. Note which tool you used, how the strike felt, and whether the result matched your intended spacing. This can help you tell a technique issue from a tool mismatch. For example, uneven stitch marks may come from how you guide the chisel, while inconsistent stamped impressions may mean your strike isn’t landing squarely.
Let your work guide any later additions. If you move from small stamped pieces to repeated belt punching, reassess your tool for the new task. Avoid buying a heavier or specialised option until your projects show a clear need. A focused setup makes it easier to learn how each tool feels and build reliable habits.
Keep the work area clear, secure the leather before striking, and pause if the tool shifts or the result changes unexpectedly. The best beginner setup supports careful practice and the projects you’re ready to make next.
Rawhide mallets are generally more expensive than plastic versions. One contributor noted that a mallet’s flat striking surface gives it a larger sweet spot and makes it less likely to deflect than a maul. Weigh that difference against your project and budget, then practise with the option you choose.
Hab-To Leather House: Vegetable Tanned Leather
Hab-To Leather House brings together vegetable-tanned leather, tools, hardware, and craft supplies for your next project. Choose leather by the cut you need, then pair it with tools suited to your technique. With no minimum order requirement, you can buy materials for a small project without committing to a whole hide.
For your workbench: Pair project leather with suitable leatherworking tools to build a setup around your craft.
Explore Related Leathercraft Topics
- How to match mallet weight to stamping and punching tasks
- How striking materials affect leather stamps and punches
- How to build a practical beginner leathercraft setup
Use these ideas to plan a project, choose materials, and build your skills one technique at a time.
Build Your Next Project Around the Right Tool
Your next step is to match your striking tool to the project you want to make. Before starting, lay out the leather, hardware, and tools you’ll use together. This simple habit helps you spot missing pieces and choose a setup that supports your work, rather than buying tools without a clear purpose.
Keep learning through practice. Try a new technique on scrap, notice how each strike feels, and adjust your approach before working on the finished piece. With time, choosing the right mallet for leatherwork becomes less about rules and more about understanding the balance between your hand, your tools, and the material.
Take your next project one careful step at a time. Good work grows from thoughtful choices and steady practice.
Frequently Asked Questions
What mallet weight is best for leather stamping and tooling?
A 24 oz. maul is a versatile choice for general tooling, while a 16 oz. maul suits very delicate work. To choose between them, make a few impressions with the same stamp on scrap leather. Look for clear marks with controlled strikes, then consider whether the heavier tool feels tiring during repeated stamping. Your best weight is the one that produces consistent impressions without forcing your swing.
Is a maul or a mallet better for leather carving and stamping?
Either can work; choose the shape that helps you strike accurately. A maul’s tapered head can help adjust the strike angle and force during detailed carving. A mallet’s flatter face can be easier to centre on a stamp. Test both with the same tool on scrap, following a curved carving line or repeating a stamp pattern. Choose the one that keeps your strikes even as your hand moves across the design.
Which leatherworking mallet brands are recommended for beginners?
Rather than relying on a brand name alone, beginners should prioritise a face suited to their tools, a secure head, and a steady grip. For example, a replaceable rawhide head gives you a maintenance option as it wears, while a flat face provides a broad target for practice strikes. Try the tool on scrap before detailed work, then choose based on control and the tasks you do most.
How much do leatherworking mallets cost in the United States?
Disclaimer
All our blog articles are made for information purposes only we dont take responsability for any content from third parties.