


How to Cut Leather Straight: The Ultimate Artisan’s Guide to Precision
Hi, I'm Mike, from Hab-To Leather House! Last Tuesday, a maker in our Amsterdam workshop watched 110 Euros worth of Shell Cordovan turn into scrap because their blade drifted just three millimeters off course. It's a heart-sinking moment every artisan knows well. You've likely felt that same frustration when a ruler slips or an edge ends up slanted instead of a crisp 90 degrees. Mastering how to cut leather straight is the fundamental difference between a hobbyist project and a professional piece of heritage gear.
Cutting premium vegetable-tanned leather should feel like a meditation, not a gamble. I agree that nothing is more discouraging than seeing expensive material bunch up under a blade. I promise that by the end of this guide, you'll have the confidence to make every cut count without wasting a single square inch of hide. We're going to dive into the triple-point grip to stop ruler migration, the physics of blade angles, and the specific tools that ensure your edges stay perpendicular every time.
Key Takeaways
- Learn why a "perfect cut" requires a 90-degree perpendicular edge and how a 1mm error can ruin your stitching and burnishing later.
- Master the "Sharpness Rule" to ensure your blade never drags, preventing the common mistakes that lead to jagged or uneven edges.
- Discover the professional "Score and Snap" method and other artisan techniques on how to cut leather straight every time.
- Identify and correct technical pitfalls like "The Lean" and "Ruler Climb" to maintain total control over your knife and guide.
- Understand why starting with premium, hand-selected vegetable-tanned leather makes mastering precision cutting ten times easier for any maker.
The Anatomy of a Straight Cut: Why Precision Matters
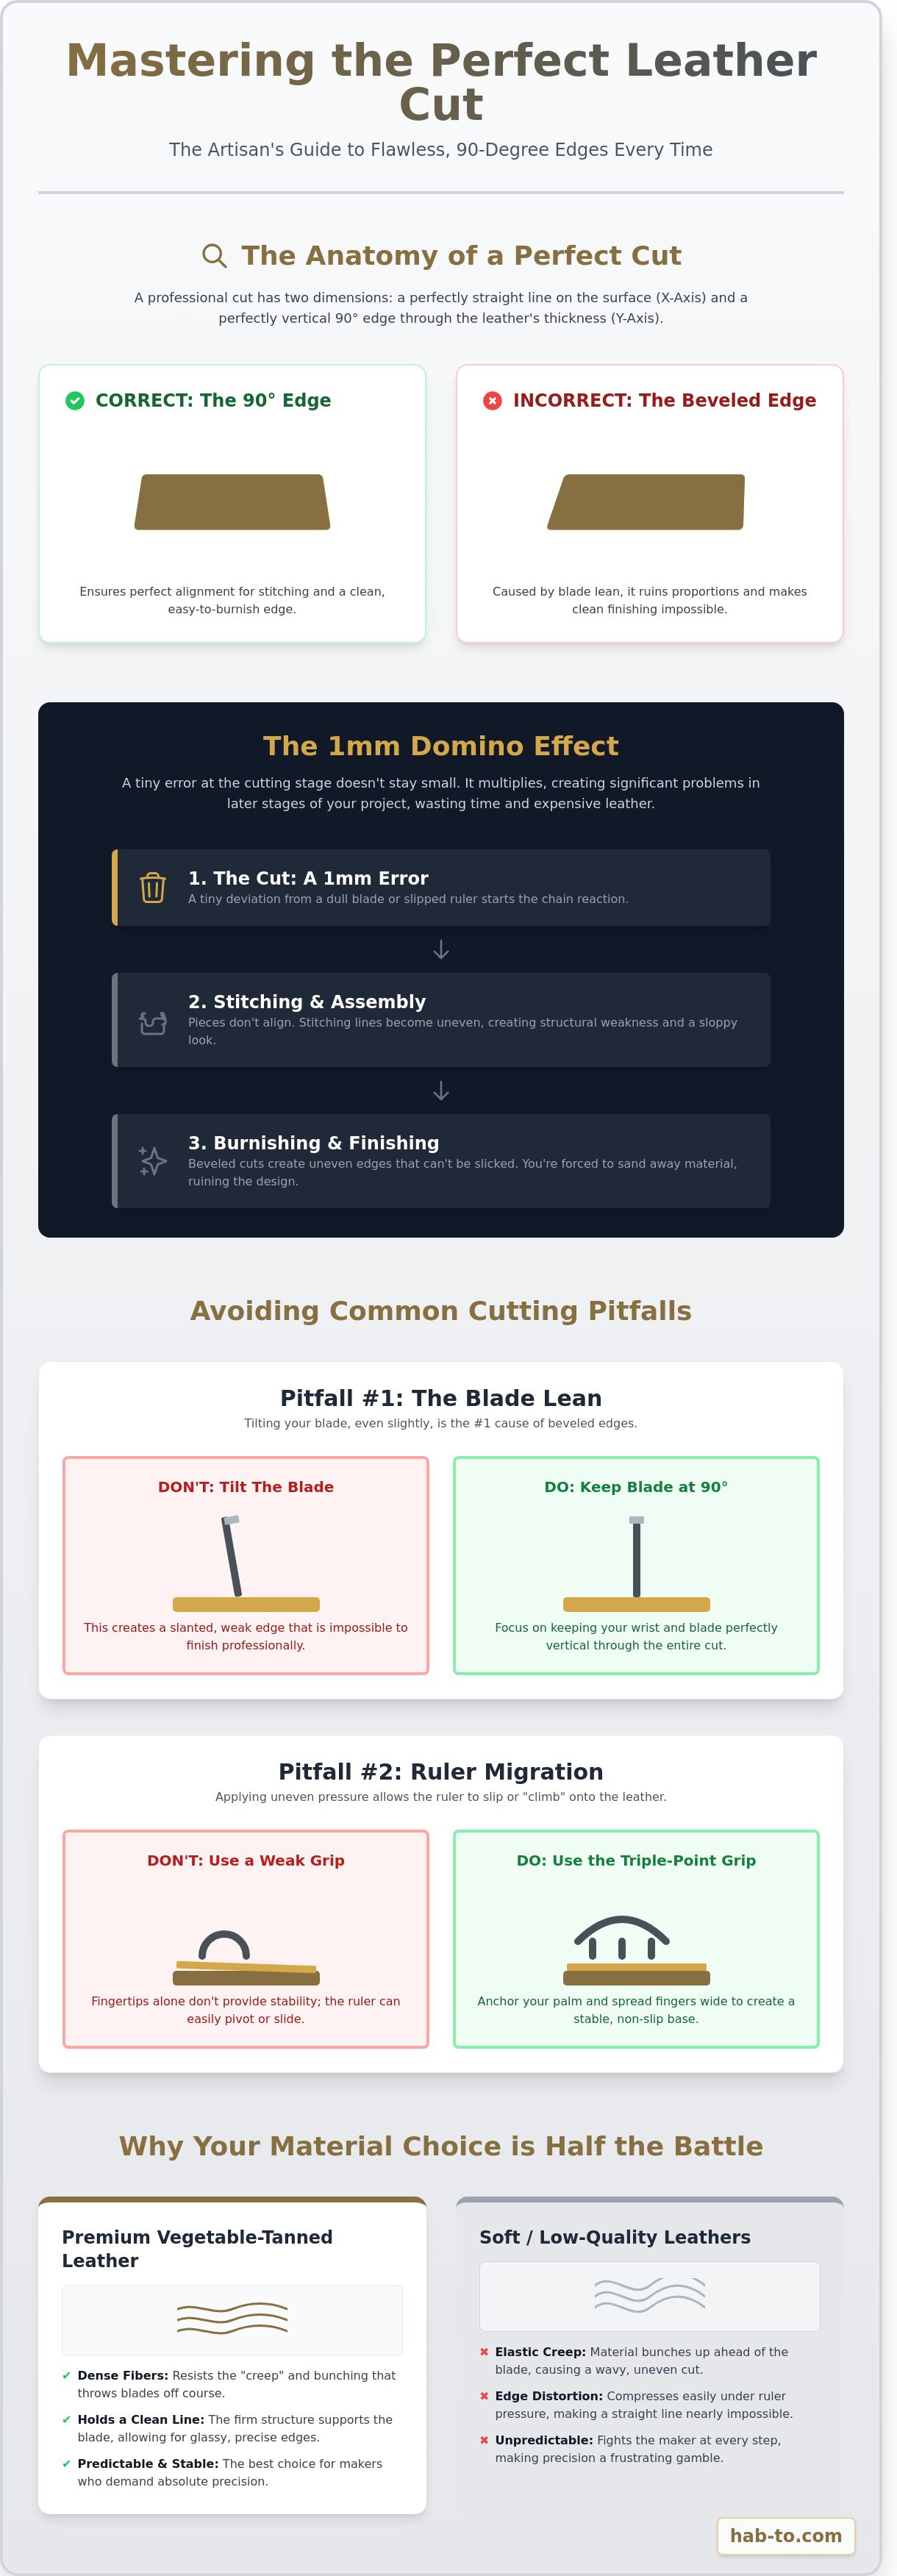
Hi, I'm Mike! At Hab-To Leather House, we've spent decades obsessing over the details that separate a hobbyist project from a professional masterpiece. When you're learning how to cut leather straight, you need to realize that a "perfect cut" is actually two things at once: a perfectly straight line on the surface and a consistent 90-degree perpendicular edge through the thickness of the hide. If you miss either one, the soul of your craft suffers.
Mastering basic leather crafting techniques starts with understanding how a blade interacts with organic fibers. Most beginners treat leather like heavy paper, but leather is a three-dimensional material with internal tension. We call this "Leather Physics." Unlike wood, which has a rigid grain, leather has "creep." This means the material stretches and compresses ahead of your blade. If your knife isn't surgical-sharp, the leather will move 1mm or 2mm before the edge actually bites, leading to a wavy line even if your ruler stayed perfectly still.
Precision matters because of the "Domino Effect." In our 160 years of family experience in the leather trade, we've seen how a tiny 1mm error at the cutting table creates a nightmare at the workbench. If your initial cut is off by just a fraction, your stitching lines won't align. When you reach the burnishing stage, you'll find one side of your edge is thicker than the other. This forces you to sand away more material to level it out, which often ruins the proportions of your design. You aren't just making a mark; you're setting the foundation for every stitch and finished edge that follows.
Straight Lines vs. Perpendicular Edges
Visualizing your cut on an X and Y axis is essential. The X-axis is the line you see from above, while the Y-axis is the vertical path the blade takes through the leather. If your hand tilts even 5 degrees to the left or right, you create a beveled edge. This is a common issue with soft-tempered leathers. The "Temper," or stiffness of the hide, determines how much the edge will distort under the weight of your ruler. A soft chrome-tanned leather might compress by 15% under your grip, causing the blade to wander as the internal fibers shift.
Why Premium Veg-Tan Requires a Different Approach
Vegetable-tanned leather is a different beast entirely. Because it's tanned with natural barks and tannins, the fiber structure is incredibly dense. This density offers high resistance to the blade, which is actually a benefit for precision. High-tannin leathers like Pueblo are favorites in our Amsterdam shop because they "hold" a line beautifully without the elastic creep found in cheaper materials. The fibers are packed so tightly that they support the blade, allowing for a clean, glassy edge. For more on why this material behaves the way it does, check out our Vegetable Tanned Leather: A Complete Guide to understand the science behind the hide. When you work with quality veg-tan, you aren't fighting the material; you're collaborating with it.
- The 1mm Rule: Any error at the start triples in complexity by the final assembly.
- Blade Geometry: A 90-degree vertical angle is just as important as the horizontal line.
- Material Memory: Dense veg-tan remembers the cut, while soft leathers try to hide it.
The Right Tools for the Job: Beyond the Basic Utility Knife
Hi, I'm Mike. At Hab-To Leather House, we've lived and breathed this craft for over 160 years. One lesson stands above the rest: your tool choice dictates your edge. If you're struggling with how to cut leather straight, the problem usually isn't your hand; it's your gear. We follow the 'Sharpness Rule' here. A blade that's only 95% sharp is a 100% failure. When a blade is even slightly dull, it drags against the fibrous structure of the leather. This drag creates microscopic bunching, which pushes your knife off-course by 1mm or 2mm. In professional leatherwork, that's the difference between a luxury wallet and a scrap-bin project.
Safety is the other side of that coin. A surgical blade is significantly safer than a dull utility knife. A dull edge requires you to apply three times the downward pressure to penetrate the grain. If that blade slips while you're leaning into it, you lose control instantly. A razor-sharp edge glides with minimal force, keeping you in total command of the stroke. No compromises on sharpness means no compromises on your fingers.
Your cutting surface matters just as much as the steel. Many beginners use soft, spongy hobby mats. These cause 'troughing', where the weight of your ruler and knife creates a physical dip in the mat. As you cut, the leather deforms into this valley, making it impossible to keep the blade vertical. Use a high-density self-healing mat with a Shore A hardness rating of at least 80 to ensure the leather stays flat and firm.
The Knife Hierarchy
Different hides require different edges. For thin, stretchy leathers like 1mm goat or chrome-tanned skins, a rotary cutter is your best friend. It applies vertical pressure without the horizontal 'pull' of a fixed blade, which prevents the leather from stretching as you move. If you're working with 4mm thick vegetable-tanned bridle leather, you need a fixed-blade utility knife or a Japanese skiving knife. These tools allow you to 'stamp' the end of a cut with a vertical drop, ensuring a clean exit. For more technical details on blade angles, check out this step-by-step guide to cutting leather which covers various knife techniques.
Rulers and Stabilisation
A plastic ruler is useless for how to cut leather straight because the blade will eventually bite into the edge. You need a heavy, stainless steel ruler. We prefer cork-backed versions because the 1mm layer of cork provides essential friction against the smooth grain. If your leather is particularly oily or 'pull-up' style, even cork can slide. This is where the 'Sandpaper Trick' comes in. Stick a strip of 320-grit adhesive sandpaper to the underside of your ruler. It 'locks' the leather to the table without leaving permanent marks. For long cuts on large hides, place 1kg pattern weights at both ends of your ruler. This 2kg of total pressure ensures the hide doesn't shift mid-stroke. If you want to upgrade your kit, you can find premium leatherworking tools that Mike personally selects for our Amsterdam workshop. Professional results require professional stability.
Step-by-Step: Mastering the Straight Cut Technique
Preparation is the foundation of every clean edge. I've seen many beginners rush this stage, only to end up with a jagged mess. Start by cleaning your cutting surface; even a tiny 1mm scrap of leather under your hide can cause the blade to jump. You must also align the grain. Leather stretches about 15% more across the belly than along the spine. If you don't align your cut with the grain, the leather will deform under the pressure of the blade. For hides thicker than 4mm, like a heavy vegetable-tanned bridle leather, I often use the "Score and Snap" method. You make a shallow guide cut and then apply pressure to "snap" the fibers open before finishing the slice. This prevents the blade from wandering in the dense internal structure.
Your body is the machine here. Most people think the hand guides the knife, but it's actually your shoulder and elbow. Lock your wrist and use your entire arm to pull the blade. If you rely on finger movement, you'll create micro-wobbles that ruin the edge. Learning how to cut leather straight starts with this mechanical shift from the hand to the core.
The 5-Step Cutting Process
- Step 1: Alignment and Pressure. Place your steel ruler on the grain side. Apply "downward-outward" pressure. This means pushing down to hold the leather and slightly outward against the ruler to keep the blade flush.
- Step 2: The Ghost Pass. Before the blade touches the hide, run your hand through the motion. This ensures your arm isn't blocked by a tool or the edge of the table. If you want to see these movements in action, this expert tutorial on cutting leather straight from Weaver Leather Supply shows the physical flow perfectly.
- Step 3: The Scoring Cut. Don't try to go through in one go. Make a light initial pass, about 0.5mm deep. This creates a track for the blade to follow.
- Step 4: The Deep Pass. Follow the track with 2 or 3 medium-pressure strokes. Multiple light passes are always safer than one heavy push that might slip.
- Step 5: Finishing. To avoid the "tag" or a torn corner, stop 2mm before the end of the leather. Lift the knife, place it exactly at the corner, and cut backward into your existing line.
Posture and Grip
I always tell my students at Hab-To to stand up. Sitting limits your range of motion and reduces your vertical leverage by nearly 40%. When you stand, your weight is directly over the blade, which keeps it from tilting. A tilted blade creates a beveled edge that you'll have to sand down later, wasting material and time. Standing is a core part of how to cut leather straight without frustration.
Use the "Locked Wrist" technique. Your hand should be a rigid extension of the tool. If your wrist is loose, the blade will follow the softest parts of the leather rather than your intended line. Where you look is just as vital. Don't stare at the point where the blade meets the leather. Instead, focus your eyes about 2cm ahead of the blade. This allows your brain to anticipate the path and make micro-adjustments before a mistake happens. It's the same principle as driving; you look down the road, not at the hood of the car. We don't make compromises on technique because quality materials deserve quality craftsmanship.
Avoiding Common Pitfalls: The Secret to Perpendicular Edges
Your hand is a creature of habit. When you track a long line, your wrist naturally rotates outward to give your eyes a better view of the blade's tip. This creates the 'Lean.' While the top of your cut looks perfect, the bottom edge is actually beveled at a 5 or 10-degree angle. This tiny deviation ruins the alignment when you try to glue two pieces together. Mike always says that 85% of beginners struggle with this tilt because they focus on the line rather than the verticality of the steel.
The 'Ruler Climb' is another frequent mistake that leads to wasted material and potential injury. This happens when you apply too much horizontal pressure against your metal guide. If the blade meets a tough fiber, that sideways force pushes the knife up and over the ruler. Instead of forcing the blade against the guide, use your non-cutting hand to exert 10 pounds of downward pressure on the ruler. Let the knife simply glide alongside it without trying to crush the metal edge.
If you feel the leather bunching or pulling, you're dealing with 'Leather Drag.' Even the sharpest Japanese steel can struggle with friction. We've found that lubricating your blade with a quick swipe of 100% natural beeswax every three or four passes reduces friction by nearly 40%. This ensures the blade slices through the grain instead of dragging the fibers forward, which is essential for maintaining a crisp start and finish.
Cutting into the belly of a hide presents a unique challenge. This area has a loose fiber structure that can stretch up to 15% more than the shoulder or butt. When you apply pressure, the leather moves before the blade can bite. To master how to cut leather straight on these spongy sections, you must use a fresh blade and a series of light, shallow scores rather than one heavy pass. This prevents the 'wave' effect that happens when the material shifts under the knife.
Ready to upgrade your workbench with professional-grade materials? Browse our selection of premium vegetable-tanned leather to see the difference quality makes.
Why Your Edges Are Slanted
The grip you choose dictates your accuracy. A 'Pencil Grip' is great for detail but often causes the blade to tilt. Switch to a 'Power Grip' where your index finger sits on the spine of the knife to keep it vertical. Use a small 90-degree machinist square to check your edge every 20cm. If you notice a slight bevel, don't restart; use a 400-grit sanding block to square the edge back to 90 degrees manually.
Cutting Tricky Corners and Ends
Internal corners require the 'Overcut' method. Instead of stopping exactly at the corner, let your blade travel 1mm past the intersection to ensure a clean release. For the final 5mm of a strap or belt, stop slicing and use a vertical 'Stamping' motion. Press the blade straight down through the leather. Always cut away from the corner toward the open edge. Cutting into a corner often leads to over-shooting and damaging your main piece.
Premium Materials for Professional Results
You can own the sharpest Japanese steel blade in the world, but if your leather is spongy or inconsistent, your edges will inevitably wander. Learning how to cut leather straight is ten times easier when you start with a firm, high-quality hide. At Hab-To, we believe your materials should support your skill development, not hinder it. We hand-select every piece to ensure the grain density remains consistent from the belly to the spine. This means the knife won't suddenly dive or skip because of a soft spot in the fiber.
Our family has been rooted in the leather trade for over 160 years. This isn't just a warehouse; it's a legacy of Amsterdam craftsmanship passed down through generations. We don't do synthetics and we don't do compromises. When you work with our vegetable-tanned leathers, you're working with a material that responds predictably to your knife. This predictability is what allows you to build the muscle memory needed for those long, clean cuts that define professional work.
Don't jump straight into a full project hide if you're still shaky with the blade. We recommend using 'scrap' vegetable-tan for daily cutting drills. Spend 12 minutes each morning practicing parallel cuts on 3mm thick shoulder pieces. This builds the hand strength and eye coordination required for precision. Because we offer a "No Minimum" order policy, you can pick up exactly what you need for practice without investing in a full side of leather.
Choosing the Right Leather from Hab-To
For beginners, we often suggest starting with a firm leather like Buttero. It has a high temper, meaning it won't stretch or distort as you pull your blade through. This rigidity is your best friend when mastering how to cut leather straight. You can order small panels through our "No Minimum" policy to test different weights. If you're unsure which finish fits your design, Mike is available for a consultation to provide expert advice based on your specific project needs.
Visit Our Amsterdam Showroom
Digital photos can't convey the temper or the scent of true vegetable-tanned leather. We invite you to experience the quality firsthand at our Amsterdam location. You can feel the difference between a supple Pueblo and a rigid harness leather before making your first cut. It's a personalized selection process designed to eliminate guesswork and ensure you leave with the right tool for the job. Book an appointment with Mike in Amsterdam to find the perfect hide for your next masterpiece.
Elevate Your Craft with Every Cut
Precision isn't just about a steady hand; it's about the synergy between your blade and the surface beneath it. You've learned that choosing a heavy steel ruler and maintaining a consistent 90-degree blade angle are the foundations of a professional edge. When you master how to cut leather straight, you eliminate material waste and ensure every piece fits perfectly during the final assembly. It's these small technical adjustments that separate a hobbyist project from a gallery-quality piece.
At Hab-To, we believe great work starts with the right foundation. We bring 160+ years of family expertise to every hide we offer. Our hand-selected, sustainable leathers are chosen specifically for artisans who refuse to settle for second best. We've removed the barriers to entry by offering no minimum order requirements, so you can access world-class materials for any project size. No synthetics. No compromises. Just quality materials for real craftsmanship.
Browse our premium Vegetable Tanned Leather and start your next project with the best materials
Grab your knife and start cutting with confidence. Your next masterpiece is waiting to take shape.
Frequently Asked Questions
Why does my leather bunch up in front of the knife?
Leather bunches up because your blade is dull or you're applying too much forward pressure. A sharp blade should glide through 3.5mm vegetable-tanned leather with minimal resistance. If you notice a 2mm wave forming in front of the steel, stop immediately. Switch to a fresh scalpel blade or strop your knife for 30 seconds to restore the edge and reduce friction.
Is a rotary cutter better than a fixed blade for straight lines?
Rotary cutters excel at thin leathers under 1.2mm because they don't drag the material. For 2.0mm shoulder or thicker hides, a fixed blade provides the stability you need to learn how to cut leather straight. About 85% of professional saddlers prefer a fixed head knife for heavy utility cuts. It gives you better control over the vertical angle during the stroke.
How often should I sharpen my leather knife?
You should strop your blade every 15 minutes of active cutting to maintain a razor edge. If you're working with 4.0mm bridle leather, you'll need to touch up the edge every 10 cuts. A full sharpening on whetstones is usually required once every 3 months for a daily crafter. This routine prevents the blade from tearing the fibers and ensures a clean finish.
Can I use a plastic ruler for leatherworking?
Plastic rulers are dangerous because a sharp blade can easily shave off the edge or jump over it. Use a stainless steel ruler with a non-slip cork backing instead. A 30cm steel ruler costs less than $15 and will last a lifetime. It provides a solid 1mm vertical wall that keeps your blade on track without damaging the measuring tool or your fingers.
What should I do if my ruler slips mid-cut?
Stop cutting the second you feel the ruler move even 1mm. Carefully realign the ruler with the already established cut line and apply 5kg of downward pressure before continuing. If the slip caused a visible nick, you'll need to trim 2mm off the entire edge to square it up again. Using 2kg weights on the ends of the ruler can prevent 90% of these slips.
Does the thickness of the leather change how I should hold the knife?
Thicker leathers require a more vertical blade angle to ensure the edge stays square. When cutting 5.0mm sole leather, keep your wrist locked at a 90 degree angle to the table. For 0.8mm lining leather, you can use a shallower 45 degree angle for more speed. This adjustment is a fundamental part of mastering how to cut leather straight across different material weights.
How do I cut a long straight line that is longer than my ruler?
Use a 10cm overlap method to extend your cut line accurately. Cut until you reach the last 5cm of your ruler, then slide the ruler forward while keeping the blade tip in the leather. Align the back half of the ruler with the existing 10cm of the cut. This technique ensures a seamless transition even on a 2 meter hide without leaving jagged marks.
Why is my cut straight on top but curved on the bottom side of the leather?
This happens because your knife is tilting to the left or right during the stroke. Even a 3 degree tilt results in a 1mm deviation on the bottom of a 4.0mm piece of leather. Focus on keeping the blade perfectly perpendicular to the cutting mat. Check your progress every 20cm to ensure the edge remains square from top to bottom throughout the entire length.
