


How to Dye Vegetable Tanned Leather: The Artisan’s Guide for 2026
Just last Tuesday, a crafter came into our Amsterdam shop holding a wallet he’d spent hours on. The color was a landscape of dark splotches and light streaks, and the premium leather felt stiff, almost brittle. "I followed the instructions," he said, "so why does it look like this?" It's a frustratingly common story, and one I've seen countless times. You invest in beautiful, premium leather, only to feel like you've ruined it at the final step.
But achieving that deep, even, and vibrant color you envision isn't about luck; it's about technique. This guide is my answer to that question. I'm going to show you the professional process for how to dye vegetable tanned leather, eliminating splotchiness, preventing dye bleed, and ensuring your finished piece remains soft and supple for years to come. We'll cover everything from the crucial preparation steps that 90% of beginners skip to selecting the right dye for your project and applying a finish that feels like quality, not plastic.
Key Takeaways
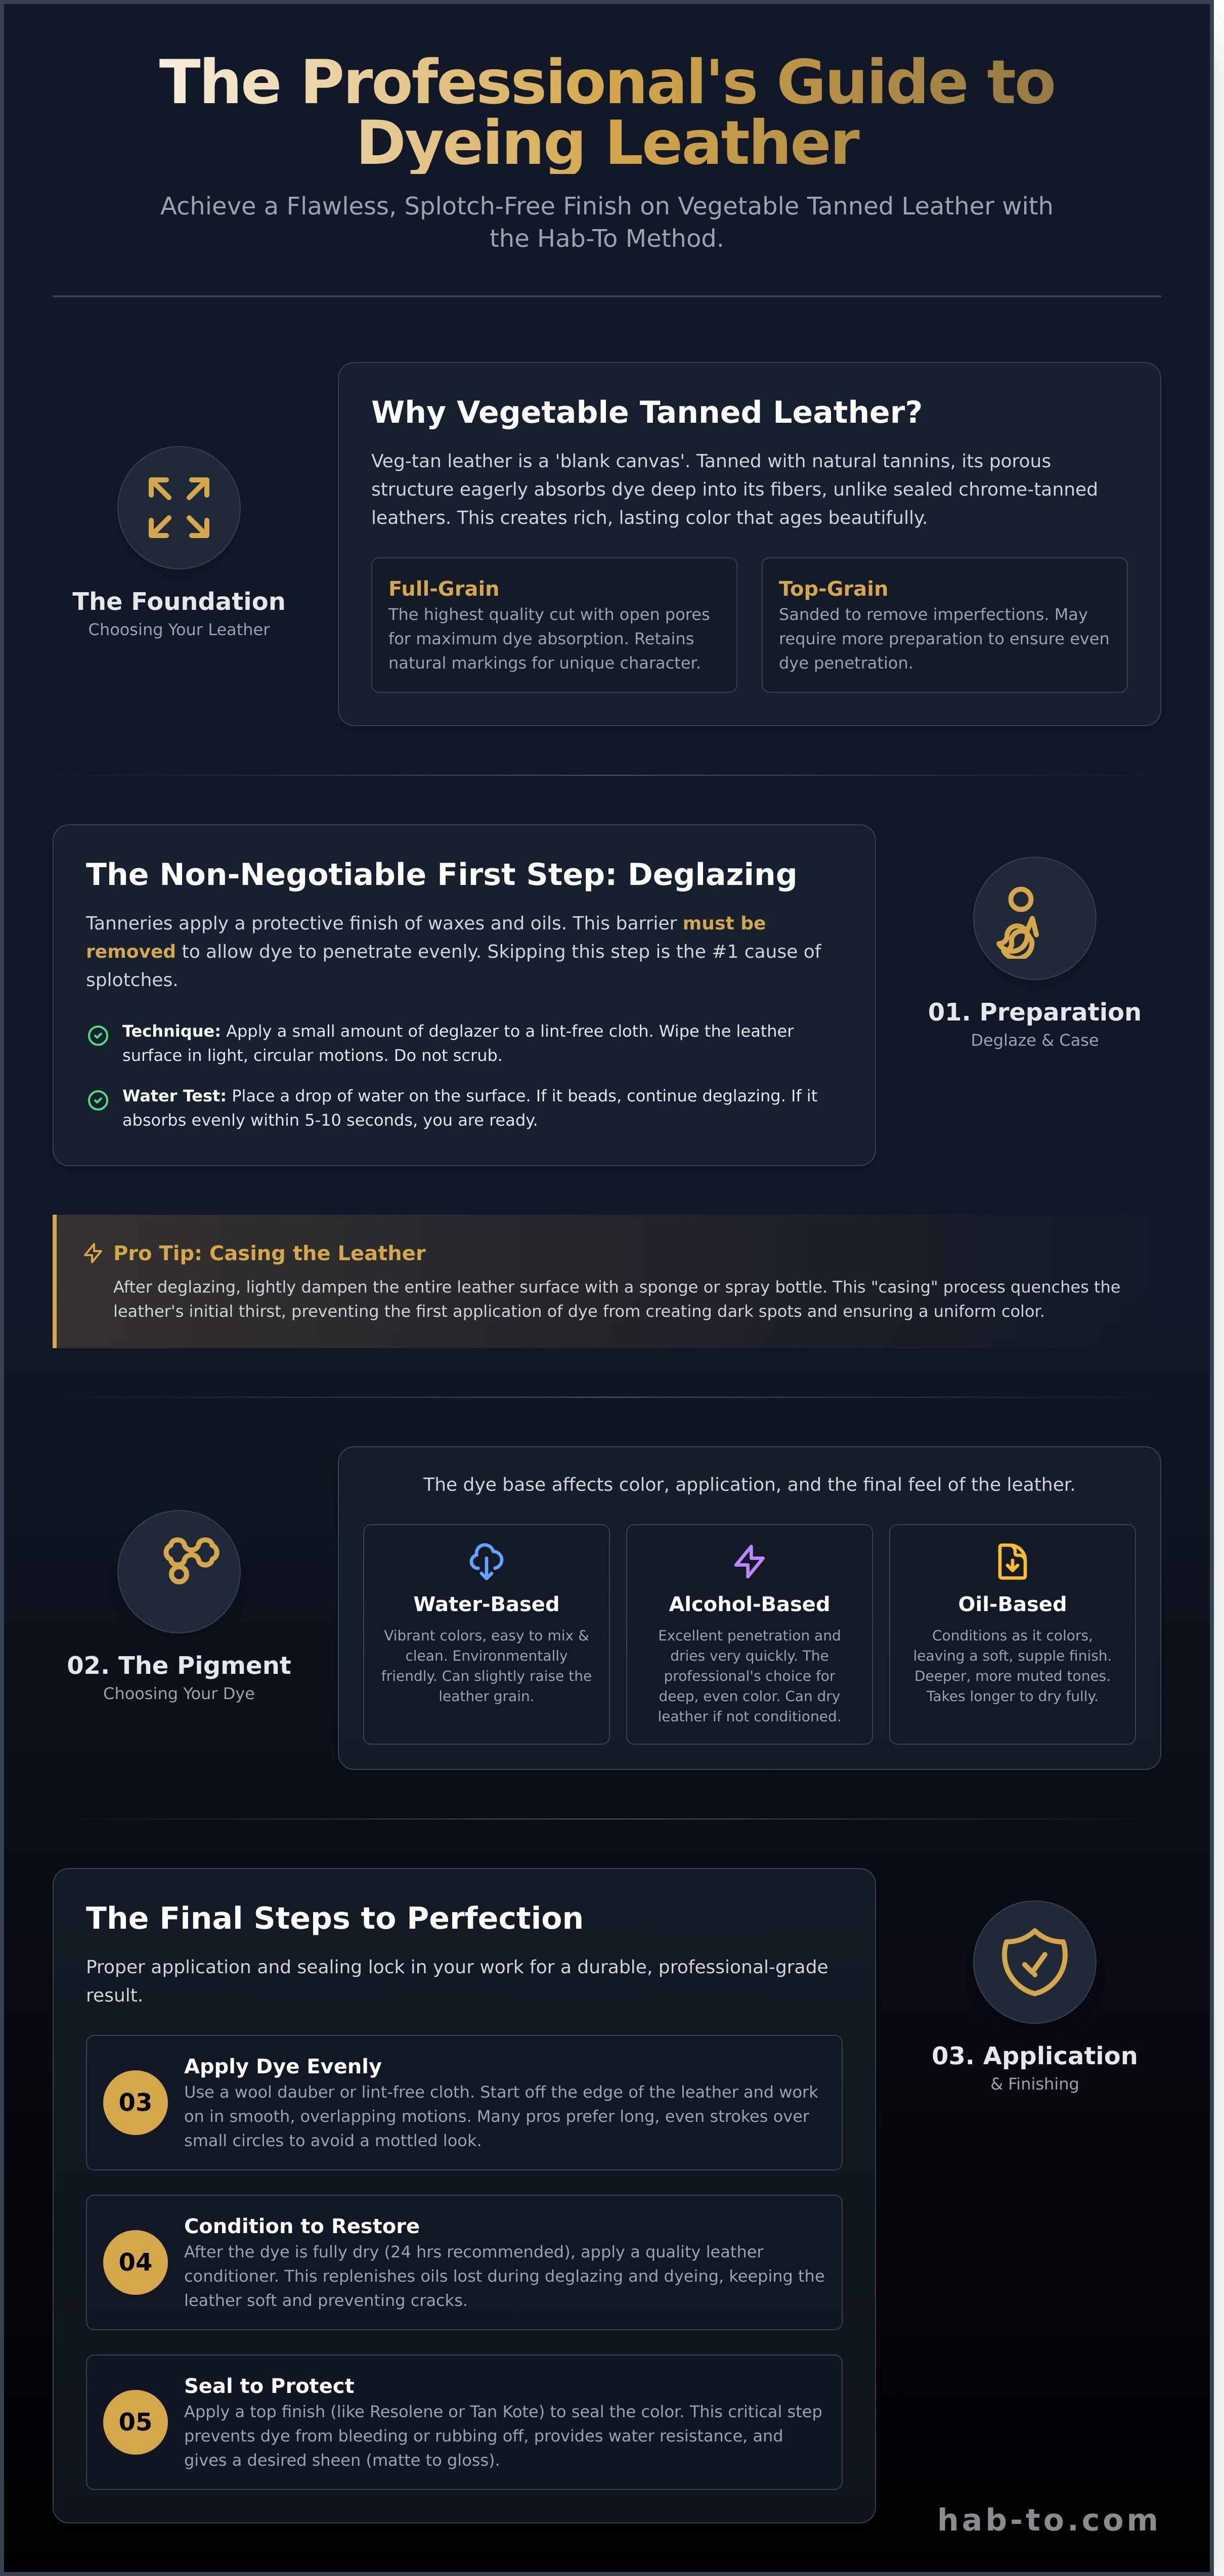
- Learn why properly preparing your leather by deglazing and casing is the non-negotiable first step to avoiding splotches and achieving a flawless finish.
- Discover the key differences between water, alcohol, and oil-based dyes to select the perfect pigment that matches your project's needs and your craft philosophy.
- Master our step-by-step professional method for how to dye vegetable tanned leather, settling the 'small circles vs. long strokes' debate to ensure even color distribution.
- Understand the critical final steps of conditioning and sealing to lock in your color, prevent bleeding, and give your leather a durable, professional-grade finish.
Understanding the Canvas: Why Vegetable Tanned Leather is Perfect for Dyeing
Before you ever open a bottle of dye, your success is largely determined by the material you choose. Think of vegetable-tanned leather as a blank, thirsty canvas. It’s often called ‘naked’ or ‘crust’ leather for a reason: it’s free of the synthetic topcoats and acrylic finishers that plague other leathers. This raw state is precisely what makes it the perfect medium for color. Your first step in learning how to dye vegetable tanned leather isn't about technique; it's about understanding the material itself.
The magic lies in tannins. Unlike chrome-tanned leather, which is treated with mineral salts that make it more resistant to water and dye, veg-tan leather is created through a much longer, more organic method. The entire vegetable tanning process uses natural compounds from tree bark and plants to preserve the hide. These tannins bond with the leather's collagen fibers, creating a porous and breathable structure that is exceptionally receptive to absorbing pigments. This is why a quality veg-tan hide doesn't just get colored on the surface; it drinks the dye deep into its core, resulting in a rich, durable finish that ages beautifully.
This is where our ‘No compromises’ philosophy becomes critical. You might be tempted by cheap off-cuts, but these often come from lower-grade sections of the hide or are tanned with inconsistent methods, leading to a blotchy, uneven dye job. A premium, hand-selected hide from a reputable tannery provides a consistent fiber density, ensuring your dye applies smoothly. Choosing the right weight and grain for your project-whether it's a sturdy 8-9 oz shoulder for a belt or a supple 3-4 oz side for a wallet-is the first act of true craftsmanship.
Full Grain vs. Top Grain: How Surface Texture Impacts Color
Full-grain leather is the highest quality cut, retaining the hide's complete, unadulterated surface. It has 'open' pores that absorb dye deeply, creating incredible depth. However, it also reveals every natural marking, from healed scratches to insect bites. Top-grain leather has been sanded to remove these imperfections, which can partially 'close' the pores. This may require more surface preparation to ensure the dye penetrates rather than sits on top. For heavily textured leathers like Pueblo, the unique circular pattern will trap more dye in its grooves, creating a beautiful two-tone effect you must account for in your design.
The 160-Year Hab-To Perspective on Material Selection
Hi, I'm Mike, and after decades in my family's business, I can tell you this: the heritage of the tannery dictates your dyeing success. A tannery with over a century of history has perfected the balance of oils and pH in their hides, creating a predictable canvas. Before committing to a large project, always test a small swatch. Apply a single drop of water and watch. Does it absorb evenly within 3-5 seconds? That's a 'thirsty' hide, perfect for dyeing. If the water beads up, the leather may have a higher oil content or a slight finish that needs attention. This simple test tells you how to proceed and helps you match the leather's natural oils with the right dye base, a crucial detail for achieving that professional finish we're all after.
The Science of Splotch-Free Color: Preparing Your Leather
You can have the best dye in the world, but if you apply it to unprepared leather, you're setting yourself up for a splotchy, uneven finish. Think of it like painting a masterpiece; you wouldn't start on a dirty, sealed canvas. The preparation stage is where 90% of the magic happens. It’s about understanding the leather’s nature and working with it, not against it. This is the secret to achieving that deep, uniform color that defines professional craftsmanship.
The Deglazing Process: Don't Skip This Step
Your beautiful piece of vegetable tanned leather arrives from the tannery with a protective finish. This layer of waxes and oils is great for shipping, but it’s a barrier to dye. Deglazing removes this barrier, opening the leather’s pores. You have two main options: a purpose-made product like Fiebings Deglazer, or 91% Isopropyl Alcohol. The commercial deglazer is formulated to be gentle, while alcohol is more aggressive and can dry the leather if overused. Apply a small amount to a clean, lint-free cloth (an old t-shirt scrap is perfect) and wipe the surface in light, circular motions. Don't scrub. You’ll know it’s clean with the water-drop test: place a single drop of water on the surface. If it beads up, keep cleaning. If it darkens the leather and absorbs within 5-10 seconds, you’re ready for the next step.
Casing and Pre-Oiling: Managing the Leather's Thirst
Bone-dry vegetable tanned leather is incredibly thirsty. If you apply dye directly to it, the first drops will be absorbed instantly, creating dark spots and ugly "tide marks" where the dye pools and dries unevenly. The solution is 'casing' the leather. This means evenly dampening the surface with a fine mist of water from a spray bottle or a damp sponge. You're not trying to soak it; you want it to feel cool and consistently damp to the touch. This moisture acts as a carrier, allowing the dye to flow smoothly across the surface and penetrate evenly. It's the single most effective technique when learning how to dye vegetable tanned leather without streaks.
For an even more controlled application, especially with lighter dye colors, try the Neatsfoot oil trick. Apply a very light coat of 100% Pure Neatsfoot Oil with a soft cloth a full 24 hours before you plan to dye. This pre-conditions the fibers, evening out their absorbency and resulting in a richer, more consistent final color.
The chemical dance between dye and leather hide is complex. The pH of the leather surface, for instance, dramatically affects how well pigments bond. Harsh cleaners can throw off the leather's natural acidic state (typically pH 4.5-5.5). This isn't just workshop wisdom; scientific research on leather dyeing confirms that surface chemistry is critical for achieving consistent coloration. A final wipe with a cloth dampened with distilled water after deglazing can help neutralize the surface, ensuring it's perfectly primed for dye. Getting these details right requires the right tools. Having clean wool daubers, lint-free cloths, and a quality deglazer on hand makes all the difference. If you're building your toolkit, you can find our hand-selected range of leathercraft supplies designed for real craftsmanship.
Choosing Your Pigment: Water, Alcohol, and Oil-Based Dyes Compared
Once you've prepped your veg tan leather, you face one of the most exciting decisions in the entire process: choosing your dye. This choice isn't just about color; it's about the character, depth, and final feel of your project. The pigment you select will dictate your workflow, the final look, and even the long-term health of the leather. Let's break down the three main players in any serious workshop.
- Water-Based Dyes: The modern, eco-conscious option. These dyes have a very low odor and clean up with simple soap and water, making them perfect for small or home-based workshops. They are an excellent starting point for beginners.
- Alcohol-Based Dyes: The classic choice for decades. Known for their incredibly vibrant colors and rapid drying times, these dyes penetrate quickly. That speed can be a double-edged sword, sometimes leading to streaks if you're not fast and consistent with your application.
- Oil-Based (Pro) Dyes: The professional standard for a reason. These dyes use a blend of oils and solvents as a carrier, allowing the pigment to penetrate deeper and more evenly than other types. The result is a rich, uniform color that also conditions the leather as it works.
Water-Based vs. Oil-Based: The Sustainable Crafting Debate
In our workshop, we respect tradition but embrace innovation. Water-based dyes, like Fiebing's Eco-Flo, are a fantastic innovation. Their Volatile Organic Compound (VOC) levels are often below 50 grams per liter, making them a safe choice for crafters without professional ventilation systems. However, they can sometimes raise the grain of the leather more noticeably, requiring extra buffing. Professional artisans often still reach for oil-based 'Pro' dyes because of their unmatched control and depth. The oil carrier prevents the dye from drying too quickly, giving you more time to work the color in for a flawless, blended finish. If you choose oil or alcohol-based dyes, ensure your workspace has good airflow, like an open window with a fan rated for at least 50 CFM, to keep you safe.
Building Color Depth Through Dilution
Here's a piece of advice that has saved countless projects: never apply dye at full strength on your first coat. This is a crucial part of learning how to dye vegetable tanned leather properly. Start with what I call the 50/50 rule: mix one part dye with one part of its corresponding reducer. For oil and alcohol dyes, use a dedicated product like Fiebing's Dye Reducer; for water-based dyes, simple distilled water works perfectly. This thinned-out first coat seals the leather's surface and prevents the dreaded blotchy finish, giving you a beautiful, even base to build upon.
This technique is also the secret to creating stunning 'sunburst' or 'ombre' effects. You can create a beautiful gradient by applying different dilutions in layers. For example:
- Start with a 1:4 mix (1 part dye, 4 parts reducer) in the center of your piece.
- Blend a 1:2 mix around that initial light area.
- Finish the outer edges with a 1:1 mix for the deepest color.
Wondering how much to mix? A little goes a long way. For a standard 1.5-inch wide belt, you'll likely only need 15-20 ml of total mixed solution for a couple of even coats. For a larger project like a tote bag panel (around 12x15 inches), plan on mixing at least 50-60 ml to ensure you don't run out mid-application. It's always better to have a little extra than to stop and remix. No compromises, remember?
The Hab-To Method: Step-by-Step Professional Dyeing Technique
You’ve prepared your premium vegetable tanned leather. You’ve chosen a quality, penetrating dye. Now comes the moment of truth. This isn't just about applying color; it's about technique. Over my years working with leather, I've seen that the method you use is just as critical as the materials you start with. It's the difference between a splotchy, uneven finish and a deep, professional color that looks like it came straight from a high-end workshop. Let’s get it right.
First, set up your space for success. Don't underestimate this step. Proper preparation prevents mistakes and ensures safety. You need three things:
- Ventilation: Most professional leather dyes are alcohol or oil-based and release fumes. Work in a garage with the door open or a workshop with cross-breeze. A simple box fan pointing out a window can make a huge difference.
- Lighting: Poor light hides streaks until it's too late. I work under a 5000K daylight bulb to see the true, neutral color of the dye as it’s applied.
- Surface Protection: Lay down a few layers of cardboard or a dedicated non-porous craft mat. Dye will bleed through a single sheet of newspaper and can permanently stain your workbench or floor.
The great debate in leather dyeing is 'Small Circles' vs. 'Long Strokes'. While long, straight strokes can work for experts on large, flat panels, I teach the circular method to 99% of crafters. Why? It's far more forgiving and builds color evenly, which is the secret to avoiding a blotchy finish. For the edges, the approach depends on your process. If you plan to burnish, you must dye the raw edge first; trying to dye a sealed, burnished edge is like trying to paint glass. The dye simply won't penetrate. For raw edges, use a dauber with less dye to avoid oversaturation, which can cause the edge to become dark and brittle.
Finally, there's the buffing phase. After the dye is dry to the touch (usually 1-2 hours), but before you apply any top coat, you must remove the excess pigment. Vigorously rub the entire surface with a clean, soft, lint-free cloth, like a piece of an old cotton t-shirt. You'll see color transfer to the cloth. Keep buffing with clean sections until the cloth comes away clean. This single step is the key to preventing dye from rubbing off on clothing later on. No compromises means a clean finish, every time.
The Application: Circular Motion for Even Coverage
This is where your project comes to life. Load your wool dauber or applicator, blot the excess on a piece of scrap, and begin. Your first coat should be applied in tight, overlapping circular motions, moving steadily across the leather surface. Think of it like mowing a lawn; each pass should overlap the last by about 30-50% to ensure no "holidays" or missed spots. For the second coat, which deepens the color, apply it at a 90-degree angle to your first application's path. This cross-hatch pattern is a master's trick for achieving flawless saturation. When you encounter corners or hardware holes, switch to a smaller applicator like a cotton swab to avoid "pooling," where excess dye gathers and creates dark spots.
The Critical 24-Hour Wait: Drying and Oxidation
Patience is a virtue in craftsmanship. The color you see moments after application is not the final color. As the alcohol or oil solvent evaporates, the dye will often lighten and lose its initial glossy look. This is normal. To learn how to dye vegetable tanned leather correctly, you must respect the drying process. Let the piece dry for a full 24 hours in a climate-controlled room, around 20°C (70°F), away from direct sunlight or heat sources. During this time, you might notice a slight metallic sheen, a phenomenon called "bronzing." This isn't a mistake; it's a sign of high pigment saturation and can be easily buffed off before sealing if you prefer a more matte look.
Getting these steps right requires both knowledge and the right tools. If you're ready to achieve that perfect finish, we've got you covered. Browse our collection of premium leather dyes and applicators, hand-selected for real craftsmanship.
Beyond the Color: Conditioning, Finishing, and Preventing Bleeding
You've applied the final coat of dye, and the color looks perfect. Your job isn't done yet. In fact, the steps you take now are what separate an amateur piece from a professional-grade product that lasts a lifetime. The dyeing process, especially with alcohol-based dyes, strips the leather of its natural oils and fats, leaving the fibers dry and brittle. This final stage is all about reintroducing life, locking in the color, and guaranteeing your work is ready for the real world.
Conditioning: Restoring Suppleness to Dyed Fibers
Think of conditioning as the mandatory rehydration step. It’s not optional. Without it, your beautifully dyed leather will be prone to cracking and fatigue. The choice of conditioner matters immensely. Oils like 100% pure Neatsfoot offer deep penetration but can significantly darken your final color. Waxes provide more of a surface-level barrier. For my projects, I almost always reach for a high-quality leather balm or cream. These are emulsions of oils and waxes that nourish deeply without over-saturating the fibers or drastically changing the color you worked so hard to achieve. To apply it, wait at least 24 hours after dyeing. Use a soft, lint-free cloth and apply a very thin, even coat in a gentle circular motion. Let it penetrate for several hours, or even overnight, before buffing off any excess.
Final Sealants: Glossy vs. Matte Finishes
A top coat, or sealant, locks in the conditioner, provides a layer of protection, and most importantly, prevents dye from bleeding onto clothing. This bleeding is called 'crocking', and it's a craftsperson's worst nightmare. Your choice of sealant dictates the final look and durability.
- For Maximum Protection: An acrylic finish like Fiebings's Resolene is the industry standard for items that will see heavy use or exposure to moisture. My tip: dilute it 50/50 with water. This prevents that thick, plastic-like finish and gives you a more natural-looking satin sheen. Apply two thin coats with a damp sponge, letting it dry completely between applications.
- For a Natural Feel: For a more traditional, heritage finish, nothing beats a carnauba or beeswax-based polish. Apply the wax, let it haze over, and then buff it vigorously with a scrap of canvas or wool. The friction creates heat, melting the wax into the grain and creating a warm, subtle luster that only gets better with age.
After your sealant has cured for a full 48 hours, perform the 'white cloth test'. Rub the leather firmly with a clean white cloth. If even a trace of color transfers, you need another light coat of sealant. Don't skip this. It’s your final quality control check and the key to customer confidence.
Get Started with Premium Hides
Ultimately, the quality of your finish is directly tied to the quality of your canvas. A superior result in learning how to dye vegetable tanned leather starts with a superior hide. Premium, full-grain leather from world-class tanneries has a tight, consistent grain structure that accepts dye evenly and finishes beautifully. You can't fix a blotchy dye job that was caused by poor-quality leather. Starting right is 90% of the battle. Ready to see the difference a premium hide makes? Browse Hab-To's curated selection of Vegetable Tanned Leather.
Every project is unique. If you're stuck on which finish is right for your specific application, I can help. Book a consultation with Mike for personalized project advice.
Your Next Masterpiece Starts with the Perfect Color
You're now equipped with the professional knowledge to transform natural hides into vibrant works of art. Remember the two most critical steps: meticulous preparation is 90% of the battle for a splotch-free finish, and a proper sealant is essential to lock in your color and prevent bleeding. This guide has given you the foundational knowledge for how to dye vegetable tanned leather, turning a simple hide into a personal statement.
Of course, the finest techniques demand the finest materials. Your craft deserves a canvas worthy of your skill. Backed by 160+ years of our family's expertise, Hab-To provides hand-selected, sustainable veg-tan leather with no minimum order requirements. You get premium quality for every project, whether it's a single wallet or a full collection. Ready to start?
Begin your next project with a superior foundation. Shop Premium Veg-Tan Leather for Your Next Project. We can't wait to see what you create.
Frequently Asked Questions About Dyeing Veg Tan Leather
Why does my dyed leather look splotchy and uneven?
Splotchy results are almost always caused by an improperly prepared surface. Vegetable tanned leather absorbs dye like a sponge, so any oils from your hands, existing dirt, or uneven moisture will cause the dye to take unevenly. For a flawless finish, always clean your leather with a dedicated leather preparer, like Fiebing's Deglazer, and then apply the dye with long, consistent strokes to a uniformly dampened (cased) surface.
Can I dye vegetable tanned leather with coffee or tea?
Yes, you can absolutely use coffee or tea to dye veg tan leather, and it's a fantastic way to achieve a natural, vintage patina. This method requires patience. You'll need to create a highly concentrated brew and submerge the leather multiple times, often 10-15 times or more, letting it dry between dips to build up the color. The final result will be more subtle and less uniform than a commercial dye, which is part of its unique character.
What is the best type of dye for a beginner leatherworker?
Water-based leather dyes are the best choice for beginners. They are far more forgiving than spirit or oil-based alternatives because they have a longer drying time, which helps prevent streaks. Brands like Eco-Flo offer excellent water-based options that are low-odor and easy to clean up with just soap and water. You can also easily dilute them with water to create lighter shades, giving you more control over the final color.
How do I stop leather dye from rubbing off on my clothes?
To stop dye from rubbing off, a process called "crock-off," you must seal your project with a top coat finisher. After letting the dye dry for a full 24 hours, buff the surface vigorously with a clean, soft cloth or piece of sheep's wool to remove any loose pigment. Then, apply a quality sealant like Carnauba Creme or Resolene in 2-3 thin, even coats. This locks the color in permanently and protects the leather.
Do I need to sand the leather before I start dyeing it?
No, you should not sand the grain side of leather before dyeing it. Sanding will damage the smooth top grain, which is the best surface for absorbing dye evenly and showing off the leather's natural character. Proper preparation involves cleaning the leather, not abrading it. Sanding is only used in specific situations, like roughing up an area for an adhesive or intentionally creating a distressed, suede-like texture.
How long should I wait between applying coats of dye?
You should wait until the surface is fully dry to the touch, which typically takes between 1 to 3 hours, depending on the dye and ambient humidity. Rushing this step is a common mistake. Applying a second coat while the first is still wet can reactivate the dye and pull it up, resulting in a muddy, uneven finish. For oil-based dyes, you may need to wait even longer, up to 6 hours, for the best results.
Can I dye leather that has already been finished or sealed?
Dyeing leather that already has a sealed finish is extremely difficult and not recommended. The sealant creates an impermeable barrier that prevents new dye from penetrating the leather's pores. To even attempt it, you would first need to strip the finish completely with a powerful solvent like acetone. The process of how to dye vegetable tanned leather is designed for raw, unfinished hides where the fibers are open and ready to accept color.
Is it possible to dye dark leather a lighter color?
No, you cannot dye a dark piece of leather a lighter color. Leather dyes are translucent, meaning they add color to the existing base rather than covering it up. Think of it like a wood stain; you can always make pine darker, but you can't stain a dark walnut to look like light pine. To make a dark leather item lighter, you would need to use an opaque leather paint, which sits on the surface instead of soaking in.
