


How to Use a Stitching Awl: A Comprehensive Guide for Leather Crafters
Why does a tool as simple as a sharpened piece of steel cause so much frustration for even the most patient crafters? You've likely felt the sting of an awl getting stuck in thick vegetable tanned leather or the disappointment of seeing crooked stitch lines on the backside of your project. It's a common hurdle, but mastering how to use a stitching awl is what separates a hobbyist from a true artisan. The global leather goods market is projected to reach over $855 billion by 2032, and the demand for authentic, hand-stitched quality has never been higher. Consumers are moving away from mass-produced items and seeking the durability that only a manual lock-stitch can provide.
I understand the struggle of trying to keep your spacing consistent while fighting against the physical resistance of the hide. Whether you are crafting a custom belt or a heavy-duty bag, the geometry of your tool matters as much as your technique. In this guide, I'll show you how to develop a rhythmic stitching habit that produces professional, durable seams designed to last a lifetime. We'll break down the differences between awl types and master the precision movements needed for a perfect, clean saddle stitch every time.
Key Takeaways
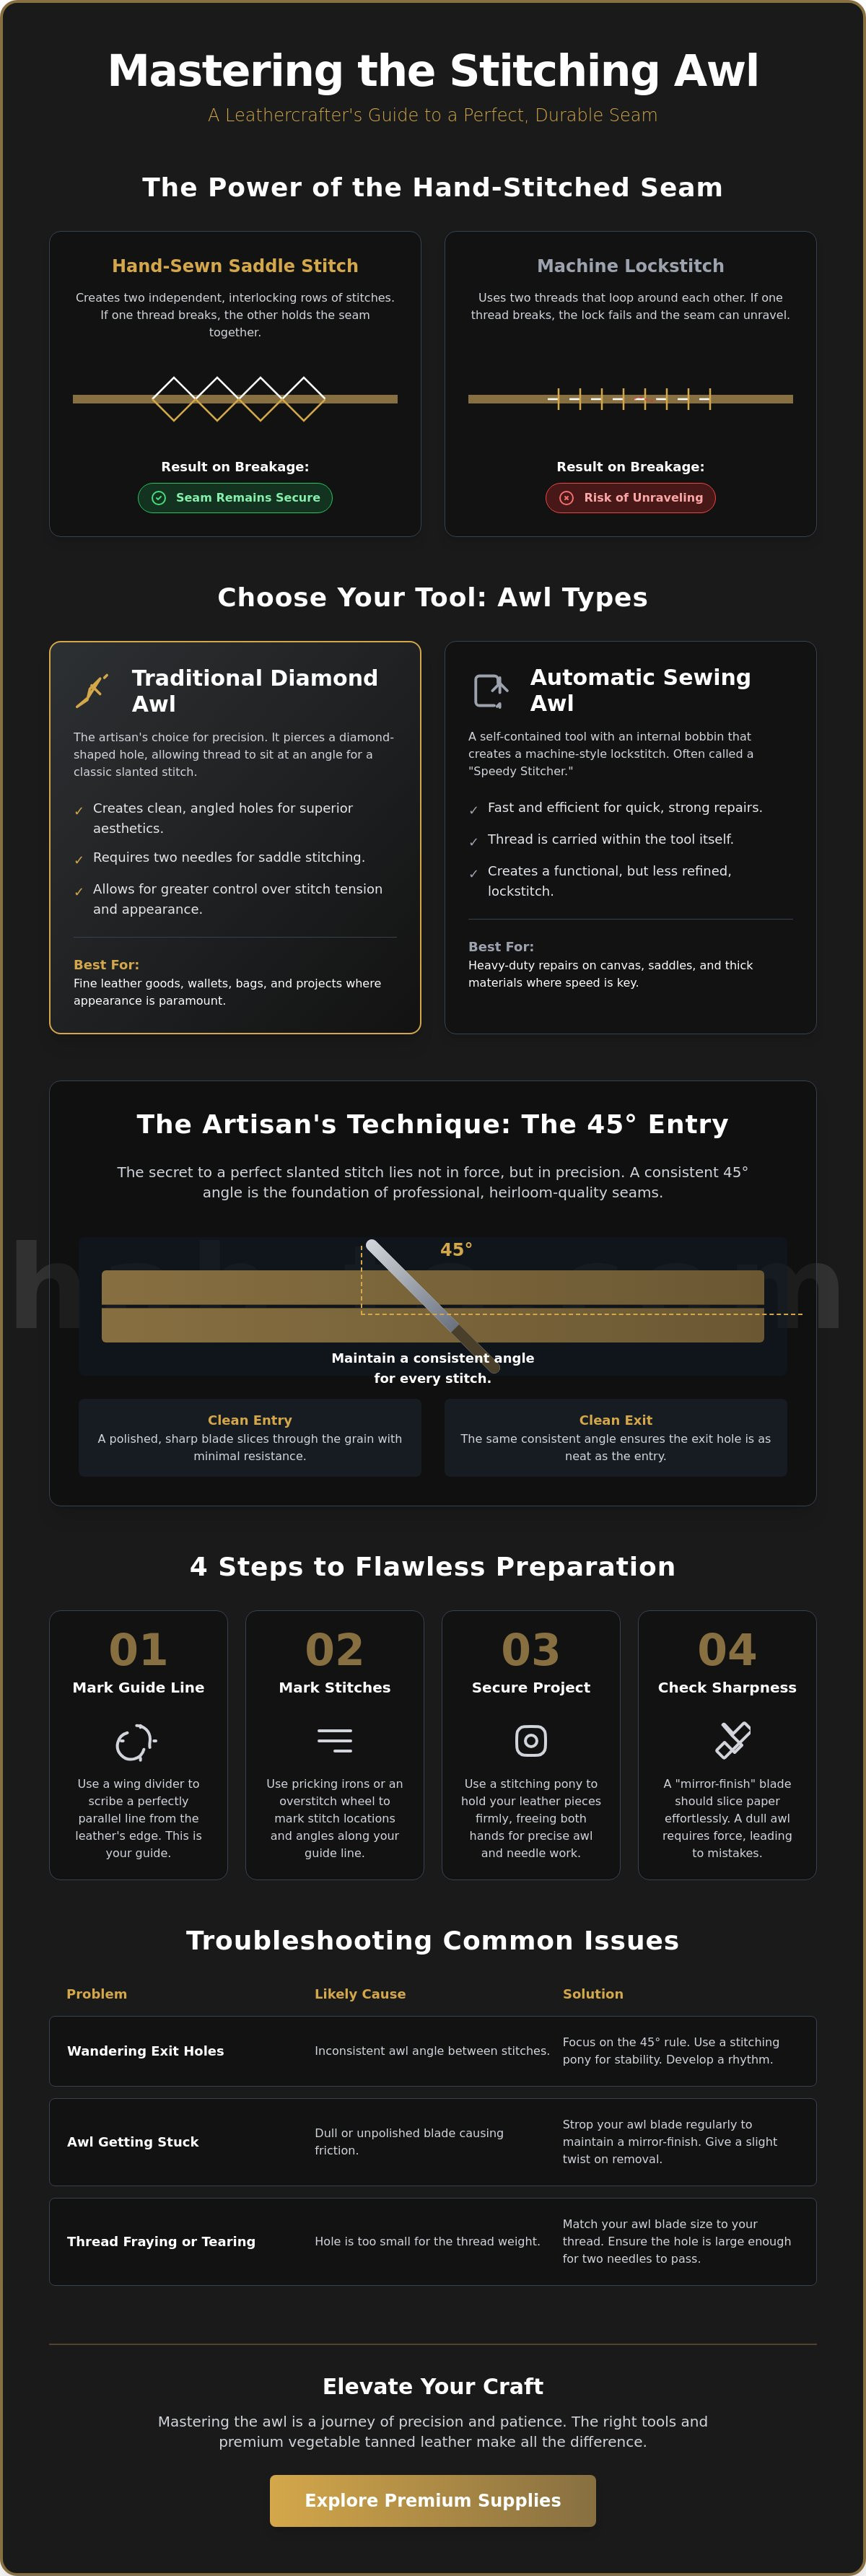
- Identify the unique benefits of the traditional diamond awl versus the automatic sewing awl to select the best instrument for your specific project.
- Learn how to use wing dividers and marking tools to establish the foundation for straight, professional stitch lines.
- Master the essential hand positioning and the 45-degree entry angle required for how to use a stitching awl with precision and ease.
- Troubleshoot common issues like wandering exit holes and thread fraying to ensure your seams look perfect on both the front and back.
- Explore how premium vegetable tanned leather and high-quality tools work together to create durable, heirloom-quality seams.
What is a Stitching Awl and Why is it Essential?
A stitching awl is the heartbeat of traditional leatherwork. It isn't just a sharp point; it's a precision instrument designed to penetrate the toughest vegetable tanned leather without compromising the material's integrity. While modern machines are fast, they lack the soul and structural strength of a hand-sewn seam. Understanding how to use a stitching awl allows you to create a saddle stitch that is functionally superior to anything a factory can produce. If a single thread breaks in a hand-stitched seam, the rest of the stitches remain locked in place. In contrast, a machine's lockstitch can unravel like a zipper once the tension is lost. This tool gives you the power to work through thick hides that would break a standard sewing needle, making it an absolute necessity for anyone serious about the craft.
Automatic Sewing Awl vs. Traditional Diamond Awl
Many beginners start with an automatic sewing awl, often called a "speedy stitcher." This tool houses an internal bobbin and uses a threaded needle to create a lock stitch. It's a fantastic choice for heavy duty repairs, such as fixing a horse saddle or a thick canvas tarp. However, for fine leathercraft like making wallets or bespoke bags, the traditional diamond awl is king. It doesn't carry thread itself. Instead, you use the blade to pierce a clean hole before passing two needles through in a saddle stitch. Choosing the right one depends on your goal. Are you looking for a quick, rugged repair, or are you aiming for the refined elegance of professional leatherwork? High-quality leatherworking tools make the learning curve much shallower, regardless of which path you choose.
The Mechanics of the Diamond Blade
The diamond shape of the blade is intentional and genius. Unlike a round needle that forces leather fibers apart, the diamond blade slices a tiny, angled slit. This specific geometry prevents the leather from tearing or stretching when you pull your thread tight. It's a delicate balance. You must match your blade size to your thread weight. If the hole is too large, the stitch looks sloppy; if it's too small, you'll struggle to pass your needles through. A true artisan knows that a "mirror-finish" on the blade is vital. A polished blade glides through the grain with minimal resistance, reducing hand fatigue and ensuring your exit holes are just as clean as your entry points. Mastering how to use a stitching awl starts with respecting the blade's edge and its relationship with the leather.
Preparing Your Leather for the First Stitch
Professional results are never an accident. They're the result of meticulous preparation. Before you even pick up your needles, you must create a roadmap for your thread. Without a clear path marked on your hide, even the steadiest hand will eventually drift. This leads to the "wandering" stitch that ruins a project's symmetry. Learning how to use a stitching awl begins long before the blade touches the grain. You need a consistent stitch line, and you need a way to keep your work steady while you pierce through multiple layers of vegetable tanned leather. A stitching pony is your best friend here. It acts as a third hand, holding your project upright so you can focus on the entry and exit angles of your awl.
Marking the Path
I always recommend using a wing divider to set a consistent distance from the edge of your project. By dragging one leg of the divider along the edge, you leave a faint, perfectly parallel scribe line. This is your guide. Once the line is set, you'll use pricking irons or an overstitch wheel to mark your intervals. I prefer pricking irons because they provide the exact angle for the diamond blade to follow. Pricking is the process of using a tool to mark the location and angle of each stitch without fully penetrating the leather. This technique ensures your spacing is mathematically perfect. For those working with heavy materials, Using an Awl to Sew Leather provides excellent context for managing thickness and ensuring your marks remain visible throughout the process.
The Role of Tool Sharpness
A dull tool is a dangerous tool. It requires more force, which increases the chance of the blade slipping and damaging your project or your hand. You can test your edge with the paper test. If the blade doesn't slice through a piece of printer paper with zero resistance, it isn't ready for your leather. Stropping your awl blade is a 30-second habit that will save you hours of frustration. Use a piece of scrap leather loaded with polishing compound and pull the blade toward you, maintaining the factory bevel. A mirror-polished edge reduces the physical effort needed for how to use a stitching awl, preventing hand fatigue and ensuring your exit holes line up perfectly with your entry points. If you're looking to upgrade your kit, our selection of professional leatherworking tools is designed to hold an edge through even the toughest projects.
Managing thickness is another hurdle. When you're piercing through three or four layers of hide, the friction can be intense. A sharp, polished awl minimizes this "grab." If you feel the tool getting stuck, don't force it. A small amount of beeswax on the tip of the blade can act as a lubricant, allowing for a smoother entry. This preparation phase is where the quality of your finished piece is truly decided. Take your time, mark your lines clearly, and keep your tools sharp.
Step-by-Step: How to Use a Stitching Awl
Learning how to use a stitching awl effectively requires a marriage of muscle memory and visual precision. It starts with the grip. You should seat the rounded end of the handle firmly in the center of your palm rather than holding it like a pencil. This "palm-seating" technique allows you to use the strength of your arm and shoulder to drive the blade through the leather, giving you far more control than your fingers alone could provide. Your index finger should extend along the shaft of the blade to help guide the point exactly where it needs to go. Once you've established your grip, focus on the entry angle. For traditional diamond holes, you must maintain a consistent 45-degree angle. This slant is what creates the beautiful, staggered look seen on high-end leather goods.
Executing the Piercing Motion
Position your project in a stitching pony so the marked stitch line is level and easily accessible. As you begin the pierce, use a steady "push-pull" rhythm. Drive the blade through until the widest part of the diamond has passed through all layers, then retract it cleanly. Avoid wiggling the tool from side to side, as this will widen the hole and lead to loose, sloppy stitches. It is vital that the diamond blade orientation remains identical for every single hole. If you rotate the awl even slightly, your thread will sit at different angles, ruining the visual flow of the seam. Once you understand how to use a stitching awl for the initial pierce, the rest of the process becomes a rhythmic dance between the tool and your thread.
Thread Management and Tension
The method changes slightly depending on your tool. If you're using an automatic awl, you'll push the needle through, pull it back slightly to create a loop, and then pass your secondary thread through that loop to create a lock stitch. For the traditional method, the awl simply clears the path for your needles. Many crafters find that following a professional guide to saddle stitching helps clarify the hand movements needed to keep the thread from tangling. Achieving consistent tension is the secret to a professional finish. You want the thread to be snug enough to hold the leather together but not so tight that it "puckers" or distorts the grain. You must bury the knot in the center of the leather layers to ensure a clean finish on both sides.
To end your stitch, backstitch through the last two or three holes. This doubles the thread in the areas of highest stress, ensuring the seam won't fail over time. Trim your thread ends close to the leather and, if using synthetic thread, lightly singe the tips to melt them into place. If you're using natural thread with our premium vegetable tanned leather, a small dab of glue or a firm tap with a cobbler's hammer will flatten the stitches and lock everything into place. Master these steps, and your hand-sewn seams will outlast any machine-made alternative.
Common Mistakes and How to Troubleshooting Them
Every crafter has been there. You finish a long row of stitches, flip the project over, and see a jagged line of exit holes. It's frustrating. It's also entirely fixable. Mastering how to use a stitching awl isn't just about the push; it's about the precision of the exit. If your holes are wandering, it usually means your tool is tilting as it passes through the layers. This happens most often when working with multiple layers of dense vegetable tanned leather where resistance is high. Alignment is the soul of professional work, and even a small deviation at the entry point becomes a massive error by the time the blade exits the back.
Solving Alignment Issues
Posture is the silent killer of straight lines. If you're slumping over your work, your hand will naturally angle the awl downward. Sit straight. Keep your eyes directly above the entry point. I recommend the "finger-guide" technique for better feedback. Place the index finger of your receiving hand on the backside of the leather. As you push the awl, you'll feel the pressure of the tip against the grain before it pierces through. This tells you exactly where the blade is headed. If you make a mistake, don't worry. You can often "heal" a misplaced hole by rubbing it firmly with a smooth bone folder or burnisher before it's threaded. This resets the fibers and allows you to try again.
Thread fraying is another common headache. If your thread looks fuzzy halfway through a seam, your hole size is likely too small for your thread weight. The constant friction as you pull the thread through the tight leather eventually shreds the fibers. Using beeswax is non-negotiable here. It lubricates the passage and coats the thread for extra protection. In the rare event that a blade or needle snaps mid-project, stop immediately. Use needle-nose pliers to pull the broken piece out from the direction it entered. Never try to push it through, as this will only damage the internal fibers of your project.
Thread and Needle Selection
Consistency requires the right combination of materials. Your thread weight should always match the width of your awl's diamond blade. If the thread is too thin, the hole looks like a gaping wound. If it's too thick, you'll struggle with every stitch. Waxed linen is the traditional choice for its grip, while braided polyester offers superior strength for heavy-duty items. You can learn more about how to choose the right needle to ensure your hardware matches your thread type perfectly.
Tension issues often boil down to the "pull." If the leather puckers, you're pulling too hard. If there are visible loops, you're being too timid. Find a steady, firm rhythm. If you're struggling with a dull or bent blade, it's time for an upgrade. Explore our collection of professional leatherworking tools to find an awl that stays sharp and true through every project.
Elevating Your Craft with the Right Materials
The mastery of any craft is a dialogue between the artisan, the tool, and the medium. You can spend weeks practicing how to use a stitching awl, but if you're fighting against subpar materials, your progress will stall. High-quality leatherworking tools don't just make the job faster. They make the learning curve shallower by providing consistent, reliable feedback. When a blade is forged from superior steel and polished to a mirror shine, it tells you exactly how the leather is reacting. You feel the grain. You sense the density. This sensory connection is what allows you to transition from mechanical movements to an intuitive, rhythmic habit that produces heirloom-quality results.
Why Material Choice Matters
The type of leather you choose significantly impacts stitch retention and the overall sewing experience. At Hab-To, we prioritize vegetable tanned hides because of their unique structural properties. Unlike chrome-tanned leathers, which are often too soft or "spongy" for precise awl work, vegetable tanned leather has a firm, dense fiber structure. When you pierce it with a diamond blade, the leather actually "heals" slightly around the thread after the stitch is set. This creates a natural, tight seal that locks the thread in place for decades. Using an awl on overly soft or synthetic materials often results in ragged holes that stretch or tear over time. We've spent over 160 years refining our selection process, and we're always here to help you choose the right hide for your specific project needs.
Investing in Professional Tools
A "budget" awl might look similar to a professional-grade tool in a photo, but the difference is felt in the hand. Professional tools feature blades that are correctly tempered to hold an edge without being brittle. The haft, or handle, is equally important. A well-made wooden haft is ergonomically shaped to seat comfortably in your palm, which drastically reduces hand fatigue during long stitching sessions. Cheap plastic handles often cause hot spots or blisters because they don't allow for the same nuanced grip. As you build your kit, remember that your tools are an extension of your hands. Investing in quality hardware ensures that your focus remains on the beauty of the stitch rather than the failure of the equipment. Explore our curated selection of leather hardware and professional tools at Hab-To to find the perfect match for your workshop.
Building a serious hobbyist kit requires more than just the awl itself. Consider adding high-quality stropping boards, specialized needles, and premium waxed threads to your arsenal. These accessories support the core technique of how to use a stitching awl by ensuring every variable is controlled. When your materials are as dedicated to quality as you are, the results speak for themselves. You'll create seams that aren't just functional, but are true testaments to the art of traditional leathercraft.
Mastering the Art of the Hand-Stitched Seam
Mastering how to use a stitching awl is a transformative step for any leather crafter. It shifts your work from simple assembly to true artistry. By focusing on a consistent 45-degree angle and maintaining a mirror-polished blade, you ensure every seam is as durable as it is beautiful. You've learned that preparation, from marking your path with wing dividers to stropping your blade, is what separates a masterpiece from a mistake. Your materials speak as loudly as your technique. High-quality vegetable-tanned leather provides the specific fiber density needed for superior stitch retention and a clean, professional finish.
At Hab-To, we bring over 160 years of family expertise to help you succeed in every project. Based in Amsterdam and offering worldwide shipping, we provide the sustainable hides and precision tools that have defined our heritage for generations. We believe in craftsmanship without compromises. Don't settle for mass-produced results when authentic, artisan quality is within your reach.
Find the perfect tools and premium leather for your next project at Hab-To Leather House.
Your journey into traditional craft is just beginning. Every stitch you pull and every hole you pierce brings you closer to mastering this timeless skill. Keep your tools sharp and your passion alive.
Frequently Asked Questions
Is a stitching awl better than a sewing machine for leather?
A stitching awl is superior for durability because it allows you to create a traditional saddle stitch. While machines are faster, they use a lockstitch that can unravel if a single thread breaks. Hand-stitching with an awl ensures that even if one stitch fails, the rest of the seam remains secure. This makes it the preferred choice for heirloom-quality goods and heavy-duty repairs on thick hides.
Can I use a regular sewing needle in a stitching awl?
No, you cannot use standard household needles in these tools. Automatic sewing awls require specialized heavy-duty needles with a side-loading eye to accommodate thick, waxed threads. If you're using a traditional diamond awl, you'll need blunt-tipped harness needles to pass through the holes you've created. Regular needles are too fragile and will likely snap when they encounter the resistance of dense vegetable tanned leather.
How do I sharpen a diamond awl blade?
Sharpening requires a fine-grit whetstone followed by a leather strop loaded with polishing compound. Hold the blade at its original bevel angle and pull it toward you across the stone with steady pressure. Repeat this on all four sides of the diamond shape until it slices through paper effortlessly. Maintaining a mirror-polished edge is the most important part of learning how to use a stitching awl without hand fatigue.
What thread is best for use with a sewing awl?
Waxed polyester or linen threads are the best options for hand-sewing. The wax coating is essential because it protects the fibers from fraying as they pass through the leather and helps the thread glide smoothly. Braided polyester is particularly popular for its high tensile strength and resistance to rot. Always match your thread weight to the width of your awl blade to ensure the holes are filled correctly.
Why does my thread keep breaking when I use the awl?
Thread breakage usually happens because the awl blade is dull or the hole is too small for the thread weight. A dull blade creates ragged edges that can saw through the thread fibers during the sewing process. If you don't use enough beeswax, the friction from the leather will also weaken the thread until it snaps. Ensure your blade is razor-sharp and your thread is well-lubricated to prevent this frustration.
Do I need a stitching pony to use an awl correctly?
A stitching pony is highly recommended for achieving professional results. It acts as a third hand, holding your project securely so you can focus on the entry and exit angles of the blade. Without one, you'll struggle to maintain the consistent 45-degree slant required for a beautiful saddle stitch. Using a pony is a fundamental part of how to use a stitching awl while keeping your stitch lines perfectly straight.
Can a stitching awl be used on materials other than leather?
Yes, these tools are incredibly versatile and work well on any heavy-duty material. They are frequently used for repairing canvas tents, denim, sails, and even thick upholstery fabrics. If the material is too dense for a standard sewing needle to penetrate without bending, a stitching awl is the correct tool for the job. Just ensure you use a thread type that is compatible with the specific material you are repairing.
How do I prevent the awl from making too large a hole?
Control the depth of your push to avoid oversized holes. Many awl blades are tapered, meaning they get wider toward the handle. If you push the tool all the way in, the hole will be significantly larger than your thread. Only drive the blade far enough for the widest part of the diamond to clear the leather layers. This technique keeps your stitches looking tight and refined rather than loose and sloppy.
