


How to Use Leather Dye Reducer: A Masterclass in Tonal Control
Leather dye reducer isn't a mere dilutant; it's a precision tool for controlling the depth and saturation of every pigment you apply. Many crafters treat it as an optional extra, only to watch their expensive Shell Cordovan turn muddy or unexpectedly dark with a single stroke. You've likely felt that sting of regret when a project you've spent hours on comes out blotchy or oversaturated. Learning how to use leather dye reducer correctly is the secret to achieving that elusive, high-end finish that defines truly professional work.
I've spent decades at the workbench, and I know that mastering tonal control is about understanding the chemistry behind the craft. This guide will teach you how to blend dyes for perfect sunburst gradients and maintain consistency across every piece in a collection. We'll also cover vital 2026 updates, including how to navigate VOC regulations in California and Canada by using compliant low-VOC alternatives. Whether you're working with a small four-ounce bottle or a gallon jug, you'll learn to stop wasting materials and start creating layered, professional finishes with total confidence.
Key Takeaways
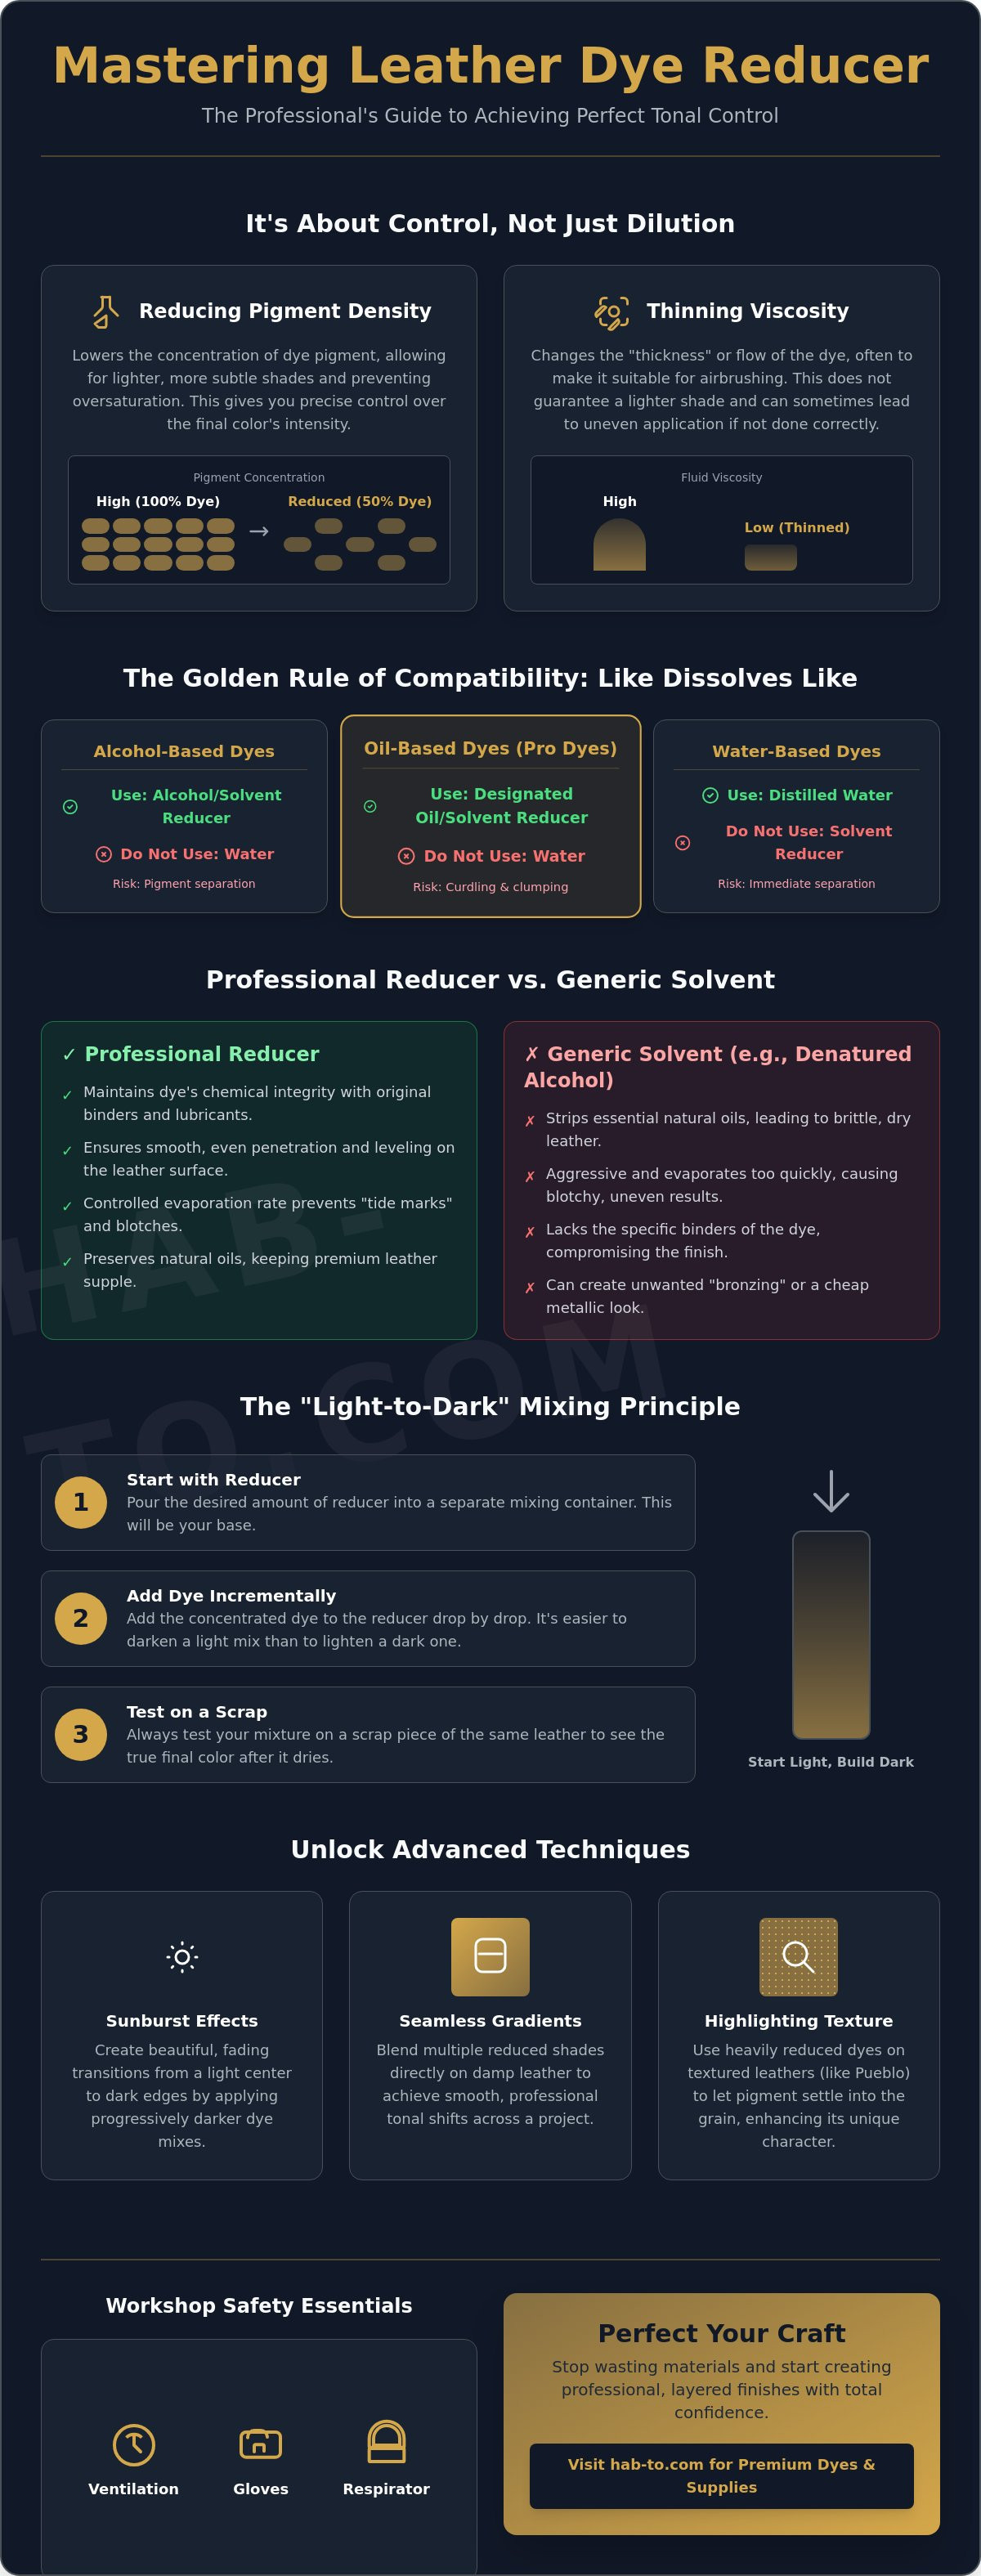
- Understand the technical difference between reducing pigment density and thinning viscosity to maintain the structural integrity of your leather.
- Learn the "Golden Rule" of chemical compatibility to ensure your reducer matches your solvent, oil, or alcohol-based dye perfectly.
- Master the step-by-step process of how to use leather dye reducer using the "Light-to-Dark" mixing principle to prevent blotches and save expensive materials.
- Discover advanced blending techniques for creating professional sunburst effects and seamless tonal gradients directly on the leather surface.
- Prioritize workshop safety with essential advice on ventilation and protective gear while learning cost-effective sourcing strategies for active crafters.
What is Leather Dye Reducer and Why Do Crafters Need It?
Leather dye reducer is a specialized solvent-based medium designed to give you absolute control over the intensity of your finish. It isn't just a bottle of "thinner" to make your dye last longer. It's a precision tool. To truly grasp how to use leather dye reducer, you must first understand what dyes are: complex chemical solutions formulated to penetrate deep into the fibers of the leather. When you apply dye straight from the bottle, the pigment density is often too high for subtle work. Reducer allows you to "dial back" that intensity without compromising the dye's ability to bond with the hide.
To better understand this concept, watch this helpful video:
There's a vital distinction between reducing and thinning. Thinning usually refers to changing the viscosity, or the "thickness," of a liquid to help it flow better. Reducing is about lowering the pigment density. If you apply a highly saturated dye to a piece of Maryam Shell Cordovan, the leather can only absorb so much. The excess pigment sits on the surface, creating a "metallic" bronzing effect that looks cheap and can rub off on clothing. A professional reducer prevents this by ensuring the pigment-to-solvent ratio is perfectly balanced for the specific leather you're using.
Reducer vs. Solvent: The Chemical Difference
You might wonder why you can't just use cheap denatured alcohol. While alcohol is a solvent, it's aggressive. Professional reducers contain specific binders and lubricants that are already present in the original dye formula. When you use a proper reducer, you're maintaining the chemical integrity of the product. Generic solvents evaporate too quickly, which often leads to "tide marks" and blotchy penetration. They also strip the natural oils from premium vegetable-tanned leather, leaving your project feeling brittle and dry. A reducer slows the evaporation rate just enough to allow the dye to level out smoothly across the surface.
When to Reach for the Reducer
Knowing how to use leather dye reducer opens up a world of creative possibilities. It's essential for achieving soft, pastel tones or "washed" effects on light-colored hides. If you're airbrushing, a reducer is your best friend. It prevents the dye from drying mid-air and clogging your nozzle. It's also the secret to highlighting the unique texture of leathers like Badalassi Pueblo. By using a heavily reduced dye, you can create multi-tonal depth where the pigment settles into the "scuffed" grain of the Pueblo, creating a rugged, sophisticated look that opaque dyes would simply cover up.
Compatibility: Matching Your Reducer to Your Dye Base
Chemistry is the silent partner in every leather project. If you don't respect the bond between your dye and your reducer, you're setting yourself up for a workshop disaster. The golden rule is simple: like dissolves like. Solvent-based dyes require solvent-based reducers, while water-based dyes must be paired with water. Mixing incompatible bases doesn't just result in a poor finish; it causes "curdling." This is where the pigment separates from the carrier, creating a gritty, clumping mess that can permanently ruin your hide. Understanding these chemical boundaries is the first step in mastering how to use leather dye reducer effectively.
Most professional dyes fall into three categories: alcohol-based (often called spirit dyes), oil-based (like Pro Dye), and water-based. Alcohol and oil-based dyes are both solvent-based, but they aren't always interchangeable. Oil-based dyes are designed to penetrate deeper and offer more lightfastness, requiring a reducer that can handle their higher pigment load. Water-based dyes are a different breed entirely. They don't use harsh chemicals, so you'll use distilled water as your reducer to avoid introducing minerals that could alter the color. If you're looking for the best canvas to test these leather dyeing techniques, consider starting with high-quality vegetable tanned leather to see how different bases react to the grain.
Identifying Your Dye Type
Dye labels aren't always clear. Look for keywords like "Spirit-based" for alcohol or "Professional" for oil-based formulas. If the label is missing or faded, use the "Drop Test." Place a small amount of reducer in a glass jar and add a single drop of dye. If the dye disperses evenly and remains clear, they're compatible. If the dye clouds, clumps, or sinks to the bottom in a stringy mass, stop immediately. Using brand-specific reducers is usually the safest bet, as manufacturers formulate them to maintain the specific binders that keep the color stable during application.
Compatibility Guide: Reducer vs. Dye
Matching the right tool to the right job ensures your project dries evenly without losing its luster. Here is a quick breakdown of common combinations:
- Standard Alcohol Dye: Use a standard solvent reducer. Typical ratio: 1:1 for medium tones, 3:1 (reducer to dye) for light washes.
- Pro Oil Dye: Use a specialized oil-dye reducer. These formulas contain extra lubricants to keep the leather supple. Start with a 2:1 ratio.
- Water-Based Dye: Use distilled water only. Tap water contains chlorine and minerals that can cause unexpected color shifts.
- Acrylic Finishes: These are generally not reduced with dye reducers. They require specific thinning mediums or water, depending on the brand.
Each reducer choice impacts your dry time. Alcohol-based reducers evaporate quickly, which is great for fast production but requires a steady hand to avoid streaks. Oil-based reducers stay "open" longer, giving you more time to blend and buff the surface for a rich, professional glow.
Step-by-Step: How to Use Leather Dye Reducer for Custom Shades
Precision in the workshop starts with preparation. To master how to use leather dye reducer, you need a dedicated set of tools: glass mixing jars with airtight lids, graduated pipettes for measurement, and a steady hand. Never guess your ratios. If you're working with premium skins like Maryam Shell Cordovan, even a minor mistake in pigment density can lead to a costly waste of material. Solvents evaporate quickly, so keeping your containers sealed between applications is non-negotiable for maintaining color consistency.
The most important rule for custom shades is the "Light-to-Dark" principle. Always start with your reducer in the jar and add the dye one drop at a time. It's far easier to darken a light mix than it is to save a blend that's already too heavy. Once mixed, test your solution on a scrap piece of the exact same tannage. Leather is a natural material; it reacts differently based on its fat content and grain structure. A wash that looks perfect on Virgilio Vaccheta might look entirely different on a more porous hide. For a deeper look at these steps, this provides an excellent breakdown of the mixing process.
The Mixing Process and Ratio Frameworks
Consistency is the hallmark of a professional. A 1:1 ratio is the industry workhorse, effectively cutting the pigment in half to create soft, natural tones. If you want to create "ghost" washes or subtle antiquing effects, move toward a 1:10 ratio. This highly diluted mix allows the natural character of the grain to shine through while adding just a hint of color. Record every recipe in a workshop log. Whether you're mixing five milliliters or fifty, knowing the exact drop count ensures you can replicate the shade months later for a matching set.
Application Techniques for Reduced Dyes
Your choice of applicator changes the final look. Wool daubers are great for saturating large areas quickly, but they can hold too much liquid, leading to puddling. Sponges offer more control for thinned dyes, allowing you to "massage" the color into the fibers. Use a firm, circular motion to apply the dye. This technique prevents "tide marks," those dark, unsightly lines that form when dye dries unevenly at the edges. Because high-reducer blends dry faster than straight dye, work in small sections and keep a "wet edge" to ensure a seamless, streak-free finish across the entire surface.
Advanced Techniques: Gradients, Sunbursts, and Tonal Depth
Mastering a flat, even coat is a vital skill. But true artistry begins when you treat your reducer like a blending medium rather than a simple dilutant. Dye isn't just color. It's depth. It's history. When you move beyond standard applications, your reducer becomes your most powerful brush. By varying the concentration of pigment across a single panel, you can create a sunburst effect that draws the eye and highlights the natural curves of your project. Learning how to use leather dye reducer as a tonal control tool allows you to transform a simple piece of craft into a gallery-ready heirloom.
On textured hides, thinned dye behaves with remarkable character. Instead of sitting on the surface, the reducer carries the pigment into the "lows" of the grain. This highlights the unique, scuffed character of the leather without making it look muddy. It adds a three-dimensional depth that is impossible to achieve with full-strength dye. This technique is especially effective for creating a rugged, sophisticated look that feels lived-in from day one.
The Wet-on-Wet Blending Method
Before you apply a single drop of color, try wiping the leather with a clean rag dampened with pure reducer. This "primes" the surface. When the dye hits the damp leather, it bleeds and spreads naturally, much like watercolors on a canvas. If a transition looks too harsh, don't reach for more color. Instead, use a clean sponge with a small amount of reducer to buff the edge of the dye while it's still wet. This softens the "halo" effect and creates a seamless transition between your light and dark tones.
Achieving the "Vintage" Look with Multiple Washes
Building color slowly is the secret to a rich, historical patina. Applying three or four highly reduced washes results in a far more complex finish than one heavy coat. This method is particularly superior for Shell Cordovan and other premium hides where you want to preserve the leather's natural luster. Because you are layering thin veils of color, the light reflects through the different levels of pigment. If a section becomes too saturated, you can use the reducer to "pull back" the color, lifting the pigment to create highlights that mimic years of natural wear. Knowing how to use leather dye reducer for these subtle adjustments gives you a level of control that straight dye simply cannot offer.
Ready to elevate your next project? Browse our collection of premium vegetable tanned leather to find the perfect canvas for your custom finishes.
Professional Tips for Sourcing and Safety
Efficiency in a workshop isn't just about speed. It's about smart sourcing. If you're an active crafter, buying reducer in small 4-ounce bottles is rarely the best path. Those small containers often cost around $6.50, while a full 1-gallon jug can be found for roughly $66.95. The savings are clear. However, sourcing in 2026 requires more than just price checking. You must be aware of local regulations. In regions like California and Canada, high-VOC solvents are restricted under rules like the SOR/2021-268 regulation. This law limits VOC concentrations in leather care products to 15%. Always look for "Low VOC" alternatives if you're shipping to these areas to ensure your workshop stays compliant and your projects aren't delayed by customs.
Safety is the foundation of every masterclass. When you're learning how to use leather dye reducer, you're handling volatile chemicals. An N95 dust mask won't protect your lungs from solvent vapors. You need a respirator equipped with organic vapor cartridges. Nitrile gloves are also essential. They prevent the dye from leaching into your skin and protect you from the drying effects of the reducer. It's about respecting the craft and your health simultaneously.
Selecting the Best Leather for Dyeing
Your results are only as good as your material. Vegetable Tanned Leather remains the industry standard because its fibers are receptive to pigment. Different tannages react uniquely to reduced dyes. The open, scuffed grain of Badalassi Pueblo is particularly forgiving. It allows thinned dyes to settle into the texture for a rugged look. If you're aiming for a sleek, high-end accessory, Maryam Vacchetta offers a smooth surface that displays tonal gradients with incredible clarity. Choosing the right base is half the battle won.
Safety and Workshop Setup
Solvent-based reducers have a low flash point. This means they can ignite easily near heat or sparks. Keep your mixing station away from heaters or open flames. Storage is equally critical. Keep your reducer in a cool, dark place in airtight containers to prevent evaporation. One of the biggest hidden dangers is the disposal of dye-soaked rags. These can undergo spontaneous combustion if left in a pile. Always dry them flat or store them in a water-filled metal container. Finally, ensure your workspace has active airflow. Good ventilation doesn't just keep you safe. It helps your reduced dyes dry evenly, preventing the blotchiness that occurs when vapors linger on the leather surface. Understanding how to use leather dye reducer safely ensures you'll be crafting for decades to come.
Elevate Your Craft to Professional Standards
Mastering the depth and flow of your pigments is what separates a hobbyist from a true artisan. You now understand that tonal control isn't about luck; it's about respecting chemical compatibility and the light-to-dark mixing principle. By learning how to use leather dye reducer with precision, you've gained the power to create layered sunbursts and vintage patinas that highlight the natural soul of every hide. Remember to prioritize your workshop safety and source your materials with an eye for quality and compliance to ensure your projects stand the test of time.
At our Amsterdam-based wholesale house, we bring over 160 years of family leather expertise directly to your workbench. We believe high-quality materials should be accessible to everyone, which is why we offer global shipping with no minimum order requirements for crafters. Whether you're a seasoned professional or just starting your journey, we're honored to be part of your process. Explore our premium Vegetable Tanned Leathers for your next dyeing project and start creating something extraordinary today. Your next masterpiece is waiting to be brought to life.
Frequently Asked Questions
Can I use 70% isopropyl alcohol instead of a leather dye reducer?
You shouldn't use 70% isopropyl alcohol as a substitute for a professional reducer. While it acts as a solvent, alcohol is far more aggressive and lacks the essential binders found in specialized formulas. It often strips the natural oils from your leather, leaving the fibers brittle and dry. Additionally, the high water content in 70% alcohol can cause uneven penetration, whereas a dedicated reducer ensures the dye remains stable and bonds correctly.
Will using a reducer make my leather dye less permanent or prone to fading?
Using a reducer does not make your dye less permanent or more prone to fading. It simply lowers the pigment concentration, allowing you to achieve lighter, more translucent shades. Once the solvent evaporates, the remaining pigment is bonded to the leather exactly as it would be from a full-strength application. As long as you apply a high-quality top finish, your custom-blended tones will remain vibrant and durable for years.
What is the best ratio for thinning leather dye for an airbrush?
The ideal ratio for airbrushing is typically between 1:1 and 2:1 (reducer to dye). This consistency ensures the liquid is thin enough to pass through the nozzle without clogging while still providing excellent coverage. Mastering how to use leather dye reducer in an airbrush setup allows you to build color in light, misty layers. Always start with a 1:1 mix and adjust based on the specific PSI of your equipment.
How do I prevent reduced dye from looking splotchy on large surfaces?
To prevent splotchiness on large surfaces, dampen the leather with pure reducer before applying your colored mix. This "wet-on-wet" technique helps the dye spread more evenly across the grain. Work in small, overlapping circular motions and maintain a wet edge to avoid hard lines. Using a sponge instead of a wool dauber can also provide a more consistent, streak-free distribution of highly thinned dyes on expansive panels.
Does leather dye reducer expire or lose its effectiveness over time?
Leather dye reducer doesn't technically expire, but it can lose effectiveness if the container isn't airtight. The solvents are highly volatile and will evaporate over time, changing the chemical balance of the liquid. If your reducer looks cloudy or has developed a thick consistency, it's likely contaminated or partially evaporated. Always store your bottles in a cool, dark place and tighten the lids immediately after use to preserve the formula.
Can I mix different brands of dye and reducer together?
You can often mix brands if the chemical bases are identical, such as two alcohol-based products, but it carries risks. Manufacturers use different proprietary binders and lubricants that may not play well together. Mixing a Fiebing's reducer with an Angelus dye might work, but you risk minor separation or "curdling." To ensure professional results, it's safest to stay within the same brand's ecosystem whenever you're blending custom shades.
How does the use of a reducer affect the final patina of vegetable-tanned leather?
A reducer enhances the final patina of vegetable-tanned leather by allowing the natural grain and "character marks" to remain visible. Because the thinned dye is less opaque, it doesn't mask the hide's surface. As the leather ages and reacts to sunlight and oils, the custom-dyed tones will evolve more gracefully than a heavy, solid coat. This transparency is essential for achieving the sophisticated, translucent look found in high-end Italian leatherwork.
Is it possible to use too much reducer in a mix?
It is possible to use too much reducer, which can lead to a "washed out" look where the pigment fails to bond properly. If you exceed a 10:1 ratio, the binders in the original dye may become too diluted to hold the color effectively. Understanding how to use leather dye reducer means finding the limit where the color is subtle but still structurally sound. If your mix looks like tinted water, you've likely over-reduced it.
