

Investing in Quality Leather Tools: What to Buy First
The best first leatherworking tools help you cut accurately, make consistent stitching holes, and finish edges: a cutting knife, ruler, cutting surface, mallet, diamond stitching chisel, needles, and thread. Investing in quality leather tools means prioritizing the tools you’ll use on nearly every project, then adding specialized pieces as your skills and work develop.
It’s tempting to buy a large collection at the start, but a carefully chosen foundation makes it easier to learn each tool and identify what your next project actually requires. Clean cuts and even stitching also come from practice, not simply from owning more equipment.
This guide explains what to buy first, what each tool does, and how to weigh quality and cost without paying for gear you may rarely use. We’ll cover cutting, stitching, edge finishing, and workshop setup, then consider when a specialized tool earns its place. Whether you’re making your first small project or building a long-term leathercraft practice, you’ll have a clear order for assembling a useful kit.
Key Takeaways
- Start with tools for the tasks you’ll repeat most: cutting leather, spacing stitching holes, and preparing edges.
- Choose a diamond stitching chisel to create evenly spaced holes, then match your needles and thread to the project.
- Use an edge beveler and burnisher to smooth and finish cut edges for a cleaner result.
- Compare tools by their purpose and how often you’ll use them, rather than buying a large kit before you know what your projects require.
- Build your setup in stages, adding specialized cutters and other tools as your leatherwork develops.
1. Diamond chisels for spacing stitching holes
Choose knives, punches, and stitching tools according to the job, the leather, and the finish you want. For hand stitching, start with a diamond chisel that spaces holes evenly, needles that fit those holes, and thread suited to the leather’s thickness. For cutting and punching, prioritize control and a tool shape that matches the mark or opening your project needs.
A diamond chisel makes a row of stitching holes with consistent spacing before you sew. Place its teeth along a marked stitch line, then strike the handle with a suitable mallet. Keep the chisel aligned with the previous holes as you move along a long seam. Leather tooling chisels can punch upwards of 10 stitching holes at once, which helps establish a steady rhythm on straight runs.
Pricking irons serve a related but distinct purpose: they leave slits in leather at a 45-degree angle. That angled mark guides a slanted stitch. A stitch groover creates a straight channel instead, allowing stitches to sit below the leather surface and helping reduce snags and thread abrasion. Use a groover when a recessed line suits the project; use a chisel or iron to mark or create stitch holes.
Needles and thread complete the stitching setup. Leather needles have blunt tips, so they follow pre-punched holes rather than making new ones. Waxed thread helps needles pass through leather smoothly, while waxed or bonded nylon thread moves through the material with little resistance. Needle sizes, thicknesses, lengths, points, and eyelets vary, so match the needle to the leather and project instead of forcing a thick needle through a small hole.
An awl adds control where a chisel cannot reach. Use a scratch awl to mark a stitch line, guide tooling, or help pass a needle through a tight stitch hole. A stitching punch creates round holes; a round dent punch leaves a rounded impression without removing material. Choose according to whether your design needs an opening or only a visible mark.
For a first purchase, prioritize a chisel and compatible needles and thread, then add an awl or groover when your projects call for one. A selection of leatherworking tools can help you build that kit around the work you plan to make, rather than buying every punch at once.
A chisel prepares holes for sewing, while a groover changes the stitch line itself. Choose between them based on whether you need openings for the needle, a recessed path for the thread, or both.
A leather groover makes a straight stitching line, removes some leather bulk along it, and recesses the stitches. It is useful when you want the thread to sit below the surface, rather than relying on holes alone. Before adding one to a basic setup, consider which task your projects call for most often.
2. Burnishers and slickers for finishing edges
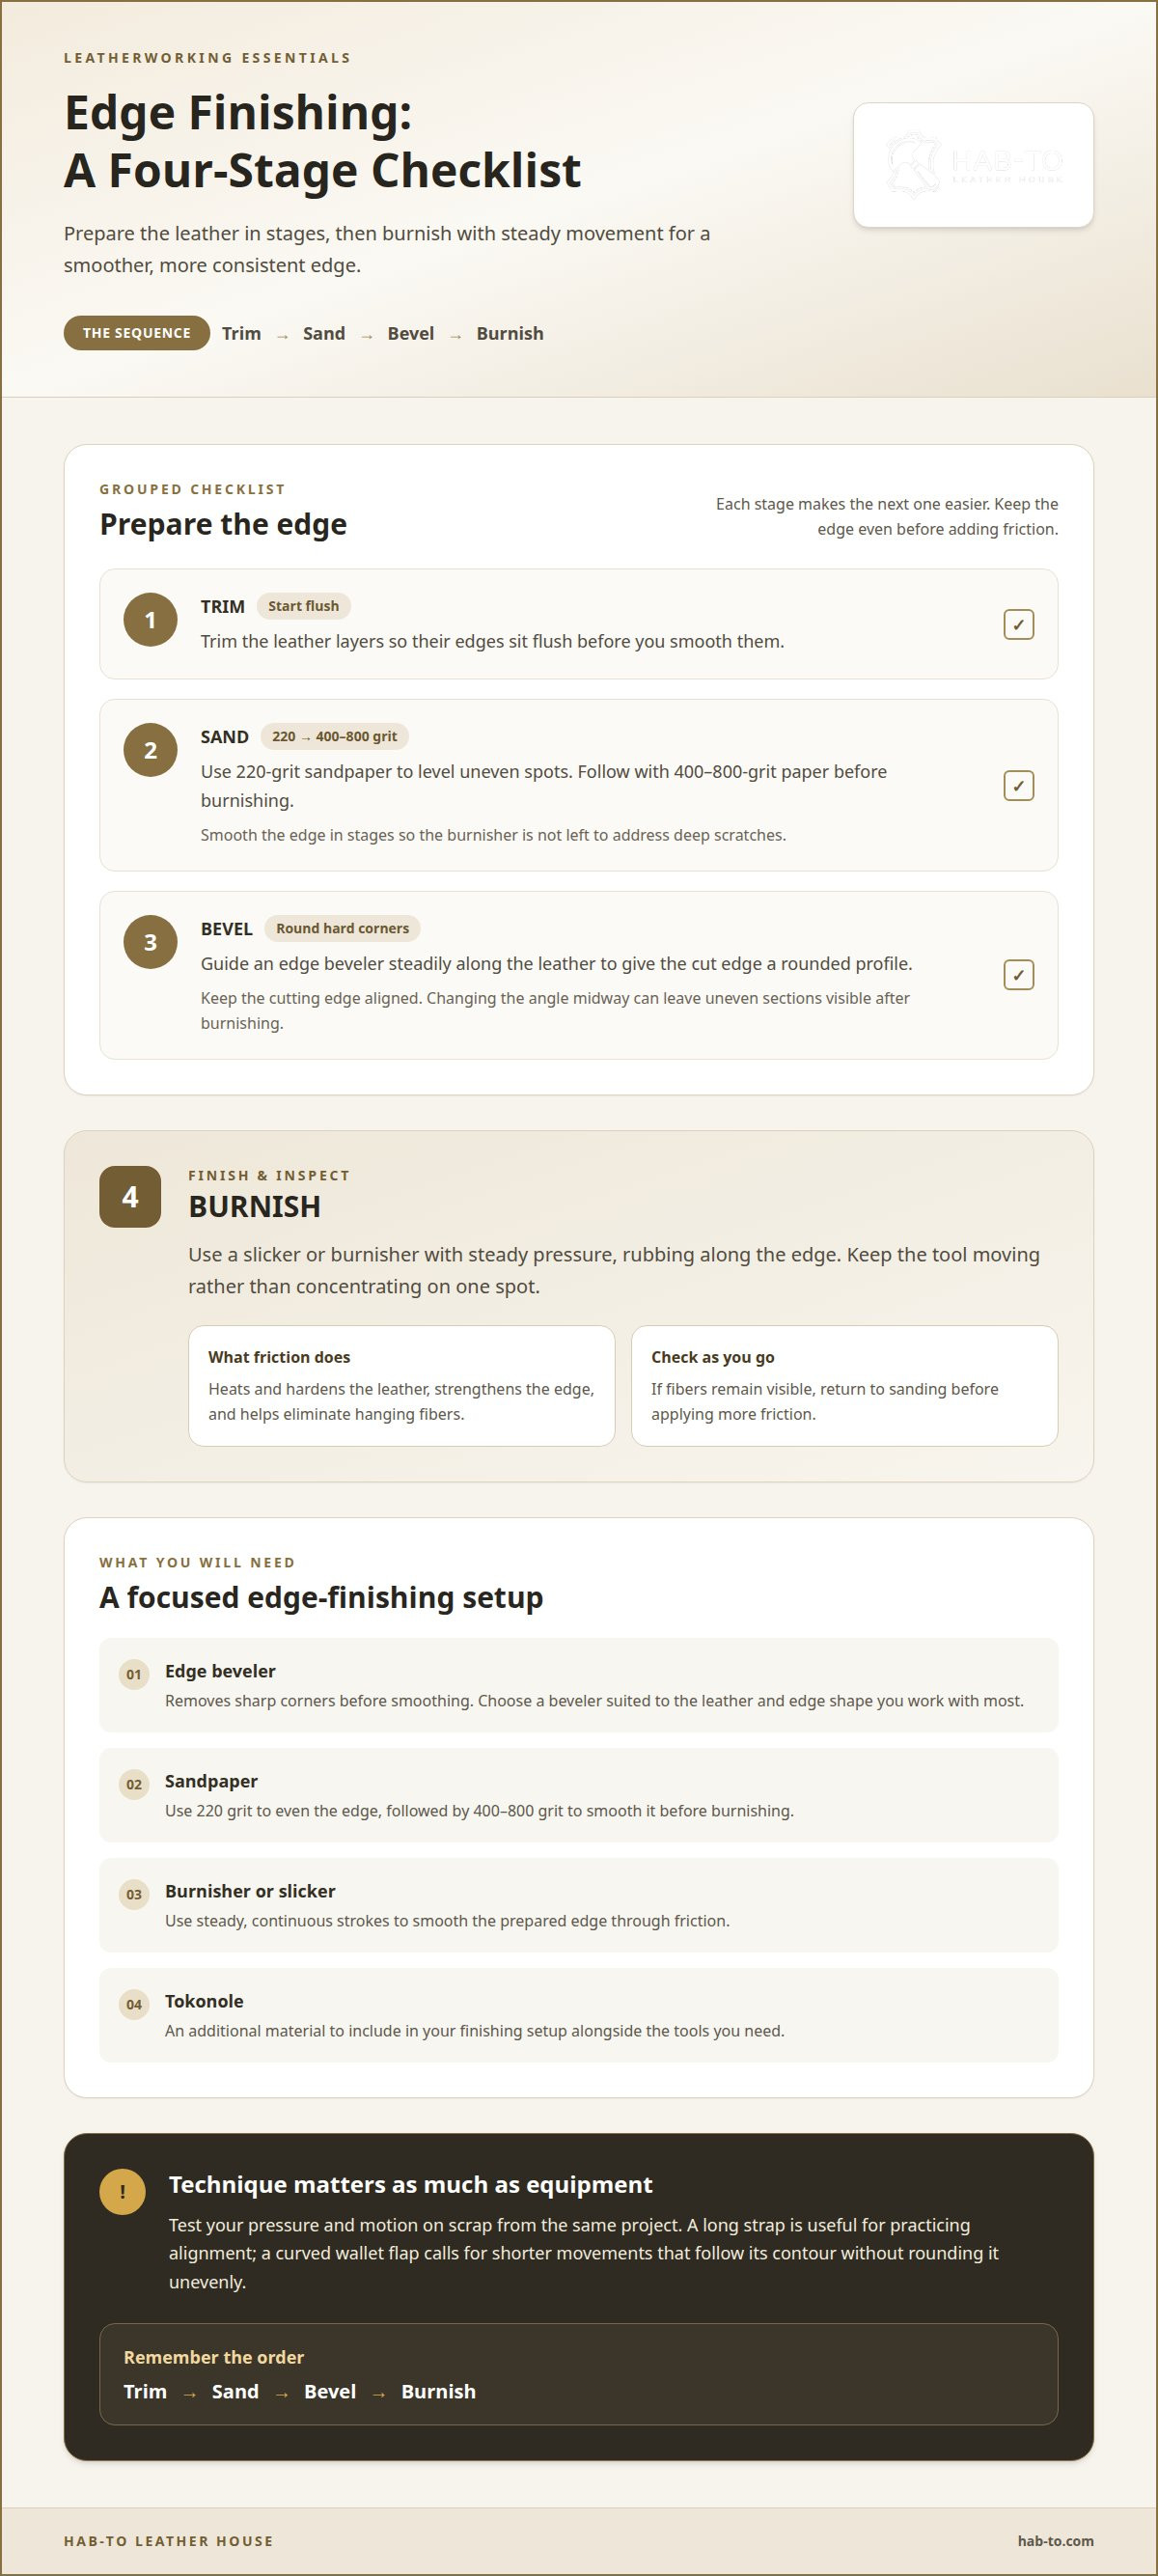
A clean edge starts before burnishing. First, trim the leather layers so their edges sit flush, then level uneven spots with 220-grit sandpaper. Follow with 400–800-grit sandpaper before burnishing. This progression smooths the edge in stages and avoids leaving deep scratches for the burnisher to address. Keep each sanding pass controlled, especially where a corner meets a straight run.
An edge beveler removes hard corners and gives a cut edge a rounded profile. Guide it steadily along the leather, keeping the cutting edge aligned with the material. Changing the angle midway can leave uneven sections that remain visible after burnishing. Choose a beveler suited to the leather and edge shape you work with most. A consistent bevel gives the burnisher a more uniform surface to smooth.
Burnish with a slicker or burnisher, rubbing along the edge with steady pressure. Friction heats and hardens the leather, strengthens the edge, and helps eliminate hanging fibers. Keep the tool moving instead of concentrating on one spot. On a card holder, for example, work each short edge from end to end, then inspect the corners before moving to the next side.
What You Will Need
- An edge beveler: Use it to remove sharp corners before smoothing. Browse edge-finishing tools for a tool suited to your work.
- Sandpaper: Start with 220-grit paper to even the edge, then use 400–800-grit paper before burnishing.
- A burnisher or slicker: Use steady, continuous strokes to smooth the prepared edge through friction.
- Tokonole: Include it in your finishing setup alongside the tools and materials you need. Tokonole bundles offer a way to consider it with related supplies.
Keep the sequence consistent: trim, sand, bevel, then burnish. If fibers remain visible after the first pass, return to sanding before applying more friction. Test your pressure and motion on scrap from the same project. A long strap is useful practice for keeping the tool aligned; a curved wallet flap calls for shorter movements that follow the contour without rounding it unevenly.
Edge finishing takes practice as well as equipment. Prioritize a beveler and burnisher if finished edges matter to your projects, then add materials as your technique develops. A coordinated setup can be useful when you’re assembling several finishing supplies together, so explore leathercraft bundles that fit the work you plan to do.
A leather edge beveller removes hard corners and edges to give them a more rounded appearance. Consider the edge profile you want before choosing a tool, then guide it evenly along the leather so the softened shape stays consistent from one end to the other.
3. What Are The Most Essential Tools For Beginner Leatherworkers?
Start with tools that cover the main stages of a small project: cutting, measuring, shaping, and setting hardware. A utility knife or leather scissors, a ruler or T-square, and a self-healing cutting mat make a practical cutting setup. Add a wooden or rubber mallet for striking leather tools and setting hardware. Choose each piece for the work you plan to make, not for the size of a preassembled collection.
Which leather tools are worth investing in first? Prioritize a reliable cutting tool, a straightedge, a cutting surface, and a mallet, then add specialty tools when a project needs them. For example, a strap cutter is useful when your work regularly calls for leather straps; its cutting thickness can usually be adjusted before cutting. If you make varied small projects, a ruler and knife may see more use.
Leatherworking tools fall into useful categories: cutting tools shape the leather, measuring tools guide accurate layout, striking tools drive punches, and hardware tools attach components. A self-healing mat protects the work surface and can help keep cutting tools from dulling as quickly as they might on other surfaces. A T-square or ruler paired with a cutting tool helps produce quick, clean cuts.
Which leather tool brands offer the best quality and durability? No single brand is best for every tool or project; focus on sound construction, comfortable control, and a tool suited to its task. Explore leatherworking tools by category, then build a set around the work you’ll do regularly.
Are used leatherworking tools a good investment? They can be, if the cutting edge, handle, and moving parts are in usable condition. Check that a knife cuts cleanly, a mallet head is secure, and adjustable parts move as intended. A worn cutting edge or damaged handle can make an otherwise inexpensive tool poor value.
Maintenance keeps a useful kit ready. Store metal tools in a dry place with moderate humidity of 40–60% to help prevent rust and wood damage. Oil moving tool parts regularly to help prevent rust and keep them operating smoothly. Return knives and punches to a consistent storage place after use, so their edges stay protected between projects.
What safety precautions apply when using leatherworking tools? Use a wooden or rubber mallet to strike leather tools, since a metal hammer can warp or damage them. Keep your cutting surface stable and use tools for their intended task, especially when cutting leather or setting hardware.
4. Utility knives, precision knives, and rotary cutters
Match the cutter to the cut. A utility knife handles straight cuts and general pattern work, while a precision knife gives you control around tight corners and small details. A rotary cutter rolls along the leather, making it useful for sweeping curves and long cuts. Each can cut leather; the best first choice depends on the shapes you make most often.
For a straight wallet panel, align a ruler with the pattern edge and guide a utility knife along it. Use a sharp blade and a steady pass rather than forcing the knife through the leather. A precision knife suits narrow slots or small pattern corners where a broad blade limits visibility. For a long curve, a rotary cutter can follow the line smoothly. Pushing it through thicker leather may provide more leverage than pulling.
Swivel knives serve a different purpose from utility knives and rotary cutters. Their rotating blades follow curves as you cut decorative lines into leather. Hold the handle upright and guide the blade along the design, turning the barrel with your fingers as the line changes direction. This control is useful for outlining a leaf, border, or other tooling pattern before adding impressions.
Tooling stamps create texture and shaped impressions; they don’t replace a swivel knife. For example, cut a leaf outline with a swivel knife, then use stamps to add veins or background texture. Keeping these jobs distinct helps you choose tools for the design. If you’re focused on functional pieces, prioritize cutting tools, then add swivel knives and stamps when decorative work becomes part of your plan.
A sharp edge supports accurate cutting. When a knife starts dragging or compressing leather instead of slicing cleanly, stop and sharpen it. Leatherworkers can strop cutting tools on leather charged with polishing compound. Draw the blade across the strop with controlled movement, keeping the cutting edge aligned and avoiding pressure that rolls or damages it. Repeat consistently, then test the edge on scrap leather before returning to the project.
Maintain each blade according to its role. A utility knife needs a secure blade and controlled extension; a precision knife needs careful handling around fine details; a rotary cutter needs a clean, freely moving blade. Keep edges protected between tasks and avoid using a cutting blade for prying or scraping. These habits help preserve the working edge and keep cuts predictable.
Choose a cutter that suits your usual projects, then add another when its cutting style solves a real limitation. If you cut both long straps and detailed shapes, a utility knife and rotary cutter offer different kinds of control. A swivel knife becomes a worthwhile addition when your designs call for carved outlines rather than simple pattern cuts.
5. Prices of leatherworking tools and supplies
There’s no single total for a leatherworking setup. The amount depends on the tools your projects require, how often you’ll use them, and whether you choose individual pieces or a coordinated set. Investing in quality leather tools starts with deciding which jobs you need to complete now. A functional kit for small accessories differs from one built for carving, repeated strap cutting, or hardware setting.
How do premium and budget leather tools compare? Budget tools can be practical for occasional tasks, while well-constructed tools may offer more consistent handling during repeated use. Compare the working edge, grip, fit, and moving parts for the task at hand. For example, a knife used on every project deserves closer consideration than a decorative stamp used only for a particular design.
Build your purchase plan around project stages. Cutting and measuring tools prepare the leather; punches and hardware tools support assembly; stitching tools join pieces; finishing tools refine visible edges. Buying each category only when a project calls for it keeps your first setup focused. A small card case and a long belt, for instance, need different cutting approaches and may call for different specialized tools.
Remember to account for supplies as well as reusable tools. Leather, thread, hardware, and adhesive are used up or selected for particular projects, while a mallet or knife can serve across multiple builds. Before choosing a kit, compare its contents with your next project. A bundle is useful when it groups items you’ll use together, but extra pieces add little value if they remain untouched.
Where can I buy quality leatherworking tools in the United States? Choose a leathercraft supplier that organizes tools by task and provides clear descriptions, so you can match each item to cutting, stitching, punching, or finishing. This makes it easier to assemble a purposeful setup rather than choosing tools by appearance alone.
Compare tools by how they perform the same task. Consider whether a knife cuts cleanly, a punch makes the required opening, or a tool’s moving parts operate smoothly. Maintenance matters too: blades need sharpening, and moving parts need care. For makers investing in quality leather tools, a tool suited to regular work and easy to maintain may offer better long-term value than a cheaper piece that soon needs replacing.
Prioritize tools for your next projects, then add specialized equipment when a specific task calls for it. This ties purchases to real use while leaving room for your skills and projects to develop.
Hab-To Leather House: Vegetable Tanned Leather
Hab-To Leather House is a natural next step when you’ve chosen your tools and are ready to select leather for a project. Vegetable-tanned leather gives you a material to practise cutting, stitching, and finishing. Pairing the right leather with tools suited to your project helps you plan the build from the first pattern cut to the final edge.
For a specific example, explore vegetable-tanned Pueblo leather. Leatherworking tools, leather hardware, and crafting bundles can also help you gather materials for the work you want to make.
If you’re planning a project and would like to discuss your material or tool choices, contact Hab-To Leather House.
Build Your Next Project With Intention
Your next step isn’t to own every tool. Choose a project that gives your current kit a purpose, then let its needs guide what you add. Each new piece can mark a skill you want to practise or a detail you want to refine. Build steadily, and let experience, not impulse, shape your workbench.
Choose Supplies for Your Next Build
As you plan the project, explore leathercraft bundles to find a combination of supplies that fits the work ahead.
Related Reading
- Planning your first leathercraft project
- Choosing leather for handmade accessories
- Practising hand stitching on leather
Choose a project, make it your own, and keep creating.
Frequently Asked Questions
What Are The Most Essential Tools For Beginner Leatherworkers?
The essentials depend on the first project you plan to complete. For a card sleeve, focus on accurate layout and clean assembly rather than buying decorative stamping tools. Sketch the project’s steps, then identify which tool supports each operation. This simple planning exercise also reveals useful gaps, such as needing a way to attach a snap or reinforce a fold, before you spend on tools for work you may not make.
What are the essential leatherworking tools for beginners?
A beginner’s kit should support one complete project, including its closures and finishing details. For a key fob with a snap, for example, plan for the leather, a cutting setup, a way to make the required holes, and the hardware-setting tools. Keep a short project log after each build: note which tools you used, which felt awkward, and what you borrowed or improvised. Let those notes guide your next purchase.
How much do quality leatherworking tools cost?
There isn’t one fixed total: the cost depends on the tools you choose, their construction, and whether your project needs specialized equipment. A basic functional kit differs from a setup for detailed carving or repeated strap cutting. Separate durable tools from supplies you’ll use up, such as thread or adhesive, then budget by project. This gives you a more useful estimate than comparing kits with different contents.
Which leather tool brands offer the best quality and durability?
No single brand is best for every tool or project. Look for sound construction, comfortable control, and a tool suited to its task.
Disclaimer
All our blog articles are made for information purposes only we dont take responsability for any content from third parties.