



Leather Craft Workshops for Beginners and Groups
A beginner workshop is about more than taking home a finished piece. Leather craft workshops typically introduce material handling, measuring and cutting, stitching, and finishing. The project and class format shape how much you practise each skill. Since class lengths vary, check the schedule and project details to understand what you’ll have time to make.
It’s natural to want clear instruction and a project you’ll be proud to use. This guide explains what beginners can expect to learn, how to assess a workshop’s duration, and which projects suit a first class, from small accessories to more involved pieces. You’ll also find practical ways to compare listings and group options, so you can choose a workshop that suits your interests and the experience you want.
Key Takeaways
- Use the class schedule and project scope to judge whether a hands-on session gives you enough time to learn at a comfortable pace.
- Look for instruction that covers the full process, from accurate cutting and stitching to clean finishing.
- Compare workshop listings by project, skill level, materials, tools, and group format, not just by title.
- Choose a first project that matches the techniques you want to practise and the time available.
- Workshop costs depend on what the class includes and the project involved, so compare the full listing details before deciding.
Workshop length and hands-on learning
Class length depends on the project, the techniques taught, and how much of the work participants do themselves. A simple card sleeve may focus on measuring, cutting, and hand stitching, while a more involved bag requires additional construction and finishing. Instead of relying on a general time estimate, use the project description and schedule to understand the pace.
In-person leather craft workshops let you handle the leather, practise tool control at a workbench, and get direct guidance. Online classes offer demonstrations you can follow remotely, but hands-on feedback depends on the course format and instruction provided.
A useful class plan breaks the project into clear stages. The instructor first introduces the leather and explains how its thickness and firmness affect the piece. Next come pattern placement and cutting, followed by marking stitch holes, sewing, and finishing edges. Seeing each stage in sequence helps beginners understand how small choices, such as keeping a cut square, affect assembly.
The balance between demonstration and practice matters as much as the scheduled duration. A class with repeated stitching practice gives you time to build an even rhythm; one centred on a finished item may devote more time to assembly. Consider what you want to learn: saddle stitching, shaping a small accessory, or completing a whole project. That goal makes it easier to assess the listing.
What tools and materials are included in workshop fees? There’s no standard kit across classes. A fee may cover leather, a prepared pattern, and shared tools, or just instruction and workspace. Look for specific items in the class details, such as a stitching pony, stitching chisels, thread, and edge-finishing supplies.
Do you need prior experience or anything to bring to a leatherworking class? Beginner classes teach foundational steps, so previous leatherwork experience isn’t essential at that level. Bring only what the class requests. Some sessions supply materials and tools, while others specify personal items such as notes or an apron.
For hands-on learning, pay attention to how instructors demonstrate safe, controlled tool use and correct mistakes. Cutting practice can begin with a straight edge and a marked pattern; stitching practice can focus on consistent spacing before a seam becomes part of the project. If tools are unfamiliar, seeing how they’re held and reset gives you a practical reference for later work. Explore the available leatherworking tools to see the kinds of equipment used in the craft.
Before choosing, match the class format to the skill you want to practise. A focused session suits one technique, such as hand stitching. A project-based class connects several steps, from preparing leather to completing an item. This distinction helps you judge whether there’s enough practice for your goal, without assuming every workshop follows the same format.
Cutting, stitching, and finishing techniques
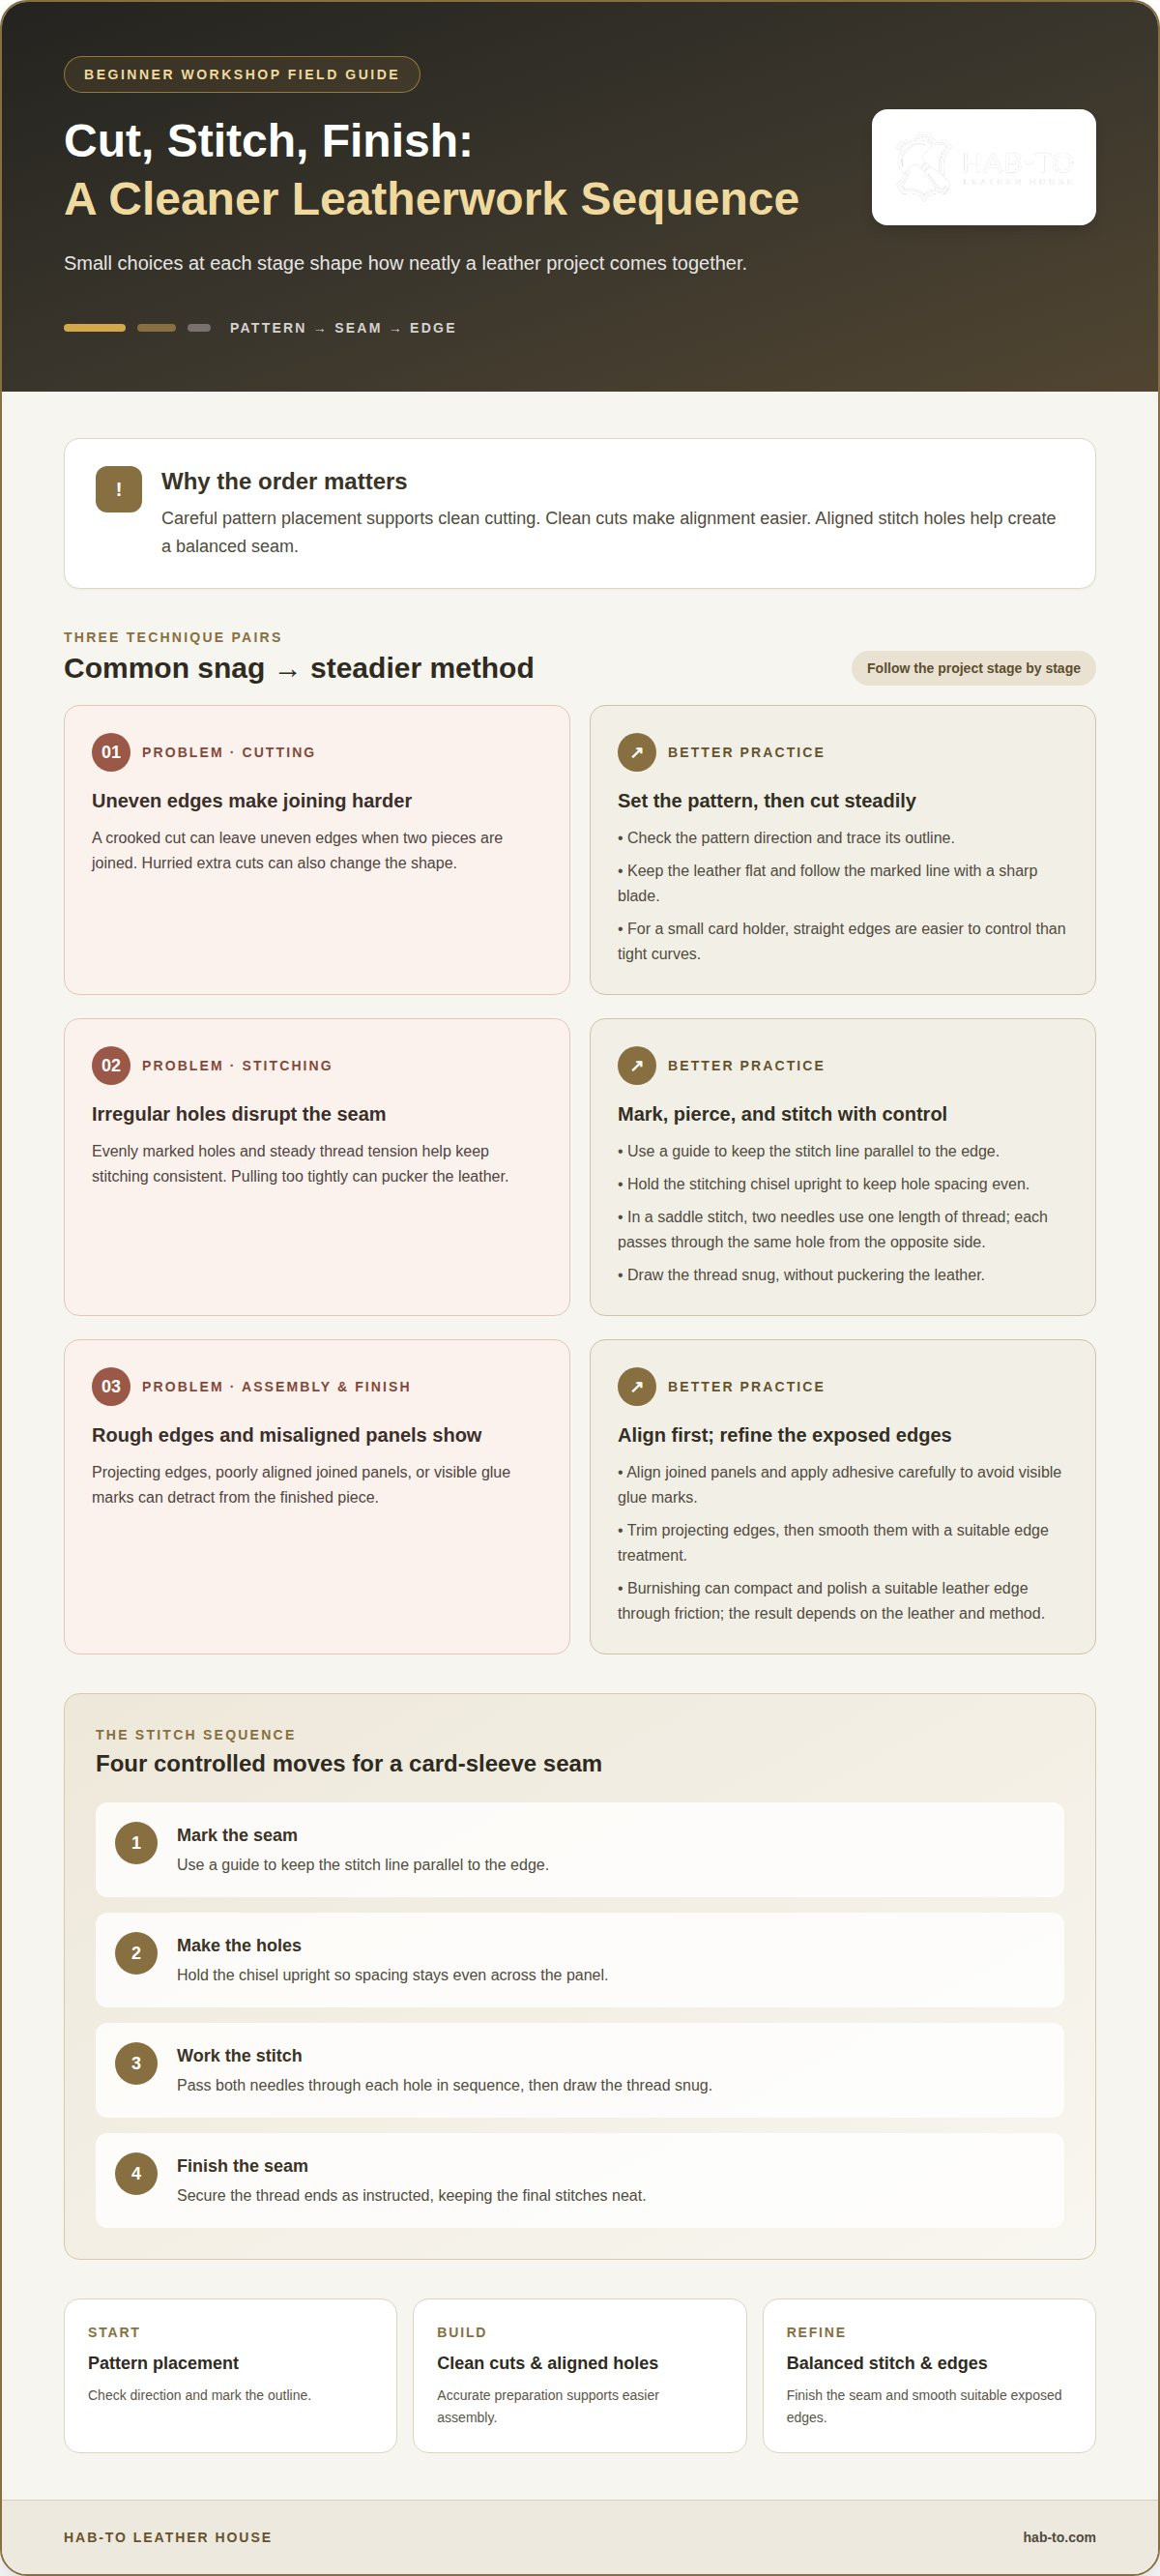
A leather project takes shape through a sequence of controlled steps. Cutting establishes the outline, stitching joins the pieces, and finishing refines exposed edges and surfaces. In class, beginners can see how accuracy at one stage affects the next. For example, a crooked cut can leave uneven edges when two pieces are joined.
Start by placing the pattern on the leather and checking its direction. Trace the outline with a suitable marking tool, then cut steadily along the line with a sharp blade. For a small card holder, straight edges are easier to control than tight curves. Keep the material flat and follow the pattern instead of making hurried extra cuts to correct the shape.
Some historical sheet-leather work used a different preparation method. According to the U.S. Bureau of Education, the technique begins by soaking leather in alum water or plain water for a few hours, then pricking patterns through a paper design. This example shows why workshop instructions should distinguish between leather types and methods. A technique for prepared sheet leather doesn’t automatically suit every project.
Stitching begins with evenly marked holes. A stitching chisel creates holes along the seam line, while an awl can help open them where needed. A saddle stitch commonly uses two needles and one length of thread. Each needle passes through the same hole from opposite sides. Steady tension helps keep the seam consistent without puckering the leather.
- Mark the seam. Use a guide to keep the stitch line parallel to the edge of a card sleeve.
- Make the holes. Hold the chisel upright so the spacing stays even across the panel.
- Work the stitch. Pass both needles through each hole in sequence, then draw the thread snug.
- Finish the seam. Secure the thread ends as instructed, keeping the final stitches neat.
Finishing gives the piece a more considered appearance. Trim projecting edges, then smooth them with a suitable edge treatment. Burnishing can compact and polish a suitable leather edge through friction; the result depends on the leather and method. A workshop may also show how to apply adhesive before assembly, align joined panels, and avoid visible glue marks.
These skills build on one another. Careful pattern placement supports clean cutting; clean cutting makes alignment easier; aligned holes help create a balanced stitch. If you want to practise with coordinated materials, explore leathercraft bundles as a starting point for planning a project beyond class.
Leather workshop listings and search filters
A workshop listing should help you assess the class before booking. Start with the project title, then read the description for the techniques taught, materials used, and level of instruction. “Make a leather card holder,” for example, tells you more than a broad label such as “leathercraft class.” Look for details that show whether the session focuses on one skill or takes participants through a complete project.
Use filters to narrow results by location, date, skill level, project type, and class format, where available. A beginner interested in hand stitching might look for a small accessory project rather than a class centred on advanced bag construction. For a group outing, consider the format and booking arrangement as well as the project: a shared session may suit a social activity, while a private booking may better fit a group seeking dedicated instruction.
What age requirements and safety rules apply to leather craft workshops? Each workshop sets its own age rules, so check the listing for its minimum age and any supervision conditions. Safety instructions should explain how participants handle tools such as blades, stitching chisels, and mallets before practical work begins.
Read the schedule as carefully as the project name. A listing may describe a demonstration, guided practice, and time to complete a piece; these details show how the session is structured. If the class teaches a wallet, check whether it covers cutting and assembly or just one technique. This helps you set realistic expectations about the finished project and the skills you’ll practise.
Materials and equipment deserve a close look, too. One listing might provide leather and shared tools, while another may ask participants to bring specific supplies. Look for clear references to leather, thread, patterns, stitching tools, and finishing materials. If edge finishing is part of the advertised project, for example, the listing should explain whether it’s demonstrated or left for participants to do independently.
- Project: Match the finished item to your interests, such as a card sleeve or belt.
- Skill level: Choose beginner instruction if you haven’t worked with leather before.
- Format: Compare in-person demonstrations with online instruction and group sessions.
- Included items: Identify supplied materials and tools, plus anything you must bring.
- Age and safety: Read entry conditions and tool-handling instructions before booking.
Compare a shortlist by checking the same details in every listing. Note whether each class names its project, explains its teaching format, and identifies included materials. This simple comparison makes gaps in the description easier to spot, beyond attractive photos or a catchy title. For a group, also review how participants are booked and whether the session is shared or private.
Use search terms that reflect the skill you want, such as “hand stitching,” “belt making,” or “leather bag class.” Combine a technique with a project type to get more specific results. Then review each listing’s schedule, skill level, and materials before deciding. A well-matched description makes it easier to choose a useful learning experience, whether you attend alone or with a group.
Leathercraft project types
Leatherworking classes can teach pattern layout, cutting, hole spacing, hand stitching, assembly, and edge finishing. The project determines which skills get the most practice. A card sleeve introduces simple panels and seams, while a small bag adds construction choices such as pockets, straps, and closures. Match the project to the techniques you want to learn, not just the finished item you admire.
Small accessories make useful first projects because they have fewer parts to align. A key fob introduces cutting and attaching a ring; a card holder adds folded leather and stitched seams. A simple bookmark lets participants practise shaping and finishing an exposed edge. These projects also show how leather thickness and firmness affect folding, flexibility, and the finished feel.
A belt project centres on length, strap width, buckle placement, and clean edges. Participants can learn to mark a straight strap, round its end, and prepare adjustment holes. A watch strap introduces narrower pieces and careful alignment around its buckle and keeper. Both projects teach precision, but their shapes and hardware call for different assembly steps.
Projects with several panels involve more construction decisions. A notebook cover may require measuring around the book, making a fold, and adding a pocket. A tote or small handbag can introduce handles, lining, and hardware, as well as seams joining larger pieces. These projects suit learners interested in assembly, but the listing should explain which parts participants complete in class.
Decorative projects focus on surface treatment rather than complex construction. A stamped coaster, for example, lets learners practise arranging impressions before applying them to leather. A small tray may use shaped corners and fasteners to hold its form. These projects can introduce tooling, marking, or hardware installation without requiring a large pattern or multiple joined panels.
- For a first seam: Choose a card sleeve or simple key fob.
- For strap skills: Consider a belt or watch strap project.
- For assembly practice: Look for a notebook cover or small bag.
- For surface work: Try a stamped coaster or shaped tray.
Compare each project’s steps with the skills listed in its description. A belt class might teach strap preparation and buckle fitting, while a wallet class may focus on pockets and multiple seams. A bag project can cover panel alignment and handle attachment. The project name alone doesn’t show how much practice each technique receives, so look for specific tasks.
Think about what you want to carry or use after class. A card holder offers a compact way to practise basic construction; a belt puts careful measuring at the centre. To explore several skills, choose a project whose listed steps connect cutting, joining, and finishing. This gives you a clear sense of the craft’s sequence and the work involved.
How much do leather craft workshops typically cost?
The fee for a leatherworking class depends on what participants make and what the instruction includes. A card sleeve with a simple pattern requires different preparation from a multi-panel bag with handles and hardware. Construction, materials, tools, teaching format, and guided practice all affect the value of a class. Compare these details before judging a listing by its fee alone.
Materials are key to the comparison. One class may supply leather, thread, a pattern, and shared tools; another may include only the materials for its featured project. A belt-making session, for example, may require leather cut to strap dimensions and a buckle. A stamped coaster may use a smaller piece, with time spent on surface decoration rather than assembly.
Instruction matters, too. A class that demonstrates several stages and then guides participants through practice offers a different experience from a short demonstration. Look at what the instructor teaches and what each participant completes. If a listing describes a finished wallet, note whether it covers pocket construction and stitching or focuses on one technique. These details help explain the differences between classes.
Group arrangements can affect how a fee is presented. A listing may show a per-person amount or a private-group booking rate. For a group, calculate the total using the stated booking terms and participant count. Then compare what everyone receives: individual materials, shared tools, instructor guidance, and workbench time. A project involving several leather pieces may need a different setup from a shared demonstration.
Use these points to compare listings side by side:
- Project scope: A key fob, belt, and handbag involve different materials and construction steps.
- Included supplies: Note whether leather, hardware, thread, and patterns are provided.
- Tools: See whether participants use shared equipment or bring specified items.
- Teaching time: Compare demonstrations, guided practice, and project completion.
- Booking format: Check whether the fee applies per participant or to a group.
Separate the class fee from any later project expenses, too. If you want to repeat a technique at home, you may choose to buy leather, stitching tools, or hardware afterward. Those additional materials depend on the project you plan to make, not automatically on the class booking. Someone making a belt, for example, may need different supplies from someone practising small accessories.
Base your decision on the value you want: direct instruction, supplied materials, a completed project, or practice with a specific technique. A detailed listing makes these elements easier to compare and explains what its fee covers. If you plan to keep making after class, explore leathercraft bundles to consider materials together and choose supplies for your next project.
Hab-To Leather House: Leatherworking Tools
Hab-To Leather House can help you continue practising beyond a class. Find leatherworking tools for hands-on projects, or explore crafting bundles for supplies grouped around your making plans. If your project involves equestrian work, leather and hardware options can support it.
Workshops can help you build skills through guided making, while the right tools let you practise cutting, stitching, and finishing at your own pace. Choose supplies to match your next project, whether you’re exploring a small accessory or working with straps and hardware.
Have a question about leatherworking tools, crafting bundles, or workshops? Contact Hab-To Leather House to discuss your project.
Choose a Project and Keep Making
Let your next project build on a technique you enjoyed learning. Choose one clear goal, then select materials and tools that suit its construction. Hab-To Leather House offers vegetable-tanned leather, leather hardware, and leatherworking tools for makers planning their next steps.
Explore related learning: The leathercraft masterclasses offer another way to develop your making skills.
Project supplies: Browse leather bundles to consider materials together for a project. Choose supplies that fit what you plan to make, rather than gathering tools without a clear purpose.
Each careful cut and considered stitch moves a project forward. Choose an idea that interests you and enjoy bringing it to life.
Frequently Asked Questions
What types of leather craft workshops are available for beginners?
Beginner options include project-based sessions and classes focused on a specific technique. Some leather craft workshops guide you through making an item, while others focus on skills such as stitching, dyeing, or surface decoration. Hab-To Leather House offers masterclasses including Understanding Leather Types, Basic Hand Stitching Techniques, Dyeing and Painting on Leather, and Sashiko Japanese Stitching. Choose based on the technique you want to practise and the instruction format you prefer.
Where can I find leather crafting workshops near me in the United States?
Search with your town, state, or ZIP code plus a specific term such as “beginner leather class” or “leather stamping workshop.” Narrow results to in-person sessions if you want to work at a physical bench. Then read each listing for its venue, project, teaching format, and age conditions. If your search returns online classes, distinguish them from local, hands-on sessions before choosing.
How long do leather craft workshops usually last?
The schedule depends on the project and how much instruction and making time it involves. Leather craft workshops may offer a focused demonstration or a session where participants complete a project. Check the advertised start and finish times, then see whether the description includes setup, guided practice, and cleanup. For a gift or a tight schedule, the stated duration helps you judge whether the class fits your plans.
How can I find a leatherworking session for groups, private events, or gifts?
Look for listings that explicitly describe group bookings, private events, or gift options. A group choosing a shared activity can compare projects by the skills participants practise, while a private event may suit a celebration or team gathering. For a gift, check whether the listing explains how the recipient chooses a class and date. Booking details help match the experience to the occasion without guesswork.
Disclaimer
All our blog articles are made for information purposes only we dont take responsability for any content from third parties.