

Leather Stitching Tools for Grooves, Needles and Awls
A thicker needle isn’t always the answer for thick leather. Use harness needles for hand-sewing heavier leather, then match your leather stitching tools to the job: a stitch groover cuts a recess for the thread, stitching chisels mark or make evenly spaced holes, and an awl helps open holes for stitching. A scratch awl is for tracing patterns, not making holes.
It’s easy to focus on the needle and overlook how the groove, hole spacing, and leather thickness work together. Each tool has a distinct role, and choosing the right one can make hand sewing feel more controlled, especially when you’re working through firm or layered leather.
This guide explains how grooves help protect thread from rubbing and snags, how to choose needles and chisels for different stitching tasks, and when to use an awl. You’ll also learn why harness needles are useful for thick leather, so you can choose tools that suit your project instead of reaching for the same one every time.
Key Takeaways
- Use a stitch groover to recess thread below the leather surface and help reduce abrasion and snags.
- Match the needle to the hand-sewing task, with harness needles suited to stitching thick leather.
- Choose diamond stitching chisels to establish consistent hole spacing before sewing.
- Use an awl to open stitching holes, and keep a scratch awl for tracing patterns.
- Build your tool setup around the leather and project, rather than relying on one tool for every step.
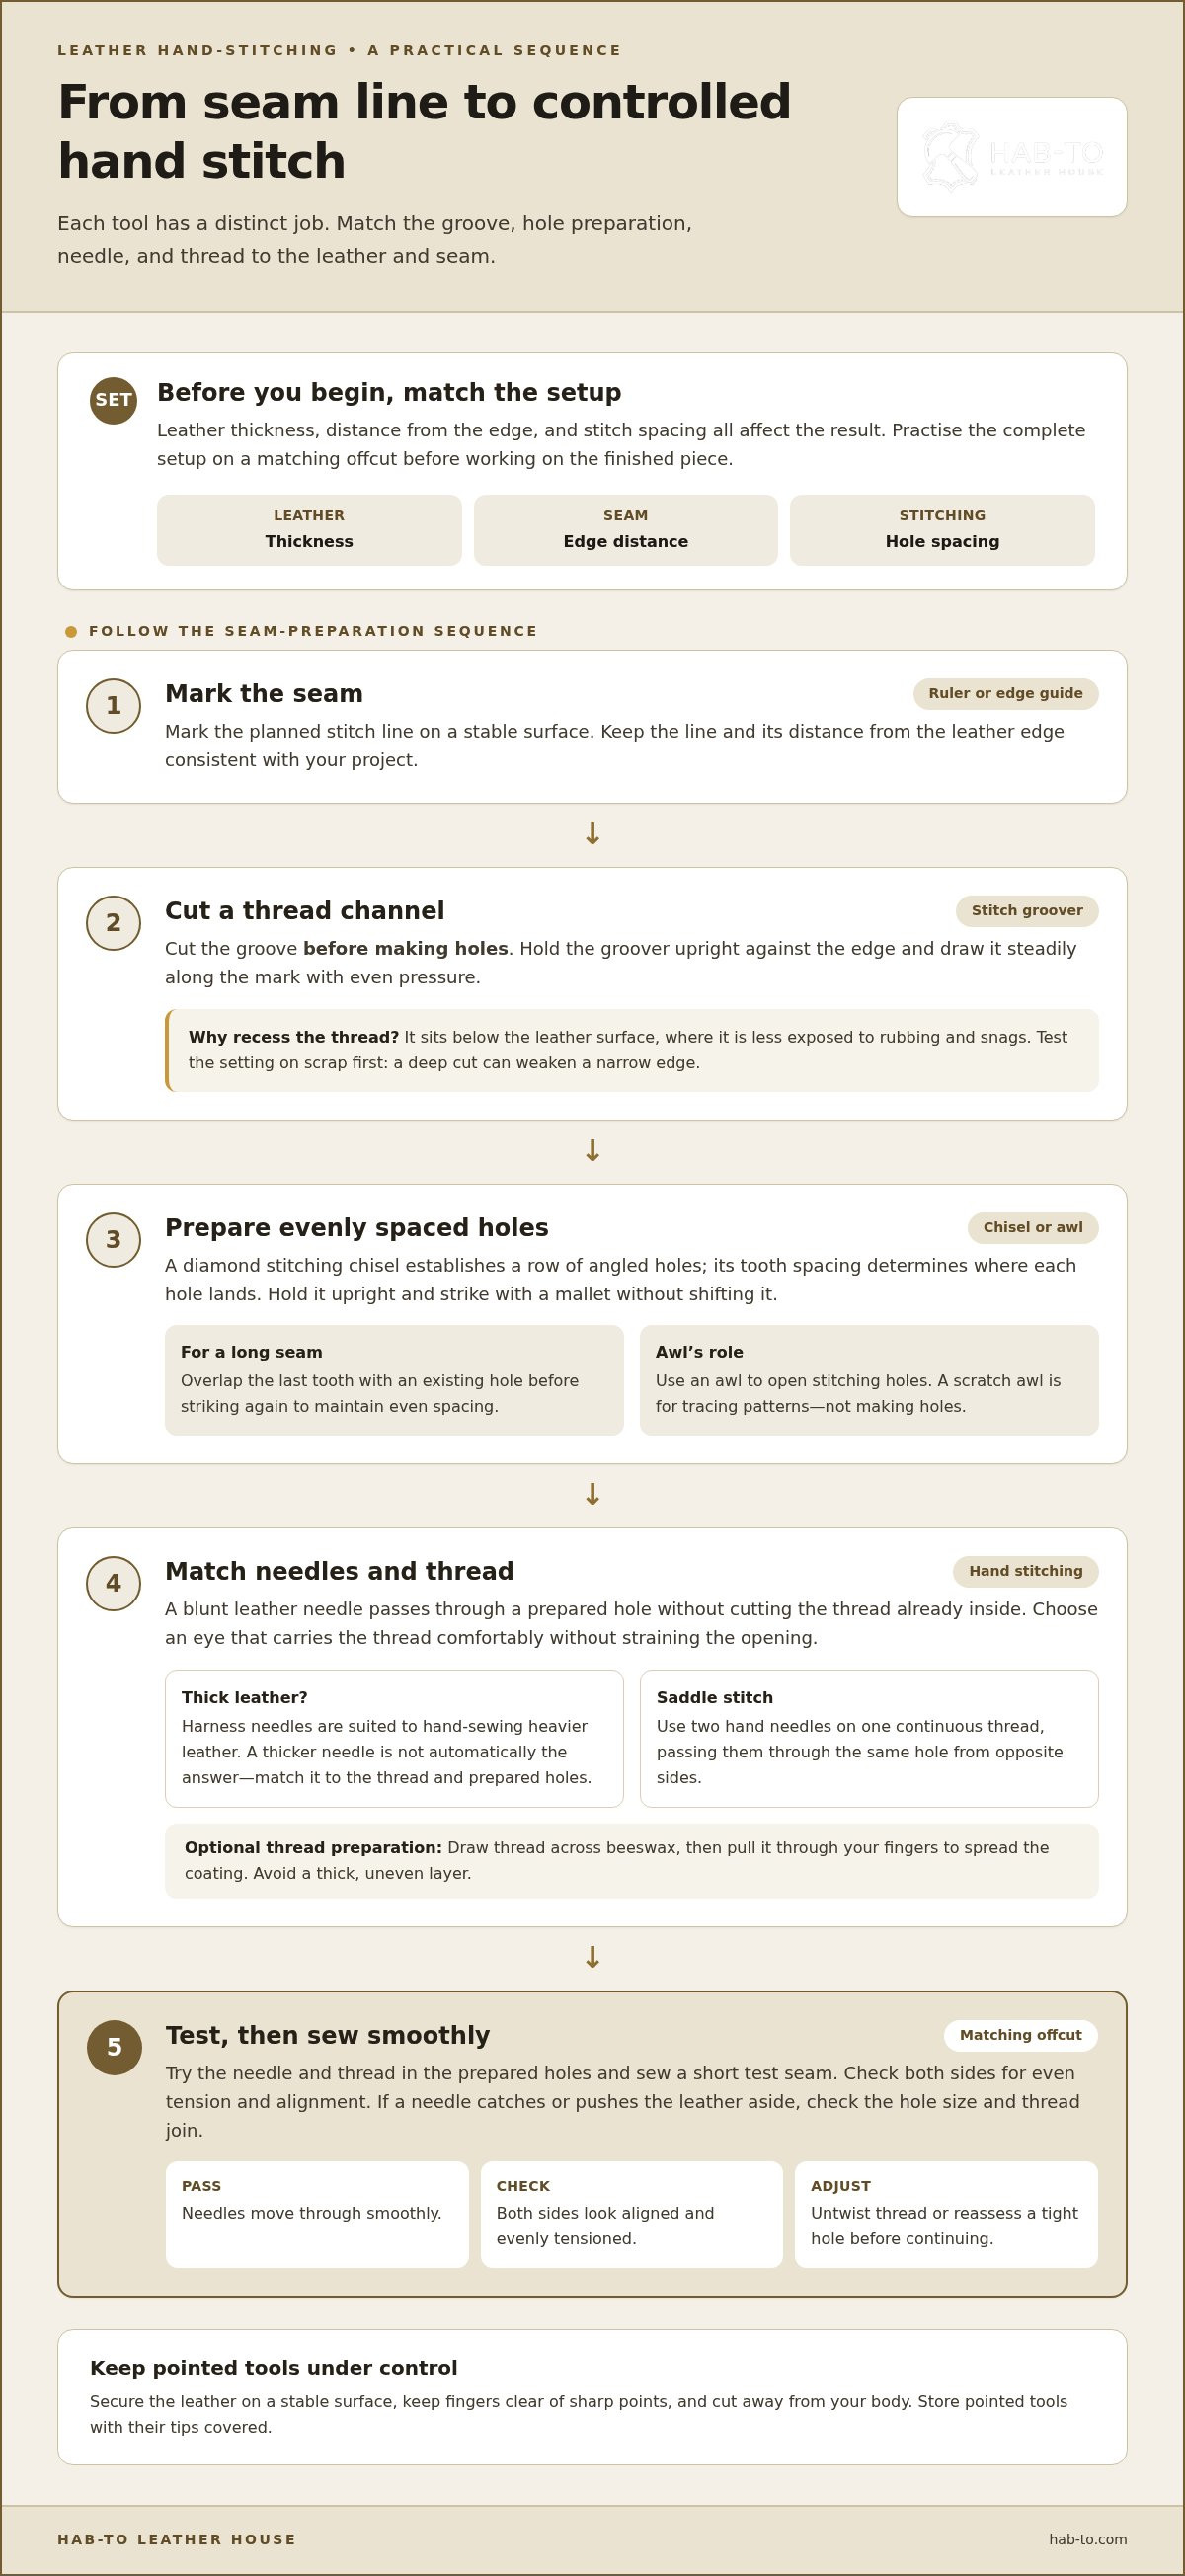
1. Cutting stitch grooves to protect thread
A stitch groover cuts a channel along the planned stitch line. Thread sits below the leather surface, where it is less exposed to rubbing and snags. On a wallet panel, for example, a groove can help prevent stitches from catching during everyday handling. It also creates a clear path for the seam beside the edge.
A practical beginner’s setup includes a groover, needles, thread, and a tool for preparing stitch holes. Match each item to the leather and seam: thickness, distance from the edge, and stitch spacing all affect the result. Practise on a matching offcut before working on the finished piece.
For a demonstration of hand stitching and seam preparation, watch J.H.Leather:
What you will need
- A stitch groover to cut the thread channel.
- Hand-stitching needles and thread suited to the project.
- A stitching chisel or awl for preparing holes.
- Beeswax to coat thread and help control loose fibres.
- A leather offcut for testing your setup.
- A stable surface and a ruler or edge guide for marking the seam.
Browse leatherworking tools to find equipment for your setup. Starter kits vary in their contents, so compare the included tools with the list above. There’s no single cost for a complete setup; it depends on whether you buy a kit or choose each tool separately.
Cut the groove before making holes. Mark the seam with a ruler or edge guide, place the groover against the edge, then draw it steadily along the mark. Keep the tool upright and apply even pressure. Test the setting on scrap first, because a deep cut can weaken a narrow edge. Check that the groove stays straight and does not drift toward the edge.
Beeswax can help prepare hand-stitching thread. Draw the thread across the wax, then pull it through your fingers to spread the coating. Avoid applying a thick, uneven layer, which can leave wax on the leather. Choose thread and needles that pass through the prepared holes without forcing them.
A scratch awl can trace a pattern, but it shouldn’t be used to make holes. Work safely by securing the leather on a stable surface, keeping fingers clear of sharp points, and cutting away from your body. Store pointed tools with their tips covered.
2. Leather sewing needles
Choose a needle according to your sewing method, thread, and prepared holes. For hand stitching, a blunt leather needle passes through a hole without cutting the thread already inside. The needle should carry the thread comfortably, without its eye straining the opening. Match needle and thread before you start, then test them together on a leather offcut.
In a saddle stitch, two hand needles work from opposite sides of one continuous thread. Pass one needle through a hole, then guide the second through the same opening from the other side. Keep the thread paths consistent so each stitch sits neatly. If a needle catches or pushes the leather aside, check whether the hole is too small or the thread forms a bulky join at the eye.
Hand sewing gives you close control over short seams, corners, and small projects. Before sewing a wallet pocket, align the layers and clear each hole. Pull the needles through smoothly rather than yanking the thread. If a knot forms, pause and untwist the thread before continuing. These small adjustments help prevent snags and keep the seam tidy.
Choose an eye that accepts the thread without forcing it through. Thread that slips free makes repeated sewing frustrating, while an oversized eye can make the needle harder to pass through a tight opening. Thread both needles before starting a saddle stitch, then sew a short test seam. Check both sides for even tension and alignment.
Machine sewing requires a different needle. The machine drives the needle through the material, so it must suit both the machine and the leather. Leather machine needles have a cutting point designed to penetrate leather. That point can leave a visible hole, so test stitch length and seam placement on matching scrap. A household machine may not handle every thickness or layered seam; the machine and material determine what feeds cleanly.
Before machine sewing, install and secure the needle according to the machine’s instructions. Test on scrap for consistent stitches, skipped loops, or damaged edges. For hand stitching, keep both needles and thread within easy reach, then sew without twisting the thread. These checks can reveal a mismatch before it affects a finished piece.
Needles are one part of a coordinated setup. Choose leather stitching tools to match the sewing method, leather, and thread you plan to use. Explore the leathercraft tools collection when selecting equipment for hand-stitching work. A well-matched needle and thread make each pass through the prepared holes more controlled.
The All-Purpose Needle Pack includes seven needles. Keep it with the leather and thread you plan to use, and test each needle against the prepared holes. A brief test shows whether it passes smoothly and carries the thread without strain. If you change materials or thread, repeat the check on an offcut before working on the finished piece.
3. Diamond stitching chisels
A diamond stitching chisel makes a row of angled holes for hand-sewn leather seams. Its teeth help set a consistent stitch line, while the spacing between them determines where each hole lands. On a card holder, for example, regular spacing can keep the seam aligned along a narrow edge. Choose a chisel with hole shape and spacing suited to the leather and thread.
Before striking, mark the seam with a ruler or stitching guide. Place the first tooth at the planned starting point, then hold the chisel upright. Strike with a mallet to drive the teeth cleanly into the leather without shifting the tool. On a long seam, overlap the last tooth with an existing hole before striking again to maintain even spacing.
Stitching chisels, pricking irons, and stitching punches differ mainly in how they prepare a seam. A stitching chisel generally makes holes through the leather, while a pricking iron marks positions or creates shallow slits to open later. A stitching punch cuts holes with its own edge, often leaving a different shape. Names and designs vary, so inspect the tool’s teeth and intended use.
Test the chisel on a scrap that matches the project leather. Check both faces for clean, aligned openings before moving to the finished panel. If the tool passes through only one layer, support the leather on a suitable cutting surface. For stacked layers, align and secure them first, or the holes may not meet when you sew.
Diamond-shaped openings create angled paths for thread. Keep the chisel’s angle consistent along a seam, especially around a corner or curve. If the slits alternate direction, the finished stitches can look uneven even when the spacing is regular. A marked centreline helps keep the tool aligned on belt tabs, wallet edges, and other narrow pieces.
For a steady rhythm, work from one end of the seam to the other. After each strike, lift the chisel straight out instead of twisting it sideways, which can stretch the opening or damage its edge. Clear loose leather fibres before sewing, then check that a needle and thread pass through without force.
The number of chisel teeth affects how much of the seam you can prepare with each strike. A multi-tooth tool helps create a straight run, while a single-tooth tool gives control near a corner or endpoint. Use the longer tool for the main seam, then position the single tooth where the larger tool cannot fit.
Clean the teeth after use and store the chisel so its points don’t knock against other metal tools. On a sample seam, compare the hole angle, spacing, and appearance on both sides of the leather. These checks help you choose a chisel that suits the project before cutting its final stitch line.
4. Awls
An awl helps make or refine holes for hand stitching, especially where leather layers meet. Its pointed blade lets you control each opening, unlike a multi-tooth chisel that works across several stitch positions. On a curved wallet seam, an awl can help align holes where a wider tool is awkward to use. Choose one that feels secure in your hand and suits the leather’s thickness.
A stitching awl has a blade designed to pass through leather along the seam. Secure the leather on a stable work surface, align the point with a marked stitch position, then push through carefully. Keep the blade in line with the seam rather than turning it across the stitch path. A controlled opening helps the thread sit consistently and reduces the chance of stretching the hole.
Some leatherworkers use an awl to open holes made by a pricking iron; others use it to create holes along a marked stitch line. On a narrow belt keeper, for example, an awl can reach positions where a multi-tooth tool may not fit. Work gradually through layered leather, keeping the pieces aligned so each opening follows the same path through every layer.
A scratch awl has a different purpose. Use it to trace a pattern onto leather, not to make stitching holes. Mark a wallet template or transfer a curve with its point, then switch to a stitching awl or suitable hole-making tool for the seam. Keeping these tasks separate helps each tool do its intended job.
Blade shape affects how an awl moves through leather. A narrow blade can create a small opening, while a diamond-shaped blade makes a slit that helps set the thread’s angle. Match the blade to the stitch method and thread. Test it on scrap from the same leather before working on a visible panel. Compare the opening from both sides, especially on a layered strap.
Keep the awl steady and direct its point away from your supporting hand. Don’t force the blade through a stubborn section; check the alignment and leather layers instead. If an opening looks too large on scrap, use less pressure or choose another tool. Wipe the blade clean after stitching and store it with the point protected to keep it ready for the next seam.
Awls work best with a light, deliberate touch. On a small card slot, mark each stitch position, then open the holes one at a time. Check the line before sewing. If the holes drift, adjust the angle rather than trying to correct the seam by pulling the thread unevenly. A scrap test, a clear mark, and a steady hand make this pointed tool easier to control.
5. Harness needles for thick leather
Thick leather challenges a needle because the material resists each pass. Harness needles are designed to carry thread through prepared holes rather than pierce the leather themselves. Their blunt points pass through existing openings without cutting the thread already inside. On a saddle-stitched belt strap, the awl or chisel makes the holes, and the needles carry thread through them.
A traditional hand-sewn seam uses two harness needles on one length of thread. Each needle passes through the same hole from opposite sides. Pull both thread ends evenly after each pass, keeping them from crossing around the hole. Consistent movement helps create a balanced seam through thick layers, such as a folded strap end or layered handle tab.
Choose a needle that fits the prepared holes and passes through without force. One that is too large can strain the opening; one that is too small may not hold the thread securely. Thread thickness matters too: it should pass through the needle’s eye without forming a bulky join that catches in the leather.
Before sewing the final piece, test the combination on scrap with matching layers. Thread both needles and make a short row of stitches, observing how they move through each opening. If a needle snags, check the hole size and thread at the eye. If the opening stretches, use less force and reassess the fit between needle and hole.
For a thick seam, align the layers and support the work so the holes meet cleanly. Pass the first needle through, then guide the second through the same opening without piercing the first thread. Pull each side until the stitch sits snug against the leather. Avoid jerking the thread; steady tension helps prevent uneven loops and keeps the seam aligned.
Harness needles are for hand stitching, not machine sewing. A sewing machine needs a machine needle suited to its mechanism and the leather. Never put a harness needle into a machine. For machine stitching thick leather, the machine, needle, thread, and layered material must work together. Hand sewing is useful when a bulky seam or small workpiece doesn’t fit comfortably under the machine foot.
Thick leather rewards careful preparation. Make holes along the seam line, confirm they pass through every layer, and test how the thread moves before stitching. Then use two harness needles to carry the thread through the openings. The key point: a harness needle does not make the hole. It helps you sew through a hole sized for the material and thread.
The small curved needle in the All-Purpose Needle Pack is 1.25 in. (3.18 cm) long. Compare its shape and length with the prepared work before stitching.
Hab-To Leather House: Vegetable Tanned Leather
Hab-To Leather House is a natural next step when you’re ready to match hand-stitching techniques with leather and tools for your project. Vegetable tanned leather gives you a material to consider for pieces such as straps, wallets, or bags. Explore vegetable tanned leather alongside the thickness and construction your design requires.
For the making process, browse leatherworking tools and crafting bundles to build a setup around your chosen project. Leather hardware can also help complete a design that needs fittings alongside its stitched seams. Selecting leather and tools together can help you plan the material, stitch line, and finishing steps as one considered project.
Visit hab-to.com to explore materials and tools for your next leathercraft project.
Put your next stitching project into practice
Use your next project to refine your approach. Make a small sample that reflects the leather layers, seam shape, and finish you plan to use. It helps you assess your setup before working on the finished piece.
Hab-To Leather House offers vegetable-tanned leather, leather hardware, and leatherworking tools to support your project from material selection through assembly. Consider how you’ll use the leather and which fittings your design needs. A clear plan helps bring those choices together.
For your next hand-sewn project: Explore the leatherworking tools collection alongside your chosen leather and hardware.
Keep exploring:
- Choosing leather for a hand-stitched project
- Planning a clean, even leather seam
Start with a simple sample, adjust your technique as you work, and use each finished seam to guide your next project.
Frequently Asked Questions
What tools are essential for hand stitching leather?
For a basic hand-sewn seam, prepare needles, suitable thread, a hole-making tool, and a way to mark the stitch line. A stitching chisel sets consistent positions, while an awl helps with individual holes or tight areas. Keep an offcut of the project leather nearby for testing. A firm work surface and clips to hold layers in alignment also make stitching a wallet gusset or strap seam easier.
How do you use a stitching chisel to make evenly spaced holes?
Mark the seam’s start and finish before striking, so the hole pattern fits the available space. Set the chisel’s teeth on the line, then strike it squarely with a mallet. For curved sections, rotate the leather as you work instead of tilting the chisel to follow the curve. Check the spacing against the marked endpoint as you go; this helps avoid an awkward partial gap where the seam ends.
How much do leather stitching tools and starter kits cost?
There’s no single cost for a complete setup: it depends on whether you buy a kit or choose tools separately.
How do you maintain and sharpen leather stitching tools?
Clean the stitching chisel’s teeth after use and store it so its points don’t strike other metal tools. Cover the tips of pointed tools before storing them.
What stitch spacing and thread size should I use for different leather projects?
Choose chisel spacing and thread to suit the leather and project, then test the combination on a matching offcut before sewing.
Disclaimer
All our blog articles are made for information purposes only we dont take responsability for any content from third parties.